


一、简介
论文链接:点击此链接查看HiDDeN的文献
论文中的Noise Layer结构,如下图所示:
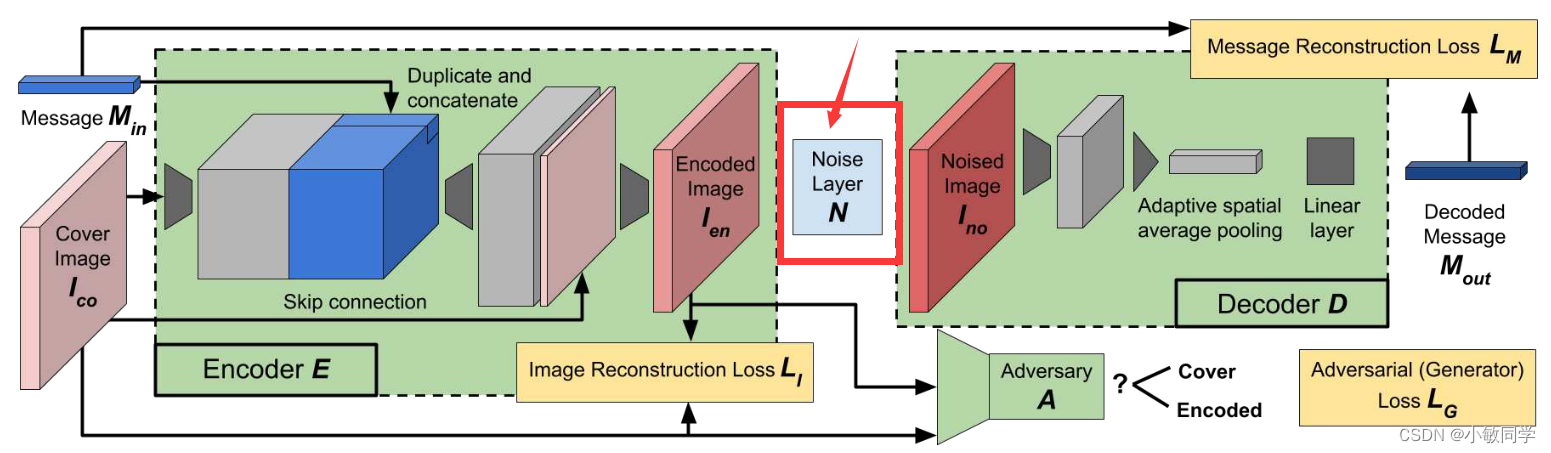
Noise Layer功能: 让编码图像经过噪声层的训练,习得抗噪声能力(即,提高编码图像的鲁棒性)。
Noise Layer输入: [ Encoded Image(编码图像) , Cover Image(原始图像) ],一个二元列表,其中两者的尺寸都是 3×128×128。
另,因为有的噪声层处理需要使用到原始图像,例如Cropout、Dropout…。因此,需要传入原始图像。
Noise Layer输出: Noised Image(噪声图像) = 3×128×128
Noise Layer实现步骤:
- 根据噪声的配置参数,组合出一个串行的噪声模块
- 前向传播,随机选择噪声模块中的一个噪声层对输入进行处理
配置参数格式:
例 1 ( 单个crop噪声 ):–noise “crop((0.4,0.55),(0.4,0.55))”
例 2 ( 单个cropout噪声 ):–noise “cropout((0.25,0.35),(0.25,0.35))”
例 3 ( 组合噪声 ):–noise “crop((0.4,0.55),(0.4,0.55))+cropout((0.25,0.35),(0.25,0.35))+dropout(0.25,0.35)+resize(0.4,0.6)+jpeg()”
Noise Layer全部噪声模块的串行组合,如下所示:
  (noiser): Noiser(
    (noise_layers): Sequential(
      (0): Identity()
      (1): Crop()
      (2): Cropout()
      (3): Dropout()
      (4): Resize()
      (5): Gaussian()
      (6): JpegCompression()
    )
二、噪声层代码模块
2.1 Identity模块
Identity模块的功能: 将图片原样返回,不进行任何处理。
Identity模块的代码,如下所示:
import torch.nn as nn


class Identity(nn.Module):
    """
    Identity-mapping noise layer. Does not change the image
    """
    def __init__(self):
        super(Identity, self).__init__()

    def forward(self, noised_and_cover):
        return noised_and_cover
2.2 Crop模块
Crop模块的功能: 类似于“图像处理软件”的裁剪功能,从原始图像中裁剪出某个矩形区域。
Crop模块的代码,如下所示:
import torch.nn as nn
import numpy as np
import torchvision.transforms as transforms
from PIL import Image
def random_float(min, max):
res = np.random.rand() * (max - min) + min
return res
def get_random_rectangle_inside(image, height_ratio_range, width_ratio_range):
image_height = image.shape[1]
remaining_height = int(np.rint(random_float(height_ratio_range[0], height_ratio_range[1]) * image_height))
if remaining_height == image_height:
height_start = 0
else:
height_start = np.random.randint(0, image_height - remaining_height)
image_width = image.shape[2]
remaining_width = int(np.rint(random_float(width_ratio_range[0], width_ratio_range[0]) * image_width))
if remaining_width == image_width:
width_start = 0
else:
width_start = np.random.randint(0, image_width - remaining_width)
return height_start, height_start + remaining_height, width_start, width_start + remaining_width
class Crop(nn.Module):
"""
Randomly crops the image from top/bottom and left/right. The amount to crop is controlled by parameters
heigth_ratio_range and width_ratio_range
"""
def __init__(self, height_ratio_range, width_ratio_range):
super(Crop, self).__init__()
self.height_ratio_range = height_ratio_range
self.width_ratio_range = width_ratio_range
def forward(self, noised_and_cover):
noised_image = noised_and_cover[0]
h_start, h_end, w_start, w_end = get_random_rectangle_inside(noised_image, self.height_ratio_range, self.width_ratio_range)
noised_and_cover[0] = noised_image[:, h_start: h_end, w_start: w_end].clone()
return noised_and_cover
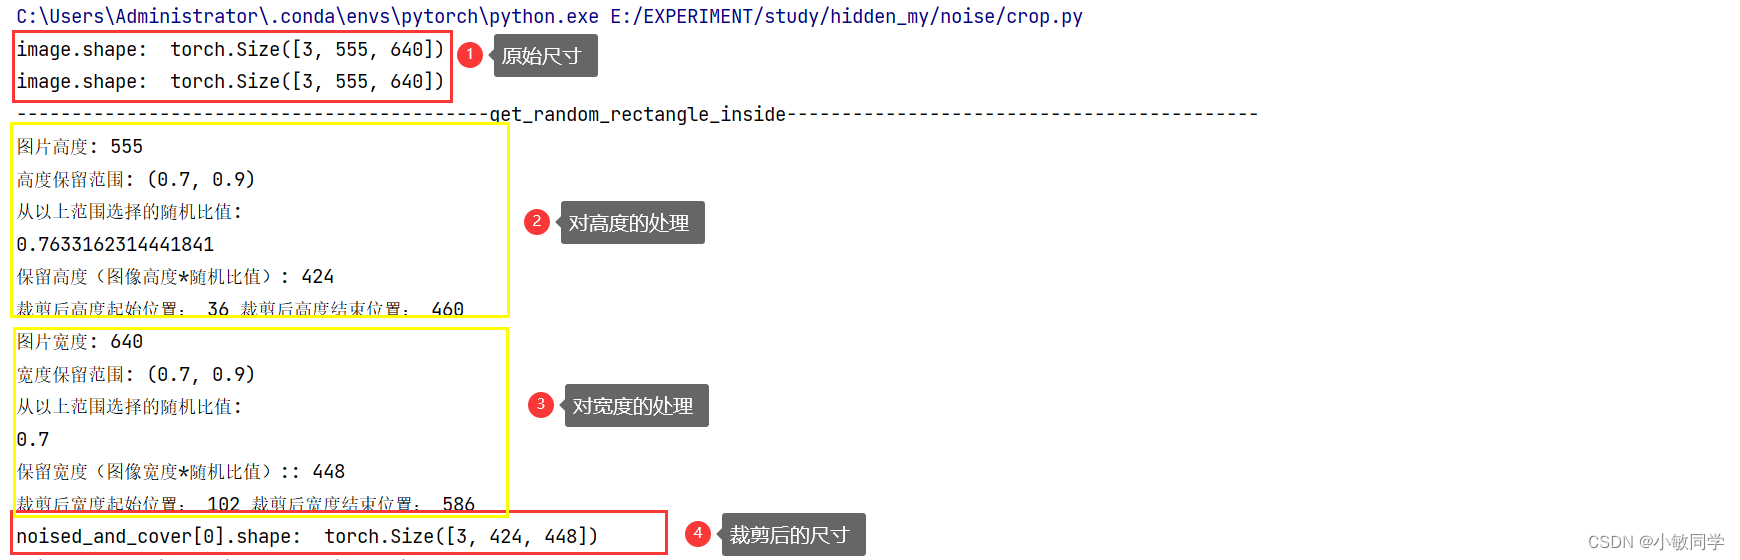
# 读取图片并转换为Tensor格式
image = Image.open("test.jpg")
transform = transforms.ToTensor()
image = transform(image)
print("image.shape: ", image.shape)
noised = Image.open("test.jpg")
noised = transform(noised)
print("image.shape: ", image.shape)
noised_and_cover = [noised, image]
model = Crop(height_ratio_range=(0.7, 0.9), width_ratio_range=(0.7, 0.9))
noised_and_cover = model(noised_and_cover)
print("noised_and_cover[0].shape: ", noised_and_cover[0].shape)
运行结果,如下所示:
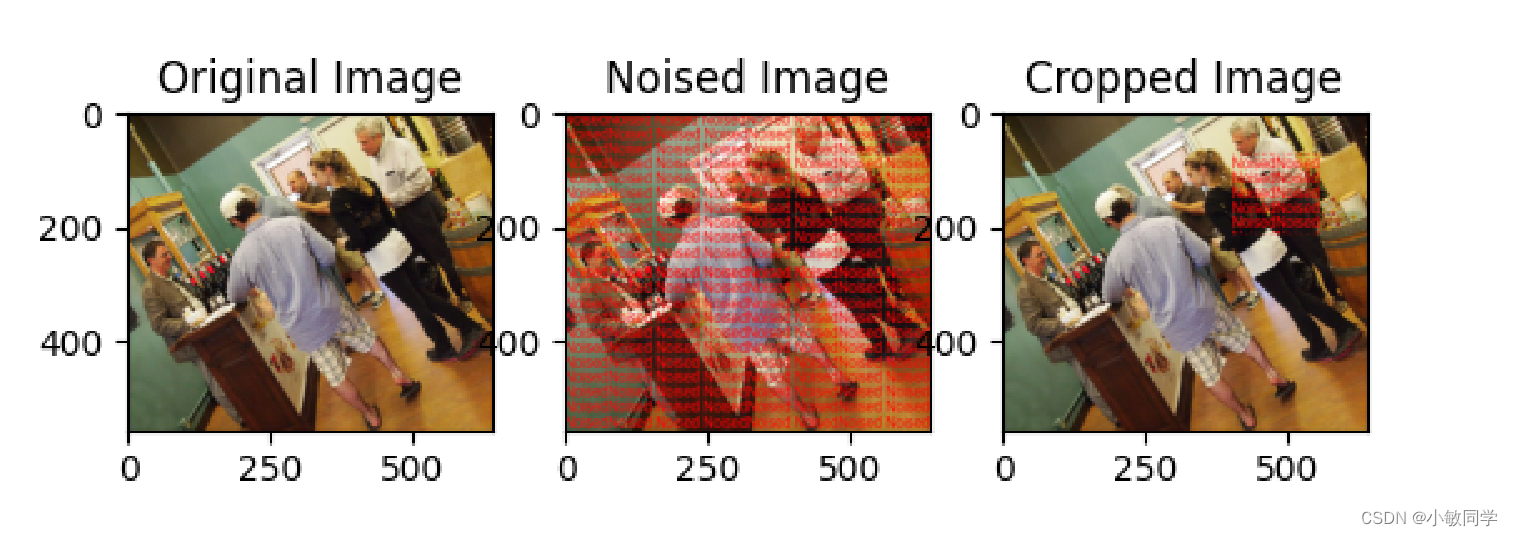
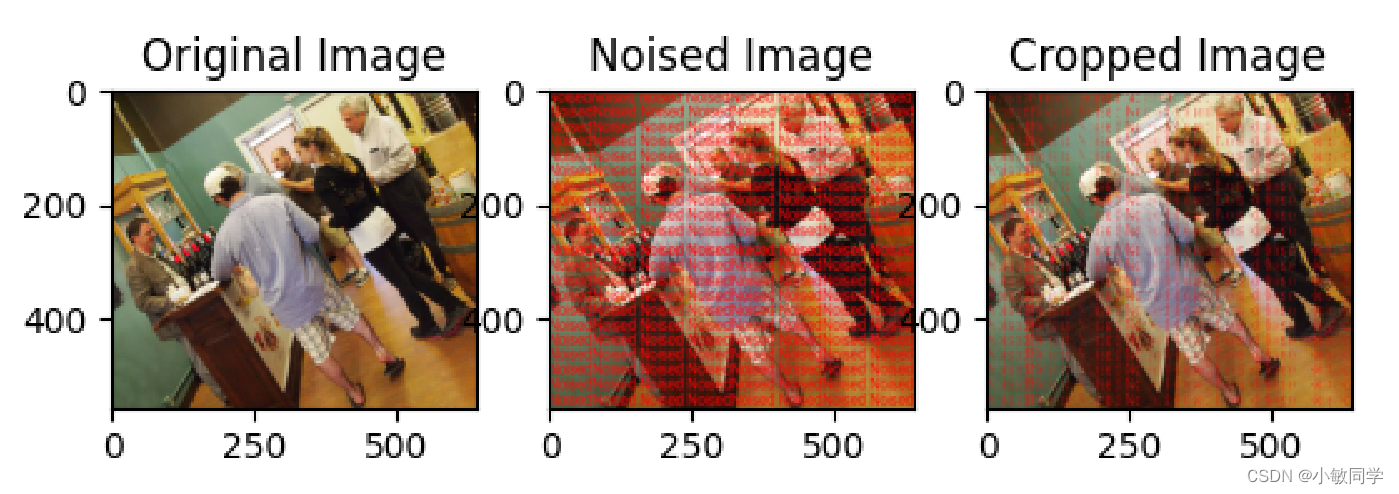
2.3 Cropout模块
Cropout模块的功能: 随机选择原始图像的一个矩形区域,将该矩形区域替换成噪声图像。
Cropout模块的代码,如下所示:
import torch
import torch.nn as nn
import numpy as np
import torchvision.transforms as transforms
from PIL import Image
import matplotlib.pyplot as plt
from crop import get_random_rectangle_inside
class Cropout(nn.Module):
"""
Combines the noised and cover images into a single image, as follows: Takes a crop of the noised image, and takes the rest from
the cover image. The resulting image has the same size as the original and the noised images.
"""
def __init__(self, height_ratio_range, width_ratio_range):
super(Cropout, self).__init__()
self.height_ratio_range = height_ratio_range
self.width_ratio_range = width_ratio_range
def forward(self, noised_and_cover):
noised_image = noised_and_cover[0]
cover_image = noised_and_cover[1]
assert noised_image.shape == cover_image.shape # The images must have the same size
cropout_mask = torch.zeros_like(noised_image)
h_start, h_end, w_start, w_end = get_random_rectangle_inside(image=noised_image,
height_ratio_range=self.height_ratio_range,
width_ratio_range=self.width_ratio_range)
cropout_mask[:, h_start:h_end, w_start:w_end] = 1
noised_and_cover[0] = noised_image * cropout_mask + cover_image * (1-cropout_mask)
return noised_and_cover
# 读取图片并转换为Tensor格式
image = Image.open("cover.jpg")
transform = transforms.ToTensor()
image = transform(image)
noised = Image.open("noised.jpg")
noised = transform(noised)
noised_and_cover = [noised, image]
model = Cropout(height_ratio_range=(0.25, 0.35), width_ratio_range=(0.25, 0.35))
noised_and_cover = model(noised_and_cover)
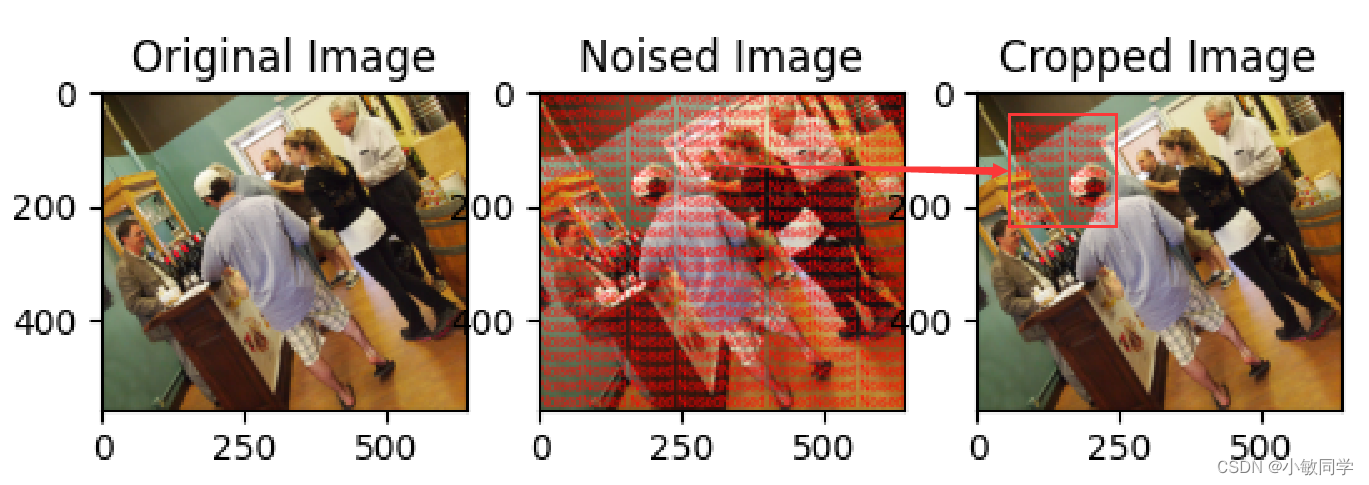
# 将Tensor格式的图像转换为PIL格式,并进行显示
to_pil = transforms.ToPILImage()
fig, (ax1, ax2, ax3) = plt.subplots(1, 3) # 修改子图数量为3
ax1.imshow(to_pil(image))
ax1.set_title('Original Image')
ax2.imshow(to_pil(noised))
ax2.set_title('Noised Image')
ax3.imshow(to_pil(noised_and_cover[0]))
ax3.set_title('Cropped Image')
plt.show()
运行结果,如下所示:
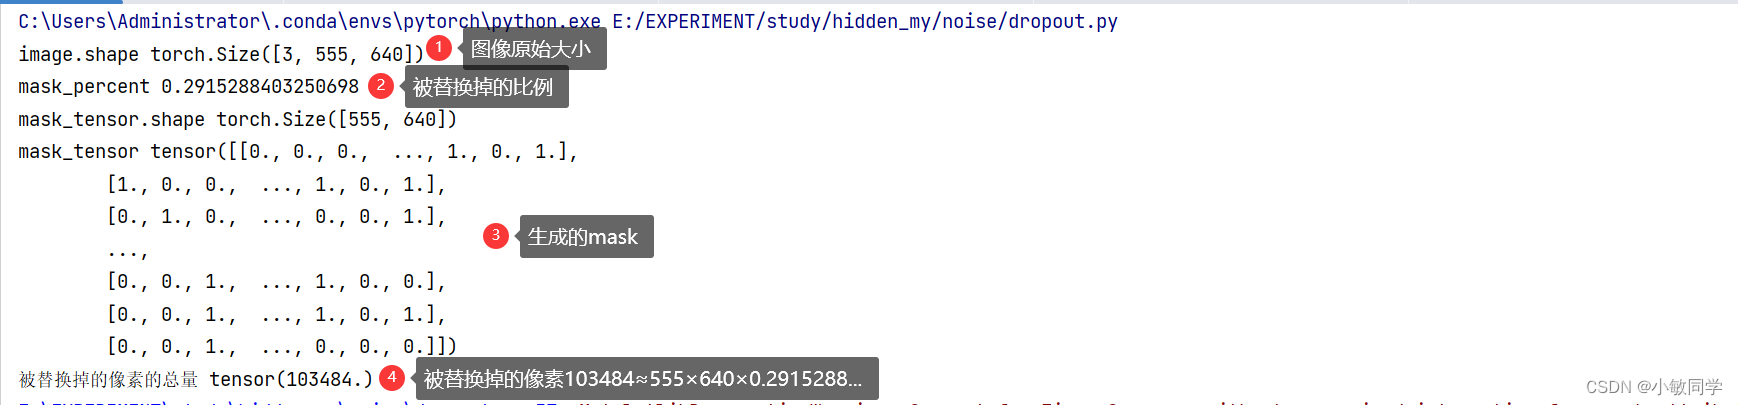
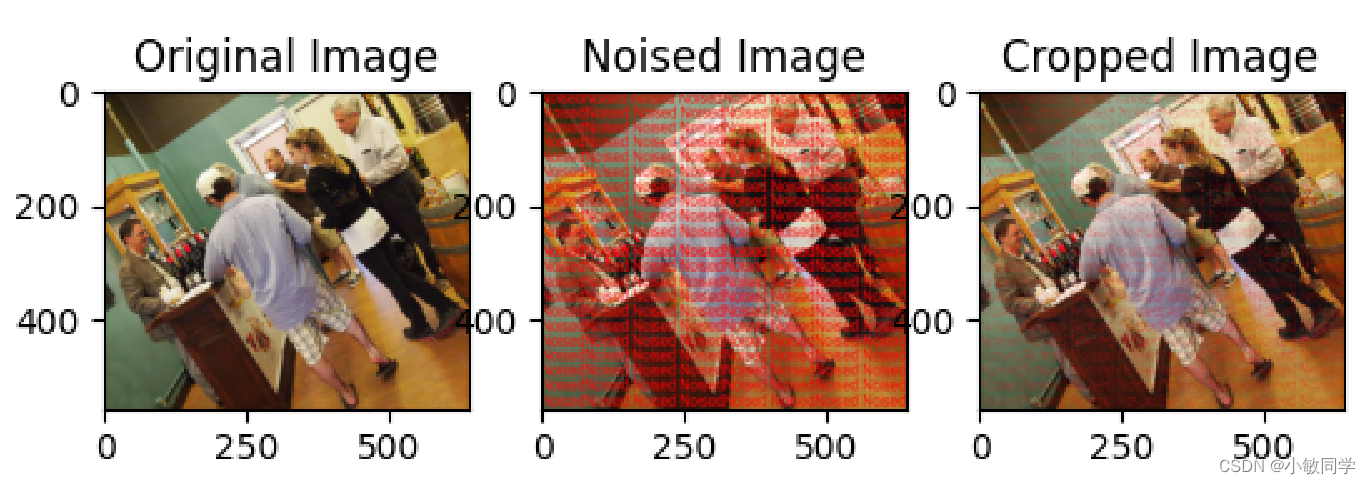
2.4 Dropout模块
Dropout模块的功能: 随机选择原始图像的一些像素,将这些像素替换成噪声图像的像素值。
Dropout模块的代码,如下所示:
import torch
import torch.nn as nn
import numpy as np
from PIL import Image
import matplotlib.pyplot as plt
import torchvision.transforms as transforms


class Dropout(nn.Module):
    """
    Drops random pixels from the noised image and substitues them with the pixels from the cover image
    """

    def __init__(self, keep_ratio_range):
        super(Dropout, self).__init__()
        self.keep_min = keep_ratio_range[0]
        self.keep_max = keep_ratio_range[1]

    def forward(self, noised_and_cover):
        noised_image = noised_and_cover[0]
        cover_image = noised_and_cover[1]

        mask_percent = np.random.uniform(self.keep_min, self.keep_max)
        print("mask_percent", mask_percent)

        # 第一个参数是样本空间,它是一个包含两个元素的列表 [0.0, 1.0],表示我们希望生成的随机样本为 0.0 或 1.0。
        # 第二个参数是样本数量,它等于 noised_image 的最后两个维度的形状,表示我们希望生成一个与 noised_image 的最后两个维度相同形状的随机二元数组[H,W]。
        # 第三个参数是概率分布,表示在生成随机样本时,0.0 和 1.0 分别对应的概率分别为 (1 - mask_percent) 和 mask_percent。
        mask = np.random.choice([0.0, 1.0], noised_image.shape[1:], p=[1 - mask_percent, mask_percent])
        # 将Python的列表mask转换为PyTorch的tensor,并设置tensor的设备为与noised_image相同的设备(通常是CPU或GPU),数据类型为float。
        mask_tensor = torch.tensor(mask, device=noised_image.device, dtype=torch.float)
        print("mask_tensor.shape", mask_tensor.shape)
        print("mask_tensor", mask_tensor)
        print("被替换掉的像素的总量", mask_tensor.sum())
        # 将mask_tensor扩展为与noised_image相同的形状
        mask_tensor = mask_tensor.expand_as(noised_image)
        # 将noised_image和cover_image进行融合
        noised_image = noised_image * mask_tensor + cover_image * (1 - mask_tensor)
        return [noised_image, cover_image]


# 读取图片并转换为Tensor格式
image = Image.open("cover.jpg")
transform = transforms.ToTensor()
image = transform(image)
print("image.shape", image.shape)

noised = Image.open("noised.jpg")
noised = transform(noised)

noised_and_cover = [noised, image]
model = Dropout(keep_ratio_range=(0.25, 0.35))
noised_and_cover = model(noised_and_cover)

# 将Tensor格式的图像转换为PIL格式,并进行显示
to_pil = transforms.ToPILImage()
fig, (ax1, ax2, ax3) = plt.subplots(1, 3)  # 修改子图数量为3
ax1.imshow(to_pil(image))
ax1.set_title('Original Image')
ax2.imshow(to_pil(noised))
ax2.set_title('Noised Image')
ax3.imshow(to_pil(noised_and_cover[0]))
ax3.set_title('Cropped Image')
plt.show()
运行结果,如下所示:
2.5 Resize模块
Resize模块的功能: 改变图像的尺寸。
Resize模块的代码,如下所示:
import torch.nn as nn
import torch.nn.functional as F
import numpy as np
from PIL import Image
from matplotlib import pyplot as plt
from torchvision.transforms import transforms


def random_float(min, max):
    res = np.random.rand() * (max - min) + min
    print(res)
    return res


class Resize(nn.Module):
    """
    Resize the image. The target size is original size * resize_ratio
    """

    def __init__(self, resize_ratio_range, interpolation_method='nearest'):
        # interpolation_method表示插值方法,可以选择 'nearest'、'linear'、'bilinear'、'bicubic'、'trilinear' 等
        super(Resize, self).__init__()
        self.resize_ratio_min = resize_ratio_range[0]
        self.resize_ratio_max = resize_ratio_range[1]
        self.interpolation_method = interpolation_method  # 插值方法

    def forward(self, noised_and_cover):
        resize_ratio = random_float(self.resize_ratio_min, self.resize_ratio_max)
        print("resize_ratio", resize_ratio)
        noised_image = noised_and_cover[0]
        # 第一个参数是要进行缩放的张量,第二个参数是缩放比例,第三个参数是插值方法
        noised_and_cover[0] = F.interpolate(
            noised_image.unsqueeze(0),
            scale_factor=resize_ratio,
            mode=self.interpolation_method)
        noised_and_cover[0] = noised_and_cover[0].squeeze(0)
        return noised_and_cover


# 读取图片并转换为Tensor格式
image = Image.open("cover.jpg")
transform = transforms.ToTensor()
image = transform(image)
print("image.shape", image.shape)

noised = Image.open("noised.jpg")
noised = transform(noised)

noised_and_cover = [noised, image]
model = Resize((0.5, 1.5))
noised_and_cover = model(noised_and_cover)
print("noised_and_cover[0].shape", noised_and_cover[0].shape)
print("noised_and_cover[1].shape", noised_and_cover[1].shape)

# 将Tensor格式的图像转换为PIL格式,并进行显示
to_pil = transforms.ToPILImage()
fig, (ax1, ax2) = plt.subplots(1, 2)
ax1.imshow(to_pil(image))
ax1.set_title('Original Image')
ax2.imshow(to_pil(noised_and_cover[0]))
ax2.set_title('resized Image')
plt.show()
运行结果,如下所示:

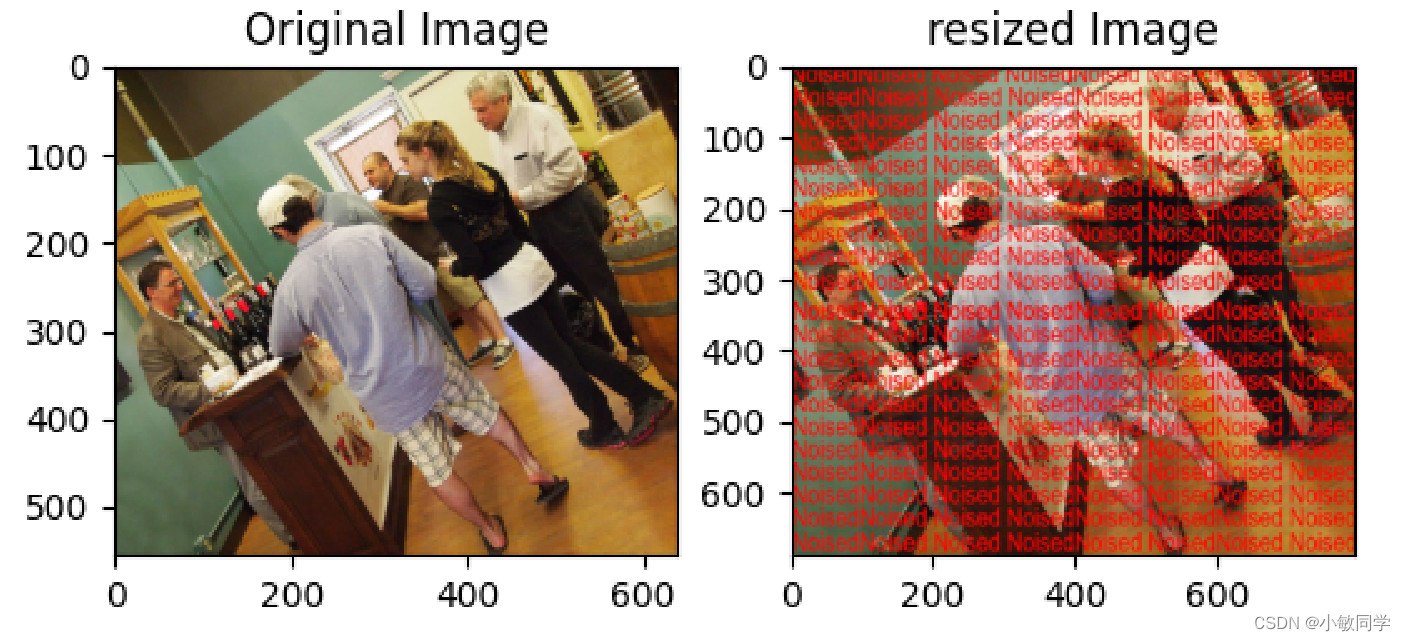
备注:Resized操作是对噪声图像进行处理,原始图像保持不变
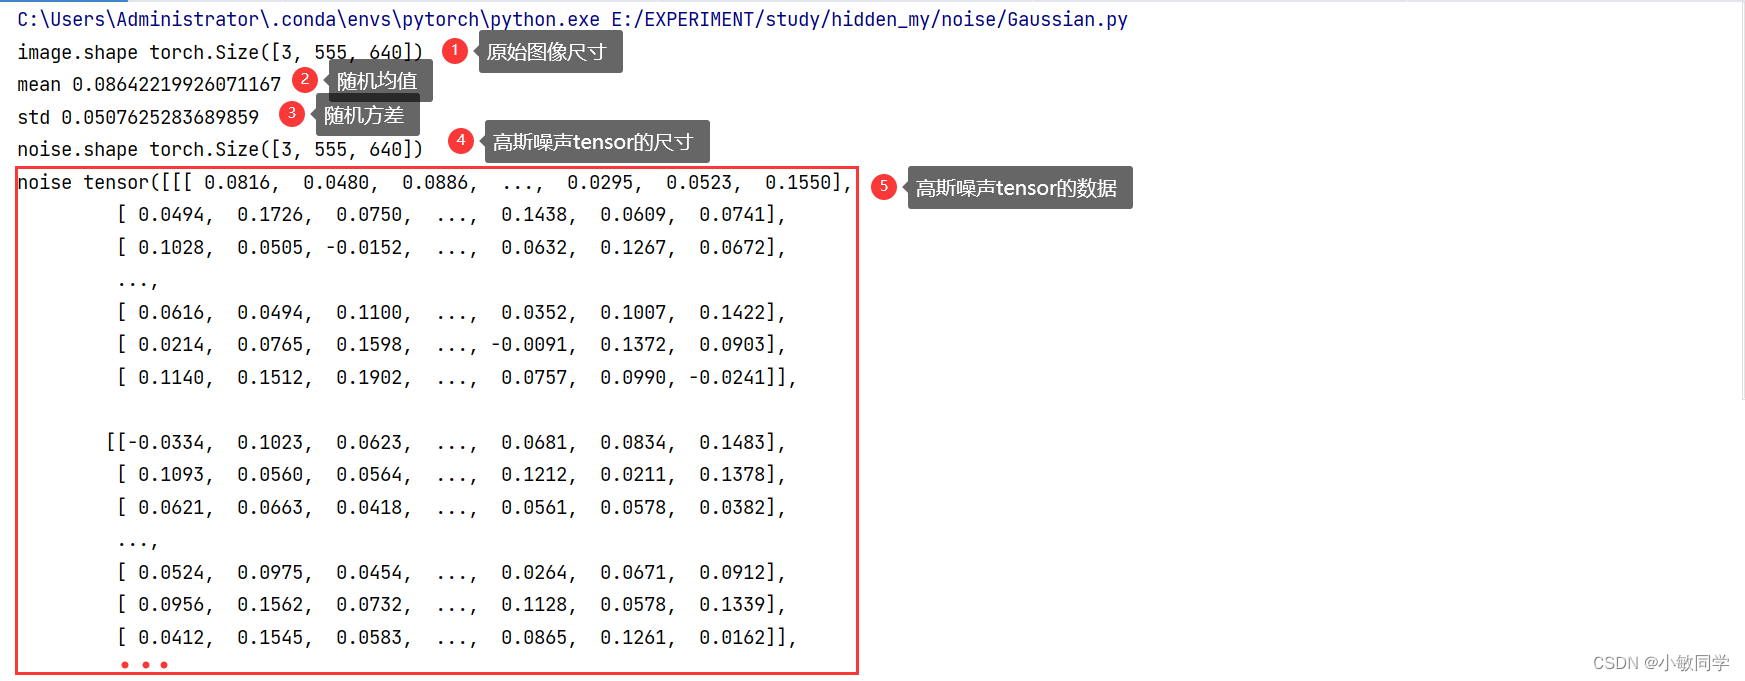
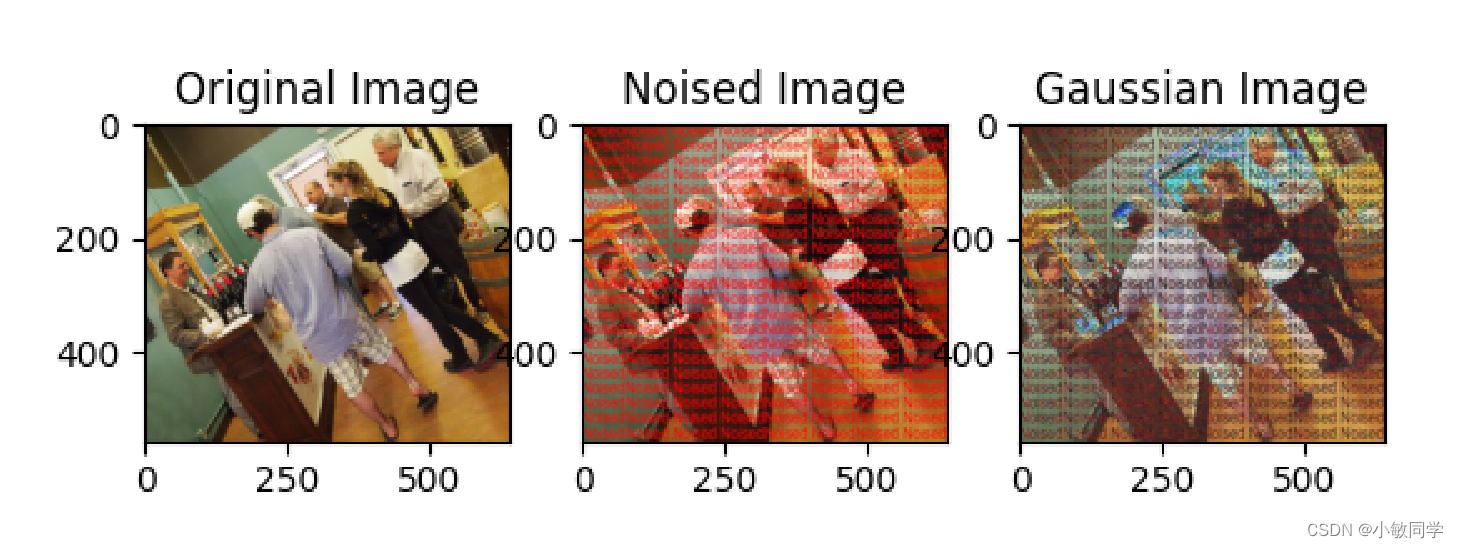
2.6 Gaussian模块
Gaussian模块的功能: 向图像添加高斯噪声。
Gaussian模块的实现步骤:
Step1:创建一个与图像尺寸、数据类型以及通道数相同的Tensor,利用torch.randn函数生成符合标准高斯分布(正态分布)的随机噪声张量。
Step2:将原图像和含有高斯分布的随机噪声张量相加。
Step3:得到添加高斯噪声之后的图像。
Gaussian模块的代码,如下所示:
import torch
import torch.nn as nn
import torch.nn.functional as F
import numpy as np
from PIL import Image
from matplotlib import pyplot as plt
from torchvision.transforms import transforms


class Gaussian(nn.Module):
    """
    Add Gaussian noise to the image.
    """

    def __init__(self, mean_range, std_range):
        super(Gaussian, self).__init__()
        self.mean_min = mean_range[0]
        self.mean_max = mean_range[1]
        self.std_min = std_range[0]
        self.std_max = std_range[1]

    def forward(self, noised_and_cover):
        mean = np.random.rand() * (self.mean_max - self.mean_min) + self.mean_min
        print("mean", mean)
        std = np.random.rand() * (self.std_max - self.std_min) + self.std_min
        print("std", std)
        noised_image = noised_and_cover[0]
        # torch.randn函数用于生成符合标准正态分布的随机噪声张量。
        # 通过乘以标准差(std)并加上均值(mean),可以改变生成噪声张量的分布,并且将其平移到期望的均值位置。
        noise = torch.randn(noised_image.shape) * std + mean
        print("noise.shape", noise.shape)
        print("noise", noise)
        # 将噪声张量添加到输入图像上。
        noised_and_cover[0] = noised_image + noise
        return noised_and_cover


# 读取图片并转换为Tensor格式
image = Image.open("cover.jpg")
transform = transforms.ToTensor()
image = transform(image)
print("image.shape", image.shape)

noised = Image.open("noised.jpg")
noised = transform(noised)

noised_and_cover = [noised, image]
model = Gaussian((0, 0.1), (0, 0.1))
noised_and_cover = model(noised_and_cover)
print("noised_and_cover[0].shape", noised_and_cover[0].shape)
print("noised_and_cover[1].shape", noised_and_cover[1].shape)

# 将Tensor格式的图像转换为PIL格式,并进行显示
to_pil = transforms.ToPILImage()
fig, (ax1, ax2, ax3) = plt.subplots(1, 3)  # 修改子图数量为3
ax1.imshow(to_pil(image))
ax1.set_title('Original Image')
ax2.imshow(to_pil(noised))
ax2.set_title('Noised Image')
ax3.imshow(to_pil(noised_and_cover[0]))
ax3.set_title('Gaussian Image')
plt.show()
运行结果,如下所示:
2.7 JpegCompression 模块
JpegCompression模块的实现较为复杂,单独拆解为一篇博客:稍后更新。
2.8 组合噪声模块
模块功能:根据配置参数构建噪声网络,每个mini-batch随机选择其中一种噪声进行训练。


 2278
2278

 被折叠的 条评论
为什么被折叠?
被折叠的 条评论
为什么被折叠?
 到【灌水乐园】发言


