 Spring容器解析


容器的基本实现
从一段代码开始
public void testIocWithConstructor() throws Exception {
        @SuppressWarnings("resource")
        ApplicationContext context = new ClassPathXmlApplicationContext("spring-ioc.xml");
        User bean = (User) context.getBean("User");
        System.out.println(bean);
    }
xml
 <!--  构造方法注入 -->
    <bean id="User" class="com.spring.demo.bean.User">
        <constructor-arg name="name" value="tom"></constructor-arg>
        <constructor-arg name="age" value="2"></constructor-arg>
    </bean>
spring 核心类
DefaultListableBeanFactory
XMLBeanFactory 继承自DefaultListableBeanFactory,DefaultListableBeanFactory是整个bean加载的核心部分,是spring注册及加载bean的默认实现。
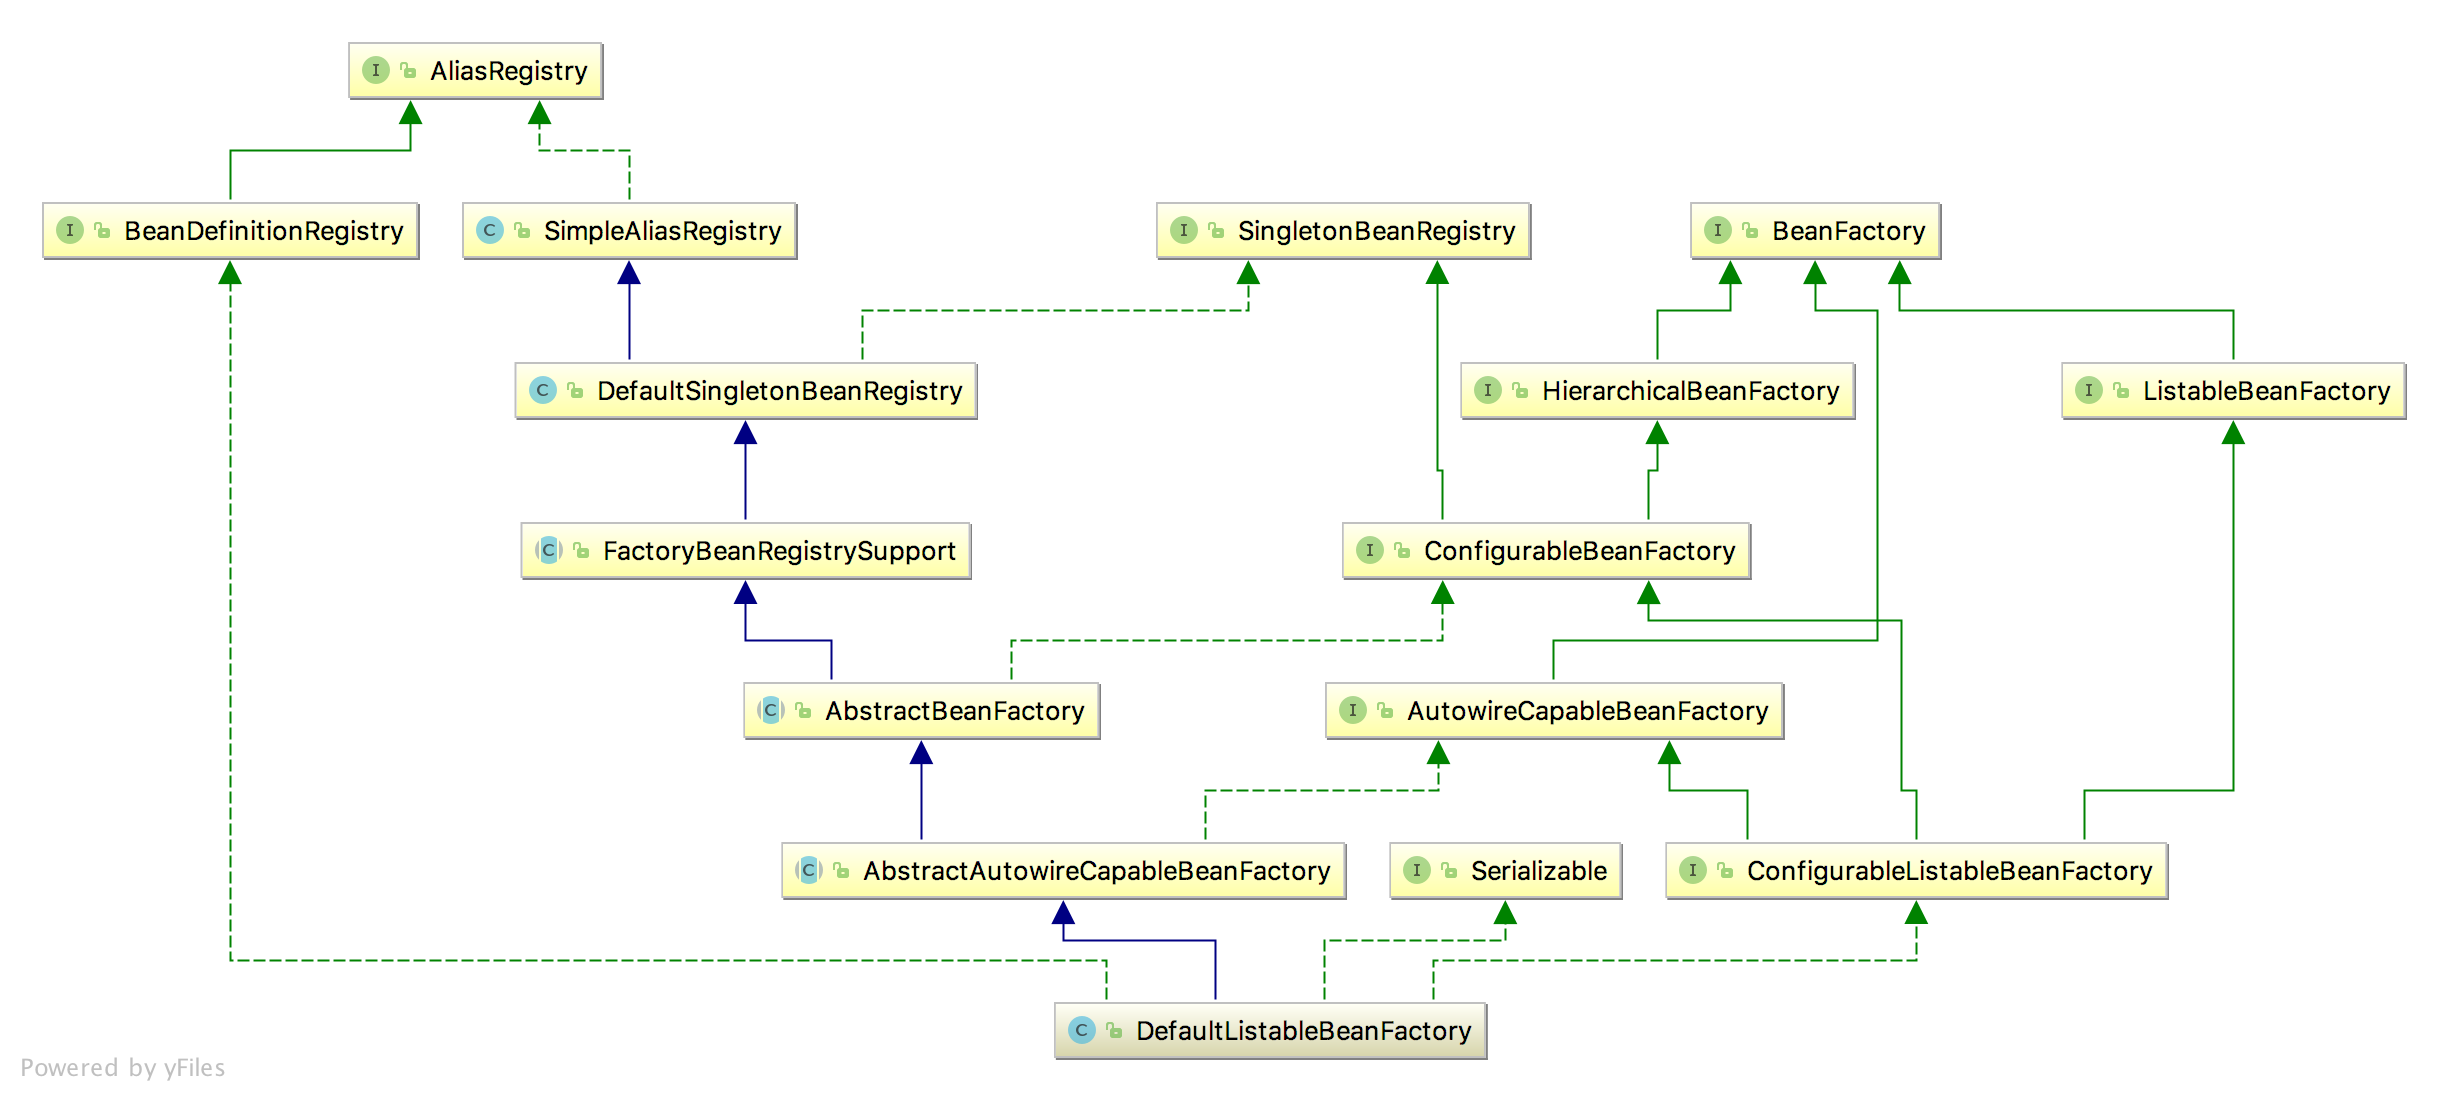
- AliasRegistry : 别名管理器。定义对alias简单增删改操作
- SimpleAliasRegistry: AliasRegistry的Spring默认实现,主要使用map作为alias的缓存。
- SingletonBeanRegistry:定义对单例的注册及获取
- BeanFactory:定义获取bean的各种属性
- DefaultSingletonBeanRegistry:对SingletonBeanRegistry的实现
- HierarchicalBeanFactory:继承BeanFactory,并增加了对parentFactory的支持
- BeanDefinitionRegistry:定义对BeanDefinition的各种增删改操作
- FactoryBeanRegistrySupport:在DefaultSingletonBeanRegistry的基础上增加了对FactoryBean的特殊处理功能
- ConfigurableBeanFactory: 提供配置Factory的各种方法
- ListableBeanFactory:根据各种条件获取bean的配置清单
- AbstractBeanFactory: 综合FactoryBeanRegistrySupport 和 ConfigurableBeanFactory的功能
- AutowireCapableBeanFactory:提供创建bean、自动注入、初始化以及bean的后置处理器
- AbstractAutowireCapableBeanFactory:综合 AbstractBeanFactory 并对接口 AutowireCapableBeanFactory 进行实现。
- ConfigurableListableBeanFactory : Beanfactory 配直清单,指定忽略类型及接口等
- DefaultListableBeanFactory : 综合上面所有功能, 主要是对 bean 注册后的处理 。
XMLBeanDefinitionReader
XmlBeanFactory 对 DefaultListableBeanFactorγ 类进行了扩展,主要用于从 XML 文档中读取 BeanDefinition ,唯独与父类不同的个性化实现就是增加了 XmlBeanDefinitionReader 类型的 reader属性。 在 XmlBeanFactory 中主要使用 reader 属性对资源文件进行读取和注册。

- BeanDefinitionReader :主要定义资源文件读取并转换为 BeanDefinition 的各个功能 。
- EnvironmentCapable :定义获取 Environment 方法 。
- AbstractBeanDefinitionReader :对 EnvironmentCapable 、BeanDefinitionReader 类定义的
功能进行实现。
其他几个相关功能类
- ResourceLoader :定义资源加载器,主妥应用于根据给定的资源文件地址返 回对应的
Resource 。 - DocumentLoader :定义从资 源、文件加载到转换为 Document 的功能 。
- BeanDefinitionDocumentReader:定义读取 Docuemnt 并注册 BeanDefinition 功能
- BeanDefinitionParserDelegate :定义解析 Element 的各种方法 。
整个XML配置文件读取的大致流程
- 通过继承 向 AbstractBeanDefinitionReader 中的方法,来使用 ResourLoader 将资源文件路径转换为对应的 Resource 文件。
- 通过 DocumentLoader 对 Resource 文件进行转换,将 Resource 文件转换为Document文件。
- 通过实现接口 BeanDefinitionDocumentReader 的 DefaultBeanDefinitionDocumentReader 类
对 Document 进行解析,并使用 BeanDefinitionParserDelegate 对 Element 进行解析。
容器的基础 XmlBeanFactory
首先看一行代码
BeanFactory factory = new XmlBeanFactory(new ClassPathResource("spring-ioc.xml"));
new ClassPathResource是构造函数,构造Resource资源文件的实例对象,这样后续的资源处理就可以用 Resource 提供的各种服务来操作了。
Resource资源的封装流程

配置文件封装
new ClassPathResource(”beanFactory Test.xm"), ClassPathResource的功能:
在 Java 中,将不同来源的资源抽象成 URL ,通过注册不同的 handler (URLStreamHandler )来处理不同来源的资源的读取逻辑,一般 handler 的类型使用不同前缀(协议, Protocol )来识别,如“file:”“http:” “jar:”等,然而 URL 没有默认定义相对 Classpath 或 ServletContext 等资源的 handler ,虽然可以注册自己的 URLStreamHandler 来解析特定的 URL 前缀(协议 ), 比如"casspath :”,然而这需要了解 URL的实现机制,而且 URL也也没有提供基本的方法,如检查当前资源是否存在、检查当前资源是否可读等方法。 因而 Spring 对其内部使用到的资源实现了自己的抽象结构 : Resource 接口封装底层资源 。
核心代码
//封装任何能返回 InputStream 的类,比如 File、Classpath 下的资游开和Byte
//Array 等
public interface InputStreamSource {
    InputStream getInputStream() throws IOException;
}

//抽象了所有 Spring 内部使用到的底层资源:File、URL、Classpath等
//定义了3个判断当前资源状态的方法:存在性(exists)、可读性(isReadable)、是否处于打
//开状态(isOpen)
//提供了不同资源到 URL、URI、File 类型的转换
//提供了基于当前资源创建一个相对资惊的方法
public interface Resource extends InputStreamSource {
    boolean exists();

    boolean isReadable();

    boolean isOpen();

    URL getURL() throws IOException;

    URI getURI() throws IOException;

    File getFile() throws IOException;

    long contentLength() throws IOException;

    long lastModified() throws IOException;

    Resource createRelative(String var1) throws IOException;

    String getFilename();

    String getDescription();
}
对不同来源的资源文件都有相应的 Resource 实现 : 文件( FileSystemResource ) 、 Classpath资源( ClassPathResource )、 URL 资源( URLResource )、 InputStream 资源( InputStreamResource ) 、Byte 数组( ByteArrayResource )等 。
日常开发也可以用到 ClassPathResource ,例如
Resource resource = new ClassPathResource("beanFactoryTest.xml");
InputStream inputStream = resource.getinputStream();
得到 inputStream 后,我们就可以按照以前的开发方式进行实现了
当通过 Resource 相关类完成了对配置文件进行封装后配置文件的读取工作就全权交给
XmlBeanDefinitionReader 来处理了 。
继续探寻XmlBeanFactory 的初始化过程了 :XmlBeanFactory 的初始化有若干办法 在这里分析的是使用 Resource 实例作为构造两数参数的办法 , 代码如下:
public class XmlBeanFactory extends DefaultListableBeanFactory {
    private final XmlBeanDefinitionReader reader;

    public XmlBeanFactory(Resource resource) throws BeansException {
        this(resource, (BeanFactory)null);
    }

    public XmlBeanFactory(Resource resource, BeanFactory parentBeanFactory) throws BeansException {
        super(parentBeanFactory);
        this.reader = new XmlBeanDefinitionReader(this);
        this.reader.loadBeanDefinitions(resource);
    }
}
this.reader.loadBeanDefinitions(resource);才是资源加载的真正实现
在 XmlBeanDefinitionReader 加载数据前还有一个调用父类构造函数初始化的过程 : super(parentBeanFactory),跟踪一下源码
public AbstractAutowireCapableBeanFactory() {
    this.instantiationStrategy = new CglibSubclassingInstantiationStrategy();
    this.parameterNameDiscoverer = new DefaultParameterNameDiscoverer();
    this.allowCircularReferences = true;
    this.allowRawInjectionDespiteWrapping = false;
    this.ignoredDependencyTypes = new HashSet();
    this.ignoredDependencyInterfaces = new HashSet();
    this.factoryBeanInstanceCache = new ConcurrentHashMap(16);
    this.filteredPropertyDescriptorsCache = new ConcurrentHashMap(256);
    this.ignoreDependencyInterface(BeanNameAware.class);
    this.ignoreDependencyInterface(BeanFactoryAware.class);
    this.ignoreDependencyInterface(BeanClassLoaderAware.class);
}
重点关注方法:ignoreDependencyInterface:
- 功能: 忽略给定接口的向动装配功能
- 当 A 中有属性 B ,那么 当 Spring 在获取 A 的 Bean 的时候如果其属性 B 还没有
初始化,那么 Spring 会自动初始化 B ,这也是Spring 提供的一个重要特性。 但是,某些情况下, B 不会被初始化,其中的一种情况就是 B 实现了 BeanNameAware 接口 。 Spring 中是这样介绍的:自动装配时忽略给定的依赖接口,典型应用是通过其他方式解析 Application 上下文注册依赖,类似于 BeanFactory 通过 BeanFactoryAware 进行注入或者 ApplicationContext 通过ApplicationContextAware 进行注入 。TODO - https://blog.youkuaiyun.com/wubai250/article/details/8255918
加载 Bean
上文已经调用 ClassPathResource 的构造函数来构造 Resource资源文件的实例对象。 提到的 this.reader.loadBeanDefinitions(resource); 是整个资源加载的切入点。
这个方法的时序图 :

整个过程大致如下:
- 封装资源文件 。当 进入 XmlBean.DefinitionReader 后首先对 参 数 Resource 使用
EncodedResource 类进行封装 。 - 获取输入流 。从 Resource 巾获取对应的 InputStrearn 并构造 lnputSource 。
- 通过构造的 lnputSource 实例和 Resource 实例继续调用函数 doLoadBean.Definitions
核心代码
loadBeanDefinitions
public int loadBeanDefinitions(Resource resource) throws BeanDefinitionStoreException {
        return this.loadBeanDefinitions(new EncodedResource(resource));
    }
EncodedResource 作用:用于对资服文件的编码进行处理的。其中的主要逻辑体现在 getReader()方法中, 当设置了编码属性的时候 Spring会使用相应的编码作为输入流的编码
与构造好EncodedResource对象后,再次转入了可复复用方法loadBeanDefinitions(new EncodedResource(resource));
public int loadBeanDefinitions(EncodedResource encodedResource) throws BeanDefinitionStoreException {
Assert.notNull(encodedResource, "EncodedResource must not be null");
       ...
//通过属性记录已经加载的资源
Set<EncodedResource> currentResources = (Set)this.resourcesCurrentlyBeingLoaded.get();
        ...
//从encodedResource中获取已经封装的Resource兑现,并再次从Resource中获取 inputStream
InputStream inputStream = encodedResource.getResource().getInputStream();
...
InputSource inputSource = new InputSource(inputStream);
                    if (encodedResource.getEncoding() != null) {                       inputSource.setEncoding(encodedResource.getEncoding());
                    }
//真正进入逻辑核心部分
var5 = this.doLoadBeanDefinitions(inputSource, encodedResource.getResource());
                } finally {
    //关闭输入流
                    inputStream.close();
                }
上述方法的核心流程
- 首先对传入的 resource 参数做封装,目的是考虑到Resource 可能存在编码要求的情况
- 通过 SAX 读取 XML 文件的方式来准备 lnputSource对象
- ,最后将准备的数据通过参数传入真正的核心处理部分
inputSource.setEncoding(encodedResource.getEncoding())
 protected int doLoadBeanDefinitions(InputSource inputSource, Resource resource) throws BeanDefinitionStoreException {
        try {
            Document doc = this.doLoadDocument(inputSource, resource);
            return this.registerBeanDefinitions(doc, resource);
        }
    }

 protected Document doLoadDocument(InputSource inputSource, Resource resource) throws Exception {
        return this.documentLoader.loadDocument(inputSource, this.getEntityResolver(), this.errorHandler, this.getValidationModeForResource(resource), this.isNamespaceAware());
    }
上述代码功能
- 获取对 XML 文件的验证模式 。
getValidationModeForResource - 加载 XML 文件,并得到对应的 Document。
- 根据返回的 Document 注册 Bean 信息
registerBeanDefinitions
3 个步骤支撑着整个 Spring 容器部分的实现,尤其是第 3 步对配置文件的解析,逻辑非
常的复杂
获取对 XML 文件的验证模式
XML 文件的验证模式保证了 XML 文件的正确性 ,比较常用的验证模式有两种: DTD 和 XSD
- DTD: (Document Type Definition) 文档型定义,通过比较 XML 文档和 DTD 文件来看文档是否符合规范 ,使用 DTD 验证模式的时候需要在 XML 文件的头部声明。
- XSD(XML Schemas Definition) ,使用XML Schema 文档对XML 实例文档进行检验 ,要要声明名称空间 ,指定该名称空间所对应的 XML Schema 文档的存储位置。
验证模式的读取:
Spring 通过 getValidationModeForResource 方法来获取对应资源的的验证模式 。
	protected int getValidationModeForResource(Resource resource) {
		int validationModeToUse = getValidationMode();
        //如果手动指定了验证仪式则使用指定的验证模式
		if (validationModeToUse != VALIDATION_AUTO) {
			return validationModeToUse;
		}
		int detectedMode = detectValidationMode(resource);
        ///如果未指定则使用自动检测
		if (detectedMode != VALIDATION_AUTO) {
			return detectedMode;
		}
		// Hmm, we didn't get a clear indication... Let's assume XSD,
		// since apparently no DTD declaration has been found up until
		// detection stopped (before finding the document's root tag).
		return VALIDATION_XSD;
	}
自动检测验证模式的功能在函数 detectValidationMode进行设定,在detectValidationMode 方法中将向动检测验证模式的工作委托给了专门处理类XmlValidationModeDetector ,调用了 XmlValidationModeDetector 的 validationModeDetector 方法,具体代码如下:
protected int detectValidationMode(Resource resource) {
   if (resource.isOpen()) {
      throw new BeanDefinitionStoreException(
            "Passed-in Resource [" + resource + "] contains an open stream: " +
            "cannot determine validation mode automatically. Either pass in a Resource " +
            "that is able to create fresh streams, or explicitly specify the validationMode " +
            "on your XmlBeanDefinitionReader instance.");
   }

   InputStream inputStream;
   try {
      inputStream = resource.getInputStream();
   }
   catch (IOException ex) {
      throw new BeanDefinitionStoreException(
            "Unable to determine validation mode for [" + resource + "]: cannot open InputStream. " +
            "Did you attempt to load directly from a SAX InputSource without specifying the " +
            "validationMode on your XmlBeanDefinitionReader instance?", ex);
   }

   try {
      return this.validationModeDetector.detectValidationMode(inputStream);
   }
   catch (IOException ex) {
      throw new BeanDefinitionStoreException("Unable to determine validation mode for [" +
            resource + "]: an error occurred whilst reading from the InputStream.", ex);
   }
}
detectValidationMode 调用XmlValidationModeDetector的 detectValidationMode 方法 :
public int detectValidationMode(InputStream inputStream) throws IOException {
		// Peek into the file to look for DOCTYPE.
		BufferedReader reader = new BufferedReader(new InputStreamReader(inputStream));
		try {
			boolean isDtdValidated = false;
			String content;
			while ((content = reader.readLine()) != null) {
				content = consumeCommentTokens(content);
                //如果取出的行是空或者注释略过
				if (this.inComment || !StringUtils.hasText(content)) {
					continue;
				}
				if (hasDoctype(content)) {
					isDtdValidated = true;
					break;
				}
                //如果取到< 开始符号,验证模式一定在开始符号之前
				if (hasOpeningTag(content)) {
					// End of meaningful data...
					break;
				}
			}
			return (isDtdValidated ? VALIDATION_DTD : VALIDATION_XSD);
		}
		catch (CharConversionException ex) {
			// Choked on some character encoding...
			// Leave the decision up to the caller.
			return VALIDATION_AUTO;
		}
		finally {
			reader.close();
		}
	}
上述方法的核心:Spring 用来检测验证模式的办法就是判断是否包含 DOCTYPE ,如果包含就是 DTD ,否则就是 XSD 。
获取Document
经过了验证模式准备的步骤就可以进行 Document 加载了,XmlBeanFactoryReader 类对于文档读取并没有亲力亲为,而是委托给了 DocumentLoader 去执行, 这里的 DocumentLoader是个接口,而真正调用的是 DefaultDocumentLoader ,解析代码如下:
	public Document loadDocument(InputSource inputSource, EntityResolver entityResolver,
			ErrorHandler errorHandler, int validationMode, boolean namespaceAware) throws Exception {

		DocumentBuilderFactory factory = createDocumentBuilderFactory(validationMode, namespaceAware);
		if (logger.isDebugEnabled()) {
			logger.debug("Using JAXP provider [" + factory.getClass().getName() + "]");
		}
		DocumentBuilder builder = createDocumentBuilder(factory, entityResolver, errorHandler);
		return builder.parse(inputSource);
	}
上述代码功能:通过 SAX 解析 XML 文档的套路大致都差不多 , 首先创建 DocumentBuilderFactory ,再通过DocumentBuilderFactory 创建 DocumentBuilder ,进而解析 inputSource 来返回 Document 对象。
上述代码的EntityResolver 上一步传入的参数是 getEntityResolver()的返回值,代码如下:
	protected EntityResolver getEntityResolver() {
		if (this.entityResolver == null) {
			// Determine default EntityResolver to use.
			ResourceLoader resourceLoader = getResourceLoader();
			if (resourceLoader != null) {
				this.entityResolver = new ResourceEntityResolver(resourceLoader);
			}
			else {
				this.entityResolver = new DelegatingEntityResolver(getBeanClassLoader());
			}
		}
		return this.entityResolver;
	}
接下来详细介绍 EntityResolver
EntityResolver 用法
如果 SAX 应用程序需要实现 自 定义处理外部实体,则必须实现此接口并使用 setEntityResolver方法向 SAX 驱动器注册一个实例 。 也就是说,对于解析一个 XML, SAX 首先读取该 XML 文档上的声明,根据声明去寻找相应的 DTD 定义,以便对文档进行一个验证。 默认的寻找规则,即通过网络(实现上就是声明的 DTD 的 URI 地址)来下载相应的 DTD 声明,并进行认证 。下载的过程是一个漫长的过程,而且当网络中断或不可用时,这里会报错,就是因为相应的 DTD声明没有被找到的原因 。
EntityResolver 定义:
EntityResolve的作用是项目本身就可以提供一个如何寻找 DTD 声明的方法,即由程序来实现寻找 DTD 声明的过程,比如我们将 DTD 文件放到项目中某处 ,在实现时直接将此文档读取并返回给 SAX 即可 。 这样就避免了通过网络来寻找相应的声明。
EntityResolve接口方法声明
public InputSource resolveEntity(String publicId, String systemId)
解析验证方式为DTD的配置文件文件
<!DOCTYPE html PUBLIC "-//W3C//DTD HTML 4.01 Transitional//EN" "http://www.w3.org/TR/html4/loose.dtd">
读取到的两个参数
- publicId ://W3C//DTD HTML 4.01 Transitional//EN
- systemId: http://www.w3.org/TR/html4/loose.dtd
解析验证方式为XSD的配置文件文件
<?xml version="1.0" encoding="UTF-8"?>
<beans xmlns="http://www.springframework.org/schema/beans"
       xmlns:xsi="http://www.w3.org/2001/XMLSchema-instance"
        http://www.springframework.org/schema/beans/spring-beans.xsd
读取到的两个参数
- publicId :null
- systemId: http://www.springframework.org/schema/beans/spring-beans.xsd
验证文件默认的加载方式是通过 URL 进行网络下载获取 ,为解决网络延迟,一般的做法都是将验证文件位置放置在向己的工程里 。
问题:怎么做才能将
这个 URL 转换为自己工程里对应的地址文件呢 ?以DTD为例
Spring 中使用 DelegatingEntityResolver 类为 EntityResolver的实现类, resolveEntity实现方法如下:
public InputSource resolveEntity(String publicId, String systemId) throws SAXException, IOException {
		if (systemId != null) {
			if (systemId.endsWith(DTD_SUFFIX)) {
				return this.dtdResolver.resolveEntity(publicId, systemId);
			}
			else if (systemId.endsWith(XSD_SUFFIX)) {
				return this.schemaResolver.resolveEntity(publicId, systemId);
			}
		}
		return null;
	}
BeansDtdResolver:
public InputSource resolveEntity(String publicId, String systemId) throws IOException {
		if (logger.isTraceEnabled()) {
			logger.trace("Trying to resolve XML entity with public ID [" + publicId +
					"] and system ID [" + systemId + "]");
		}
		if (systemId != null && systemId.endsWith(DTD_EXTENSION)) {
			int lastPathSeparator = systemId.lastIndexOf("/");
			int dtdNameStart = systemId.indexOf(DTD_NAME, lastPathSeparator);
			if (dtdNameStart != -1) {
				String dtdFile = DTD_FILENAME + DTD_EXTENSION;
				if (logger.isTraceEnabled()) {
					logger.trace("Trying to locate [" + dtdFile + "] in Spring jar on classpath");
				}
				try {
					Resource resource = new ClassPathResource(dtdFile, getClass());
					InputSource source = new InputSource(resource.getInputStream());
					source.setPublicId(publicId);
					source.setSystemId(systemId);
					if (logger.isDebugEnabled()) {
						logger.debug("Found beans DTD [" + systemId + "] in classpath: " + dtdFile);
					}
					return source;
				}
				catch (IOException ex) {
					if (logger.isDebugEnabled()) {
						logger.debug("Could not resolve beans DTD [" + systemId + "]: not found in classpath", ex);
					}
				}

			}
		}

		// Use the default behavior -> download from website or wherever.
		return null;
	}
上述代码原理:
直接截取 systemld 最后的 xx.dtd然后去当前路径下寻找,而加载 XSD 类型的 PluggableSchemaResolver类的 resolveEntity 是默认到 META-INF/Spring.schemas 文件巾找到 systemid 所对应的 XSD 文件并加载
解析及注册BeanDefinitions
当程序已经拥有 XML 文档文件的 Document 实例对象时,就会被引入下面这个方法.
XmlBeanDefinitionReader:
	public int registerBeanDefinitions(Document doc, Resource resource) throws BeanDefinitionStoreException {
        //使用 DefaultBeanDefinitionDocumentReader实例化BeanDefinitionDocumentReader
		BeanDefinitionDocumentReader documentReader = createBeanDefinitionDocumentReader();
        //在实例化BeanDefinitionReader的时候把BeanDefinitionRegistry传入,默认使用继承DefaultListableBeanFactory的子类
        //记录统统计前BeanDefinition加载个数
		int countBefore = getRegistry().getBeanDefinitionCount();
        // 加载及注册 bean
		documentReader.registerBeanDefinitions(doc, createReaderContext(resource));
        // 记录本次加载的 BeanDefinition 个数
		return getRegistry().getBeanDefinitionCount() - countBefore;
	}
用到的设计模式
在这个方法中很好地应用了面向对象中单一职责的原则,将逻辑处理委托给单一的类BeanDefinitionDocumentReader进行处理,BeanDefinitionDocumentReader是一个接口,实例化的工作在createBeanDefinitionDocumentReader() 中完成。通过此方法,BeanDefinitionDocumentReader 真正类型已经是 DefaultBeanDefinitionDocumentReader
进入 DefaultBeanDefinitionDocumentReader,发现这个方法的 重要 目的之一就是提取 root ,以便于再次将 root 作为参数继续BeanDefinition 的注册 。
public void registerBeanDefinitions(Document doc, XmlReaderContext readerContext) {
		this.readerContext = readerContext;
		logger.debug("Loading bean definitions");
		Element root = doc.getDocumentElement();
		doRegisterBeanDefinitions(root);
	}
以前一直是 XML 加载解析的准备阶段,那么 doRegisterBeanDefinitions 算是真正地开始进行解析了
protected void doRegisterBeanDefinitions(Element root) {
        /**
         * //任何嵌套的<beans>元素都会导致此方法的递归。
         * 为了正确传播和保留<beans> default- *属性,
         * 跟踪当前(父)委托,可以为null。创建新的(子)委托,引用父对象以进行回退,然后最终将this.delegate重置为其原始(父)引用。
         * 此行为模拟了一堆代理,而实际上并不需要一个代理。
         */
        //专门处理解析
        BeanDefinitionParserDelegate parent = this.delegate;
        this.delegate = createDelegate(getReaderContext(), root, parent);

        if (this.delegate.isDefaultNamespace(root)) {
            //处理profile属性
            String profileSpec = root.getAttribute(PROFILE_ATTRIBUTE);
            if (StringUtils.hasText(profileSpec)) {
                String[] specifiedProfiles = StringUtils.tokenizeToStringArray(
                        profileSpec, BeanDefinitionParserDelegate.MULTI_VALUE_ATTRIBUTE_DELIMITERS);
                if (!getReaderContext().getEnvironment().acceptsProfiles(specifiedProfiles)) {
                    if (logger.isInfoEnabled()) {
                        logger.info("Skipped XML bean definition file due to specified profiles [" + profileSpec +
                                "] not matching: " + getReaderContext().getResource());
                    }
                    return;
                }
            }
        }

        //解析前处理,留给子类实现
        preProcessXml(root);
        parseBeanDefinitions(root, this.delegate);
        //解析后处理,留给子类实现
        postProcessXml(root);

        this.delegate = parent;
    }
preProcessXml(root)、postProcessXml(root);用到了模板模式。
TODO: 一般会在之前之后做什么操作?
profile属性的作用
通过profile我们就可以同时在配置文件中部署两套配置来适用于生产环境和开发环境,这样可以方便的进行切换开发、部署环境, 最常用的就是更换不同的数据库 。
用法:TODO 估计很重要
流程
- 首先程序会获取 beans 节点是否定义了profile 属性
- 如果定义了则会需要到环境变量 中去寻找 ,所以这里首先断言Environment不可能为空
- 因为 profile 是可 以 同时指定多个的 ,需要程序对其拆分,并解析每个 profile 是都符合环境变量巾所定义的,不定义则不会浪费性能去解析
解析及注册BeanDefinitions
处理了 profile 后就可以进行 XML 的读取了,跟踪代码进入parseBeanDefinitions(root, this.delegate); 。
protected void parseBeanDefinitions(Element root, BeanDefinitionParserDelegate delegate) {
    //对beans的处理
		if (delegate.isDefaultNamespace(root)) {
			NodeList nl = root.getChildNodes();
			for (int i = 0; i < nl.getLength(); i++) {
				Node node = nl.item(i);
				if (node instanceof Element) {
					Element ele = (Element) node;
					if (delegate.isDefaultNamespace(ele)) {
                        //对bean处理
						parseDefaultElement(ele, delegate);
					}
					else {
						delegate.parseCustomElement(ele);
					}
				}
			}
		}
		else {
			delegate.parseCustomElement(root);
		}
	}
Spring 的 XML 配置里面有两大类 Bean 声 名,一个是默认的
<bean id="test" class="test.TestBean"/>
另一类是自定义的
<tx:annotation-driven/>
如果是默认的,用parseDefaultElement(ele, delegate);方法解析。否则用delegate.parseCustomElement(ele);方法解析
如何判断是默认的还是自定义的?delegate.isDefaultNamespace(ele)方法, )获取命名 空 间 并与 Spring 固定定的命名空间 http ?/www.springframework . org/scherna/beans 进行比对 。 如果一致则认为是默认,否则就认为是自定义 。
默认标签解析
通过上一章节,解析默认标签进入方法parseDefaultElement(ele, delegate);这个方法分别对4个标签做了不同处理(import,alias,bean,beans)
private void parseDefaultElement(Element ele, BeanDefinitionParserDelegate delegate) {
    //import
    if (delegate.nodeNameEquals(ele, IMPORT_ELEMENT)) {
        importBeanDefinitionResource(ele);
    }
    //alias
    else if (delegate.nodeNameEquals(ele, ALIAS_ELEMENT)) {
        processAliasRegistration(ele);
    }
    //bean
    else if (delegate.nodeNameEquals(ele, BEAN_ELEMENT)) {
        processBeanDefinition(ele, delegate);
    }
    //beans
    else if (delegate.nodeNameEquals(ele, NESTED_BEANS_ELEMENT)) {
        // recurse
        doRegisterBeanDefinitions(ele);
    }
}
bean标签的解析及注册
进入函数processBeanDefinition(ele, delegate);
protected void processBeanDefinition(Element ele, BeanDefinitionParserDelegate delegate) {
    BeanDefinitionHolder bdHolder = delegate.parseBeanDefinitionElement(ele);
    if (bdHolder != null) {
        bdHolder = delegate.decorateBeanDefinitionIfRequired(ele, bdHolder);
        try {
            // 注册最终修饰的实例。
            BeanDefinitionReaderUtils.registerBeanDefinition(bdHolder, getReaderContext().getRegistry());
        }
        catch (BeanDefinitionStoreException ex) {
            getReaderContext().error("Failed to register bean definition with name '" +
                    bdHolder.getBeanName() + "'", ele, ex);
        }
        // 发送注册事件
        getReaderContext().fireComponentRegistered(new BeanComponentDefinition(bdHolder));
    }
}
大致逻辑总结如下:
- 首先委托
BeanDefinitionParserDelegate类的parseBeanDefinitionElement方法进行元素解析,
返回 BeanDefinitionHolder类型的实例bdHolderr, 经过这个方法后,bdHolder实例已经包含我们配置文件中配置的各种属性了,例如 class 、 name 、 id 、 alias 之类的属性 。 - 当返回的
bdHolder不为空 的情况下若存在默认标签 的子节点下再有自定义属性 , 还需要再次对自定义标签进行解析。 - 解析完成后, 需要对解析后的
bdHolder进行注册,同样, 注册操作委托给了BeanDefinitionReaderUtils的registerBeanDefinition方法。
解析BeanDefinition
首先我们从元素解析及信息提取开始,BeanDefinitionHolder bdHolder = delegate.parseBeanDefinitionElement(ele);
BeanDefinitionHolder 这个类的作用
/**
 * 具有名称和别名的BeanDefinition的持有者。可以注册为内部bean的占位符。
 * 也可以用于内部bean定义的编程注册。
 * 如果您不关心BeanNameAware等,注册RootBeanDefinition或ChildBeanDefinition就足够了。
 */
进入parseBeanDefinitionElement 方法
public BeanDefinitionHolder parseBeanDefinitionElement(Element ele) {
    return parseBeanDefinitionElement(ele, null);
}

public BeanDefinitionHolder parseBeanDefinitionElement(Element ele, BeanDefinition containingBean) {
    //解析id属性
    String id = ele.getAttribute(ID_ATTRIBUTE);
    //解析name属性
    String nameAttr = ele.getAttribute(NAME_ATTRIBUTE);

    //分割name属性
    List<String> aliases = new ArrayList<String>();
    if (StringUtils.hasLength(nameAttr)) {
        String[] nameArr = StringUtils.tokenizeToStringArray(nameAttr, MULTI_VALUE_ATTRIBUTE_DELIMITERS);
        aliases.addAll(Arrays.asList(nameArr));
    }

    String beanName = id;
    if (!StringUtils.hasText(beanName) && !aliases.isEmpty()) {
        beanName = aliases.remove(0);
        if (logger.isDebugEnabled()) {
            logger.debug("No XML 'id' specified - using '" + beanName +
                    "' as bean name and " + aliases + " as aliases");
        }
    }

    if (containingBean == null) {
        checkNameUniqueness(beanName, aliases, ele);
    }

    //important!!!
    AbstractBeanDefinition beanDefinition = parseBeanDefinitionElement(ele, beanName, containingBean);
    if (beanDefinition != null) {
        //如果不存在beanName,则根据spring提供的命名规则为当前bean生成对应的beanName
        if (!StringUtils.hasText(beanName)) {
            try {
                if (containingBean != null) {
                    beanName = BeanDefinitionReaderUtils.generateBeanName(
                            beanDefinition, this.readerContext.getRegistry(), true);
                }
                else {
                    beanName = this.readerContext.generateBeanName(beanDefinition);
                    // 如果生成器返回类名加后缀,则注册普通bean类名的别名(如果可能的话)。这是Spring 1.2 / 2.0向后兼容性的预期
                    String beanClassName = beanDefinition.getBeanClassName();
                    if (beanClassName != null &&
                            beanName.startsWith(beanClassName) && beanName.length() > beanClassName.length() &&
                            !this.readerContext.getRegistry().isBeanNameInUse(beanClassName)) {
                        aliases.add(beanClassName);
                    }
                }
                if (logger.isDebugEnabled()) {
                    logger.debug("Neither XML 'id' nor 'name' specified - " +
                            "using generated bean name [" + beanName + "]");
                }
            }
            catch (Exception ex) {
                error(ex.getMessage(), ele);
                return null;
            }
        }
        String[] aliasesArray = StringUtils.toStringArray(aliases);
        return new BeanDefinitionHolder(beanDefinition, beanName, aliasesArray);
    }

    return null;
}
现在只能看到对属性 id 以及 name 的解析,但是很庆幸 ,思路我们已经了解了 。
在开始对属性展开全面解析前, Spring 在外层又做了一个当前层的功能架构,在当前层完成的主要工作包括如下内容 。
- 提取元素 巾的 id 以 及 name 属性 。
- 进一步解析其他所有属性并统一封装至
GenericBeanDefinition类型 的实例中。 (后面parseBeanDefinitionElement方法会看到) - 如果检测到 bean 没有指定 beanName ,那么使用默认规则为此 Bean 生成 beanName 。
- 将获取到的信息封装到 BeanDefinitionHolder 的实例中 。
进一步查看parseBeanDefinitionElement方法
/**
*解析bean定义本身,而不考虑名称或别名。
如果在解析bean定义期间出现问题,可能会返回{@code null}。
*/
public AbstractBeanDefinition parseBeanDefinitionElement(
        Element ele, String beanName, BeanDefinition containingBean) {

    //将新的{@link Entry}添加到{@link Stack}。
    this.parseState.push(new BeanEntry(beanName));

    String className = null;
    //解析class属性
    if (ele.hasAttribute(CLASS_ATTRIBUTE)) {
        className = ele.getAttribute(CLASS_ATTRIBUTE).trim();
    }

    try {
        String parent = null;
        //解析parent属性
        if (ele.hasAttribute(PARENT_ATTRIBUTE)) {
            parent = ele.getAttribute(PARENT_ATTRIBUTE);
        }
        //创始用于承载属性的 AbstractBeanDefinition 类型的 GenericBeanDefination ,创建 GenericBeanDefinition类型的实例   important!!!!
        AbstractBeanDefinition bd = createBeanDefinition(className, parent);

        // @硬编码解析默认 bean的各种属性   important!!!!
        parseBeanDefinitionAttributes(ele, beanName, containingBean, bd);
 //   提取Description
        bd.setDescription(DomUtils.getChildElementValueByTagName(ele, DESCRIPTION_ELEMENT));

        //提取元数据  important!!!!
        parseMetaElements(ele, bd);
        //解析lookup-method 属性
        parseLookupOverrideSubElements(ele, bd.getMethodOverrides());
         //解析replace-method 属性
        parseReplacedMethodSubElements(ele, bd.getMethodOverrides());

        // //解析构造函数参数
        parseConstructorArgElements(ele, bd);
        //解析property子元素
        parsePropertyElements(ele, bd);
        //解析qualifier子元素
        parseQualifierElements(ele, bd);

        bd.setResource(this.readerContext.getResource());
        bd.setSource(extractSource(ele));

        return bd;
    }
    catch (ClassNotFoundException ex) {
        error("Bean class [" + className + "] not found", ele, ex);
    }
    catch (NoClassDefFoundError err) {
        error("Class that bean class [" + className + "] depends on not found", ele, err);
    }
    catch (Throwable ex) {
        error("Unexpected failure during bean definition parsing", ele, ex);
    }
    finally {
        this.parseState.pop();
    }

    return null;
}
bean 标签的所有属性,不论常用的还是不常用的我们都看到了 !
1. 创建用于属性承载的 BeanDefinition
BeanDefinition 是一个接口,在 Spring 中存在三种实现: RootBeanDefinition 、 ChildBeanDefinition 以及 GenericBeanDefinition 。三 种实现均继承了 AbstractBeanDefiniton 。BeanDefinition 则提供了相应的 beanClass 、 scope 、 lazyInit属性, BeanDefinition 和<bean>中的属性是一一对应的 。
Spring 通过 BeanDefinition 将配置文件中的<bean>配置信息转换为容器 的内部表示,并将这些BeanDefiniton注册到BeanDefinitonRegistry 中 。 Spring 容器的 BeanDefinitionRegistry 就像是 Spring 配置信息的内存数据库,主要是以 map 的形式保存,后续操作直接从 BeanDefinitionRegistry 中读取配置信息 。
TODO:没有找到上一步的源码
由此可知 ,要解析属 性首先要创建用于承载属性的实例 ,也就是创建GenericBeanDefinition类型的实例 。 而代码 createBeanDefinition(className, parent)的作用就是实现此功能 。
//为给定的类名和父名创建bean定义
protected AbstractBeanDefinition createBeanDefinition(String className, String parentName)
        throws ClassNotFoundException {

    return BeanDefinitionReaderUtils.createBeanDefinition(
            parentName, className, this.readerContext.getBeanClassLoader());
}

//为给定的类名和父名创建bean定义,如果指定了ClassLoader,则急切地加载bean类。
public static AbstractBeanDefinition createBeanDefinition(
        String parentName, String className, ClassLoader classLoader) throws ClassNotFoundException {

    GenericBeanDefinition bd = new GenericBeanDefinition();
    bd.setParentName(parentName);
    if (className != null) {
        if (classLoader != null) {
            //如果 classLoader 不为空, 则使用以传人的 classLoader 同一虚拟机加载类对象,否则只是记录className
            bd.setBeanClass(ClassUtils.forName(className, classLoader));
        }
        else {
            bd.setBeanClassName(className);
        }
    }
    return bd;
}
2.解析各种属性
创建了 bean 信息的承载实例后,便可以进行 bean 信息的各种属性解析了,首先我
们进入 parseBeanDefinitionAttributes 方法 。 该方法是对 element 所有元素属性进行解析 :
public AbstractBeanDefinition parseBeanDefinitionAttributes(Element ele, String beanName,
                                                            BeanDefinition containingBean, AbstractBeanDefinition bd) {

    //解析singleton属性
    if (ele.hasAttribute(SINGLETON_ATTRIBUTE)) {
        error("Old 1.x 'singleton' attribute in use - upgrade to 'scope' declaration", ele);
    }
    //解析scope属性
    else if (ele.hasAttribute(SCOPE_ATTRIBUTE)) {
        bd.setScope(ele.getAttribute(SCOPE_ATTRIBUTE));
    }
    else if (containingBean != null) {
        // 在嵌入 beanDifinition 情况下且没有单独指定 scope 属性则使用父类默认的属性
        bd.setScope(containingBean.getScope());
    }

    ////解析abstract属性
    if (ele.hasAttribute(ABSTRACT_ATTRIBUTE)) {
        bd.setAbstract(TRUE_VALUE.equals(ele.getAttribute(ABSTRACT_ATTRIBUTE)));
    }

    //解析lazy-init属性
    String lazyInit = ele.getAttribute(LAZY_INIT_ATTRIBUTE);
    if (DEFAULT_VALUE.equals(lazyInit)) {
        lazyInit = this.defaults.getLazyInit();
    }
    //若没有设置号或设置成其他字何都会被设置为 false
    bd.setLazyInit(TRUE_VALUE.equals(lazyInit));

    //解析autowire属性
    String autowire = ele.getAttribute(AUTOWIRE_ATTRIBUTE);
    bd.setAutowireMode(getAutowireMode(autowire));

    //解析dependencyCheck属性
    String dependencyCheck = ele.getAttribute(DEPENDENCY_CHECK_ATTRIBUTE);
    bd.setDependencyCheck(getDependencyCheck(dependencyCheck));

    //解析depends-on属性
    if (ele.hasAttribute(DEPENDS_ON_ATTRIBUTE)) {
        String dependsOn = ele.getAttribute(DEPENDS_ON_ATTRIBUTE);
        bd.setDependsOn(StringUtils.tokenizeToStringArray(dependsOn, MULTI_VALUE_ATTRIBUTE_DELIMITERS));
    }

    //解析 autowireCandidate 属性
    String autowireCandidate = ele.getAttribute(AUTOWIRE_CANDIDATE_ATTRIBUTE);
    if ("".equals(autowireCandidate) || DEFAULT_VALUE.equals(autowireCandidate)) {
        String candidatePattern = this.defaults.getAutowireCandidates();
        if (candidatePattern != null) {
            String[] patterns = StringUtils.commaDelimitedListToStringArray(candidatePattern);
            bd.setAutowireCandidate(PatternMatchUtils.simpleMatch(patterns, beanName));
        }
    }
    else {
        bd.setAutowireCandidate(TRUE_VALUE.equals(autowireCandidate));
    }

    //解析 primary 属性
    if (ele.hasAttribute(PRIMARY_ATTRIBUTE)) {
        bd.setPrimary(TRUE_VALUE.equals(ele.getAttribute(PRIMARY_ATTRIBUTE)));
    }

    //解析 init 属性
    if (ele.hasAttribute(INIT_METHOD_ATTRIBUTE)) {
        String initMethodName = ele.getAttribute(INIT_METHOD_ATTRIBUTE);
        if (!"".equals(initMethodName)) {
            bd.setInitMethodName(initMethodName);
        }
    }
    else {
        if (this.defaults.getInitMethod() != null) {
            bd.setInitMethodName(this.defaults.getInitMethod());
            bd.setEnforceInitMethod(false);
        }
    }

    //解析 destroy-method 属性
    if (ele.hasAttribute(DESTROY_METHOD_ATTRIBUTE)) {
        String destroyMethodName = ele.getAttribute(DESTROY_METHOD_ATTRIBUTE);
        bd.setDestroyMethodName(destroyMethodName);
    }
    else {
        if (this.defaults.getDestroyMethod() != null) {
            bd.setDestroyMethodName(this.defaults.getDestroyMethod());
            bd.setEnforceDestroyMethod(false);
        }
    }

    //解析 factory-method 属性
    if (ele.hasAttribute(FACTORY_METHOD_ATTRIBUTE)) {
        bd.setFactoryMethodName(ele.getAttribute(FACTORY_METHOD_ATTRIBUTE));
    }
     //解析 factory-bean 属性
    if (ele.hasAttribute(FACTORY_BEAN_ATTRIBUTE)) {
        bd.setFactoryBeanName(ele.getAttribute(FACTORY_BEAN_ATTRIBUTE));
    }

    return bd;
}
TODO : 查阅不熟悉的标签
3.解析元素meta
meta标签的使用
<bean id="myTestBean" class="bean.MyTestBean">
    <property name="name" value="Tom"/>
  <meta key = "key" value = "values">
</bean>
meta标签的作用 TODO: 应用场景
这段代码并不会体现在 MyTestBean 的属性当 中,而是一个额外的声明,当需要使用里面的信息的时候可以通过BeanDefinition 的getAttribute(key)方法进行获取。
对 meta 属性的解析代码如下:
public void parseMetaElements(Element ele, BeanMetadataAttributeAccessor attributeAccessor) {
    //获取当前节点的所有子元素
    NodeList nl = ele.getChildNodes();
    for (int i = 0; i < nl.getLength(); i++) {
        Node node = nl.item(i);
        //提取meta
        if (isCandidateElement(node) && nodeNameEquals(node, META_ELEMENT)) {
            Element metaElement = (Element) node;
            String key = metaElement.getAttribute(KEY_ATTRIBUTE);
            String value = metaElement.getAttribute(VALUE_ATTRIBUTE);
            //使用 key、value 构造 BeanMetadataAttribute
            BeanMetadataAttribute attribute = new BeanMetadataAttribute(key, value);
            attribute.setSource(extractSource(metaElement));
            //记录信息
            attributeAccessor.addMetadataAttribute(attribute);
        }
    }
}
4. 解析元素 lookup-method
lookup-method作用
demo
//User类
public class User {
	public void showMe(){
		System.out.println("我是user");
	}
}

//Test类
public abstract class TestLookUp {
 	public abstract UserLookUp getBean();
	public void showMe(){
		this.getBean().showMe();
	}
}
//测试代码
public static void main(String[] args) {
	ApplicationContext applicationContext = new ClassPathXmlApplicationContext("spring-bean-lookup.xml");
	TestLookUp user = (TestLookUp) applicationContext.getBean("testLookUp");
	user.showMe();
}
xml配置文件
<?xml version="1.0" encoding="UTF-8" ?>
<beans
       xmlns="http://www.springframework.org/schema/beans"
       xmlns:xsi="http://www.w3.org/2001/XMLSchema-instance"
       xsi:schemaLocation="http://www.springframework.org/schema/beans
    http://www.springframework.org/schema/beans/spring-beans-3.0.xsd">

	<bean id="userLookUp" class="lantao.UserLookUp"/>

	<bean id="testLookUp" class="lantao.TestLookUp">
		<lookup-method name="getBean" bean="userLookUp"/>
	</bean>

</beans>
程序输出
我是user
测试代码的抽象类没有被实现,但是可以直接调用,这个过程是获取器注入,是一种特殊的方法注入,把一个方法声明为返回某种类型的bean,但实际要返回的bean实在配置文件里配置的。这个方法可用在有些可插拔的功能上,接触程序依赖。
源码
public void parseLookupOverrideSubElements(Element beanEle, MethodOverrides overrides) {
    NodeList nl = beanEle.getChildNodes();
    for (int i = 0; i < nl.getLength(); i++) {
        Node node = nl.item(i);
        //当且仅当spring默认bean的子元索为<lookup-method>有效
        if (isCandidateElement(node) && nodeNameEquals(node, LOOKUP_METHOD_ELEMENT)) {
            Element ele = (Element) node;
            //获取要修饰的方法
            String methodName = ele.getAttribute(NAME_ATTRIBUTE);
            //获取配置返回的bean
            String beanRef = ele.getAttribute(BEAN_ELEMENT);
            LookupOverride override = new LookupOverride(methodName, beanRef);
            override.setSource(extractSource(ele));
            overrides.addOverride(override);
        }
    }
}
这段代码和parseMetaElements很相似,不同点:在数据存储上面通过使用 LookupOverride 类型的实体类来进行数据承载并记录在 AbstractBeanDefinition中的methodOverrides 属性中 。
5. 解析元素 replaced-method
元素用法:可以在运行时用新的方法替换现有的方法 。 与之前的 look-up 不同的是,replaced-method不但可以动态地替换返回实体 bean ,而且还能动态地更改原有方法的逻辑 。
demo
//在changeMe中完成某个业务逻辑
public class TestChangeMethod {
    public void changeMe(){
        System.out.println("changeMe");
    }
}
// 在运行了一段时间后需要改变原有的业务逻辑
public class TestMethodReplacer implements MethodReplacer{
    @Override
    public Object reimplement(Object obj, Method method, Object[] args)throws Throwable{
        System.out.println("我替换了原有的方法");
        return null;
    }
}

//测试
public class test {
    public static void main(String[] args) {
        ClassPathXmlApplicationContext bf = new ClassPathXmlApplicationContext("test/replacemethod/replaceMethodTest.xml");
        TestChangeMethod test = (TestChangeMethod) bf.getBean("testChangeMethod");
        test.changeMe();
    }
}
xml配置文件
<?xml version="1.0" encoding="UTF-8"?>
<beans xmlns="http://www.springframework.org/schema/beans"
       xmlns:xsi="http://www.w3.org/2001/XMLSchema-instance"
       xsi:schemaLocation="http://www.springframework.org/schema/beans http://www.springframework.org/schema/beans/spring-beans.xsd">

    <bean id="testChangeMethod" class="test.Replacemethod.TestChangeMethod">
        <replaced-method name="changeMe" replacer="replacer"/>
    </bean>

    <bean id="replacer" class="test.replacemethod.TestMethodReplacer"/>
</beans>
控制台成功打印出"我替换了原有的方法"。
源码
public void parseReplacedMethodSubElements(Element beanEle, MethodOverrides overrides) {
    NodeList nl = beanEle.getChildNodes();
    for (int i = 0; i < nl.getLength(); i++) {
        Node node = nl.item(i);
        //当且仅当spring默认bean的子元索为<replace-method>有效
        if (isCandidateElement(node) && nodeNameEquals(node, REPLACED_METHOD_ELEMENT)) {
            Element replacedMethodEle = (Element) node;
            //提取要替换的旧方法
            String name = replacedMethodEle.getAttribute(NAME_ATTRIBUTE);
            //提取对应的新方法
            String callback = replacedMethodEle.getAttribute(REPLACER_ATTRIBUTE);
            ReplaceOverride replaceOverride = new ReplaceOverride(name, callback);
            // Look for arg-type match elements.
            List<Element> argTypeEles = DomUtils.getChildElementsByTagName(replacedMethodEle, ARG_TYPE_ELEMENT);
            for (Element argTypeEle : argTypeEles) {
                //记录参数
                String match = argTypeEle.getAttribute(ARG_TYPE_MATCH_ATTRIBUTE);
                match = (StringUtils.hasText(match) ? match : DomUtils.getTextValue(argTypeEle));
                if (StringUtils.hasText(match)) {
                    replaceOverride.addTypeIdentifier(match);
                }
            }
            replaceOverride.setSource(extractSource(replacedMethodEle));
            overrides.addOverride(replaceOverride);
        }
    }
}
无论是 look-up 还是 replaced-method 都是构造了一个MethodOverride,并最
终记录在了AbstractBeanDefinition 中的methodOverrides属性中 。 这个属性的功能在后续介绍。
6. 解析元素 constructor-arg
用法:
下面代码实现的功能:实现的功能就是对HelloBean自动寻找对应的构造函数,并在初始化的时候将设置的参数传入进去.
<beans>
    <!-- 默认的情况下是按照参数的顺序注入,当指定index索引后就可以改变注入参数的顺序 -->
    <bean id="helloBean" class="com.HelloBean">
        <constructor-arg index="0">
            <value>Spring</value>
        </constructor-arg>
        <constructor-arg index="1">
            <value>你好</value>
        </constructor-arg>
    </bean>
</beans>
源码 parseConstructorArgElement
public void parseConstructorArgElements(Element beanEle, BeanDefinition bd) {
    NodeList nl = beanEle.getChildNodes();
    for (int i = 0; i < nl.getLength(); i++) {
        Node node = nl.item(i);
        if (isCandidateElement(node) && nodeNameEquals(node, CONSTRUCTOR_ARG_ELEMENT)) {
            parseConstructorArgElement((Element) node, bd);
        }
    }
}
功能:遍历所有子元素,提取所有constructor-arg ,然后进行解析 ,解析工作在parseConstructorArgElement((Element) node, bd);方法中。
public void parseConstructorArgElement(Element ele, BeanDefinition bd) {
    //提取index属性
    String indexAttr = ele.getAttribute(INDEX_ATTRIBUTE);
    //提取type属性
    String typeAttr = ele.getAttribute(TYPE_ATTRIBUTE);
    //提取name属性
    String nameAttr = ele.getAttribute(NAME_ATTRIBUTE);
    if (StringUtils.hasLength(indexAttr)) {
        try {
            int index = Integer.parseInt(indexAttr);
            if (index < 0) {
                error("'index' cannot be lower than 0", ele);
            }
            else {
                try {
                    this.parseState.push(new ConstructorArgumentEntry(index));
                    //解析ele对应的属性元素   important!!!
                    Object value = parsePropertyValue(ele, bd, null);
                    ConstructorArgumentValues.ValueHolder valueHolder = new ConstructorArgumentValues.ValueHolder(value);
                    if (StringUtils.hasLength(typeAttr)) {
                        valueHolder.setType(typeAttr);
                    }
                    if (StringUtils.hasLength(nameAttr)) {
                        valueHolder.setName(nameAttr);
                    }
                    valueHolder.setSource(extractSource(ele));
                    //不允许指定重复的参数
                    if (bd.getConstructorArgumentValues().hasIndexedArgumentValue(index)) {
                        error("Ambiguous constructor-arg entries for index " + index, ele);
                    }
                    else {
                        //important!!
                        bd.getConstructorArgumentValues().addIndexedArgumentValue(index, valueHolder);
                    }
                }
                finally {
                    this.parseState.pop();
                }
            }
        }
        catch (NumberFormatException ex) {
            error("Attribute 'index' of tag 'constructor-arg' must be an integer", ele);
        }
    }
    else {
        try {
            //没有index属性则自动忽略,自动寻找
            this.parseState.push(new ConstructorArgumentEntry());
            Object value = parsePropertyValue(ele, bd, null);
            ConstructorArgumentValues.ValueHolder valueHolder = new ConstructorArgumentValues.ValueHolder(value);
            if (StringUtils.hasLength(typeAttr)) {
                valueHolder.setType(typeAttr);
            }
            if (StringUtils.hasLength(nameAttr)) {
                valueHolder.setName(nameAttr);
            }
            valueHolder.setSource(extractSource(ele));
            //important!!!

           bd.getConstructorArgumentValues().addGenericArgumentValue(valueHolder);
        }
        finally {
            this.parseState.pop();
        }
    }
}
上述代码的大致流程
- 如果配置中指定了index属性,那么操作步骤如下.
- 解析
constructor-arg的子元素. - 使用
ConstructorArgumentValues.ValueHolder类型来封装解析出来的元素. - 将type name和index属性一并封装在
ConstructorArgumentValues.ValueHolder类型中并添加至当前BeanDefinition的constructorArgumentValues()的indexedArgumentValues属性中.
- 解析
- 如果没有指定
index属性,那么操作步骤如下. TODO 好像有错误- 解析
constructor-arg的子元素. - 使用
ConstructorArgumentValues.ValueHolder类型来封装解析出来的元素. - 将type name和index属性一并封装在
ConstructorArgumentValues.ValueHolder类型中并添加至当前BeanDefinition的constructorArgumentValues()的genericArgumentValues属性中.
- 解析
进入parsePropertyValue方法
/**
 * 获取属性元素的值。可能是一个list等。
 * 也用于构造函数参数,“propertyName”在这种情况下为null。
 */
public Object parsePropertyValue(Element ele, BeanDefinition bd, String propertyName) {
    String elementName = (propertyName != null) ?
            "<property> element for property '" + propertyName + "'" :
            "<constructor-arg> element";

    //一个属性只能对应一种类型: ref, value, list, etc.
    NodeList nl = ele.getChildNodes();
    Element subElement = null;
    for (int i = 0; i < nl.getLength(); i++) {
        Node node = nl.item(i);
        //对应 description 或者 meta 不处理
        if (node instanceof Element && !nodeNameEquals(node, DESCRIPTION_ELEMENT) &&
                !nodeNameEquals(node, META_ELEMENT)) {
            // Child element is what we're looking for.
            if (subElement != null) {
                error(elementName + " must not contain more than one sub-element", ele);
            }
            else {
                subElement = (Element) node;
            }
        }
    }

    // 解析constructor-arg上的ref属性
    boolean hasRefAttribute = ele.hasAttribute(REF_ATTRIBUTE);
     // 解析constructor-arg上的value属性
    boolean hasValueAttribute = ele.hasAttribute(VALUE_ATTRIBUTE);
    if ((hasRefAttribute && hasValueAttribute) ||
            ((hasRefAttribute || hasValueAttribute) && subElement != null)) {
        /**
             * 在constructor-arg上不存在 :
             *      1. 同时既有ref属性又有value属性
             *      2. 存在ref属性或者value属性且又有子元素
             */
        error(elementName +
                " is only allowed to contain either 'ref' attribute OR 'value' attribute OR sub-element", ele);
    }

    if (hasRefAttribute) {
        // ref属性的处理,使用RuntimeBeanReference封装对应的ref名称
        String refName = ele.getAttribute(REF_ATTRIBUTE);
        if (!StringUtils.hasText(refName)) {
            error(elementName + " contains empty 'ref' attribute", ele);
        }
        RuntimeBeanReference ref = new RuntimeBeanReference(refName);
        ref.setSource(extractSource(ele));
        return ref;
    }
    else if (hasValueAttribute) {
         // value属性的处理,使用TypedStringValue封装
        TypedStringValue valueHolder = new TypedStringValue(ele.getAttribute(VALUE_ATTRIBUTE));
        valueHolder.setSource(extractSource(ele));
        return valueHolder;
    }
    else if (subElement != null) {
        // 解析子元素
        return parsePropertySubElement(subElement, bd);
    }
    else {
        // // 既没有ref也没有value子元素则报错
        error(elementName + " must specify a ref or value", ele);
        return null;
    }
}
上述代码的功能
-
略过
description和meta. -
提取
constructor-arg上的ref和value属性,以便于根据规则验证正确性,其规则为在constructor-arg上不存在以下情况. -
同时既有
ref又有value属性. -
存在
ref属性或者value属性且又有子元素. -
ref属性的处理.使用RuntimeBeanReference封装对应的ref名称,如:<constructor-arg ref="a" > -
value属性的处理.使用TypedStringValue封装,例如:<constructor-arg value="a" > -
子元素的处理.例如 :
<constructor-arg>
    <map>
        <entry key="key" value="value" />
   </map>
</constructor-arg>
而对于子元素的处理,例如这里提到的在构造函数中又嵌入了子元素map是怎么实现的呢?parsePropertySubElement中实现了对各种子元素的分离处理.
public Object parsePropertySubElement(Element ele, BeanDefinition bd) {
    return parsePropertySubElement(ele, bd, null);
}

//解析property或constructor-arg元素的value,ref或collection子元素。
public Object parsePropertySubElement(Element ele, BeanDefinition bd, String defaultValueType) {
    if (!isDefaultNamespace(ele)) {
        return parseNestedCustomElement(ele, bd);
    }
    else if (nodeNameEquals(ele, BEAN_ELEMENT)) {
        BeanDefinitionHolder nestedBd = parseBeanDefinitionElement(ele, bd);
        if (nestedBd != null) {
            nestedBd = decorateBeanDefinitionIfRequired(ele, nestedBd, bd);
        }
        return nestedBd;
    }
    else if (nodeNameEquals(ele, REF_ELEMENT)) {
        // A generic reference to any name of any bean.
        String refName = ele.getAttribute(BEAN_REF_ATTRIBUTE);
        boolean toParent = false;
        if (!StringUtils.hasLength(refName)) {
            // A reference to the id of another bean in the same XML file.  解析local
            refName = ele.getAttribute(LOCAL_REF_ATTRIBUTE);
            if (!StringUtils.hasLength(refName)) {
                // A reference to the id of another bean in a parent context.  解析parent
                refName = ele.getAttribute(PARENT_REF_ATTRIBUTE);
                toParent = true;
                if (!StringUtils.hasLength(refName)) {
                    error("'bean', 'local' or 'parent' is required for <ref> element", ele);
                    return null;
                }
            }
        }
        if (!StringUtils.hasText(refName)) {
            error("<ref> element contains empty target attribute", ele);
            return null;
        }
        RuntimeBeanReference ref = new RuntimeBeanReference(refName, toParent);
        ref.setSource(extractSource(ele));
        return ref;
    }
    //解析idref TODO
    else if (nodeNameEquals(ele, IDREF_ELEMENT)) {
        return parseIdRefElement(ele);
    }
    //解析value元素
    else if (nodeNameEquals(ele, VALUE_ELEMENT)) {
        return parseValueElement(ele, defaultValueType);
    }
    //解析null
    else if (nodeNameEquals(ele, NULL_ELEMENT)) {
        // It's a distinguished null value. Let's wrap it in a TypedStringValue
        // object in order to preserve the source location.
        TypedStringValue nullHolder = new TypedStringValue(null);
        nullHolder.setSource(extractSource(ele));
        return nullHolder;
    }
    else if (nodeNameEquals(ele, ARRAY_ELEMENT)) {
        //解析aray子数组
        return parseArrayElement(ele, bd);
    }
    else if (nodeNameEquals(ele, LIST_ELEMENT)) {
        //解析list子数组
        return parseListElement(ele, bd);
    }
    else if (nodeNameEquals(ele, SET_ELEMENT)) {
        //解析set子数组
        return parseSetElement(ele, bd);
    }
    else if (nodeNameEquals(ele, MAP_ELEMENT)) {
        //解析map子数组
        return parseMapElement(ele, bd);
    }
    else if (nodeNameEquals(ele, PROPS_ELEMENT)) {
        //解析props子数组
        return parsePropsElement(ele);
    }
    else {
        error("Unknown property sub-element: [" + ele.getNodeName() + "]", ele);
        return null;
    }
}
7. 解析子元素 property
property使用方法
<bean id="test" class="test.TestClass">
    <property name="testStr" value="aaa" />
</bean>
或者
<bean id="a">
        <property name="p">
            <list>
                <value>aa</value>
                <value>bb</value>
            </list>
        </property>
</bean>
源码
//获取所有property子元素,然后调用parsePropertyElement处理
public void parsePropertyElements(Element beanEle, BeanDefinition bd) {
    NodeList nl = beanEle.getChildNodes();
    for (int i = 0; i < nl.getLength(); i++) {
        Node node = nl.item(i);
        if (isCandidateElement(node) && nodeNameEquals(node, PROPERTY_ELEMENT)) {
            parsePropertyElement((Element) node, bd);
        }
    }
}

public void parsePropertyElement(Element ele, BeanDefinition bd) {
    String propertyName = ele.getAttribute(NAME_ATTRIBUTE);
    if (!StringUtils.hasLength(propertyName)) {
        error("Tag 'property' must have a 'name' attribute", ele);
        return;
    }
    this.parseState.push(new PropertyEntry(propertyName));
    try {
        //不允许多次对同一属性配置
        if (bd.getPropertyValues().contains(propertyName)) {
            error("Multiple 'property' definitions for property '" + propertyName + "'", ele);
            return;
        }
        Object val = parsePropertyValue(ele, bd, propertyName);
        PropertyValue pv = new PropertyValue(propertyName, val);
        parseMetaElements(ele, pv);
        pv.setSource(extractSource(ele));
        bd.getPropertyValues().addPropertyValue(pv);
    }
    finally {
        this.parseState.pop();
    }
}
可以看到上面方法与构造方法注入方式不同的是返回值使用PropertyValue进行封装,并记录在了BeanDefinition中的propertyValues属性中.
8.解析 qualifier TODO
对于qualifier元素的获取,我们接触更多的是注解的形式,在使用Spring框架中进行自动注入时,Spring容器中匹配的候选Bean数目必须有且仅有一个.当找不到一个匹配的Bean时,Spring容器将抛出BeanCreationException异常,并指出必须至少拥有一个匹配的Bean。
Spring允许我们通过Qualifier指定注入Bean的名称,这样歧义就消除了,而对于配置方式使用如下:
<bean id="myTestBean" class="bean.MyTestBean">
     <qualifier type="org.springframework.beans.factory.annotation.Qualifier" value="qf" />
</bean>
AbstractBeanDefinition属性
至此我们便完成了对XML文档到GenericBeanDefinition的转换,也就是说到这里,XML中所有的配置都可以在GenericBeanDefinition的实例类中找到对应的位置.
GenericBeanDefinition只是子类实现,而大部分的通用属性都保存在了AbstractBeanDefinition中,那么我们再次通过AbstractBeanDefinition的属性来回顾一下我们都解析了哪些对应的配置.
public abstract class AbstractBeanDefinition extends BeanMetadataAttributeAccessor
        implements BeanDefinition, Cloneable {

    // 此处省略静态变量以及final常量

    /**
     * bean的作用范围,对应bean属性scope
     */
    @Nullable
    private String scope = SCOPE_DEFAULT;

    /**
     * 是否是抽象,对应bean属性abstract
     */
    private boolean abstractFlag = false;

    /**
     * 是否延时加载,对应bean的属性lazy-init
     */
    private boolean lazyInit = false;

    /**
     * 自动注入模式,对应bean属性autowire
     */
    private int autowireMode = AUTOWIRE_NO;

    /**
     * 依赖检查,Spring 3.0 后弃用这个属性
     */
    private int dependencyCheck = DEPENDENCY_CHECK_NONE;

    /**
     * 用来表示一个bean的实例化依靠另一个bean先实例化,对应bean属性depend-on
     */
    @Nullable
    private String[] dependsOn;

    /**
     * autowire-candidate属性设置为false,这样容器在查找自动装配对象时,将不在考虑该bean,
     * 即它不会被考虑作为其他bean自动装配的候选者,但是该bean本身还是可以使用自动装配来注入其
     * 他bean的.对应bean属性autowire-candidate
     */
    private boolean autowireCandidate = true;

    /**
     * 自动装配时当出现多个bean候选者时,将作为首选者,对应bean属性primary
     */
    private boolean primary = false;

    /**
     * 用于记录Qualifier,对应子元素qualifier
     */
    private final Map<String, AutowireCandidateQualifier> qualifiers = new LinkedHashMap<>();


    @Nullable
    private Supplier<?> instanceSupplier;

    /**
     * 允许访问非公开的构造器和方法,程序设置
     */
    private boolean nonPublicAccessAllowed = true;

    /**
     * 是否以一种宽松的模式解析构造函数,默认为true,
     * 如果为false,则在如下情况
     * interface ITest{ }
     * class ITestImpl implements ITest{ };
     * class Main{
     *    Main(ITest i){ }
     *    Main(ITestImpl i){ }
     * }
     * 抛出异常,因为Spring无法准确定位哪个构造函数
     * 程序设置
     */
    private boolean lenientConstructorResolution = true;

    /**
     * 对应bean属性factory-bean
     */
    @Nullable
    private String factoryBeanName;

    /**
     * 对应bean属性factory-method
     */
    @Nullable
    private String factoryMethodName;

    /**
     * 记录构造函数注入属性,对应bean属性constructor-arg
     */
    @Nullable
    private ConstructorArgumentValues constructorArgumentValues;

    /**
     * 普通属性集合
     */
    @Nullable
    private MutablePropertyValues propertyValues;

    /**
     * 方法重写的持有者,记录lookup-method, replaced-method元素
     */
    @Nullable
    private MethodOverrides methodOverrides;

    /**
     * 初始化方法,对应bean属性init-method
     */
    @Nullable
    private String initMethodName;

    /**
     * 销毁方法,对应bean属性destory-method
     */
    @Nullable
    private String destroyMethodName;

    /**
     * 是否执行init-method,程序设置
     */
    private boolean enforceInitMethod = true;

    /**
     * 是否执行destory-method,程序设置
     */
    private boolean enforceDestroyMethod = true;

    /**
     * 是否是用户定义的而不是应用程序本身定义的,创建AOP时候为true,程序设置
     */
    private boolean synthetic = false;

    /**
     * 定义这个bean的应用
     * APPLICATION      :   用户
     * INFRASTRUCTURE   :   完全内部使用,与用户无关
     * SUPPORT          :   某些复杂配置的一部分
     * 程序设置
     */
    private int role = BeanDefinition.ROLE_APPLICATION;

    /**
     * bean的描述信息
     */
    @Nullable
    private String description;

    /**
     * 这个bean定义的资源
     */
    @Nullable
    private Resource resource;

    // 此处省略get/set方法

}
解析默认标签中的自定义标签元素
到了这里我们已经完成了分析默认标签的解析与提取过程(parseBeanDefinitionElement),加下来进入下一步
protected void processBeanDefinition(Element ele, BeanDefinitionParserDelegate delegate) {
        BeanDefinitionHolder bdHolder = delegate.parseBeanDefinitionElement(ele);
        if (bdHolder != null) {
            bdHolder = delegate.decorateBeanDefinitionIfRequired(ele, bdHolder);
            try {
                // Register the final decorated instance.
                BeanDefinitionReaderUtils.registerBeanDefinition(bdHolder, getReaderContext().getRegistry());
            }
            catch (BeanDefinitionStoreException ex) {
                getReaderContext().error("Failed to register bean definition with name '" +
                        bdHolder.getBeanName() + "'", ele, ex);
            }
            // Send registration event.
            getReaderContext().fireComponentRegistered(new BeanComponentDefinition(bdHolder));
        }
    }
进入方法decorateBeanDefinitionIfRequired(ele, bdHolder);,这句代码的适用场景:pring中的bean使用的是默认的标签配置,但是其中的子元素却使用了自定义的配置。
<bean id="test" class="test.MyClass">
        <myBean:user userName="aaa"/>
</bean>
疑问:bean的解析分为两种类型,一种是默认类型的解析,另一种是自定义类型的解析,这不正是自定义类型的解析吗?为什么会在默认类型解析中单独添加一个方法来处理呢?
这个自定义类型并不是以
Bean的形式出现的.之前讲过的两种类型的不同处理只是针对Bean的这里我们看到,这里我们看到,这个自定义类型其实是属性
进入代码
//第三个参数作用:父类bean,当对某个嵌套配置进行分析时,这里需要传递父类beanDefinition.分析源码得知这里传递的参数其实是为了使用父类的scope属性,以备子类若没有设置scope时默认使用父类的属性,这里分析的是顶层配置,所以传递null.
public BeanDefinitionHolder decorateBeanDefinitionIfRequired(Element ele, BeanDefinitionHolder definitionHolder) {
    return decorateBeanDefinitionIfRequired(ele, definitionHolder, null);
}

public BeanDefinitionHolder decorateBeanDefinitionIfRequired(
        Element ele, BeanDefinitionHolder definitionHolder, BeanDefinition containingBd) {

    BeanDefinitionHolder finalDefinition = definitionHolder;

    // Decorate based on custom attributes first.
    NamedNodeMap attributes = ele.getAttributes();
    for (int i = 0; i < attributes.getLength(); i++) {
        Node node = attributes.item(i);
        finalDefinition = decorateIfRequired(node, finalDefinition, containingBd);
    }

    // Decorate based on custom nested elements.
    NodeList children = ele.getChildNodes();
    for (int i = 0; i < children.getLength(); i++) {
        Node node = children.item(i);
        if (node.getNodeType() == Node.ELEMENT_NODE) {
            finalDefinition = decorateIfRequired(node, finalDefinition, containingBd);
        }
    }
    return finalDefinition;
}


 6294
6294

 被折叠的 条评论
为什么被折叠?
被折叠的 条评论
为什么被折叠?
 到【灌水乐园】发言


