


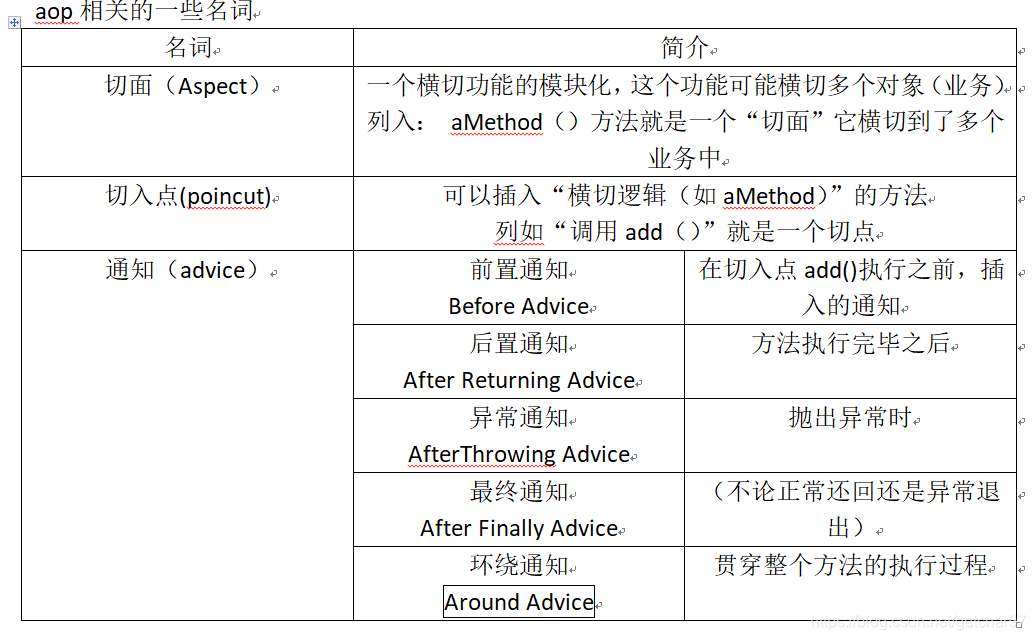
AOP:面向方面编程
一个普通的类 -> 有特定功能的类
a.继承类 b.实现接口 c.注解 d.配置
jar:
spring 的基础jar
另需要
spring-aop.jar
aopaliance.jar
aspectjweaver.jar
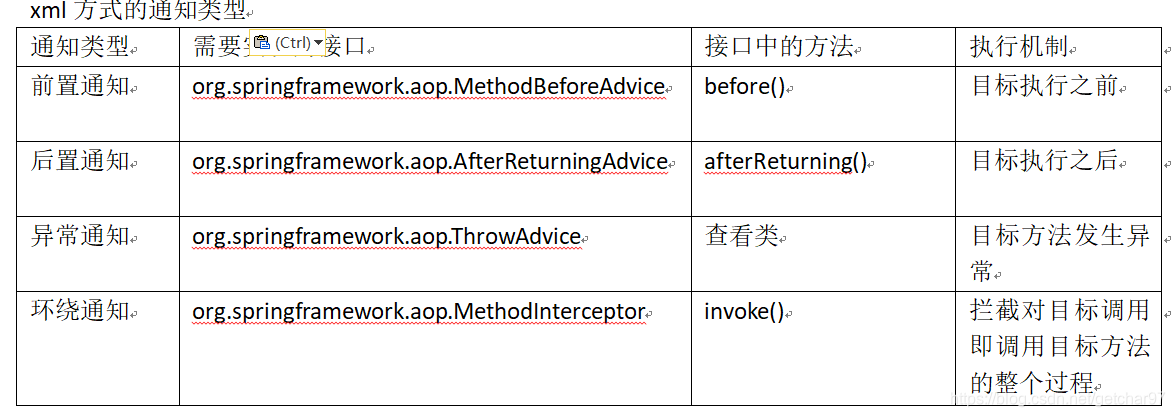
方式一:实现接口
前置通知: 实现  org.springframework.aop.MethodBeforeAdvice  接口
后置通知:实现 org.springframework.aop.AfterReturningAdvice 接口
异常通知:实现 org.springframework.aop.ThrowsAdvice 接口
参数 :
①都有的参数
	Method method, Object[] args, Object target
	method :反射包中 ,代表具体的执行方法
	args:方法参数列表
	target:目标对象
②不同的参数
	在后置通知中: 第一个参数 为 Object returnValue 方法的 返回值
	在异常通知中:最后一个参数为 需要进行捕获的  《异常类型》
			可以实现的方法通过源码可以发现:
				public void afterThrowing(Method, args, target, ThrowableSubclass)
				public void afterThrowing( ThrowableSubclass)
			两个方法任选其一
环绕通知 : 实现 org.aopalliance.intercept.MethodInterceptor 接口
参数:org.aopalliance.intercept.MethodInvocation  invocation
环绕通知可实现前面三者  在invocation.proceed()
	之前  可以作为前置通知
	之后 可以作为后置通知
	在catch中 为异常通知
	在finally 中  为最终通知
案列: 环绕通知
实现接口
package org.aop;

import org.aopalliance.intercept.MethodInterceptor;
import org.aopalliance.intercept.MethodInvocation;
public class LogAround  implements MethodInterceptor{
	@Override
	public Object invoke(MethodInvocation invocation) throws Throwable {
		Object result  = null ;
		//方法体1...
		try {
			//方法体2...
			System.out.println("用环绕通知实现的[前置通知]...");
			// invocation.proceed() 之前的代码:前置通知
			 result  = invocation.proceed() ;//控制着目标方法的执行  ,addStudent()
			//result 就是目标方法addStudent()方法的返回值
//			 invocation.proceed() 之后的代码:后置通知
			System.out.println("用环绕通知实现的[后置通知]...:");
			System.out.println("目标对象target"+invocation.getThis()+
			",调用的方法名:"+invocation.getMethod().getName()+
			",方法的参数个数:"+invocation.getArguments().length+",返回值:"+result);
		}catch(Exception e) {
			//方法体3...
			//异常通知
			System.out.println("用环绕通知实现的[异常通知]...");
		}
		return result;//目标方法的返回值
	}

}
在applicationContext.xml中配置
<!-- 将准备转为 通知的类 纳入ioc容器 -->
<bean id="logAround " class="org.aop.LogAround "></bean>
<aop:config>
<!-- 切入点(连接线的一端:业务类的具体方法) -->
<aop:pointcut id="around"
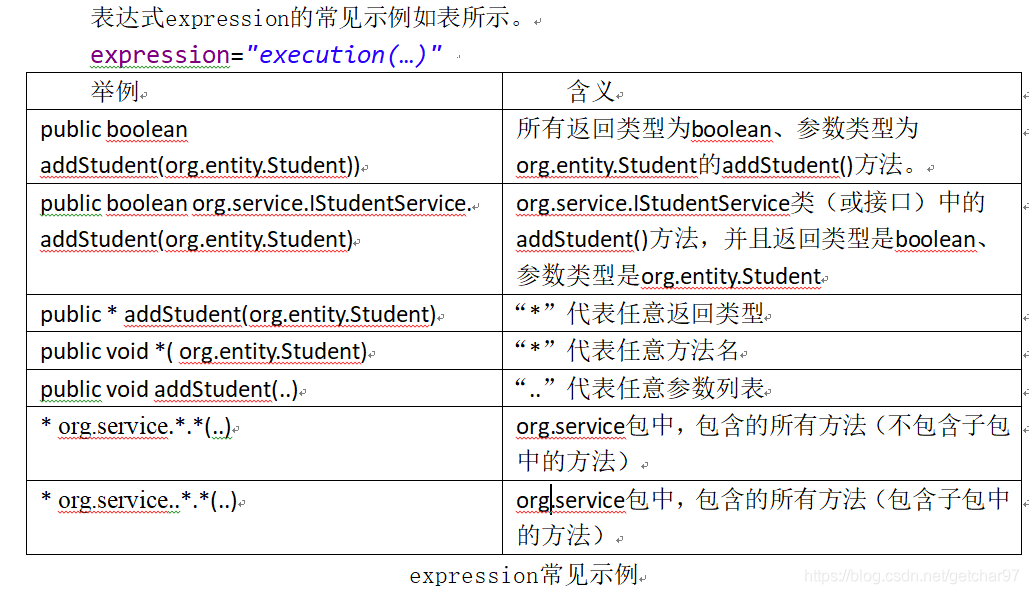
expression="execution(public * org.service.impl.StudentServiceImpl.addStudent(..))" />
<!-- (连接线的另一端:通知 类)-->
<aop:advisor advice-ref="logAround " pointcut-ref="around" />
</aop:aspect>
</aop:config>
方式二:基于注解
配置 <aop:aspectj-autoproxy></aop:aspectj-autoproxy> 开启对注解的支持
相关注解
①@Aspect 作用于类
@Aspect 声明该类是一个通知
public class LogforAnnotation(){}
@Aspect 不需要加入扫描器 只需要开启即可 aop:aspectj-autoproxy
②通知的方法注解
前置通知:	@Before("execution()")  // 切入点
后置通知:	@AfterReturning( pointcut= "execution( )" ,returning="returningValue" )
环绕通知:	@Around("execution( )")
异常通知:	@AfterThrowing(pointcut= "execution ( )",throwing="e")
最终通知:	@After("execution( )"
注解形式的返回值:
声明 返回值 的参数名
 @AfterReturning(pointcut="excution(public *addStudent(..))",returning = "returnValue"
	public void myAfter(JoinPoing jp, Object returnValue){
		System.out.println("《注解形式-后置通知》:目标对象:"+jp.getTarget()+
		",方法名:"+jp.getSignature().getName() +",参数列表:"+
		 jp.getArgs().length+",返回值:"+returningValue );
	}
环绕通知的参数类型为:ProceedingJoinPoint
注解形式实现 通知的参数不能多 也不能少
实现接口 、注解形式 只能捕获声明的特定类型的异常 而其他异常 不捕获
方式三:基于Scheme配置
>>>>不实现接口 不使用注解 : 通过配置 将类 变成通知
Schema方式实现:
a、编写一个普通的类 public class LogAfter{}
b、将该类 通过配置 转为一个通知
案例
通知方法
package org.aop;

public class LogSchema {
//后置通知方法  :JoinPoint适用于注解
	public void afterReturning(JoinPoint jp,Object returnValue) throws Throwable {
		System.out.println("》》》》》》》》》》》后置通知:目标对象:"+jp.getThis()+",调用的方法名:"+jp.getSignature().getName()+",方法的参数个数:"+jp.getArgs().length+",方法的返回值:"+returnValue);
	}
}
xml配置
<!-- 将准备转为 通知的类 纳入ioc容器 -->
	<bean id="logSchema" class="org.aop.LogSchema"></bean>
	<aop:config>
		<!-- 切入点(连接线的一端:业务类的具体方法) -->
		<aop:pointcut expression="execution(public * org.service.impl.StudentServiceImpl.addStudent(..))"   id="pcShema"/>
		 <!-- schema方式 -->
		 <aop:aspect ref="logSchema">
		  	<!-- 连接线:连接 业务 addStudent  和  通知before -->
		 	<aop:before method="before" pointcut-ref="pcShema"/>
		 	<!-- 连接线:连接 业务 addStudent  和  通知afterReturning -->
		 	<aop:after-returning method="afterReturning" returning="returnValue" pointcut-ref="pcShema"/>
		 	<aop:after-throwing method="whenException" pointcut-ref="pcShema" throwing="e"/>
		 	<!-- 环绕 -->
		 	<aop:around method="around" pointcut-ref="pcShema" />
		 </aop:aspect>
	</aop:config>
可以配置多个通知
总结
如果 要获取目标对象 信息
注解、Schema: JoinPoint
接口 :Method method,Object[] args, Object target
schema 形式 和 注解形式相似 不同之处 注解形式 使用了 注册 @After
schema形式进行 了多余的配置


 被折叠的 条评论
为什么被折叠?
被折叠的 条评论
为什么被折叠?
 到【灌水乐园】发言


