


 本文详细介绍了如何使用RibbitMQ进行服务间的异步通信,从同步通讯与异步通讯的概念出发,重点探讨了RibbitMQ的快速入门及springAMQP中的五种消息队列模型:Basic Queue、Work Queue、Fanout、Direct和Topic。通过实例展示了每种模型的工作原理和应用场景,如广播模型、定向模型和通配符模型,并提供了具体的代码实现。
初识MQ
1.同步通讯和异步通讯

1.1 微服务间基于Feign的调用属于同步方法
RibbitMQ快速入门
1首先我们先安装RibbitMQ,安装教程这里就不演示了
2.做一个简单入门案例:
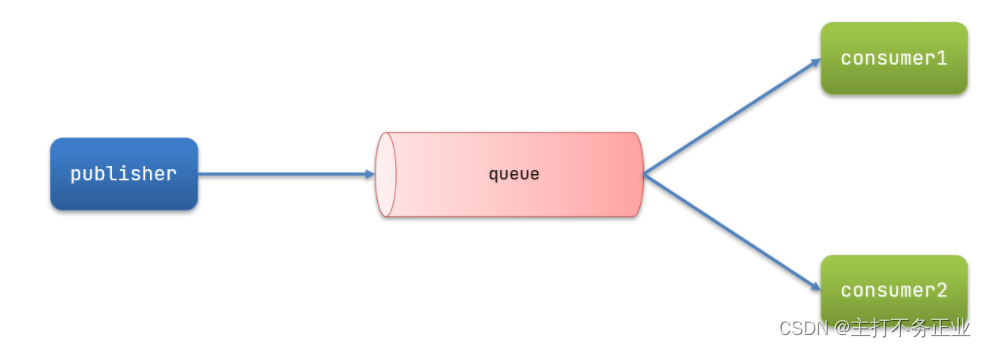
简单队列模式:

publisher:消息发布者;
queue:消息队列,负责接收并缓存消息;
consumer: 订阅队列(消息接受者):负责处理队列中的消息
简单消息队列代码实现:
发送消息到消息队列
public class PublisherTest {
    @Test
    public void testSendMessage() throws IOException, TimeoutException {
        // 1.建立连接
        ConnectionFactory factory = new ConnectionFactory();
        // 1.1.设置连接参数,分别是:主机名、端口号、vhost、用户名、密码
        factory.setHost("192.168.29.129");
        factory.setPort(5672);
        factory.setVirtualHost("/");
        factory.setUsername("itcast");
        factory.setPassword("123321");
        // 1.2.建立连接
        Connection connection = factory.newConnection();

        // 2.创建通道Channel
        Channel channel = connection.createChannel();

        // 3.创建队列
        String queueName = "simple.queue";
        channel.queueDeclare(queueName, false, false, false, null);

        // 4.发送消息
        String message = "hello, mq!";
        channel.basicPublish("", queueName, null, message.getBytes());
        System.out.println("发送消息成功:【" + message + "】");

        // 5.关闭通道和连接
        channel.close();
        connection.close();

    }
从消息队列中订阅消息,处理消息:
public class ConsumerTest {

    public static void main(String[] args) throws IOException, TimeoutException {
        // 1.建立连接
        ConnectionFactory factory = new ConnectionFactory();
        // 1.1.设置连接参数,分别是:主机名、端口号、vhost、用户名、密码
        factory.setHost("192.168.29.129");
        factory.setPort(5672);
        factory.setVirtualHost("/");
        factory.setUsername("itcast");
        factory.setPassword("123321");
        // 1.2.建立连接
        Connection connection = factory.newConnection();

        // 2.创建通道Channel
        Channel channel = connection.createChannel();

        // 3.创建队列
        String queueName = "simple.queue";
        channel.queueDeclare(queueName, false, false, false, null);

        // 4.订阅消息
        channel.basicConsume(queueName, true, new DefaultConsumer(channel){
            @Override
            public void handleDelivery(String consumerTag, Envelope envelope,
                                       AMQP.BasicProperties properties, byte[] body) throws IOException {
                // 5.处理消息
                String message = new String(body);
                System.out.println("接收到消息:【" + message + "】");
            }
        });
        System.out.println("等待接收消息。。。。");
    }
}
springAMQP
springAMQP中的五种消息队列模型:
1.Basic Queue简单队列模型
第一步:首先我们需要给父工程中导入依赖
<!--AMQP依赖,包含RabbitMQ-->
<dependency>
    <groupId>org.springframework.boot</groupId>
    <artifactId>spring-boot-starter-amqp</artifactId>
</dependency>
第二步:给publisher(消息发送者)配置MQ的相关配置
spring:
  rabbitmq:
    host: 192.168.150.101 # 主机名
    port: 5672 # 端口
    virtual-host: / # 虚拟主机
    username: itcast # 用户名
    password: 123321 # 密码
第三步:在publisher中编写测试类SpringAmqpTest,并利用RabbitTemplate实现消息发送:
@SpringBootTest
@RunWith(SpringRunner.class)
public class SpringAmqpTest {
    @Autowired
    private RabbitTemplate rabbitTemplate;
    @Test
    public void testSimpleQueue(){
        //发送消息
        rabbitTemplate.convertAndSend("simple,queue","hello simple");
    }

}
第四步:消息接收,给consumerMQ相关配置,同上
第五步:然后在consumer新建一个监听器类SpringRabbitListener,代码如下:
@Component
public class SpringRabbitListener {
    @RabbitListener(queues = "simple.queue")
    public void listenSimpleQueueMessage(String msg){
        System.out.println("spring消费者接收到的消息:{"+msg+"}");
    }
}
测试:启动consumer类,接着启动消息发送类,看见打印消息,证明成功
2.Work Queue工作队列模型
可以让多个消费者绑定一个队列,如图:
问题:
消费者如何从消息队列这获取消息的;下面从循环发送消息,测试多消息共同处理的场景
第一步:在publisher服务中的SpringAmqpTest类中添加一个测试方法:
/**
     * WorkQueue队列模型 发送50条消息
     * @throws InterruptedException
     */
    @Test
    public void testWorkQueue() throws InterruptedException {
        //循环发送50条消息
        for (int i = 0; i < 50; i++) {
            //发送消息
            rabbitTemplate.convertAndSend("simple.queue","hello,work");
            //设置发送时间 在一秒钟以内发送完
            Thread.sleep(20L);
        }

    }
第二步:要模拟多个消费者绑定同一个队列,我们在consumer服务的SpringRabbitListener中添加2个新的方法:
 @RabbitListener(queues = "simple.queue")
    public void listenWorkQueue1(String msg) throws InterruptedException {
        System.out.println("spring消费者1接收到的消息:{"+msg+"}");
        //设置时间 一秒钟以内接收完成
        Thread.sleep(20L);
    }
    @RabbitListener(queues = "simple.queue")
    public void listenWorkQueue2(String msg) throws InterruptedException {
        System.err.println("spring消费者2接收到的消息:{"+msg+"}");
        //设置时间 一秒钟以外接收完成
        Thread.sleep(200L);
    }
理论上来说:两个消费者接收消息,应该在1秒钟以为接收完成,但是测试效果如下:
spring消费者1接收到的消息:{hello,work02023-06-10T18:11:06.342}
spring消费者2接收到的消息:{hello,work12023-06-10T18:11:06.358}
spring消费者1接收到的消息:{hello,work22023-06-10T18:11:06.388}
spring消费者1接收到的消息:{hello,work42023-06-10T18:11:06.452}
spring消费者1接收到的消息:{hello,work62023-06-10T18:11:06.514}
spring消费者2接收到的消息:{hello,work32023-06-10T18:11:06.558}
spring消费者1接收到的消息:{hello,work82023-06-10T18:11:06.574}
spring消费者1接收到的消息:{hello,work102023-06-10T18:11:06.636}
spring消费者1接收到的消息:{hello,work122023-06-10T18:11:06.698}
spring消费者1接收到的消息:{hello,work142023-06-10T18:11:06.760}
spring消费者2接收到的消息:{hello,work52023-06-10T18:11:06.773}
spring消费者1接收到的消息:{hello,work162023-06-10T18:11:06.820}
spring消费者1接收到的消息:{hello,work182023-06-10T18:11:06.881}
spring消费者1接收到的消息:{hello,work202023-06-10T18:11:06.943}
spring消费者2接收到的消息:{hello,work72023-06-10T18:11:06.988}
spring消费者1接收到的消息:{hello,work222023-06-10T18:11:07.005}
spring消费者1接收到的消息:{hello,work242023-06-10T18:11:07.067}
spring消费者1接收到的消息:{hello,work262023-06-10T18:11:07.128}
spring消费者2接收到的消息:{hello,work92023-06-10T18:11:07.189}
spring消费者1接收到的消息:{hello,work282023-06-10T18:11:07.191}
spring消费者1接收到的消息:{hello,work302023-06-10T18:11:07.252}
spring消费者1接收到的消息:{hello,work322023-06-10T18:11:07.314}
spring消费者1接收到的消息:{hello,work342023-06-10T18:11:07.376}
spring消费者2接收到的消息:{hello,work112023-06-10T18:11:07.391}
spring消费者1接收到的消息:{hello,work362023-06-10T18:11:07.438}
spring消费者1接收到的消息:{hello,work382023-06-10T18:11:07.501}
spring消费者1接收到的消息:{hello,work402023-06-10T18:11:07.562}
spring消费者2接收到的消息:{hello,work132023-06-10T18:11:07.592}
spring消费者1接收到的消息:{hello,work422023-06-10T18:11:07.624}
spring消费者1接收到的消息:{hello,work442023-06-10T18:11:07.687}
spring消费者1接收到的消息:{hello,work462023-06-10T18:11:07.750}
spring消费者2接收到的消息:{hello,work152023-06-10T18:11:07.795}
spring消费者1接收到的消息:{hello,work482023-06-10T18:11:07.811}
spring消费者2接收到的消息:{hello,work172023-06-10T18:11:07.995}
spring消费者2接收到的消息:{hello,work192023-06-10T18:11:08.195}
spring消费者2接收到的消息:{hello,work212023-06-10T18:11:08.397}
spring消费者2接收到的消息:{hello,work232023-06-10T18:11:08.600}
spring消费者2接收到的消息:{hello,work252023-06-10T18:11:08.801}
spring消费者2接收到的消息:{hello,work272023-06-10T18:11:09.002}
spring消费者2接收到的消息:{hello,work292023-06-10T18:11:09.205}
spring消费者2接收到的消息:{hello,work312023-06-10T18:11:09.407}
spring消费者2接收到的消息:{hello,work332023-06-10T18:11:09.607}
spring消费者2接收到的消息:{hello,work352023-06-10T18:11:09.808}
spring消费者2接收到的消息:{hello,work372023-06-10T18:11:10.010}
spring消费者2接收到的消息:{hello,work392023-06-10T18:11:10.211}
spring消费者2接收到的消息:{hello,work412023-06-10T18:11:10.412}
spring消费者2接收到的消息:{hello,work432023-06-10T18:11:10.614}
spring消费者2接收到的消息:{hello,work452023-06-10T18:11:10.815}
spring消费者2接收到的消息:{hello,work472023-06-10T18:11:11.016}
spring消费者2接收到的消息:{hello,work492023-06-10T18:11:11.219}
很明显消息接收时间大于1秒,而且通过观察可以发现,消费者1只接收偶数,消费者二只接受奇数,也就是说消息是平均分配给每个消费者,并没有考虑到消费者的处理能力。这样显然是有问题的。
如何解决呢?
我们只需要在配置之中加入这样一行配置,通过改变它的预取数量,来改变每个消费者接收信息的数量,也就是能者多劳。表示一次只接受一条信息
spring:
  rabbitmq:
    listener:
      simple:
        prefetch: 1 # 每次只能获取一条消息,处理完成才能获取下一个消息
再次重启服务进行测试:
spring消费者1接收到的消息:{hello,work02023-06-10T18:50:06.351}
spring消费者2接收到的消息:{hello,work12023-06-10T18:50:06.376}
spring消费者1接收到的消息:{hello,work22023-06-10T18:50:06.407}
spring消费者1接收到的消息:{hello,work32023-06-10T18:50:06.438}
spring消费者1接收到的消息:{hello,work42023-06-10T18:50:06.469}
spring消费者1接收到的消息:{hello,work52023-06-10T18:50:06.500}
spring消费者1接收到的消息:{hello,work62023-06-10T18:50:06.532}
spring消费者1接收到的消息:{hello,work72023-06-10T18:50:06.564}
spring消费者1接收到的消息:{hello,work82023-06-10T18:50:06.595}
spring消费者2接收到的消息:{hello,work92023-06-10T18:50:06.625}
spring消费者1接收到的消息:{hello,work102023-06-10T18:50:06.657}
spring消费者1接收到的消息:{hello,work112023-06-10T18:50:06.687}
spring消费者1接收到的消息:{hello,work122023-06-10T18:50:06.720}
spring消费者1接收到的消息:{hello,work132023-06-10T18:50:06.750}
spring消费者1接收到的消息:{hello,work142023-06-10T18:50:06.782}
spring消费者1接收到的消息:{hello,work152023-06-10T18:50:06.812}
spring消费者2接收到的消息:{hello,work162023-06-10T18:50:06.844}
spring消费者1接收到的消息:{hello,work172023-06-10T18:50:06.874}
spring消费者1接收到的消息:{hello,work182023-06-10T18:50:06.904}
spring消费者1接收到的消息:{hello,work192023-06-10T18:50:06.935}
spring消费者1接收到的消息:{hello,work202023-06-10T18:50:06.966}
spring消费者1接收到的消息:{hello,work212023-06-10T18:50:06.998}
spring消费者1接收到的消息:{hello,work222023-06-10T18:50:07.029}
spring消费者1接收到的消息:{hello,work232023-06-10T18:50:07.060}
spring消费者2接收到的消息:{hello,work242023-06-10T18:50:07.091}
spring消费者1接收到的消息:{hello,work252023-06-10T18:50:07.122}
spring消费者1接收到的消息:{hello,work262023-06-10T18:50:07.154}
spring消费者1接收到的消息:{hello,work272023-06-10T18:50:07.184}
spring消费者1接收到的消息:{hello,work282023-06-10T18:50:07.215}
spring消费者1接收到的消息:{hello,work292023-06-10T18:50:07.246}
spring消费者1接收到的消息:{hello,work302023-06-10T18:50:07.277}
spring消费者1接收到的消息:{hello,work312023-06-10T18:50:07.308}
spring消费者2接收到的消息:{hello,work322023-06-10T18:50:07.339}
spring消费者1接收到的消息:{hello,work332023-06-10T18:50:07.369}
spring消费者1接收到的消息:{hello,work342023-06-10T18:50:07.401}
spring消费者1接收到的消息:{hello,work352023-06-10T18:50:07.433}
spring消费者1接收到的消息:{hello,work362023-06-10T18:50:07.464}
spring消费者1接收到的消息:{hello,work372023-06-10T18:50:07.494}
spring消费者1接收到的消息:{hello,work382023-06-10T18:50:07.526}
spring消费者1接收到的消息:{hello,work392023-06-10T18:50:07.557}
spring消费者2接收到的消息:{hello,work402023-06-10T18:50:07.588}
spring消费者1接收到的消息:{hello,work412023-06-10T18:50:07.619}
spring消费者1接收到的消息:{hello,work422023-06-10T18:50:07.650}
spring消费者1接收到的消息:{hello,work432023-06-10T18:50:07.680}
spring消费者1接收到的消息:{hello,work442023-06-10T18:50:07.711}
spring消费者1接收到的消息:{hello,work452023-06-10T18:50:07.743}
spring消费者1接收到的消息:{hello,work462023-06-10T18:50:07.774}
spring消费者1接收到的消息:{hello,work472023-06-10T18:50:07.809}
spring消费者2接收到的消息:{hello,work482023-06-10T18:50:07.836}
spring消费者1接收到的消息:{hello,work492023-06-10T18:50:07.867}
输出结果正常。
总结
Work模型的使用:
-
多个消费者绑定到一个队列,同一条消息只会被一个消费者处理
-
通过设置prefetch来控制消费者预取的消息数量
3.发布订阅模型:
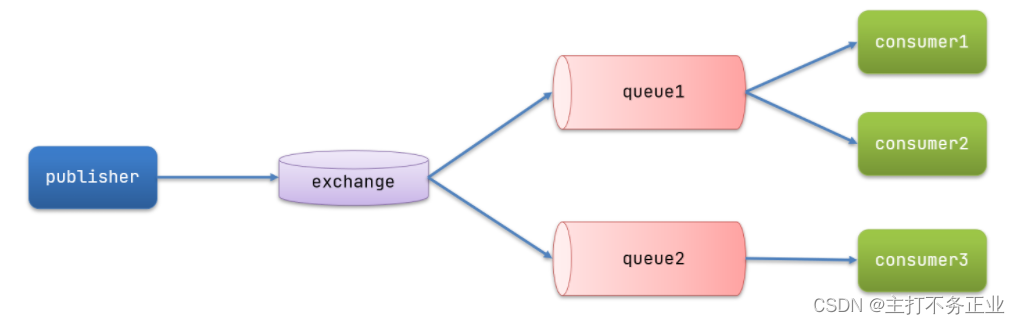
可以看到,在订阅模型中,多了一个exchange角色,而且过程略有变化:
-
Publisher:生产者,也就是要发送消息的程序,但是不再发送到队列中,而是发给X(交换机)
-
Exchange:交换机,图中的X。一方面,接收生产者发送的消息。另一方面,知道如何处理消息,例如递交给某个特别队列、递交给所有队列、或是将消息丢弃。到底如何操作,取决于Exchange的类型。Exchange有以下3种类型:
-
Fanout:广播,将消息交给所有绑定到交换机的队列
-
Direct:定向,把消息交给符合指定routing key 的队列
-
Topic:通配符,把消息交给符合routing pattern(路由模式) 的队列
-
-
Consumer:消费者,与以前一样,订阅队列,没有变化
-
Queue:消息队列也与以前一样,接收消息、缓存消息。
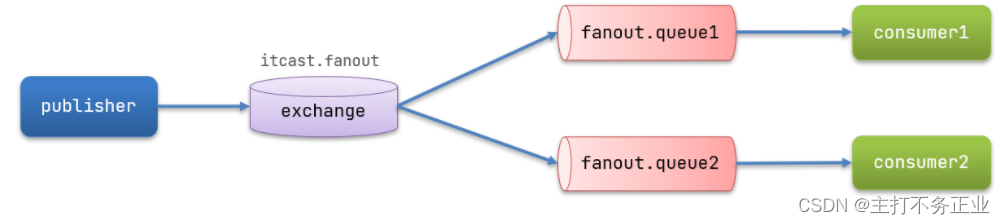
3.1Fanout广播模型
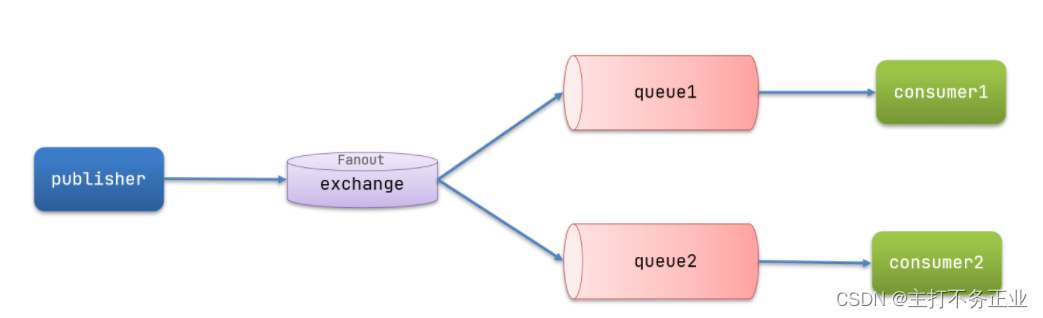
在广播模式下,消息发送的流程应该是:
- 可以有多个队列
- 每个队列都要绑定在exchange(交换机)上
- 生产者发送的消息只能发送到交换机上,由交换机决定发送个哪个队列
- 交换机把消息发送给绑定的所有队列
- 订阅队列的消费者都能拿到消息
我们的计划是这样的:
-
创建一个交换机 itcast.fanout,类型是Fanout
-
创建两个队列fanout.queue1和fanout.queue2,绑定到交换机itcast.fanout
Spring提供了一个接口Exchange,来表示所有不同类型的交换机:
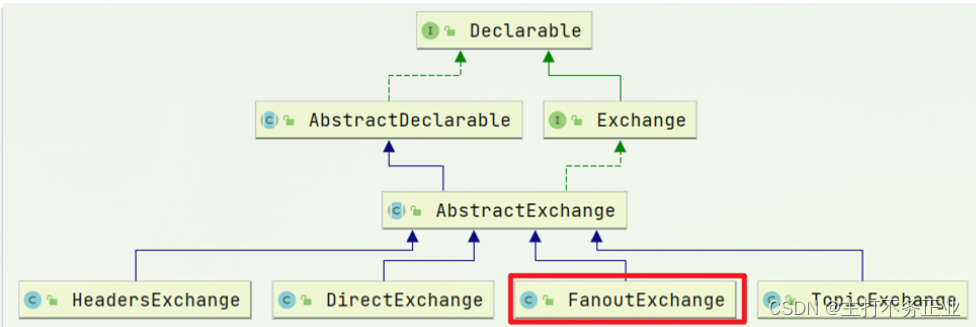
开始写代码:
1.在消费者模块创建一个config类,用来声明队列和交换机,代码如下:
@Configuration
public class FanoutConfig {
    /**
     * 声明交换机
     * @return
     */
    @Bean
    public FanoutExchange fanoutExchange(){
        return new FanoutExchange("itcast.fanout");
    }
    /**
     * 声明队列
     */
    @Bean
    public Queue fanoutQueue1(){
        return new Queue("fanout.queue1");
    }
    @Bean
    public Queue fanoutQueue2(){
        return new Queue("fanout.queue2");
    }
    /**
     * 绑定交换机和队列
     */
    @Bean
    public Binding bindingQueue1(FanoutExchange fanoutExchange,Queue fanoutQueue1){
        return BindingBuilder.bind(fanoutQueue1).to(fanoutExchange);
    }
    @Bean
    public Binding bindingQueue2(FanoutExchange fanoutExchange,Queue fanoutQueue2){
        return BindingBuilder.bind(fanoutQueue2).to(fanoutExchange);
    }
}
很显然,这种绑定方式都是基于代码绑定,比较繁琐,接下来有更简单的方式
2.紧接着,我们需要在生产者模块当中发送消息,代码如下:
@Test
    public void testFanoutExchange(){
        //发送消息
        rabbitTemplate.convertAndSend("itcast.fanout","","hello,Fanout");
    }
3.最后,我们要在消费者模块,监听器模块添加代码,来监听发送的消息.代码如下:
 /**
     * fanout模型
     */
    @RabbitListener(queues = "fanout.queue1")
    public void listenFanoutQueue1(String msg){
        System.out.println("spring消费者1接收到Fanout的消息:{" +msg+ "}");
    }
    @RabbitListener(queues = "fanout.queue2")
    public void listenFanoutQueue2(String msg){
        System.out.println("spring消费者2接收到Fanout的消息:{" +msg+ "}");
    }
测试,运行结果如下
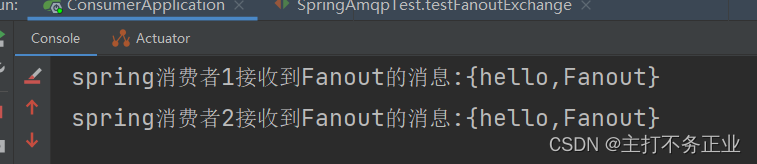
经过测试,消费者在队列中都取到了消息
总结
交换机的作用是什么?
- 接收publisher发送的消息
- 将消息按照规则路由到与之绑定的队列
- 不能缓存消息,路由失败,消息丢失
- FanoutExchange的会将消息路由到每个绑定的队列
声明队列、交换机、绑定关系的Bean是什么?
1.Queue
2.FanoutExchange
3.Binding
3.2Direct模型
在Fanout模式中,一条消息,会被所有订阅的队列都消费。但是,在某些场景下,我们希望不同的消息被不同的队列消费。这时就要用到Direct类型的Exchange。
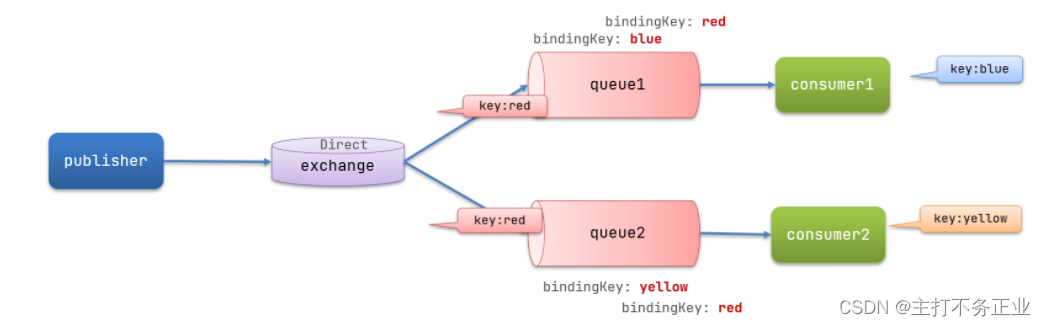
在Direct模型下:
- 队列与交换机的绑定,不能是任意绑定了,而是要指定一个
RoutingKey(路由key) - 消息的发送方在 向 Exchange发送消息时,也必须指定消息的
RoutingKey。 - Exchange不再把消息交给每一个绑定的队列,而是根据消息的
Routing Key进行判断,只有队列的Routingkey与消息的Routing key完全一致,才会接收到消息
案例需求:
-
利用@RabbitListener声明Exchange、Queue、RoutingKey
-
在consumer服务中,编写两个消费者方法,分别监听direct.queue1和direct.queue2
-
在publisher中编写测试方法,向itcast. direct发送消息
上面3.1中我们提到了,交换机与队列绑定代码过于繁琐,接下来,运用注解@RabbitListener来实现;
废话不做说直接上代码;
直接在消费者的监听器类中书写代码(接收消息):


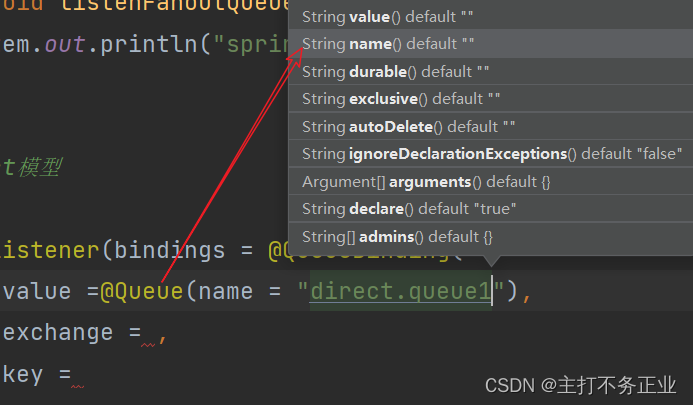
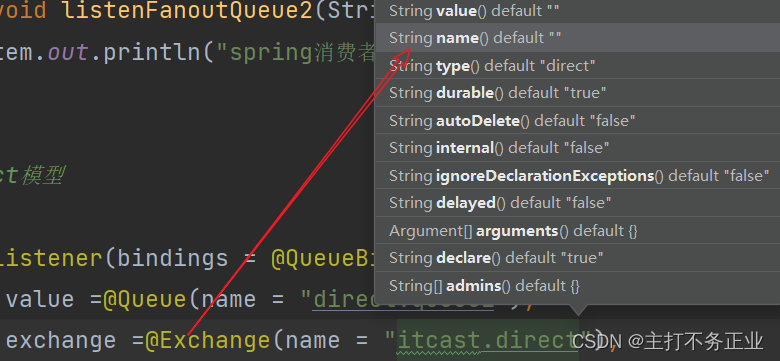
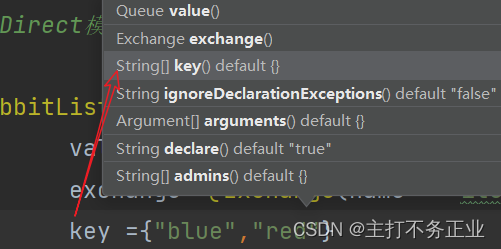
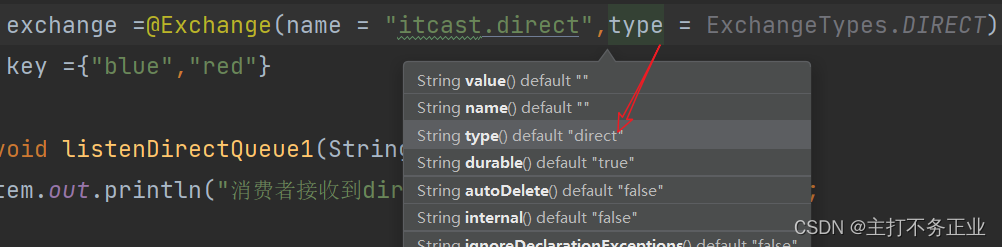
这里简单的说明一下bindings,value,exchange后边为什么使用注解,我们点进去他们的方法可以看到,声明它们的是黄色的注解接口,如图所知
![]()
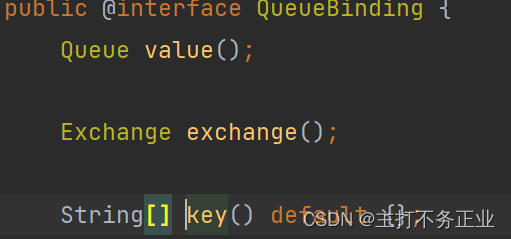
而key则是String类型的数组。
发送消息:
首先我们通过指定路由为red测试,代码如下
@Test
    public void testDirectExchange(){
        //发送消息
        rabbitTemplate.convertAndSend("itcast.direct","red","hello,Direct");
    }
测试一(指定路由为red)结果如下:

因为red两个队列都会接收到
测试二(指定路由为yellow)结果如下:
![]()
结果:交换机通过发送过来的消息的路由进行判断分给那个队列,再由队列分给接受者
总结:
描述下Direct交换机与Fanout交换机的差异?
- Fanout交换机将消息路由给每一个与之绑定的队列
- Direct交换机根据RoutingKey判断路由给哪个队列
- 如果多个队列具有相同的RoutingKey,则与Fanout功能类似
基于@RabbitListener注解声明队列和交换机有哪些常见注解?
- @Queue
- @Exchange
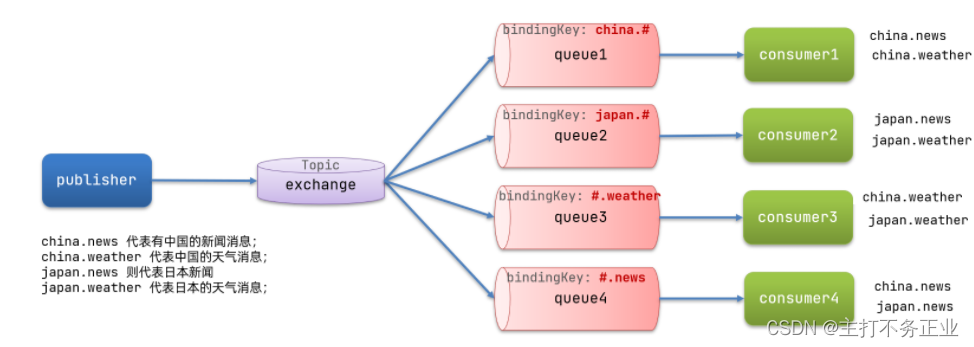
3.3Topic模型
对比:
Topic类型的Exchange与Direct相比,都是可以根据RoutingKey把消息路由到不同的队列。只不过Topic类型Exchange可以让队列在绑定Routing key 的时候使用通配符!
Routingkey介绍:
Routingkey 一般都是有一个或多个单词组成,多个单词之间以”.”分割,例如: item.insert
通配符规则:
#:匹配一个或多个词
*:匹配不多不少恰好1个词
图示:
案例需求:
实现思路如下:
-
并利用@RabbitListener声明Exchange、Queue、RoutingKey
-
在consumer服务中,编写两个消费者方法,分别监听topic.queue1和topic.queue2
-
在publisher中编写测试方法,向itcast. topic发送消息
案例实现:
1.在接受者的监听器类中编写代码,如下所示:
 /**
     * Topic模型
     */
    @RabbitListener(bindings = @QueueBinding(
            value =@Queue(name = "topic.queue1"),
            exchange =@Exchange(name = "itcast.topic",type = ExchangeTypes.TOPIC),
            key ="china.#"
    ))
    public void listenTopicQueue1(String msg){
        System.out.println("消费者接收到topic.queue1的消息:{" +msg+ "}");
    }
    @RabbitListener(bindings = @QueueBinding(
            value =@Queue(name = "topic.queue2"),
            exchange =@Exchange(name = "itcast.topic",type = ExchangeTypes.TOPIC),
            key ="#.news"
    ))
    public void listenTopicQueue2(String msg){
        System.out.println("消费者接收到topic.queue2的消息:{" +msg+ "}");
    }
编写消费者发送消息:
@Test
    public void testTopicExchange(){
        //发送消息
        rabbitTemplate.convertAndSend("itcast.topic","china.news","hello,topic");
    }
测试:

总结:
描述下Direct交换机与Topic交换机的差异?
- Topic交换机接收的消息RoutingKey必须是多个单词,以
**.**分割 - Topic交换机与队列绑定时的bindingKey可以指定通配符
#:代表0个或多个词*:代表1个词
3.4消息转换器
测试默认转换器:
@Test
public void testSendMap() throws InterruptedException {
    // 准备消息
    Map<String,Object> msg = new HashMap<>();
    msg.put("name", "Jack");
    msg.put("age", 21);
    // 发送消息
    rabbitTemplate.convertAndSend("simple.queue","", msg);
}
测试结果:
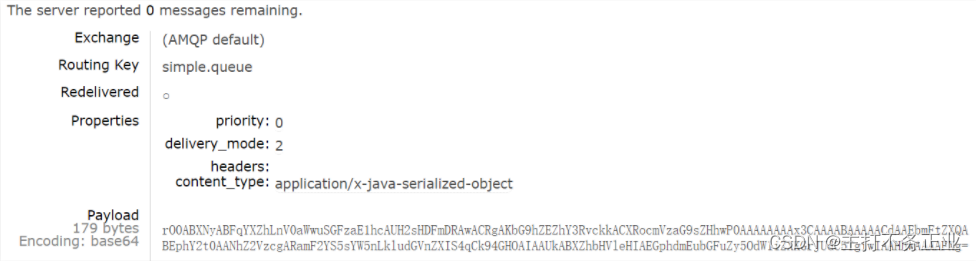
可以看到非常乱:
配置JSON转换器:
在publisher和consumer两个服务中都引入依赖:
<dependency>
    <groupId>com.fasterxml.jackson.dataformat</groupId>
    <artifactId>jackson-dataformat-xml</artifactId>
    <version>2.9.10</version>
</dependency>
在启动类中添加一个Bean即可:
@Bean
public MessageConverter jsonMessageConverter(){
    return new Jackson2JsonMessageConverter();
}


 1万+
1万+

 被折叠的 条评论
为什么被折叠?
被折叠的 条评论
为什么被折叠?
 到【灌水乐园】发言


