


Django 的视图层是 MVT 架构中的核心组件,负责处理用户请求并返回响应。
视图基础概念
视图是处理请求的核心逻辑单元,本质是一个 Python 函数或类,接收HttpRequest对象并返回HttpResponse对象。视图的核心职责包括:
- 请求处理:解析 URL 参数、表单数据或请求头信息
- 业务逻辑:调用模型层获取数据,执行计算或外部 API 调用
- 响应生成:返回 HTML 页面、JSON 数据、文件下载或重定向
函数视图(FBV)
最简单的视图形式,是接收request参数的 Python 函数。
from django.http import HttpResponse

def current_time(request):
    import datetime
    now = datetime.datetime.now()
    html = f"<html><body>Current time: {now}</body></html>"
    return HttpResponse(html)
处理不同请求方法
def article_view(request):
    if request.method == 'GET':
        # 处理GET请求(显示表单或数据)
        return HttpResponse("展示文章")
    elif request.method == 'POST':
        # 处理POST请求(提交数据)
        return HttpResponse("提交成功")
    else:
        # 处理其他方法(PUT、DELETE等)
        return HttpResponseNotAllowed(['GET', 'POST'])
接收 URL 参数
# urls.py
path('article/<int:article_id>/', views.article_detail)

# views.py
def article_detail(request, article_id):
    return HttpResponse(f"查看文章 {article_id}")
类视图(CBV)
基于类的视图提供了面向对象的方式组织视图逻辑,便于继承和复用。
from django.views import View
from django.http import HttpResponse

class CurrentTimeView(View):
    def get(self, request):
        now = datetime.datetime.now()
        return HttpResponse(f"Current time: {now}")
在 URL 中使用
from django.urls import path
from .views import MyView

urlpatterns = [
    path('my-view/', MyView.as_view(), name='my_view'),
]
类视图的优势
- 代码组织更清晰,不同 HTTP 方法对应不同方法
- 易于扩展和继承
- 内置了许多通用功能(如登录验证、权限检查)
通用类视图
Django 提供了一系列预定义的通用视图,封装了常见的 Web 开发模式。
列表视图(ListView) - 显示对象列表
from django.views.generic import ListView
from .models import Article

class ArticleListView(ListView):
    model = Article  # 指定模型
    template_name = 'article_list.html'  # 模板路径
    context_object_name = 'articles'  # 模板中使用的变量名
    paginate_by = 10  # 分页,每页10条
    queryset = Article.objects.filter(published=True)  # 自定义查询集
详情视图(DetailView) - 显示单个对象详情
from django.views.generic import DetailView
from .models import Article

class ArticleDetailView(DetailView):
    model = Article
    template_name = 'article_detail.html'
    context_object_name = 'article'

    def get_context_data(self, **kwargs):
        # 添加额外上下文数据
        context = super().get_context_data(** kwargs)
        context['related_articles'] = Article.objects.filter(category=self.object.category)
        return context
创建视图(CreateView) - 处理对象创建
from django.views.generic.edit import CreateView
from .models import Article

class ArticleCreateView(CreateView):
    model = Article
    fields = ['title', 'content', 'category']  # 表单字段
    template_name = 'article_form.html'
    success_url = '/articles/'  # 成功提交后跳转的URL
更新视图(UpdateView) - 处理对象更新
from django.views.generic.edit import UpdateView
from .models import Article

class ArticleUpdateView(UpdateView):
    model = Article
    fields = ['title', 'content']
    template_name = 'article_form.html'

    def get_success_url(self):
        # 动态生成成功跳转URL
        return reverse('article_detail', kwargs={'pk': self.object.pk})
删除视图(DeleteView) - 处理对象删除
from django.views.generic.edit import DeleteView
from django.urls import reverse_lazy
from .models import Article

class ArticleDeleteView(DeleteView):
    model = Article
    template_name = 'article_confirm_delete.html'
    success_url = reverse_lazy('article_list')  # 使用reverse_lazy延迟解析
URL 路由系统
URL 路由通过urls.py将 URL 模式映射到视图,核心组件包括:
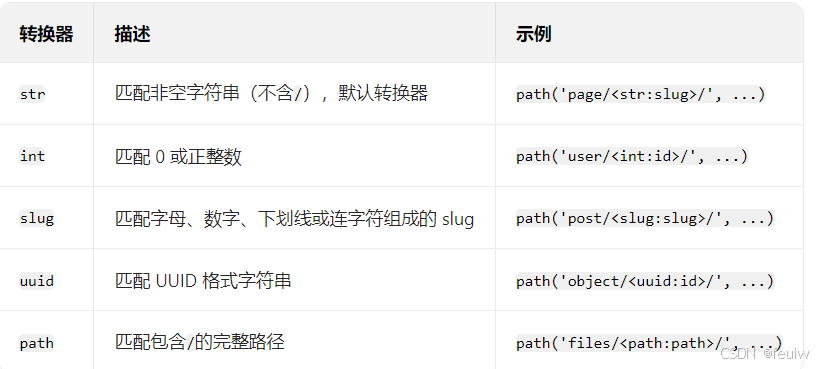
- 路径转换器:int、slug、uuid等类型匹配 URL 参数
- URL 命名空间:使用app_name和name参数实现 URL 反向解析
- 路由分发:通过include()实现模块化路由管理
工作流程如下:
- 当用户请求某个 URL 时,Django 会加载项目的主urls.py文件
- 按顺序匹配urlpatterns列表中的 URL 模式
- 匹配成功后,调用对应的视图处理请求
- 若所有模式都不匹配,返回 404 错误
基本配置结构
项目级 URL 配置(主 urls.py)
# myproject/urls.py
from django.contrib import admin
from django.urls import include, path

urlpatterns = [
    path('admin/', admin.site.urls),
    path('articles/', include('articles.urls')),  # 包含应用级URL配置
    path('blog/', include('blog.urls')),
]
应用级 URL 配置
# articles/urls.py
from django.urls import path
from . import views

urlpatterns = [
    path('', views.article_list, name='article_list'),  # 匹配/articles/
    path('<int:pk>/', views.article_detail, name='article_detail'),  # 匹配/articles/123/
]
路径转换器(Path Converters)
Django 内置了多种路径转换器,用于从 URL 中捕获特定类型的参数:
# 捕获整数ID并传递给视图
path('article/<int:article_id>/', views.article_detail)

# 视图接收参数
def article_detail(request, article_id):
    # 使用article_id查询数据
    pass
正则表达式路由
对于更复杂的 URL 模式,可以使用re_path(Django 2.0 前使用url)配合正则表达式:
from django.urls import re_path

urlpatterns = [
    # 匹配YYYY/MM/DD格式的日期
    re_path(r'^archive/(?P<year>[0-9]{4})/(?P<month>[0-9]{2})/(?P<day>[0-9]{2})/$',
            views.archive_detail),
]

# 视图接收命名参数
def archive_detail(request, year, month, day):
    pass
URL 命名与反向解析
为 URL 模式命名后,可以在模板和代码中通过名称反向生成 URL,避免硬编码。
命名 URL 模式
# articles/urls.py
urlpatterns = [
    path('detail/<int:pk>/', views.article_detail, name='article_detail'),
]
在模板中反向解析
<!-- 使用url模板标签 -->
<a href="{% url 'article_detail' pk=article.id %}">查看详情</a>

<!-- 带多个参数 -->
<a href="{% url 'archive_detail' year=2023 month=10 day=5 %}">2023-10-05归档</a>
在 Python 代码中反向解析
from django.urls import reverse
from django.http import HttpResponseRedirect

def redirect_to_article(request, article_id):
    # 生成URL
    url = reverse('article_detail', args=[article_id])
    # 或使用关键字参数
    url = reverse('article_detail', kwargs={'pk': article_id})
    return HttpResponseRedirect(url)
命名空间(Namespaces)
当多个应用有同名的 URL 模式时,使用命名空间避免冲突。
应用级命名空间
# articles/urls.py
app_name = 'articles'  # 应用命名空间
urlpatterns = [
    path('', views.list, name='list'),
]
使用时需指定命名空间:
<!-- 模板中 -->
{% url 'articles:list' %}

<!-- Python代码中 -->
reverse('articles:list')
实例命名空间
在包含 URL 配置时指定实例命名空间(用于同一应用的多个实例):
# 主urls.py
urlpatterns = [
    path('articles/', include(('articles.urls', 'articles'), namespace='articles')),
    path('special-articles/', include(('articles.urls', 'articles'), namespace='special_articles')),
]
URL 分发与包含(Including Other URLconfs)
使用include()函数实现 URL 配置的模块化和复用:
包含应用 URLs
from django.urls import include, path

urlpatterns = [
    path('blog/', include('blog.urls')),
]
直接包含 URL 模式列表:
from django.urls import path
from . import views

extra_patterns = [
    path('reports/', views.report_list),
    path('reports/<int:id>/', views.report_detail),
]

urlpatterns = [
    path('dashboard/', include(extra_patterns)),
]
传递额外参数给视图:
path('blog/', include('blog.urls'), {'blog_id': 3}),
反向解析
带查询参数的 URL
# 生成/articles/?page=2
from django.http import HttpResponseRedirect
from django.urls import reverse

def my_view(request):
    url = reverse('article_list') + '?page=2'
    return HttpResponseRedirect(url)
在类视图中使用
from django.urls import reverse_lazy
from django.views.generic import RedirectView

class MyRedirectView(RedirectView):
    # 延迟解析,避免在导入时URL尚未加载的问题
    url = reverse_lazy('article_list')
URL 配置的加载顺序
Django 按urlpatterns列表中的顺序匹配 URL 模式,因此:
- 更具体的模式应放在前面
- 通用模式(如首页)应放在后面
# 正确的顺序
urlpatterns = [
    path('articles/special/', views.special_articles),  # 具体模式在前
    path('articles/<int:id>/', views.article_detail),
    path('articles/', views.article_list),  # 通用模式在后
]
测试 URL 配置
可以使用 Django 的测试客户端测试 URL 路由:
from django.test import TestCase

class UrlTests(TestCase):
    def test_article_detail_url(self):
        response = self.client.get('/articles/1/')
        self.assertEqual(response.status_code, 200)

    def test_reverse_resolution(self):
        from django.urls import reverse
        url = reverse('article_detail', args=[1])
        self.assertEqual(url, '/articles/1/')
请求与响应处理
HttpRequest 对象
HttpRequest对象包含了所有关于请求的信息,常用属性和方法:
请求元数据
request.method:HTTP 方法(‘GET’、‘POST’ 等)request.path:请求路径request.META:包含 HTTP 头信息的字典request.user:当前登录用户(需启用认证中间件)request.session:会话对象
数据获取
request.GET:GET 参数(QueryDict 对象)request.POST:POST 参数(QueryDict 对象)request.FILES:上传的文件request.body:原始请求体(用于处理 JSON 等非表单数据)- 用户认证:
request.user(需启用AuthenticationMiddleware)
import json
from django.http import HttpResponse

def json_view(request):
    if request.method == 'POST':
        data = json.loads(request.body)
        # 处理数据
        return HttpResponse(json.dumps({'status': 'success'}),
                            content_type='application/json')
    return HttpResponse("请使用POST方法")
HttpResponse 对象
视图必须返回HttpResponse或其子类的实例。
常用响应子类
- 直接响应:
HttpResponse(content, content_type, status) - 模板渲染:
render(request, 'template.html', context) - 重定向:
redirect(to, permanent=False) - 文件下载:
FileResponse(open('file.pdf', 'rb'), as_attachment=True) JsonResponse:返回 JSON 数据HttpResponseNotFound:404 错误HttpResponseForbidden:403 错误HttpResponseRedirect:重定向(状态码 302)HttpResponsePermanentRedirect:永久重定向(状态码 301)
视图必须返回HttpResponse或其子类的实例。
基本响应
from django.http import HttpResponse

def simple_view(request):
    # 基本文本响应
    return HttpResponse("Hello, World!")

    # 指定内容类型
    return HttpResponse("<h1>HTML内容</h1>", content_type='text/html')

    # 指定状态码
    return HttpResponse("Not found", status=404)
render
渲染模板并返回响应
from django.shortcuts import render

def template_view(request):
    context = {'title': '首页', 'items': [1, 2, 3]}
    return render(request, 'template.html', context)
redirect
from django.shortcuts import redirect
from django.urls import reverse

def redirect_example(request):
    return redirect('article_list')  # 通过URL名称重定向
    return redirect(reverse('article_detail', args=[1]))  # 带参数
    return redirect('https://example.com')  # 外部URL
get_object_or_404():
获取对象或返回 404
from django.shortcuts import get_object_or_404
from .models import Article

def article_view(request, article_id):
    article = get_object_or_404(Article, id=article_id)
    return render(request, 'article.html', {'article': article})
异步响应
- 需使用 ASGI 服务器(如 Uvicorn)
- 避免在异步视图中使用同步数据库操作
- 可以使用async_to_sync和sync_to_async进行同步 / 异步转换
import asyncio
from django.http import HttpResponse

async def async_view(request):
    # 异步操作(如数据库查询、API调用)
    await asyncio.sleep(1)  # 模拟异步操作
    return HttpResponse("异步响应")
异步类视图
from django.views import View
from django.http import HttpResponse

class AsyncView(View):
    async def get(self, request):
        await asyncio.sleep(1)
        return HttpResponse("异步类视图响应")
装饰器与视图包装
限制请求方法
from django.views.decorators.http import require_http_methods, require_GET, require_POST

@require_http_methods(["GET", "POST"])
def my_view(request):
    # 只处理GET和POST请求
    pass

@require_GET
def get_only_view(request):
    # 只处理GET请求
    pass

@require_POST
def post_only_view(request):
    # 只处理POST请求
    pass
认证与权限
from django.contrib.auth.decorators import login_required, permission_required

@login_required  # 要求用户登录
def private_view(request):
    # 只有登录用户可访问
    pass

@login_required(login_url='/custom-login/')  # 自定义登录页面
def custom_login_view(request):
    pass

@permission_required('app.add_article')  # 要求特定权限
def create_article(request):
    # 只有拥有add_article权限的用户可访问
    pass
缓存控制
from django.views.decorators.cache import cache_page, never_cache

@cache_page(60 * 15)  # 缓存15分钟
def cached_view(request):
    # 结果会被缓存
    pass

@never_cache  # 禁止缓存
def dynamic_view(request):
    # 结果不会被缓存
    pass
csrf
@csrf_exempt
- 作用:禁用视图的 CSRF 验证
- 适用场景:当视图需要接收来自外部站点的 POST 请求,且无法提供 CSRF 令牌时(如 API 接口)
from django.views.decorators.csrf import csrf_exempt
from django.http import HttpResponse

@csrf_exempt
def my_view(request):
    if request.method == 'POST':
        # 处理POST数据,无需CSRF验证
        return HttpResponse("POST数据已接收")
    return HttpResponse("正常响应")
@csrf_protect
- 作用:强制为视图启用 CSRF 验证(即使全局设置中禁用了 CSRF 中间件)
- 适用场景:全局禁用 CSRF 中间件时,为特定敏感视图单独启用保护
from django.views.decorators.csrf import csrf_protect
from django.http import HttpResponse

@csrf_protect
def sensitive_view(request):
    if request.method == 'POST':
        # 必须通过CSRF验证才能处理
        return HttpResponse("已通过CSRF验证")
    return HttpResponse("请提交POST请求")
@ensure_csrf_cookie
- 作用:确保响应中包含 CSRF 令牌 cookie
- 适用场景:当页面通过 JavaScript 发起 POST 请求,且需要在初始加载时获取 CSRF 令牌时
from django.views.decorators.csrf import ensure_csrf_cookie
from django.http import HttpResponse

@ensure_csrf_cookie
def get_csrf_token(request):
    # 响应中将包含csrftoken cookie
    return HttpResponse("CSRF令牌已设置")
X-Frame-Options 控制
Django 通过X-Frame-OptionsHTTP 头控制页面是否允许在 iframe 中嵌入
@xframe_options_deny
- 作用:设置X-Frame-Options: DENY
- 效果:完全禁止页面在任何 iframe 中显示
from django.views.decorators.clickjacking import xframe_options_deny
from django.http import HttpResponse

@xframe_options_deny
def secure_view(request):
    return HttpResponse("此页面禁止在iframe中显示")
@xframe_options_sameorigin
- 作用:设置X-Frame-Options: SAMEORIGIN
- 效果:只允许在同一域名下的 iframe 中显示
from django.views.decorators.clickjacking import xframe_options_sameorigin
from django.http import HttpResponse

@xframe_options_sameorigin
def same_origin_view(request):
    return HttpResponse("此页面仅允许在同域iframe中显示")
@xframe_options_exempt
- 作用:不设置X-Frame-Options头
- 效果:允许页面在任何域名的 iframe 中显示
from django.views.decorators.clickjacking import xframe_options_exempt
from django.http import HttpResponse

@xframe_options_exempt
def embeddable_view(request):
    return HttpResponse("此页面允许在任何iframe中嵌入")
类视图使用装饰器
from django.utils.decorators import method_decorator
from django.contrib.auth.decorators import login_required

@method_decorator(login_required, name='dispatch')
class ProtectedView(View):
    def get(self, request):
        return HttpResponse("受保护的内容")
错误处理
自定义错误页面
# urls.py
handler404 = 'myapp.views.page_not_found'
handler500 = 'myapp.views.server_error'

# views.py
def page_not_found(request, exception):
    return render(request, '404.html', status=404)

def server_error(request):
    return render(request, '500.html', status=500)
异常处理
from django.http import Http404

def article_detail(request, pk):
    try:
        article = Article.objects.get(pk=pk)
    except Article.DoesNotExist:
        raise Http404("Article not found")
    return render(request, 'article_detail.html', {'article': article})
文件上传处理
from django.shortcuts import render
from django.http import HttpResponseRedirect
from .forms import UploadForm

def upload_file(request):
    if request.method == 'POST':
        form = UploadForm(request.POST, request.FILES)
        if form.is_valid():
            # 处理文件
            file = form.cleaned_data['file']
            with open('saved_file.txt', 'wb+') as destination:
                for chunk in file.chunks():
                    destination.write(chunk)
            return HttpResponseRedirect('/success/')
    else:
        form = UploadForm()
    return render(request, 'upload.html', {'form': form})


 5659
5659

 被折叠的 条评论
为什么被折叠?
被折叠的 条评论
为什么被折叠?
 到【灌水乐园】发言


