


 本文介绍了一个用于Raspberry Pi的C语言库BCM2835 GPIO,该库提供了对Broadcom BCM2835芯片上的GPIO和其他IO功能的访问权限。通过此库可以轻松地控制和与各种外部设备进行交互。文中还提供了一个简单的按键应用程序实例及编译指南。
BCM2835 GPIO library介绍
This is a C library for Raspberry Pi (RPi). It provides access to GPIO
and other IO functions on the Broadcom BCM 2835 chip, as used in the
RaspberryPi, allowing access to the GPIO pins on the 26 pin IDE plug
on the RPi board so you can control and interface with various
external devices.
其链接如下
http://www.airspayce.com/mikem/bcm2835/
在之前的文章中也有介绍
https://blog.youkuaiyun.com/feiwatson/article/details/80781683
https://blog.youkuaiyun.com/feiwatson/article/details/80779159
利用其来实现简单按键应用。代码如下
/* key.c
 * you can build this like:
 * gcc -Wall key.c -o key -lbcm2835
 * sudo ./key
*/
#include <bcm2835.h>
#include <stdio.h>

char KEY = 20;
unsigned char i;
int main(int argc, char **argv)
{
    if (!bcm2835_init())return 1;
    bcm2835_gpio_fsel(KEY, BCM2835_GPIO_FSEL_INPT);
    bcm2835_gpio_set_pud(KEY, BCM2835_GPIO_PUD_UP);
    printf("Key Test Program!!!!\n");
    while (1)
    {
        if(bcm2835_gpio_lev(KEY) == 0)
        {
            printf ("KEY PRESS\n") ;
            while(bcm2835_gpio_lev(KEY) == 0)
                bcm2835_delay(100);
        }
        bcm2835_delay(100);
    }
    bcm2835_close();
    return 0;
}
交叉编译makefile如下,(也可以选择直接在树莓派板上编译)
CC = /home/xxx/Raspberry/tools-master/arm-bcm2708/arm-rpi-4.9.3-linux-gnueabihf/bin/arm-linux-gnueabihf-gcc-4.9.3
CFLAGS = -I./ -L./lib
CFLAGS += -Wall
key:key.c
    $(CC) $(CFLAGS)  key.c -o key -lbcm2835
clean:
    rm key event
如果直接在板上编译,
gcc -Wall key.c -o key -lbcm2835运行, 按下按键后,输出“KEYPRESS”
pi@raspberrypi:~/learning/bcm2835/key_test $ ./key
Key Test Program!!!!
KEY PRESS
KEY PRESS
KEY PRESS
KEY PRESS
KEY PRESS
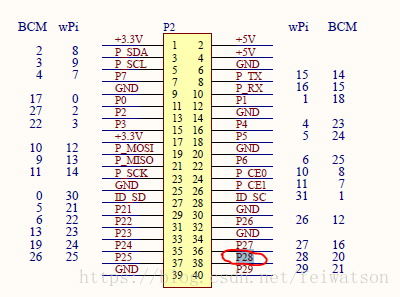
硬件接线:


 1534
1534

 被折叠的 条评论
为什么被折叠?
被折叠的 条评论
为什么被折叠?
 到【灌水乐园】发言


