


 本文详细解释了ROS中节点句柄的两种初始化方式,区分了普通句柄用于topic和服务调用,而私有句柄用于绑定参数以避免冲突。并通过实例展示了如何正确加载参数以确保程序正确运行。
1. 节点的命名方式
    ros::NodeHandle nh_; //普通定义
    ros::NodeHandle private_nh_; //私有句柄定义
2. 节点初始化方式
ros::NodeHandle nh_; //通常用于topic和service的调用
ros::NodeHandle private_nh_("~"); //通常用于参数的调用
ros::NodeHandle nh_("some_namespace"); //可以,但通常不用
这个表格说明了ROS从参数服务器中寻找参数的路径,后面会有解释和例子。
| 节点句柄初始化方式 | ROS真正寻找(resolve)的参数 |
| ros::NodeHandle nh_; | /node_namespace/param_name |
| ros::NodeHandle private_nh_("~"); | /node_namespace/node_name/param_name |
| ros::NodeHandle nh_("some_namespace"); | /node_namespace/some_namespace/param_name |
第一种:ros::NodeHandle nh_; 一般用来发布话题、服务等。因为这些话题服务都是共用的。比如:/scan话题就会被多个节点共用。所以直接调用/scan是最方便的。
第二种:ros::NodeHandle private_nh_("~"); 一般用来从参数服务器获取参数值。因为参数值都是和节点绑定的。同时,为了避免两个节点有相同名字的参数避免冲突,使用私有句柄可以更好的分辨参数是来自哪个节点,也方便命名参数。
3. 举个例子
我们在sensor_subscribe.yaml中定义了两个参数:
# sensor_params.yaml

edge_length: 0.15678
edge_angle: 2.3562
我们在sensor_subscribe.launch中启动sensor_subscribe节点并加载参数到服务器:
<launch>
  <node pkg="sensor_subscribe" type="sensor_subscribe" name="sensor_subscribe" output="screen">

        <rosparam command="load" file="$(find sensor_subscribe)/param/sensor_subscribe.yaml" />
  </node>
</launch>
现在我们使用rosparam list查看参数服务器中的参数名称和路径:
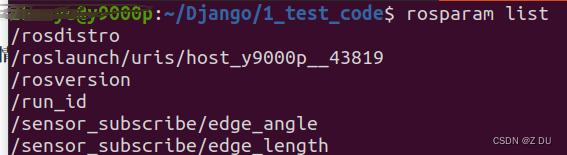
这两个参数的路径为:
/sensor_subscribe/edge_angle
/sensor_subscribe/edge_length
如果使用第一种初始化方式: ros::NodeHandle nh_; ROS寻找的参数路径为:/edge_angle和/edge_length。这样就会加载失败。
如果使用第二种初始化方式:ros::NodeHandle private_nh("~"); ROS寻找的参数路径为:/sensor_subscribe/edge_angle 和 /sensor_subscribe/edge_length。这样就会加载成功。
4. 一般怎么写
在sensor_subscribe.h头文件中定义两个节点句柄:ros::NodeHandle nh_; 和 ros::NodeHandle private_nh_;
#ifndef SENSOR_SUBSCRIBE_H
#define SENSOR_SUBSCRIBE_H

#include <ros/ros.h>


class SensorSubscribeNode
{
public:
    SensorSubscribeNode();
    Eigen::Affine3f icp(pcl::PointCloud<pcl::PointXYZ> &target, Eigen::Matrix4f &transform);
    void run();

private:
    void laserCallback(const sensor_msgs::LaserScan::ConstPtr& scan_msg);
    void imageCallback(const sensor_msgs::Image::ConstPtr& image_msg);
    bool generateIdealPointCloud();
    void pointCloudTimerCallback(const ros::TimerEvent& event);

    ros::NodeHandle nh_;
    ros::NodeHandle private_nh_;
    ros::Publisher scan_pub_;
    ros::Publisher point_cloud_pub_;
    ros::Subscriber laser_sub_;
    ros::Subscriber image_sub_;
    pcl::PointCloud<pcl::PointXYZ>::Ptr ideal_cloud_;
    double edge_length_;
    double edge_angle_;
    ros::Timer point_cloud_timer_;
};

#endif  // SENSOR_SUBSCRIBE_H
在主函数sensor_subscribe.cpp中这样写:
#include "sensor_subscribe.h"
//初始化
SensorSubscribeNode::SensorSubscribeNode():private_nh_("~")
{

    // 读取Launch文件中传递的参数
    private_nh_.param<double>("edge_length", edge_length_, 1.0);
    private_nh_.param<double>("edge_angle", edge_angle_, 0.785);


    // 创建发布器和订阅器等
    scan_pub_ = nh_.advertise<sensor_msgs::LaserScan>("/scan_pub", 1);
    point_cloud_pub_ = nh_.advertise<sensor_msgs::PointCloud>("/point_cloud", 1);
    laser_sub_ = nh_.subscribe("/scan", 1, &SensorSubscribeNode::laserCallback, this);
    image_sub_ = nh_.subscribe("/depth_image_topic", 1, &SensorSubscribeNode::imageCallback, this);
    // 设置定时器,每隔 0.1 秒触发一次
}


//激光回调函数
void SensorSubscribeNode::laserCallback(const sensor_msgs::LaserScanConstPtr &scan_msg)
{

}//SensorSubscribeNode::laserCallback


//相机回调函数
void SensorSubscribeNode::imageCallback(const sensor_msgs::Image::ConstPtr& image_msg)
{
    // 处理深度相机数据
    // ...
}//SensorSubscribeNode::imageCallback


bool SensorSubscribeNode::generateIdealPointCloud()
{

}//SensorSubscribeNode::icp


//定时发布点云
void SensorSubscribeNode::pointCloudTimerCallback(const ros::TimerEvent& event)
{

}//SensorSubscribeNode::pointCloudTimerCallback


int main(int argc, char** argv)
{
    ros::init(argc, argv, "sensor_subscribe");


    // 创建节点类的实例
    SensorSubscribeNode node;

    // 运行节点
    ros::spin();

    return 0;
}


 被折叠的 条评论
为什么被折叠?
被折叠的 条评论
为什么被折叠?
 到【灌水乐园】发言


