


 本文介绍了一种基于Python、OpenCV和Pyzbar的条形码和二维码检测识别方法。通过图像预处理,包括灰度转换、Sobel算子应用、滤波、二值化等步骤,实现了对条码的有效识别。特别地,文章详细描述了如何通过图形操作矫正图像,以提高对倾斜条码的识别率。
基于python opencv pyzbar 实现。
条形码检测识别
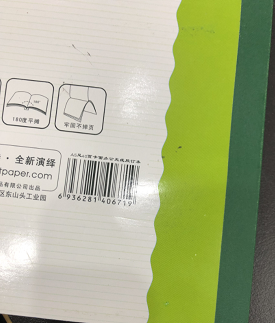
- 原图:
- 最后截取图:

- 直接上代码:
import cv2
import numpy as  np
import math
from pyzbar.pyzbar import decode

#读图
img=cv2.imread(r'XX.png',1) #读取图片
gray = cv2.cvtColor(img,cv2.COLOR_BGR2GRAY)  #将图片变为灰度图片

#使用Sobel算子,求得水平和垂直方向灰度图像的梯度差
gradX = cv2.Sobel(gray,ddepth = cv2.CV_32F,dx = 1,dy = 0,ksize = -1)
gradY = cv2.Sobel(gray,ddepth = cv2.CV_32F,dx = 0,dy = 1,ksize = -1)
gradient = cv2.subtract(gradX, gradY)
gradient = cv2.convertScaleAbs(gradient)
images = cv2.resize(gradient,(480,640))
cv2.imshow("closed1", images)
cv2.waitKey(0)
#均值滤波,消除高频噪声 (8*8)像素块
blurred = cv2.blur(gradient,(8,8))
#二值化
ret,thresh = cv2.threshold(blurred, 225, 255, cv2.THRESH_BINARY)
#闭运算 填充条码空隙 (参数自己调整)
kernel = cv2.getStructuringElement(cv2.MORPH_RECT,(25,25))
closed1 = cv2.morphologyEx(thresh,cv2.MORPH_CLOSE,kernel, iterations = 2)
# images = cv2.resize(closed1,(480,640))
# cv2.imshow("closed1", images)
# cv2.waitKey(0)
#4次腐蚀 再4次膨胀:消除小斑点
closed2 = cv2.erode(closed1, None, iterations = 4)
closed3 = cv2.dilate(closed2, None, iterations = 4)
# images = cv2.resize(closed3,(480,640))
# cv2.imshow("closed3", images)
# cv2.waitKey(0)
#开运算
ret,th2=cv2.threshold(closed3,0.1,255,cv2.THRESH_BINARY)
kernel = np.ones((10,10),np.uint8)
opening = cv2.morphologyEx(th2, cv2.MORPH_OPEN, kernel,iterations = 2)
images = cv2.resize(opening,(480,640))
cv2.imshow("contours", images)
cv2.waitKey(0)
#腐蚀
kernel = np.ones((5,5),np.uint8)
erosion = cv2.erode(opening,kernel,iterations = 2)
opening = cv2.resize(erosion ,(480,640))
cv2.imshow("contours",opening )
cv2.waitKey(0)

#找出边界
contours, hierarchy = cv2.findContours(erosion.copy(),cv2.RETR_TREE,cv2.CHAIN_APPROX_SIMPLE)

#获取最大轮廓
c = sorted(contours, key = cv2.contourArea, reverse = True)[0]

#图形旋转矫正 并截取最大边界区域
#修改最小框大小 放大50
rect = cv2.minAreaRect(c)
b = list(rect)
b[1] = list(b[1])
b[1][0] = b[1][0] + 50
b[1][1] = b[1][1] + 50
new_rect = tuple(b)
box = np.int0(cv2.boxPoints(new_rect))
#draw_img = cv2.drawContours(img.copy(), [box], -1, (0, 0, 255), 3)
# 获取画框宽高(x=orignal_W,y=orignal_H)
orignal_W = math.ceil(np.sqrt((box[3][1] - box[2][1])**2 + (box[3][0] - box[2][0])**2))
orignal_H= math.ceil(np.sqrt((box[3][1] - box[0][1])**2 + (box[3][0] - box[0][0])**2))
# 原图中的四个顶点,与变换矩阵
pts1 = np.float32([box[0], box[1], box[2], box[3]])
pts2 = np.float32([[int(orignal_W+1),int(orignal_H+1)], [0, int(orignal_H+1)], [0, 0], [int(orignal_W+1), 0]])
# 生成透视变换矩阵;进行透视变换
M = cv2.getPerspectiveTransform(pts1, pts2)
result_img = cv2.warpPerspective(img, M*1.5, (int(orignal_W+20),int(orignal_H+20)))
cv2.imshow("JIAOZHEN",result_img)
cv2.waitKey(0)
#二值化 筛掉一些错误
ret,thresh = cv2.threshold(result_img,128, 255, cv2.THRESH_BINARY)
#二维码编码检测
barcodes = decode(thresh)
result = []
for barcode in barcodes:
    barcodeData = barcode.data.decode("utf-8")
    result.append(barcodeData)
print(result)
- 最后会输出条码:
['6936281406719']
注:pyzbar模块可以识别水平竖直方向的条码,上述图像经过透视变换后基本都为竖直方向或者水平方向可以被识别出来,但是大角度的图像imshow效果不是很好,可能是倒着的。。。
二维码检测识别
-
代码同上
-
过程截图(这里测试一个移动行程码)

-
输出结果
['https://app.10086.cn/activity/epidemicQuery/index.html']
- 注:对应带有一定角度的图像,识别效果可能不是很好,需要后续加一些图形操作来矫正图像。


 3677
3677

 被折叠的 条评论
为什么被折叠?
被折叠的 条评论
为什么被折叠?
 到【灌水乐园】发言


