


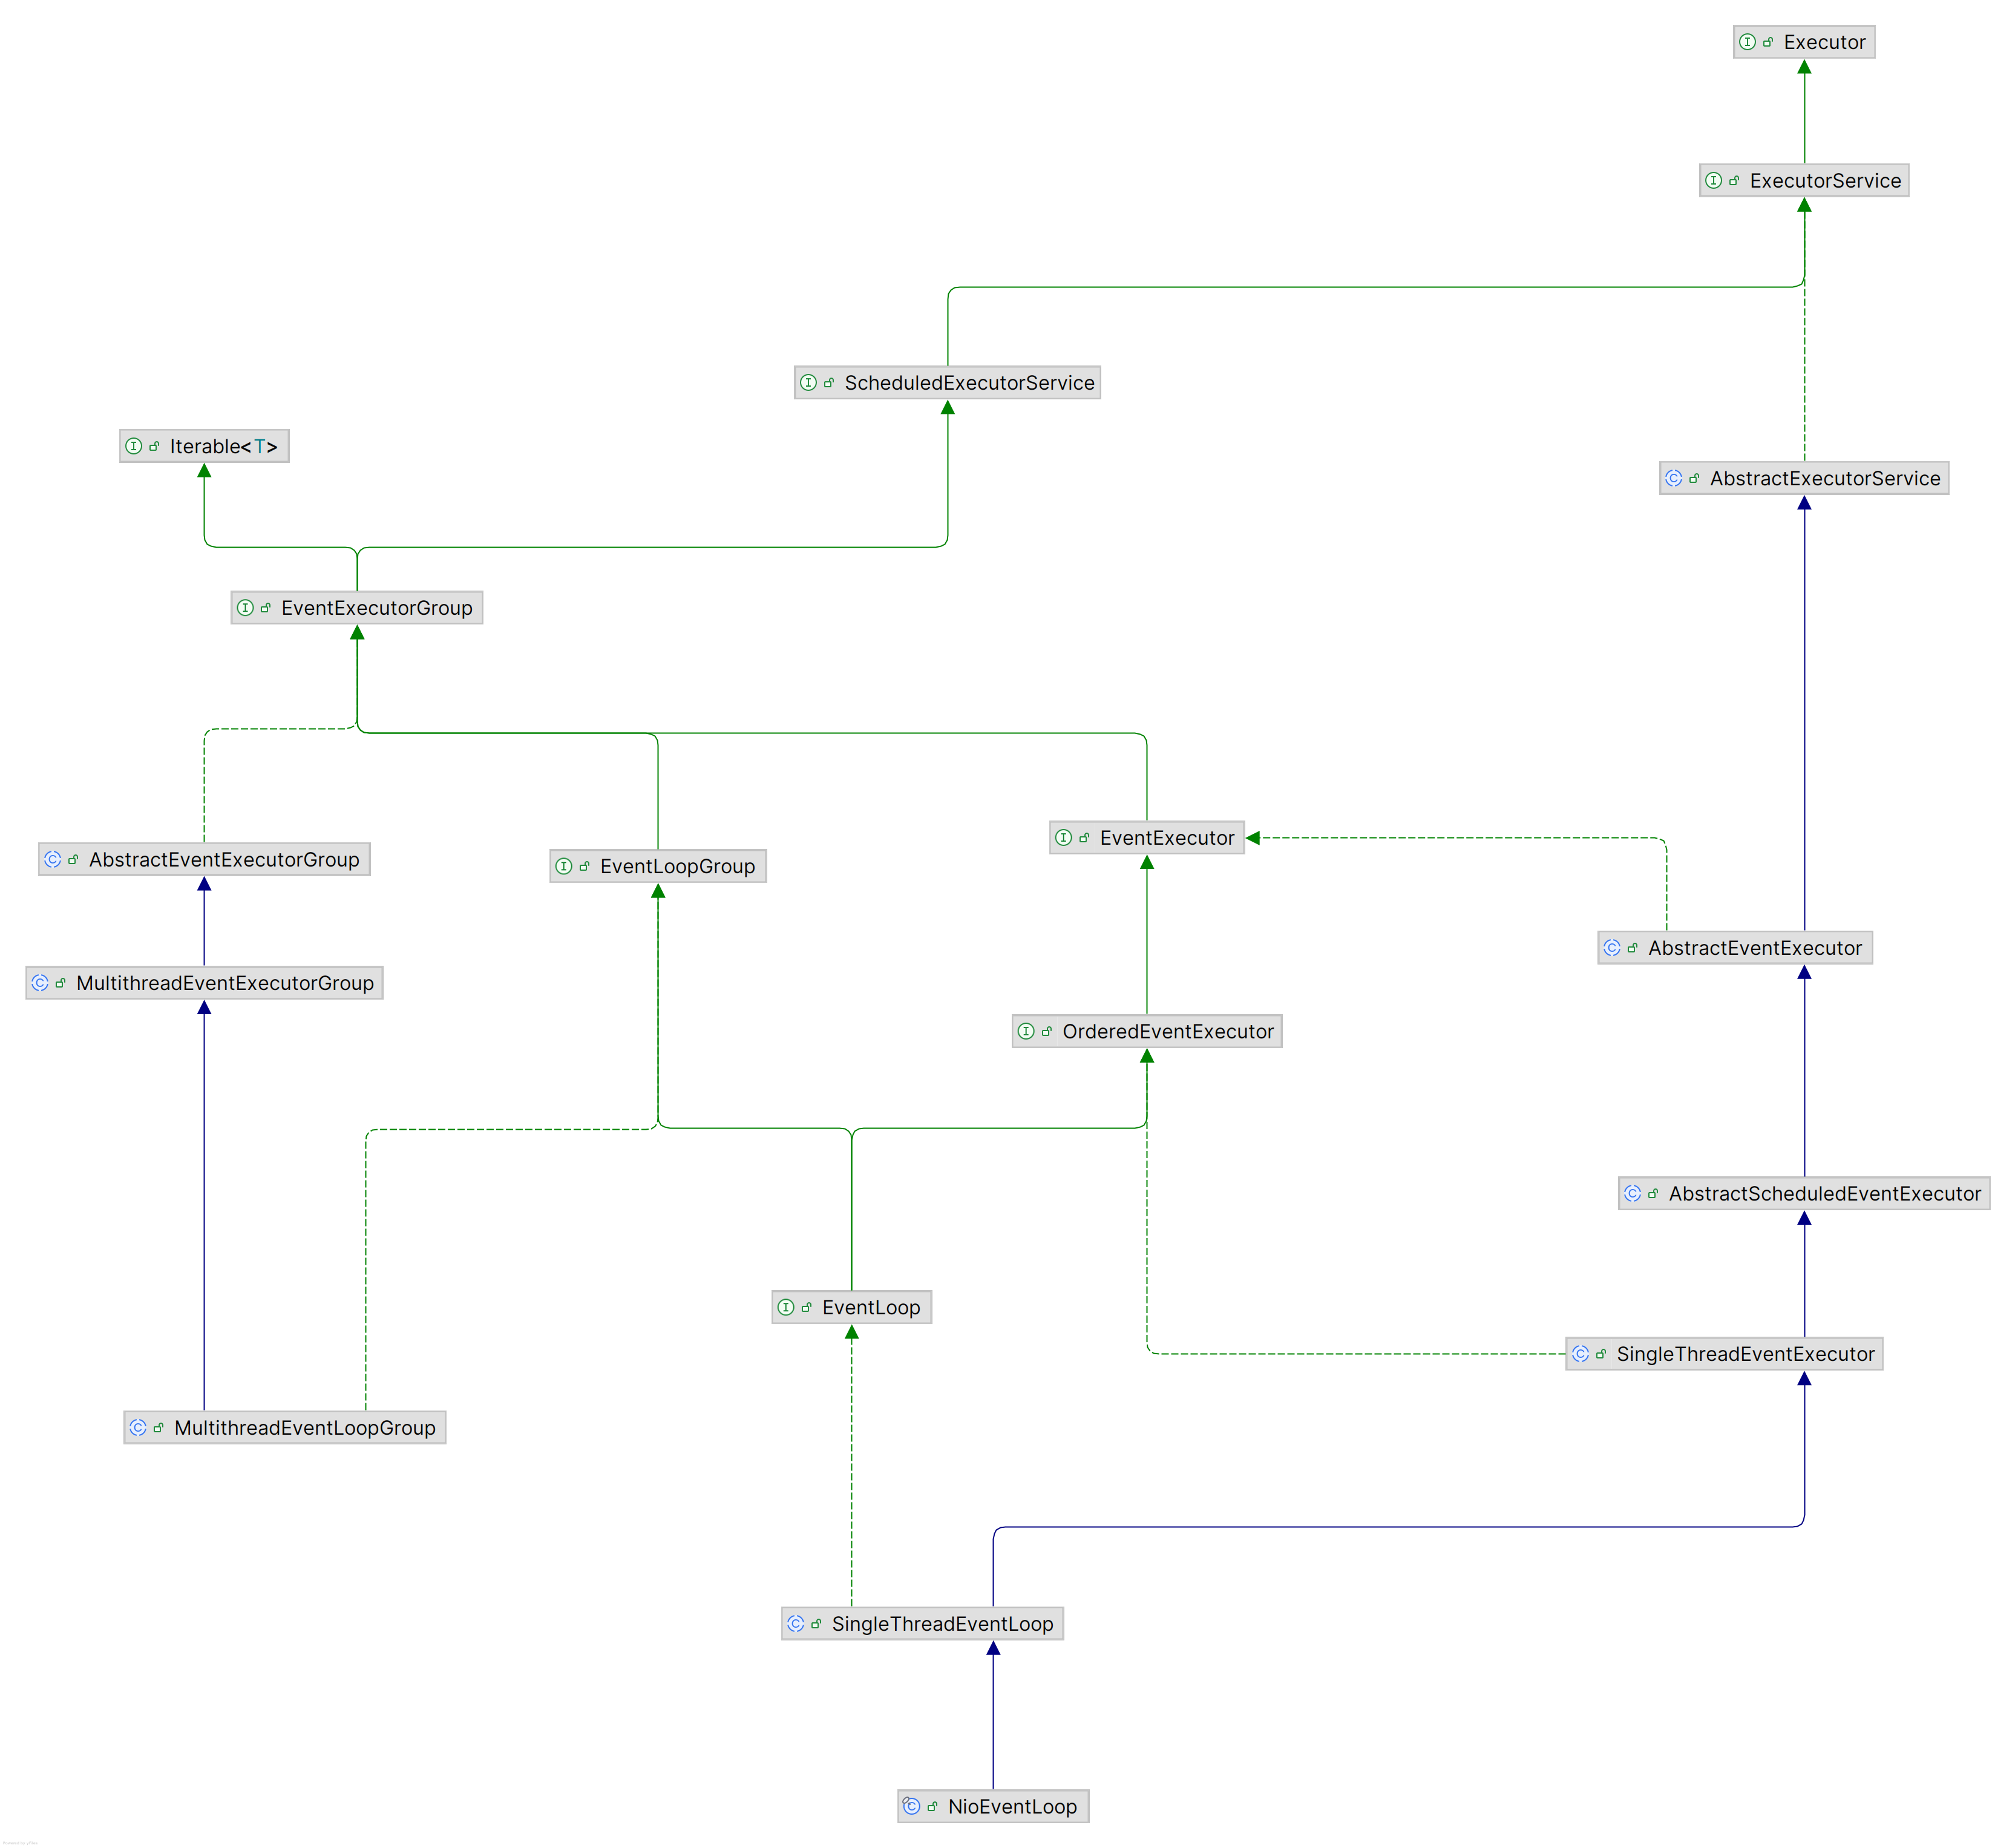
老样子,先贴出 NioEventLoop 的继承类图。
在之前的文章 “NioEventLoopGroup 对象的创建” 中,创建 NioEventLoopGroup 对象时,会调用 newChild() 循环创建 NioEventLoop对象。
我们就从 newChild() 方法切入,讲解 NioEventLoop 对象的创建过程:
NioEventLoopGroup##newChild()
@Override
protected EventLoop newChild(Executor executor, Object... args) throws Exception {
    EventLoopTaskQueueFactory queueFactory = args.length == 4 ? (EventLoopTaskQueueFactory) args[3] : null;
    return new NioEventLoop(this, executor, (SelectorProvider) args[0],
        ((SelectStrategyFactory) args[1]).newSelectStrategy(), (RejectedExecutionHandler) args[2], queueFactory);
}
NioEventLoop()
NioEventLoop##NioEventLoop()
NioEventLoop(NioEventLoopGroup parent, Executor executor, SelectorProvider selectorProvider,
             SelectStrategy strategy, RejectedExecutionHandler rejectedExecutionHandler,
             EventLoopTaskQueueFactory queueFactory) {
    super(parent, executor, false, newTaskQueue(queueFactory), newTaskQueue(queueFactory),
            rejectedExecutionHandler);
    this.provider = ObjectUtil.checkNotNull(selectorProvider, "selectorProvider");
    this.selectStrategy = ObjectUtil.checkNotNull(strategy, "selectStrategy");
    final SelectorTuple selectorTuple = openSelector();
    this.selector = selectorTuple.selector;
    this.unwrappedSelector = selectorTuple.unwrappedSelector;
}
主要做了两件事:
- 调用 2 次
newTaskQueue()创建 2 个任务队列。一个普通任务队列,一个 tail 任务队列。 - 将上一步创建的 2 个任务队列作为参数调用父类
SingleThreadEventLoop构造函数初始化。 - 调用
openSelector()打开一个 Selector。
注意:每个
**NioEventLoop**都有一个属于自己的 Selector。
我们来看下 newTaskQueue() 方法做了哪些事。
创建任务队列
NioEventLoop##newTaskQueue()
private static Queue<Runnable> newTaskQueue(
    EventLoopTaskQueueFactory queueFactory) {
if (queueFactory == null) {
    return newTaskQueue0(DEFAULT_MAX_PENDING_TASKS);
}
return queueFactory.newTaskQueue(DEFAULT_MAX_PENDING_TASKS);
}
**DEFAULT_MAX_PENDING_TASKS** 是父类 SingleThreadEventLoop 中定义的静态常量。
protected static final int DEFAULT_MAX_PENDING_TASKS = Math.max(16,
            SystemPropertyUtil.getInt("io.netty.eventLoop.maxPendingTasks", Integer.MAX_VALUE));
如果指定了任务队列工厂,则使用工厂模式创建任务队列。这里我们没有指定任务队列工厂,因此进入 newTaskQueue0() 方法逻辑。
NioEventLoop##newTaskQueue0()
private static Queue<Runnable> newTaskQueue0(int maxPendingTasks) {
    // This event loop never calls takeTask()
    return maxPendingTasks == Integer.MAX_VALUE ? PlatformDependent.<Runnable>newMpscQueue()
            : PlatformDependent.<Runnable>newMpscQueue(maxPendingTasks);
}
创建一个多生产者单消费者队列(MpscUnboundedArrayQueue)。
父类构造函数初始化
super() 执行父类 SingleThreadEventLoop 的初始化逻辑。
SingleThreadEventLoop##SingleThreadEventLoop()
protected SingleThreadEventLoop(EventLoopGroup parent, Executor executor,
                                boolean addTaskWakesUp, Queue<Runnable> taskQueue, Queue<Runnable> tailTaskQueue,
                                RejectedExecutionHandler rejectedExecutionHandler) {
    super(parent, executor, addTaskWakesUp, taskQueue, rejectedExecutionHandler);
    tailTasks = ObjectUtil.checkNotNull(tailTaskQueue, "tailTaskQueue");
}
将上一步创建的 tail 任务队列保存到 SingleThreadEventLoop 的 tailTasks 字段中。
继续向上调用父类 SingleThreadEventExecutor 的构造函数初始化。
SingleThreadEventExecutor##SingleThreadEventExecutor()
protected SingleThreadEventExecutor(EventExecutorGroup parent, Executor executor,
                                    boolean addTaskWakesUp, Queue<Runnable> taskQueue,
                                    RejectedExecutionHandler rejectedHandler) {
    super(parent);
    this.addTaskWakesUp = addTaskWakesUp;
    this.maxPendingTasks = DEFAULT_MAX_PENDING_EXECUTOR_TASKS;
    this.executor = ThreadExecutorMap.apply(executor, this); // 重点
    this.taskQueue = ObjectUtil.checkNotNull(taskQueue, "taskQueue");
    this.rejectedExecutionHandler = ObjectUtil.checkNotNull(rejectedHandler, "rejectedHandler");
}
逻辑很简单,就是初始化相关字段。
我们重点关注 ThreadExecutorMap.apply(executor, this) 这行代码!
ThreadExecutorMap.apply()
public final class ThreadExecutorMap {
    private static final FastThreadLocal<EventExecutor> mappings = new FastThreadLocal<EventExecutor>();

    ....
    private static void setCurrentEventExecutor(EventExecutor executor) {
        mappings.set(executor);
    }
    ....

    public static Executor apply(final Executor executor, final EventExecutor eventExecutor) {
        ObjectUtil.checkNotNull(executor, "executor");
        ObjectUtil.checkNotNull(eventExecutor, "eventExecutor");
        return new Executor() {
            @Override
            public void execute(final Runnable command) {
                executor.execute(apply(command, eventExecutor));
            }
        };
    }

    public static Runnable apply(final Runnable command, final EventExecutor eventExecutor) {
        ObjectUtil.checkNotNull(command, "command");
        ObjectUtil.checkNotNull(eventExecutor, "eventExecutor");
        return new Runnable() {
            @Override
            public void run() {
                setCurrentEventExecutor(eventExecutor);
                try {
                    command.run();
                } finally {
                    setCurrentEventExecutor(null);
                }
            }
        };
    }

    .....
}
其中,executor 是在 NioEventLoopGroup 中创建的 ThreadPerTaskExecutor 对象。eventExecutor 是 NioEventLoop 对象。
ThreadExecutorMap.apply(executor, this) 主要功能就是对传进来的 Runable 对象 command 进行增强,在执行 command 代码前,将 NioEventLoop 对象设置为线程的 ThreadLocal 变量。
你可能很好奇,ThreadLocal 变量在哪会被 remove 呢?
我们来看 ThreadPerTaskExecutor 的 execute() 方法
@Override
public void execute(Runnable command) {
    threadFactory.newThread(command).start();
}
@Override
public Thread newThread(Runnable r) {
    Thread t = newThread(FastThreadLocalRunnable.wrap(r), prefix + nextId.incrementAndGet());
    ...
}
这里会调用 FastThreadLocalRunnable.wrap(r) 对 Runnable 对象再进行一层封装,将其封装成 FastThreadLocalRunnable 对象。
static Runnable wrap(Runnable runnable) {
    return runnable instanceof FastThreadLocalRunnable ? runnable : new FastThreadLocalRunnable(runnable);
}
// 构造函数
private FastThreadLocalRunnable(Runnable runnable) {
    this.runnable = ObjectUtil.checkNotNull(runnable, "runnable");
}

@Override
public void run() {
    try {
        runnable.run();
    } finally {
        FastThreadLocal.removeAll(); // 删除所有ThreadLocal
    }
}
真相大白!
上面一大段描述可以总结成如下代码:
public void run() {
    try {
            setCurrentEventExecutor(eventExecutor);
            try {
                command.run();
            } finally {
                setCurrentEventExecutor(null);
            }
    } finally {
        FastThreadLocal.removeAll(); // 在这里删除
    }
}
小结一下
Netty 使用 FastThreadLocal、FastThreadLocalThread 替换 JDK 的 ThreadLocal 实现。使用 FastThreadLocalRunnable 保证了所有的 FastThreadLocal 变量可以被移除,防止内存泄露。
openSelector()
openSelector() 方法会返回一个 Selector。关于 Netty 对 Selector 的优化,参考“Netty Selector 优化”。
每一个 NioEventLoop 都会绑定一个 Selector 和一个线程实体。用来循环处理网络事件。


 720
720

 被折叠的 条评论
为什么被折叠?
被折叠的 条评论
为什么被折叠?
 到【灌水乐园】发言


