


Ceph Cookbook 学习实践笔记(三)之OpenStack
OpenStack简介
OpenStack是一个用于建设和管理共有云和私有云的基础架构开源软件平台。它被一个独立的非盈利的OpenStack基金会所管理。它拥有最大和最活跃的社区,由科技巨头如惠普、红帽、戴尔、思科、IBM和Reckspace公司,以及更多其他的公司提供支持。OpenStack秉持的理念是,云应该是实施简单和可大规模扩展的。
OpenStack被认为是用户可以以自动化的方式快速部署数百个虚拟机的云平台操作系统。它同时提供了一种轻松管理这些虚拟机的有效方法。OpenStack以动态规模、横向扩展和分布式体系结构著称,可使你的云环境非常健壮且能面向未来。OpenStack提供了企业级的基础架构及服务(Infrastructure-as-a-Service,IaaS),以满足你所有的运需求。
Ceph——OpenStack的最佳匹配
Ceph提供了OpenStack一直在寻找的稳健、可靠的存储后端。它与OpenStack的Cinder、Glance、Nova和Keystore等模块无缝集成,提供了一个完整的云存储后端。下面是使得Ceph成为OpenStack的最佳匹配的一些主要优点:
- Ceph提供了企业级的功能丰富的存储后端,而且每GB成本非常低,这有助于保持OpenStack云部署的较低成本。
- Ceph为OpenStack提供了一个统一的包含块、文件或者对象存储的解决方案,让应用程序各取所需。
- Ceph为OpenStack云提供了先进的块存储功能,包含轻松和快速地孵化实例,以及对虚拟机进行备份和克隆。
- Ceph为OpenStack实例提供了默认的持久卷,使其可以像传统的服务器那样工作,实例中的数据将不会因为重新启动虚拟机而丢失。
- Ceph支持虚拟机迁移,这使得OpenStack实例能做到独立于宿主机,而且扩展存储组件也不会影响虚拟机。
- Ceph为OpenStack卷提供的快照功能,也可以用作本分的一种手段。
- Ceph的COW克隆功能为OpenStack提供了同时孵化多个实例的能力,这有助于提供快速的虚拟机创建机制。
- Ceph支持为Swift和S3对象存储提供丰富的API接口。
OpenStack是一个多组件构成的模块化系统,并且每个组件都有其自身明确的任务。有多个组件需要向Ceph一样可靠的存储后端,以便将这些组件集成起来。
搭建OpenStack
此处主要为了学习Ceph与OpenStack的整合,为了快速进入,我们直接使用Vagrant搭建一个预先配置好的OpenStack环境,并使用CLI和GUI访问它。
1、使用Vagrantfile启动openstack-node1(此处由于www.dropbox.com无法访问,故可以使用离线的方式添加openstack.box)。
#离线添加box
vagrant box add openstack /root/vagrant_local_box/openstack.box
vagrant box list

#启动虚拟机
vagrant up openstack-node1
2、openstack-node1启动后,检查Vagrant状态,并登陆到该节点
vagrant status openstack-node1
vagrant ssh openstack-node1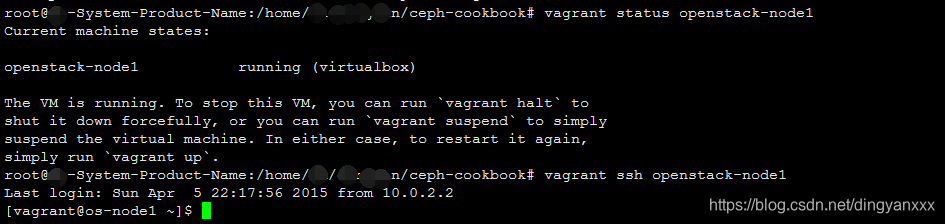
3、运行一些基本命令以确保它被正确配置了,由于新的OpenStack环境没有创建任何实例和卷,有一些命令没有显示任何信息。
sudo su -
source keystonerc_admin
nova list
cinder list
glance image-list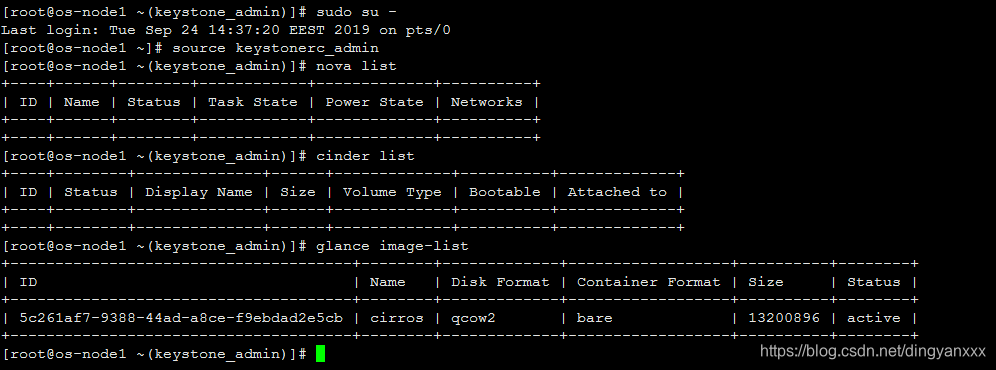
4、也可以使用admin/vagrant登陆OpenStack Horizon网站:https://192.168.1.111/dashboard
配置OpenStack为Ceph客户端
OpenStack节点应该配置为Ceph的客户端,以便于访问Ceph集群。为此,在OpenStack节点上安装Ceph的包,确保其可以访问Ceph集群。
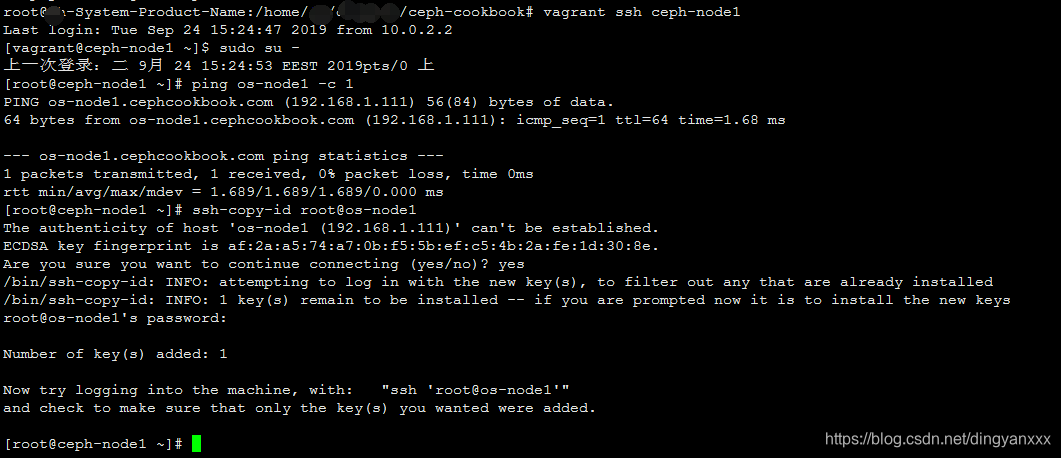
1、在ceph-node1上,通过ceph-deploy在os-node1上安装Ceph二进制程序,首先是建立信任
vagrant ssh ceph-node1
sudo su -
ping os-node1 -c 1
ssh-copy-id root@os-node1
2、接下来,通过ceph-deploy在os-node1上安装Ceph
cd /etc/ceph
ceph-deploy install os-node1
3、将Ceph配置文件ceph.conf从ceph-node1推送到os-node1。这个配置文件会帮助客户端访问Ceph monitor和OSD设备
ceph-deploy config push os-node1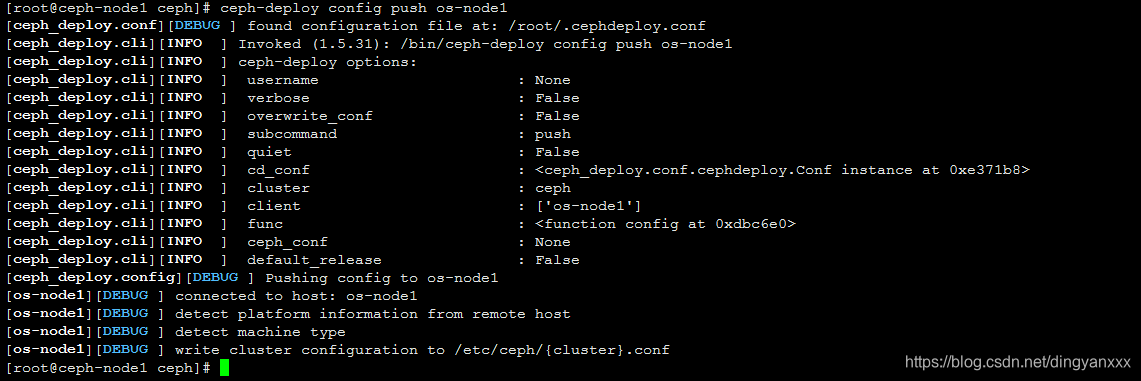
4、为Cinder、Glance、Nova创建Ceph存储池(建议为不同的OpanStack组件分别创建不同的存储池)。
ceph osd pool create images 128
ceph osd pool create volumes 128
ceph osd pool create vms 128

5、通过为Cinder和Glance创建新用户来搭建用户验证
ceph auth get-or-create client.cinder mon 'allow r' osd 'allow class-read object_prefix rbd_children, allow rwx pool=volumes,allow rwx pool=vms,allow rx pool=images'
ceph auth get-or-create client.glance mon 'allow r' osd 'allow class-read object_prefix rbd_children, allow rwx pool=images'
6、为os-node1添加keyring并改变他们的所属权限
ceph auth get-or-create client.glance | ssh root@os-node1 sudo tee /etc/ceph/ceph.client.glance.keyring
ssh os-node1 sudo chown glance:glance /etc/ceph/ceph.client.glance.keyring

ceph auth get-or-create client.cinder | ssh root@os-node1 sudo tee /etc/ceph/ceph.client.cinder.keyring
ssh os-node1 sudo chown cinder:cinder /etc/ceph/ceph.client.cinder.keyring
7、当从Cinder挂载或者卸载块设备时,libvirt进程需要有访问Ceph集群的权限。我们需要创建一个临时的client.cinder秘钥副本,用于本章后面的Cinder和Nova配置。
ceph auth get-key client.cinder | ssh os-node1 tee /etc/ceph/temp.client.cinder.key8、现在,可以在os-node1上使用client.glance和client.cinder Ceph用户来访问Ceph集群了。
vagrant ssh openstack-node1
sudo su -
cd /etc/ceph
ceph -s --name client.glance --keyring ceph.client.glance.keyring
ceph -s --name client.cinder --keyring ceph.client.cinder.keyring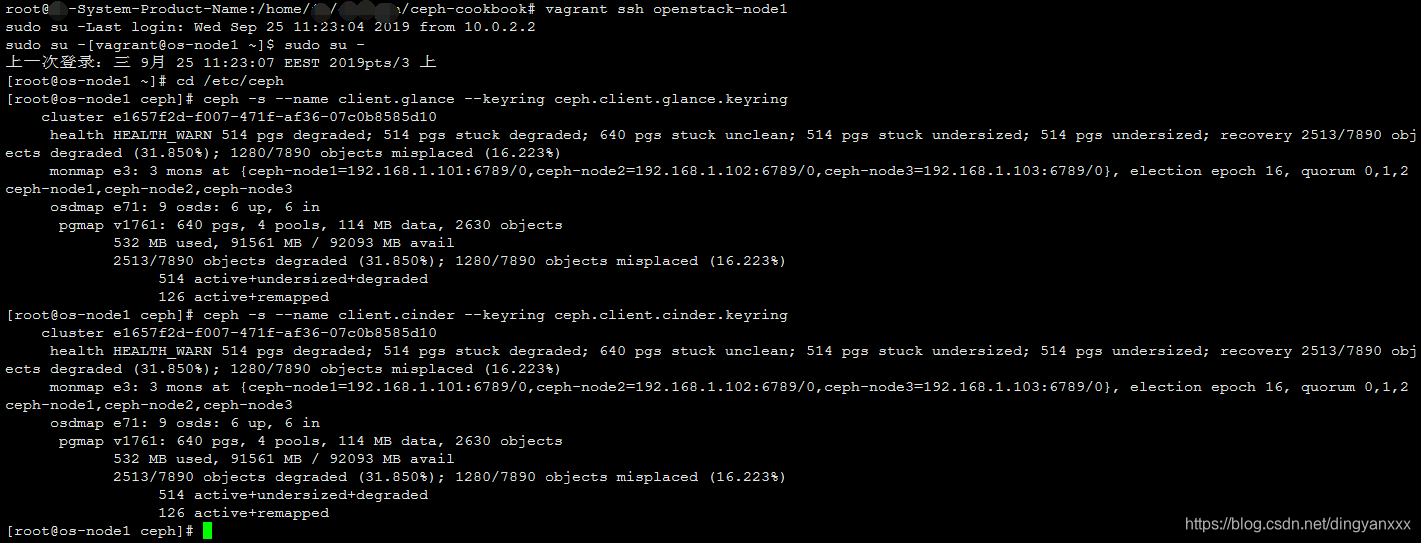
9、最后,生成uuid,然后创建、定义和设置秘钥给libvirt,并且移除掉临时生成的秘钥副本。
(1)使用如下命令生成uuid:
cd /etc/ceph
uuidgen
(2)创建秘钥文件,并将uuid设置给它
cat > secret.xml << EOF
<secret ephemeral='no' private='no'>
    <uuid>1a4495d2-7c0f-41c6-aa81-8ada69836578</uuid>
    <usage type='ceph'>
        <name>client.cinder secret</name>
    </usage>
</secret>
EOF
(3)定义秘钥文件,并保证我们生成的保密字符串值是安全的。
virsh secret-define --file secret.xml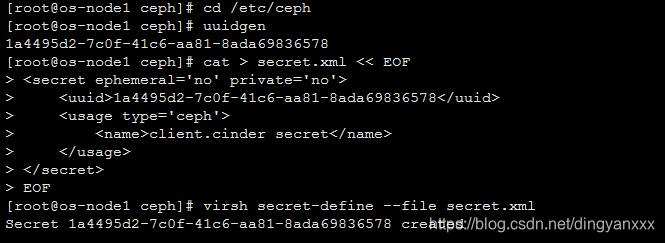
(4)在vrish里设置好我们最后一步生成的保密字符串值,并删除临时文件。
virsh secret-set-value --secret 1a4495d2-7c0f-41c6-aa81-8ada69836578 --base64 $(cat temp.client.cinder.key) && rm temp.client.cinder.key secret.xml
virsh secret-list
配置Ceph作为Glance后端存储
配置OpenStack Glance模块来将其虚拟机镜像存储在Ceph RBD中。
1、登陆os-node1,也就是我们的Glance节点,然后编辑/etc/glance/glance-api.conf文件并作如下修改:
(1)在[DEFAULT]部分,请确保已添加以下代码行
default_store=rbd
show_image_direct_url=True
(2)执行以下命令来验证配置项
cat /etc/glance/glance-api.conf | egrep -i "default_store|image_direct"
(3)在[glance_store]部分,请确保在RBD Store配置部分有以下行
stores = rbd
rbd_store_ceph_conf=/etc/ceph/ceph.conf
rbd_store_user=glance
rbd_store_pool=images
rbd_store_chunk_size=8
(4)执行如下命令来验证之前的配置
cat /etc/glance/glance-api.conf | egrep -v "#|default" | grep -i rbd
2、重启OpenStack Glance服务
service openstack-glance-api restart3、查看Glance中的虚拟机镜像
source keystonerc_admin
glance image-list
4、从网上下载cirros镜像,稍后它将被存储在Ceph中
wget http://download.cirros-cloud.net/0.3.1/cirros-0.3.1-x86_64-disk.img5、使用一下命令创建一个新的Glance镜像
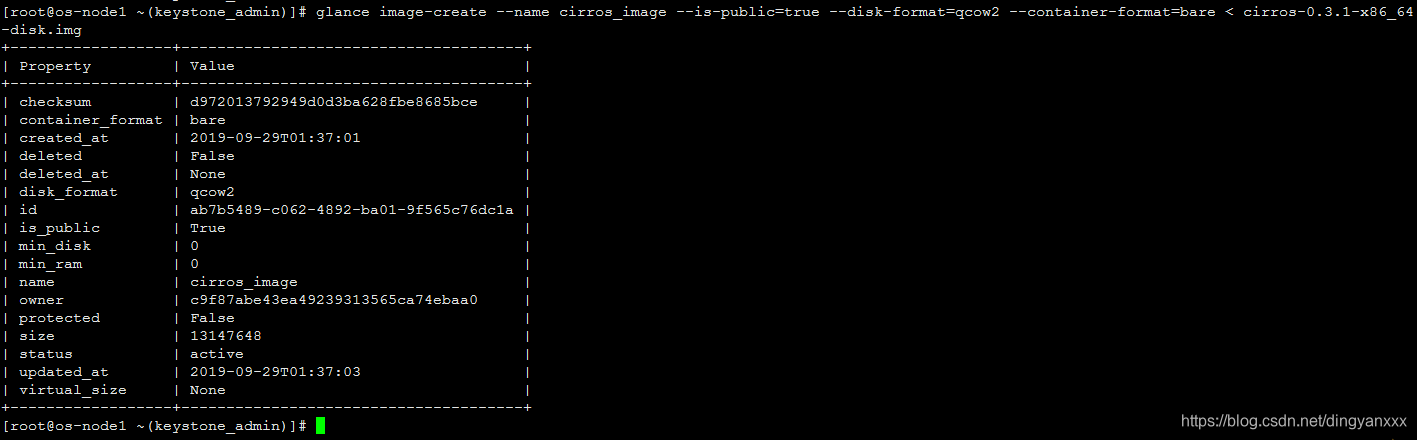
6、使用下列命令列出Glance镜像
glance image-list
7、通过在Ceph的镜像池中查询镜像ID来验证我们新添加的镜像
rados -p images ls --name client.glance --keyring /etc/ceph/ceph.client.glance.keyring | grep -i id
8、至此,我们已经将Glabce的默认存储后端配置为Ceph,现在所有的Glance镜像都将存储在Ceph中。也可以尝试从OpenStack的Horizon Dashboard下新建镜像。
9、最后,我们尝试使用我们先前创建的额镜像启动一个实例
nova boot --flavor 1 --image ab7b5489-c062-4892-ba01-9f565c76dc1a vm1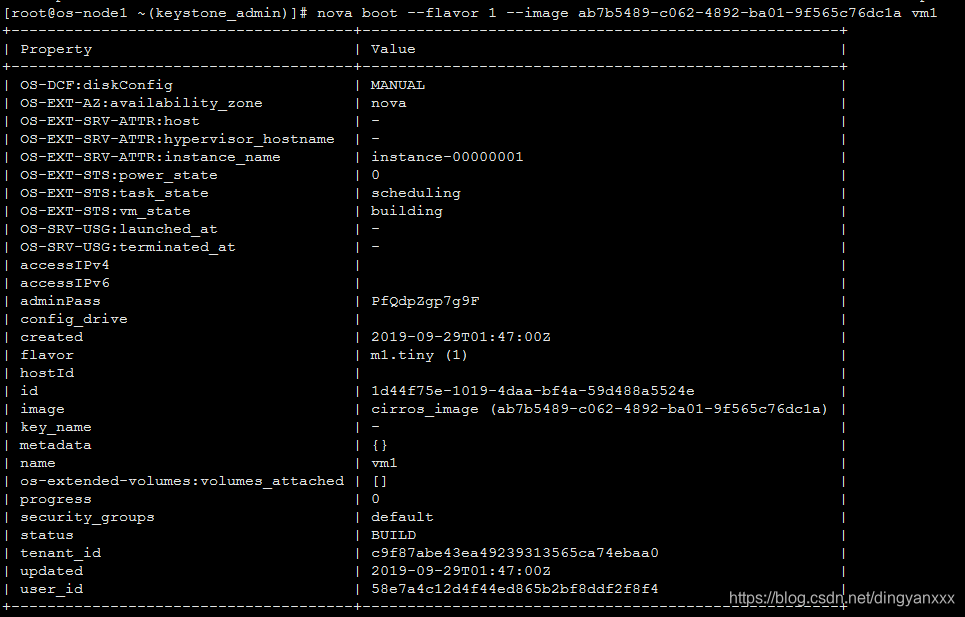
配置Ceph为Cinder后端存储
OpenStack的Cinder程序为虚拟机提供了块存储。本节中,我们将配置Ceph作为OpenStack Cinder的后端存储。OpenStack Cinder需要一个驱动程序与Ceph的块设备进行交互。在OpenStack节点,编辑/etc/cinder/cinder.conf配置文件,并加入以下部分给出的代码片段。
1、由于演示中,我们没有使用多个Cinder后端存储配置项,编辑/etc/cinder/cinder.conf文件,将其中的enabled_backends项注释掉。
2、在/etc/cinder/cinder.conf文件中的cinder.volume.drivers.rbd选项部分中,添加如下配置选项(将保密的uuid替换为自身环境下的值)
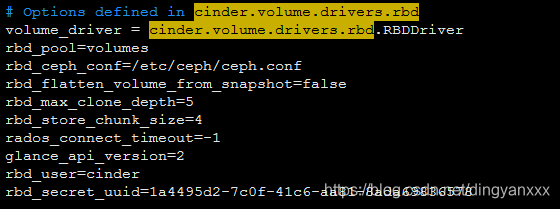
3、执行以下命令来验证以上配置项
cat /etc/cinder/cinder.conf | egrep "rbd|rados|version" | grep -v "#"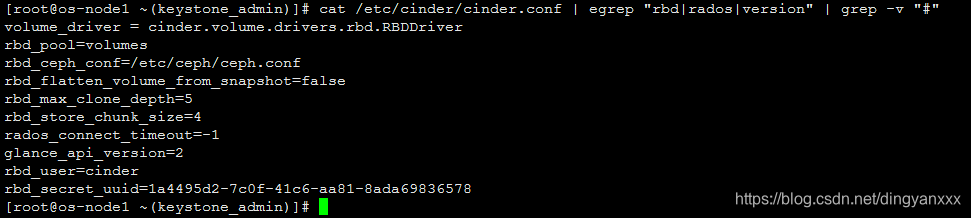
4、重启OpenStack Cinder服务
service openstack-cinder-volume restart
source /root/keystonerc_admin
cinder list
5、为了测试以上配置,在Ceph集群上创建一个2GB大小的第一个Cinder卷,他将会被创建在Ceph集群中
cinder create --display-name ceph-volume01 --display-description "Cinder volume on CEPH storage" 2
cinder list
rados -p volumes --name client.cinder --keyring /etc/ceph/ceph.client.cinder.keyring ls | grep -i id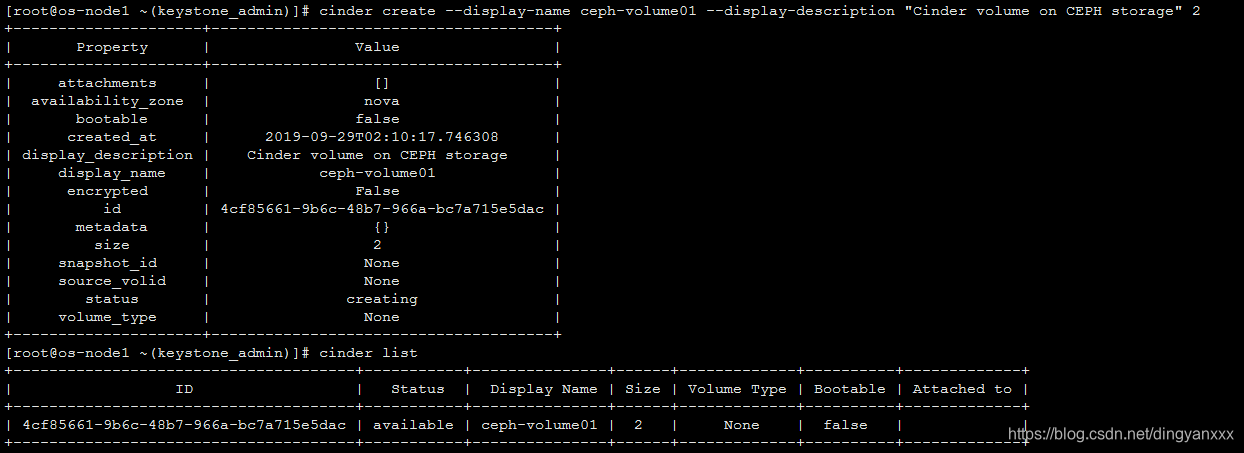
6、同样可以尝试使用OpenStack Horizon Dashboard创建另外一个新的卷。
将Ceph RBD挂载到Nova上
要挂载Ceph RBD到OpenStack实例,我们需要配置OpenStack Nova模块,添加它访问Ceph集群所需要的rbd用户和uuid信息。要做到这一点,需要在OpenStack节点上编辑/etc/nova/nova.conf,并执行一下更改。
上一节中我们配置的Cinder服务会将卷创建在Ceph中,然而,要将这些卷挂载到OpenStack虚拟机,我们还需要配置Nova。
1、配置文件/etc/nova/nova.conf中,找到nova.virt.libvirt.volume选项部分,添加以下代码行(其中的uuid需要替换成实际环境中的值)
2、重启OpenStack Nova服务
service openstack-nova-compute restart
nova list
cinder list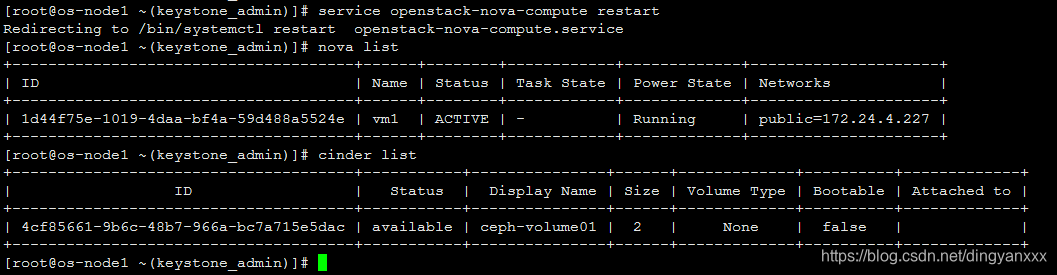
3、将卷挂载到实例上
4、现在可以在OpenStack的实例中像平常的硬盘一样使用改卷
Nova基于Ceph RBD启动实例
为了将所有OpenStack实例放进Ceph——这也符合boot-from-volume特性,我们需要为Nova配置一个临时性后端。
1、修改配置文件/etc/nova/nova.conf的 [libvirt]部分并添加一下内容
inject_partition=-2
images_type=rbd
images_rbd_pool=vms
images_rbd_ceph_conf=/etc/ceph/ceph.conf
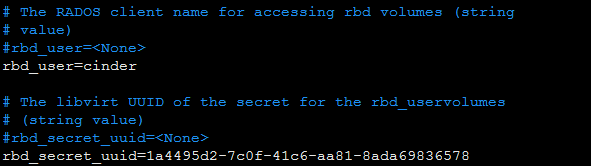
rbd_user=cinder
2、验证修改

3、重启OpenStach Nova服务
service openstack-nova-compute restart4、要在Ceph中启动虚拟机,Glance镜像的格式必须为RAW。转换镜像格式
qemu-img convert -f qcow2 -O raw cirros-0.3.1-x86_64-disk.img cirros-0.3.1-x86_64-disk.raw5、使用RAW镜像创建Glance镜像
glance image-create --name cirros_raw_image --is-public=true --disk-format=raw --container-format=bare<cirros-0.3.1-x86_64-disk.raw6、创建一个可引导的卷来测试从Ceph卷启动虚拟机
nova image-list
cinder create --image-id 8a7fdc35-6e15-42d7-82f4-e53c8dda5276 --display-name cirros-ceph-boot-volume 1
7、列出Cinder卷,查看可引导字段是否为True

8、现在,我们有了一个存储在Ceph上的可启动卷,我们来从这个卷上启动一个实例
nova boot --flavor 1 --block_device_mapping vda=093ad084-3339-494d-a04f-ef2e29509458::1 --image 8a7fdc35-6e15-42d7-82f4-e53c8dda5276 vm29、最后,检查实例状态(本例中启动失败,存在异常,待处理)


 1228
1228

 被折叠的 条评论
为什么被折叠?
被折叠的 条评论
为什么被折叠?
 到【灌水乐园】发言


