


 本文详细介绍了Nginx的访问控制、用户认证及HTTPS配置方法。包括如何通过allow和deny指令控制访问,使用auth_basic实现基本认证,并生成及配置SSL证书以启用HTTPS。
nginx访问控制、用户认证、https
访问控制
用于location段
allow:设定允许哪台或哪些主机访问,多个参数间用空格隔开
deny:设定禁止哪台或哪些主机访问,多个参数间用空格隔开
例子
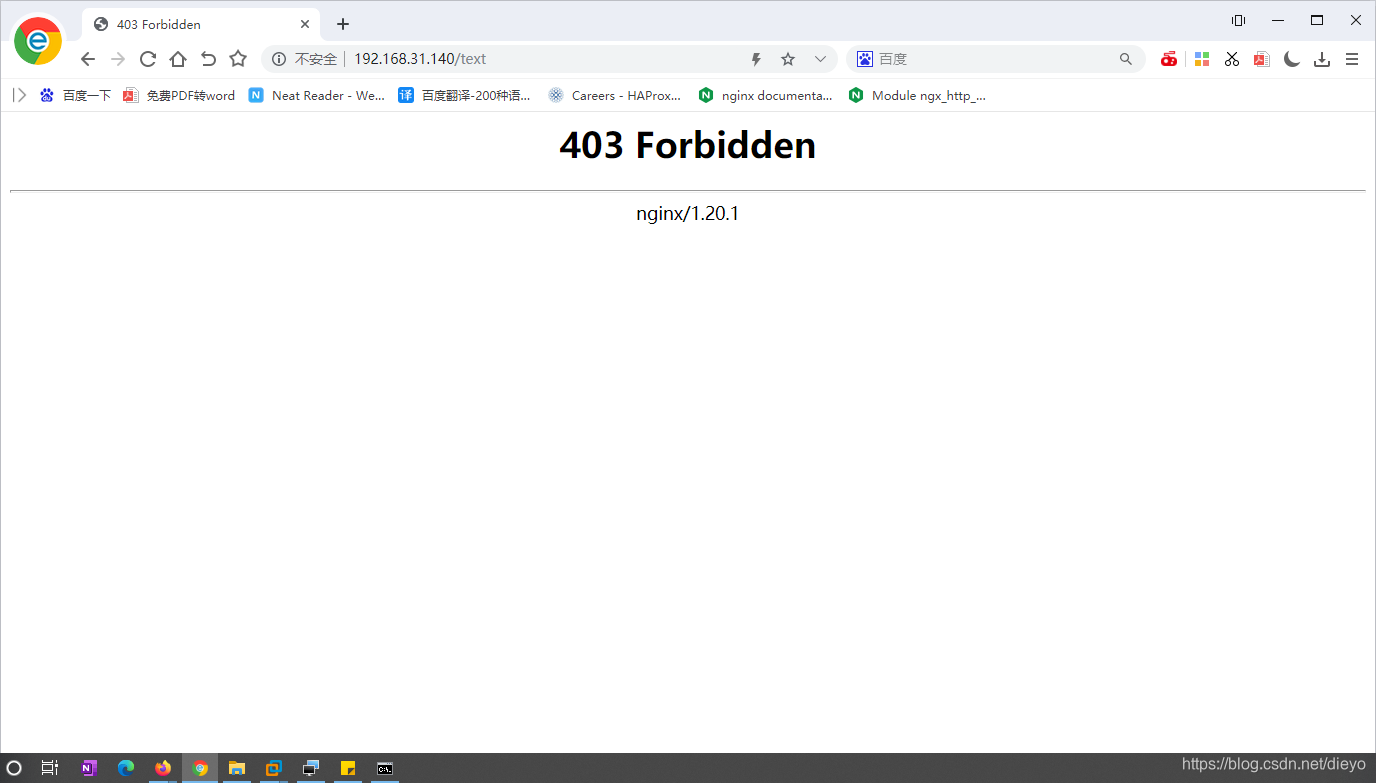
拒绝192.168.31.140访问
[root@czh ~]# vim /usr/local/nginx/conf/nginx.conf
        location /text {
            deny 192.168.31.140
            echo "abc";
        }
[root@czh ~]# nginx -s reload
发现访问被拒绝
[root@czh ~]# curl http://192.168.31.140
<html>
<head><title>403 Forbidden</title></head>
<body>
<center><h1>403 Forbidden</h1></center>
<hr><center>nginx/1.20.1</center>
</body>
</html>
然后禁止除了192.168.31.140以外的所有ip的访问
[root@czh ~]# vim /usr/local/nginx/conf/nginx.conf
        location /text {
            allow 192.168.31.140
            deny all;    //禁止所有
            echo "abc";
        }
[root@czh ~]# nginx -s reload

然后测试
用虚拟机查看
[root@czh ~]# curl http://192.168.31.140/text
abc
再用网页打开
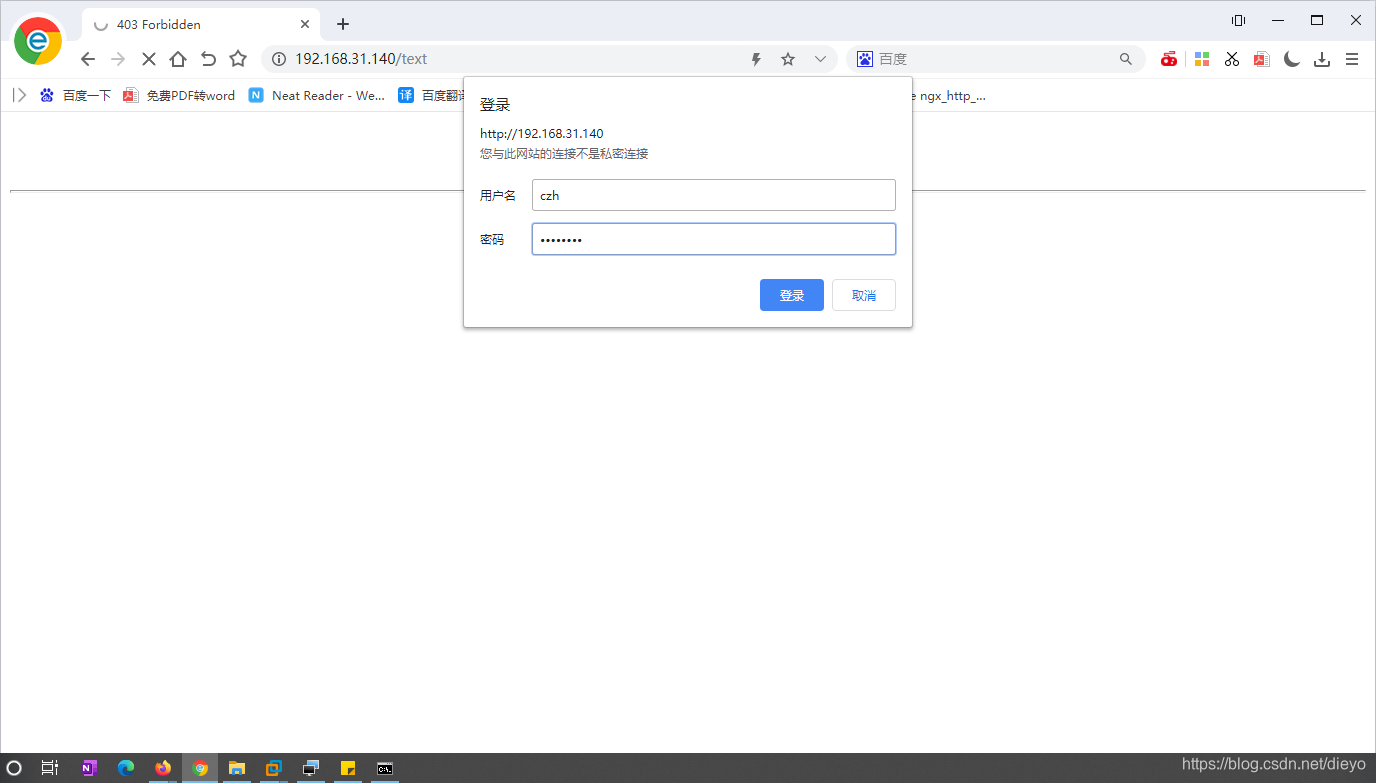
用户认证
auth_basic "欢迎信息";
auth_basic_user_file "/path/to/user_auth_file"
user_auth_file内容格式为
username:password
这里的密码为加密后的密码串,建议用htpasswd来创建此文件:
htpasswd -c -m /path/to/.user_auth_file USERNAME
实际操作
[root@czh ~]# yum -y install httpd-tools
[root@czh ~]# htpasswd -c -m /usr/local/nginx/conf/.user_auth czh
New password:
Re-type new password:
Adding password for user czh
查看
[root@czh ~]# vim /usr/local/nginx/conf/.user_auth
czh:$apr1$7vfdWUAA$St2IsO8y9HgNrQo3Y6r871   //如果密码忘记的话,重新在覆盖一个就行了

[root@czh ~]# vim /usr/local/nginx/conf/nginx.conf
        location /text {
            auth_basic    "test";
            auth_basic_user_file /usr/local/nginx/conf/.user_auth;
        echo "abc";
        }
[root@czh ~]# nginx -s reload
 修改位置
修改位置
直接放在http下面
http {
        auth_basic    "test";
        auth_basic_user_file /usr/local/nginx/conf/.user_auth;
再次尝试,发现可以,不过如果能直接进去,需要把浏览器数据清一下。

https的配置
首先需要生成一个证书的签署,再在nginx.conf里面配置
生成证书
在CA生成一对密钥
[root@czh ~]# mkdir /etc/pki/CA
[root@czh ~]# cd /etc/pki/CA/
[root@czh CA]# mkdir private
[root@czh CA]# umask 077;openssl genrsa -out private/cakey.pem 2048
Generating RSA private key, 2048 bit long modulus (2 primes)
.................................................................+++++
...................................................................................+++++
e is 65537 (0x010001)

CA生成自签署的证书
[root@czh CA]# openssl req -new -x509 -key private/cakey.pem -out cacert.pem -days 365
You are about to be asked to enter information that will be incorporated
into your certificate request.
What you are about to enter is what is called a Distinguished Name or a DN.
There are quite a few fields but you can leave some blank
For some fields there will be a default value,
If you enter '.', the field will be left blank.
-----
Country Name (2 letter code) [XX]:CN
State or Province Name (full name) []:HB
Locality Name (eg, city) [Default City]:WH
Organization Name (eg, company) [Default Company Ltd]:czh
Organizational Unit Name (eg, section) []:czh
Common Name (eg, your name or your server's hostname) []:czh.example.com
Email Address []:1@1.com

生成密钥
[root@czh CA]# mkdir certs newcerts crl
[root@czh CA]#  touch index.txt && echo 01 > serial
[root@czh CA]# cd /usr/local/nginx/
[root@czh nginx]# mkdir ssl
[root@czh nginx]# cd ssl/
[root@czh ssl]# ls
[root@czh ssl]# (umask 077;openssl genrsa -out nginx.key 2048)
Generating RSA private key, 2048 bit long modulus (2 primes)
...+++++
............................................................................................+++++
e is 65537 (0x010001)
[root@czh ssl]# openssl req -new -key nginx.key -days 365 -out nginx.csr
Ignoring -days; not generating a certificate
You are about to be asked to enter information that will be incorporated
into your certificate request.
What you are about to enter is what is called a Distinguished Name or a DN.
There are quite a few fields but you can leave some blank
For some fields there will be a default value,
If you enter '.', the field will be left blank.
-----
Country Name (2 letter code) [XX]:CN
State or Province Name (full name) []:HB
Locality Name (eg, city) [Default City]:WH
Organization Name (eg, company) [Default Company Ltd]:czh
Organizational Unit Name (eg, section) []:czh
Common Name (eg, your name or your server's hostname) []:czh.example.com
Email Address []:1@1.com

Please enter the following 'extra' attributes
to be sent with your certificate request
A challenge password []:12345678
An optional company name []:12345678
[root@czh ssl]# ls
nginx.csr  nginx.key
[root@czh ssl]# openssl ca -in nginx.csr -out nginx.crt -days 365
Using configuration from /etc/pki/tls/openssl.cnf
Check that the request matches the signature
Signature ok
Certificate Details:
        Serial Number: 1 (0x1)
        Validity
            Not Before: Jun 27 10:46:05 2021 GMT
            Not After : Jun 27 10:46:05 2022 GMT
        Subject:
            countryName               = CN
            stateOrProvinceName       = HB
            organizationName          = czh
            organizationalUnitName    = czh
            commonName                = czh.example.com
            emailAddress              = 1@1.com
        X509v3 extensions:
            X509v3 Basic Constraints:
                CA:FALSE
            Netscape Comment:
                OpenSSL Generated Certificate
            X509v3 Subject Key Identifier:
                3E:6B:A0:0E:7F:0B:92:19:3E:23:BB:38:E9:E0:48:61:69:A8:D4:93
            X509v3 Authority Key Identifier:
                keyid:FF:C8:1E:ED:7F:34:4C:7B:9A:DB:75:1D:87:AD:31:F3:8F:4D:83:41

Certificate is to be certified until Jun 27 10:46:05 2022 GMT (365 days)
Sign the certificate? [y/n]:y


1 out of 1 certificate requests certified, commit? [y/n]y
Write out database with 1 new entries
Data Base Updated
[root@czh ssl]# ls
nginx.crt  nginx.csr  nginx.key
    server {
        listen       443 ssl;
        server_name  czh.example.com;

        ssl_certificate      /usr/local/nginx/ssl/nginx.crt;
        ssl_certificate_key  /usr/local/nginx/ssl/nginx.key;

        ssl_session_cache    shared:SSL:1m;
        ssl_session_timeout  5m;

        ssl_ciphers  HIGH:!aNULL:!MD5;
        ssl_prefer_server_ciphers  on;

        location / {
            root   html;
            index  index.html index.htm;
        }
    }

}
[root@czh html]# nginx -s reload
[root@czh html]# ss -antl
State   Recv-Q  Send-Q   Local Address:Port   Peer Address:Port Process
LISTEN  0       128            0.0.0.0:22          0.0.0.0:*
LISTEN  0       128            0.0.0.0:443         0.0.0.0:*
LISTEN  0       128            0.0.0.0:9000        0.0.0.0:*
LISTEN  0       128            0.0.0.0:80          0.0.0.0:*
LISTEN  0       128               [::]:22             [::]:*
LISTEN  0       80                   *:3306              *:*
访问好了


 1162
1162

 被折叠的 条评论
为什么被折叠?
被折叠的 条评论
为什么被折叠?
 到【灌水乐园】发言


