


 博主通过 Blend 创建模板副本,研究WPF Slider结构,实现颜色修改。文章介绍了使用 Blend 设计界面的过程,并提供了水平Slider的修改代码。
效果如下:

鄙人虽然开发WPF有些时间,但之前一直是一些简单Template和Style改改之类的工作,并没有深入研究过。此次为了完成工作,首先也是网上搜了半天,没有找到合适的代码直接拷贝(搜索能力待提高),干脆就直接静下心来琢磨琢磨。
一开始在界面上就放了Slider,挠挠头,怎么修改Template才能达到效果呢?后来想到了Blend,之前一直听说很强大的界面设计工具,但是一直没有用过,就趁此机会就简单运用了一下。Blend中很牛逼的就是编辑模板,通过创建模板副本,可以看到Slider结构
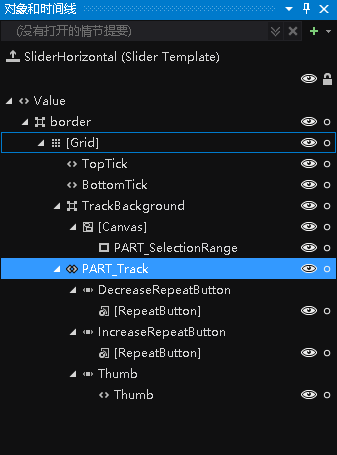
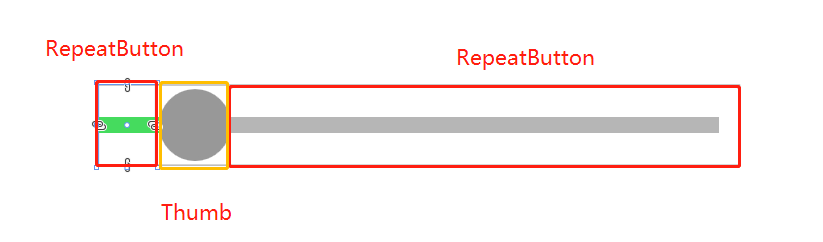
结合代码发现,Thumb左右两边的ReapeatButton的宽度会随着Thumb的位置会变化。那问题就变得简单很多,修改左RepeatButton的Template就可以达到目的,核心代码如下。
       <Style x:Key="DecreaseBtn" TargetType="{x:Type RepeatButton}">
            <Setter Property="Template">
                <Setter.Value>
                    <ControlTemplate TargetType="{x:Type RepeatButton}">
                        <Border Background="{TemplateBinding Background}"
                                Height="{TemplateBinding Height}" Width="{TemplateBinding Width}">
                            <!--轨迹,设置Background-->
                            <Border Margin="0,0,-1,0" Background="{StaticResource SliderThumb.Track.DecreaseBackground}"
                                    VerticalAlignment="center" Height="4.0" />
                        </Border>
                    </ControlTemplate>
                </Setter.Value>
            </Setter>
        </Style>
完整代码(只是考虑水平的Slider):


  1 <ResourceDictionary xmlns="http://schemas.microsoft.com/winfx/2006/xaml/presentation"
  2                     xmlns:x="http://schemas.microsoft.com/winfx/2006/xaml">
  3
  4
  5     <SolidColorBrush x:Key="SliderThumb.Static.Foreground" Color="#FFE5E5E5"/>
  6     <SolidColorBrush x:Key="SliderThumb.MouseOver.Background" Color="Gray"/>
  7     <SolidColorBrush x:Key="SliderThumb.MouseOver.Border" Color="#FF7Eb4EA"/>
  8     <SolidColorBrush x:Key="SliderThumb.Pressed.Background" Color="Gray"/>
  9     <SolidColorBrush x:Key="SliderThumb.Pressed.Border" Color="Gray"/>
 10     <SolidColorBrush x:Key="SliderThumb.Disabled.Background" Color="#FFF0F0F0"/>
 11     <SolidColorBrush x:Key="SliderThumb.Disabled.Border" Color="#FFD9D9D9"/>
 12     <SolidColorBrush x:Key="SliderThumb.Static.Background" Color="#989898"/>
 13
 14     <ControlTemplate x:Key="SliderThumbHorizontalTop" TargetType="{x:Type Thumb}">
 15         <Grid HorizontalAlignment="Center" UseLayoutRounding="True" VerticalAlignment="Center"
 最低0.47元/天 解锁文章


 475
475

 被折叠的 条评论
为什么被折叠?
被折叠的 条评论
为什么被折叠?
 到【灌水乐园】发言


