记录:tinyrenderer---1.2 Rasterizing the boundary

光栅化三角形

Scanline rendering(扫描线渲染),一个老式的算法

  • 按y轴坐标进行排序,我这里采取降序,ay > by > cy
  • 同时光栅化三角形的左右两边
  • 绘制水平线段,连接左右边界点
不理解的可以看这里
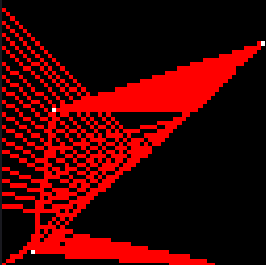
这个很好理解,从最高的顶点出发,同步绘制此顶点连接的两条边,在每条边渲染的y值都发生一次变化,此时y值相同,绘制其连线即可。
通过排序可以做到:在逻辑上ay就是最大的,这样可以减少大量没有必要的工作。
这是一张之前失败的图片,应该有一些辅助效果。

img

这里记录一下我最初的尝试

友情提示:该代码有些伤眼,请谨慎观看:

先是对y坐标进行了降序,ay > by > cy;

    //y坐标降序
    if(ay < by) { std::swap(ax, bx); std::swap(ay, by); }
    if(ay < cy) { std::swap(ax, cx); std::swap(ay, cy); }
    if(by < cy) { std::swap(bx, cx); std::swap(by, cy); }

之后我采取了先绘制三条边的策略,(现在看来是选了个不得了的策略)
在之前我们绘制一条直线时,需要求得两点steep,所以这次绘制三条直线,我计算了三次
没错,我计算了三个steep,这使我不得不考虑swap将会导致的混乱:
我选择了简单暴力的方法,copy一份。

    //副本
    int ax_copy = ax;
    int ay_copy = ay;
    int bx_copy = bx;
    int by_copy = by;
    int cx_copy = cx;
    int cy_copy = cy;


    //直线,消gap
    //ab
    bool steep_ab_gap = std::abs(bx - ax) < std::abs(by - ay);
    if(steep_ab_gap){
        std::swap(ax,ay);
        std::swap(bx,by);
    }
    //ac
    bool steep_ac_gap = std::abs(cx - ax_copy) < std::abs(cy - ay_copy);
    if(steep_ac_gap){
        std::swap(ax_copy,ay_copy);
        std::swap(cx,cy);
    }
    //bc
    bool steep_bc_gap = std::abs(cx_copy - bx_copy) < std::abs(cy_copy - by_copy);
    if(steep_bc_gap){
        std::swap(bx_copy,by_copy);
        std::swap(cx_copy,cy_copy);
    }

在消除缺口后,需要使光栅化从左至右进行,这样可以让我少写一些重复的代码。
不过这次需要存储大小比较的结果,而不直接交换,我不想打破y的排序,先以实现为先

    //x大小确定
    //ab
    bool size_x1 = (bx < ax);
    //ac
    bool size_x2 = (cx < ax_copy);
    //bc
    bool size_x3 = (cx_copy < bx_copy);

好了,现在我可以以更水平的方式从左至右光栅化三条边,这也导致了一个问题,我无法统一每条边是按y或是x进行光栅化。
嘿,我又有了一个简单暴力的方法,我把每一次y+1或者x+1的第一个像素坐标保存,
在同步光栅化边和填充的问题中,我选择了将他们分开进行。

我需要三个std::vector<Vector3>来存储每条边需要的像素点

    //pixel坐标
    std::vector<Vector3> a_b;
    std::vector<Vector3> a_c;
    std::vector<Vector3> b_c;

接下来就是line()函数的改版,c_line(),引入了参数std::vector<Vector3>& tri_pixl

//创建了Vector3 temp,赋给引用的std::vector<Vector3>& tri_pixl
void c_line(int ax,int ay,int cx,int cy,bool size_x,bool steep_gap,TGAImage &framebuffer,TGAColor color,std::vector& tri_pixl){
    
    int ierror = 0;
    int y = ay;
    Vector3 temp;

    if(size_x){
        for(int x = ax; x > cx; x --){
            //渲染,存储
            if(steep_gap){
                framebuffer.set(y,x,color);
                //取点
                ierror += 2 * std::abs(cy - ay);
                if(ierror > (ax - cx)){
                    y += cy > ay ? 1 : -1;
                    ierror -= 2 * (ax - cx);
                }
                //存储
                temp.x = y;
                temp.y = x - 1;
                tri_pixl.push_back(temp);
            }       
            else{
                framebuffer.set(x,y,color);
                ierror += 2 * std::abs(cy - ay);
                if(ierror > (ax - cx)){
                    y += cy > ay ? 1 : -1;
                    ierror -= 2 * (ax - cx);

                    temp.x = x - 1;
                    temp.y = y;
                    tri_pixl.push_back(temp);
                } 
            }
        }
    }
    else{
        for(int x = ax; x < cx; x ++){
            if(steep_gap){
                framebuffer.set(y,x,color);
                ierror += 2 * std::abs(cy - ay);
                if(ierror > (cx - ax)){
                y += cy > ay ? 1 : -1;                
                ierror -= 2 * (cx - ax);
                }

                temp.x = y;
                temp.y = x + 1;
                tri_pixl.push_back(temp);
            }
               
            else{
                framebuffer.set(x,y,color);
                ierror += 2 * std::abs(cy - ay);

                if(ierror > (cx - ax)){
                y += cy > ay ? 1 : -1;                
                ierror -= 2 * (cx - ax);

                temp.x = x + 1;
                temp.y = y;
                tri_pixl.push_back(temp);
                }
            }
        }
    }
}

现在我有了每条边每行每列第一个光栅化的像素点的坐标,只需要按行或按列填充即可

//填充
void straight_line(int ax,int ay,int bx,int by,TGAImage &framebuffer,TGAColor color){    
    if(ax > bx){ std::swap( ax, bx );}
        for(int x = ax; x <= bx; x++){
            framebuffer.set(x,ay,color);
    }       
}

遍历


    size_t i = 0;
    size_t i_bc = 0;
    for(;i < a_b.size(); i ++){ straight_line(a_b[i].x, a_b[i].y, a_c[i].x, a_c[i].y, framebuffer, color); }

    for(i_bc = 0;i_bc < b_c.size(); i ++, i_bc ++){ straight_line(b_c[i_bc].x, b_c[i_bc].y, a_c[i].x, a_c[i].y, framebuffer, color); }    

img
img


进行扫描线渲染,作者写了新的triangle函数
首先进行了冒泡排序,采用的升序,不过我用的降序。


    //verts.y排序,冒泡
    if(ay < by) { std::swap(ax, bx); std::swap(ay, by); }
    if(ay < cy) { std::swap(ax, cx); std::swap(ay, cy); }
    if(by < cy) { std::swap(bx, cx); std::swap(by, cy); }

扫描线渲染,我们需要两边的像素点作为开始和结束,b点将成为我们的分界点,用来区分ab,bc直线。

在b点水平切割,绘制它的上半部分

我们这次不选择去更换x或y轴,忽视间隙的产生,计算左右边界,遍历填充

这里有我的理解
仔细想一下,假设我们每次y --,那么可能会遇到y - 1,而x + n的情况,导致y和y-1在水平上有n - 1个间隙,之前绘制直线我们会等到在y填补完这些间隙后,才会跳到y - 1,进行第x + n的绘制。
现在我们进行填充,会直接从左边界绘制到有边界,不需要去考虑到下一行会有几个间隙了,因为都被填充了。

    int total_height = ay - cy;
    if(ay != by){
        int segment_height = ay - by;
        for(int y = ay; y >= by; y --){
            int x_l = ax + ((ax - bx) * (y - ay) / segment_height);
            int x_r = ax + ((ax - cx) * (y - ay) / total_height); 
            for(int x = std::min(x_l, x_r); x <= std::max(x_l, x_r); x ++){ framebuffer.set(x, y, color);}
        }
    }

之后是下半部分


    if(by != cy){
        for(int y = by; y >= cy; y--){
            int segment_height = by - cy;
            int x_l = bx + ((bx - cx) * (y - by) / segment_height);
            int x_r = ax + ((ax - cx) * (y - ay) / total_height);
            for(int x = std::min(x_l, x_r); x <= std::max(x_l, x_r); x ++){ framebuffer.set(x, y, color);}
        }
    }

img

扫描线光栅化是老式的方案,现在我们可以采取现代一些的光栅化方法

  • 先找一个包围盒,有三角形的坐标很好计算,选取最小和最大的坐标即可
    
        //计算包围盒
        int bbminx = std::min(std::min(ax,bx),cx);
        int bbminy = std::min(std::min(ay,by),cy);
        int bbmaxx = std::max(std::max(ax,bx),cx);
        int bbmaxy = std::max(std::max(ay,by),cy);
    
  • 之后计算包围盒内点在不在三角形内,有很多算法,这里采取计算重心坐标。
    这里通过计算PAB,PBC,PCA占ABC面积的权重来获取重心坐标,这里暂时不进一步介绍。
    
        #pragma omp parallel for
            for(int x = bbminx; x <= bbmaxx; x++){
                for(int y = bbminy; y <= bbmaxy; y++){
                    //重心坐标
                    double alpha = signed_triangle_area(x,y,bx,by,cx,cy) / total_area;
                    double beta = signed_triangle_area(x,y,ax,ay,bx,by) / total_area;
                    double gamma = signed_triangle_area(x,y,cx,cy,ax,ay) / total_area;
                    if(alpha < 0 || beta < 0 || gamma < 0) continue;
                    framebuffer.set(x,y,color);
                }
            }
    
  • 如果需要考虑正反面的情况,要进行一次裁剪
    注:这次裁剪将会删除所有背向三角形
    
        double total_area = signed_triangle_area(ax,ay,bx,by,cx,cy);
        if (total_area < 1) return;//删除覆盖少于一pixel的三角形
    

    img

    --------------------------------------------------------------------------- FileNotFoundError Traceback (most recent call last) ~/miniconda3/lib/python3.8/site-packages/matplotlib/texmanager.py in _run_checked_subprocess(self, command, tex, cwd) 232 try: --> 233 report = subprocess.check_output( 234 command, cwd=cwd if cwd is not None else self.texcache, ~/miniconda3/lib/python3.8/subprocess.py in check_output(timeout, *popenargs, **kwargs) 414 --> 415 return run(*popenargs, stdout=PIPE, timeout=timeout, check=True, 416 **kwargs).stdout ~/miniconda3/lib/python3.8/subprocess.py in run(input, capture_output, timeout, check, *popenargs, **kwargs) 492 --> 493 with Popen(*popenargs, **kwargs) as process: 494 try: ~/miniconda3/lib/python3.8/subprocess.py in __init__(self, args, bufsize, executable, stdin, stdout, stderr, preexec_fn, close_fds, shell, cwd, env, universal_newlines, startupinfo, creationflags, restore_signals, start_new_session, pass_fds, encoding, errors, text) 857 --> 858 self._execute_child(args, executable, preexec_fn, close_fds, 859 pass_fds, cwd, env, ~/miniconda3/lib/python3.8/subprocess.py in _execute_child(self, args, executable, preexec_fn, close_fds, pass_fds, cwd, env, startupinfo, creationflags, shell, p2cread, p2cwrite, c2pread, c2pwrite, errread, errwrite, restore_signals, start_new_session) 1703 err_msg = os.strerror(errno_num) -> 1704 raise child_exception_type(errno_num, err_msg, err_filename) 1705 raise child_exception_type(err_msg) FileNotFoundError: [Errno 2] No such file or directory: 'latex' The above exception was the direct cause of the following exception: RuntimeError Traceback (most recent call last) ~/miniconda3/lib/python3.8/site-packages/IPython/core/formatters.py in __call__(self, obj) 339 pass 340 else: --> 341 return printer(obj) 342 # Finally look for special method names 343 method = get_real_method(obj, self.print_method) ~/miniconda3/lib/python3.8/site-packages/IPython/core/pylabtools.py in print_figure(fig, fmt, bbox_inches, base64, **kwargs) 149 FigureCanvasBase(fig) 150 --> 151 fig.canvas.print_figure(bytes_io, **kw) 152 data = bytes_io.getvalue() 153 if fmt == 'svg': ~/miniconda3/lib/python3.8/site-packages/matplotlib/backend_bases.py in print_figure(self, filename, dpi, facecolor, edgecolor, orientation, format, bbox_inches, pad_inches, bbox_extra_artists, backend, **kwargs) 2288 ) 2289 with getattr(renderer, "_draw_disabled", nullcontext)(): -> 2290 self.figure.draw(renderer) 2291 2292 if bbox_inches: ~/miniconda3/lib/python3.8/site-packages/matplotlib/artist.py in draw_wrapper(artist, renderer, *args, **kwargs) 71 @wraps(draw) 72 def draw_wrapper(artist, renderer, *args, **kwargs): ---> 73 result = draw(artist, renderer, *args, **kwargs) 74 if renderer._rasterizing: 75 renderer.stop_rasterizing() ~/miniconda3/lib/python3.8/site-packages/matplotlib/artist.py in draw_wrapper(artist, renderer) 48 renderer.start_filter() 49 ---> 50 return draw(artist, renderer) 51 finally: 52 if artist.get_agg_filter() is not None: ~/miniconda3/lib/python3.8/site-packages/matplotlib/figure.py in draw(self, renderer) 2801 2802 self.patch.draw(renderer) -> 2803 mimage._draw_list_compositing_images( 2804 renderer, self, artists, self.suppressComposite) 2805 ~/miniconda3/lib/python3.8/site-packages/matplotlib/image.py in _draw_list_compositing_images(renderer, parent, artists, suppress_composite) 130 if not_composite or not has_images: 131 for a in artists: --> 132 a.draw(renderer) 133 else: 134 # Composite any adjacent images together ~/miniconda3/lib/python3.8/site-packages/matplotlib/artist.py in draw_wrapper(artist, renderer) 48 renderer.start_filter() 49 ---> 50 return draw(artist, renderer) 51 finally: 52 if artist.get_agg_filter() is not None: ~/miniconda3/lib/python3.8/site-packages/matplotlib/axes/_base.py in draw(self, renderer) 3044 artists.remove(spine) 3045 -> 3046 self._update_title_position(renderer) 3047 3048 if not self.axison: ~/miniconda3/lib/python3.8/site-packages/matplotlib/axes/_base.py in _update_title_position(self, renderer) 2994 _log.debug('top of Axes not in the figure, so title not moved') 2995 return -> 2996 if title.get_window_extent(renderer).ymin < top: 2997 _, y = self.transAxes.inverted().transform((0, top)) 2998 title.set_position((x, y)) ~/miniconda3/lib/python3.8/site-packages/matplotlib/text.py in get_window_extent(self, renderer, dpi) 908 909 with cbook._setattr_cm(self.figure, dpi=dpi): --> 910 bbox, info, descent = self._get_layout(self._renderer) 911 x, y = self.get_unitless_position() 912 x, y = self.get_transform().transform((x, y)) ~/miniconda3/lib/python3.8/site-packages/matplotlib/text.py in _get_layout(self, renderer) 307 308 # Full vertical extent of font, including ascenders and descenders: --> 309 _, lp_h, lp_d = renderer.get_text_width_height_descent( 310 "lp", self._fontproperties, 311 ismath="TeX" if self.get_usetex() else False) ~/miniconda3/lib/python3.8/site-packages/matplotlib/backends/backend_agg.py in get_text_width_height_descent(self, s, prop, ismath) 257 texmanager = self.get_texmanager() 258 fontsize = prop.get_size_in_points() --> 259 w, h, d = texmanager.get_text_width_height_descent( 260 s, fontsize, renderer=self) 261 return w, h, d ~/miniconda3/lib/python3.8/site-packages/matplotlib/texmanager.py in get_text_width_height_descent(self, tex, fontsize, renderer) 333 if tex.strip() == '': 334 return 0, 0, 0 --> 335 dvifile = self.make_dvi(tex, fontsize) 336 dpi_fraction = renderer.points_to_pixels(1.) if renderer else 1 337 with dviread.Dvi(dvifile, 72 * dpi_fraction) as dvi: ~/miniconda3/lib/python3.8/site-packages/matplotlib/texmanager.py in make_dvi(self, tex, fontsize) 269 # not support.) 270 with TemporaryDirectory(dir=Path(dvifile).parent) as tmpdir: --> 271 self._run_checked_subprocess( 272 ["latex", "-interaction=nonstopmode", "--halt-on-error", 273 f"../{texfile.name}"], tex, cwd=tmpdir) ~/miniconda3/lib/python3.8/site-packages/matplotlib/texmanager.py in _run_checked_subprocess(self, command, tex, cwd) 235 stderr=subprocess.STDOUT) 236 except FileNotFoundError as exc: --> 237 raise RuntimeError( 238 'Failed to process string with tex because {} could not be ' 239 'found'.format(command[0])) from exc RuntimeError: Failed to process string with tex because latex could not be found
    08-13
    评论
    成就一亿技术人!
    拼手气红包6.0元
    还能输入1000个字符
     
    红包 添加红包
    表情包 插入表情
     条评论被折叠 查看
    添加红包

    请填写红包祝福语或标题

    红包个数最小为10个

    红包金额最低5元

    当前余额3.43前往充值 >
    需支付:10.00
    成就一亿技术人!
    领取后你会自动成为博主和红包主的粉丝 规则
    hope_wisdom
    发出的红包
    实付
    使用余额支付
    点击重新获取
    扫码支付
    钱包余额 0

    抵扣说明:

    1.余额是钱包充值的虚拟货币,按照1:1的比例进行支付金额的抵扣。
    2.余额无法直接购买下载,可以购买VIP、付费专栏及课程。

    余额充值