


1)利用父子组件是实现非父子组件传值
2) 通过事件广播实现非父组件的传值
- 新建一个js文件
VueEvent.js,在该文件中引入vue,实例化vue,暴露该实例 - 在要广播(即要传送数据)和接收数据的地方都要引入该实例
- 通过
VueEvent.$emit('名称','数据') - 接收数据的地方用
$on
VueEvent.$on('名称',(data)=>{ console.log(data) })代码示例如下:
js文件: VueEvent . js
import Vue from 'vue'
var VueEvent = new Vue()
export default VueEvent
父组件:fatherComp.vue
<template>
  <div class="father_bg">
    <son1 ></son1>
    <hr>
    <h3>这是父组件</h3>
    <hr>
    <son2></son2>
    <hr>
  </div>
</template>
<script>
import son1 from './sonComp1.vue'
import son2 from './sonComp2.vue'
export default {
  name: 'father1',
  components: {
    son1,
    son2
  }
}
</script>
子组件1(广播数据):sonComp1.vue
<template>
  <div class="son1_bg">
    <h3>这是son1</h3>
    <button @click="sendMsg">给son2组件广播数据</button>
  </div>
</template>
<script>
import VueEvent from '../VueEvent.js'
export default {
  name: 'son1',
  data () {
    return {
      msg: '这是son1的数据'
    }
  },
  methods: {
    sendMsg () {
      VueEvent.$emit('msg', this.msg)
    }
  }
}
</script>
子组件2(接收数据):sonComp2.vue
<template>
    <div class="son2_bg">
        <h3>这是son2</h3>
        <h4>{{da}}</h4>
    </div>
</template>
<script>
import VueEvent from '../VueEvent.js'
export default {
  name: 'son2',
  data () {
    return {
      da: ''
    }
  },
  mounted () {
    VueEvent.$on('msg', (data) => {
      this.da = data
    })
  }
}
</script>
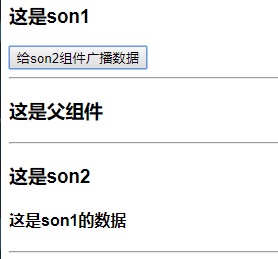
测试结果:


 4225
4225

 被折叠的 条评论
为什么被折叠?
被折叠的 条评论
为什么被折叠?
 到【灌水乐园】发言


