


上一篇我们实现了授权码的整个流程,并且添加了资源服务器,通过获取到的token去访问资源服务器提供的REST接口,现在对第一篇中提到的几个小任务进行调研修改下。
(4)获取授权码的用户登录页面是否可以定制,如何操作?
1、授权登陆页面自定义实现
(1)授权登陆页修改
第一步修改security配置文件。
获取授权码时修改登录页面,需要对授权服务器配置进行修改,修改如下:
@Override
protected void configure(HttpSecurity http) throws Exception {

    http.authorizeRequests()
            .anyRequest().authenticated()
            .and()
            .formLogin().permitAll()
            .and()
            .logout().permitAll();

    // 新增:自定义登录页面
    // http.formLogin()
    // 属性1 - loginPage() : 用户配置登录页面url地址
    //      (1)可以直接配置一个url  例如:loginPage("http://192.168.1.200/pc-admin")
    //      (2)配置项目中的页面   例如:
    http.formLogin()
            .loginPage("/login.html");

    http.csrf().disable();
}
第二步添加login.html
pom.xml文件中引入 spring-boot-starter-thymeleaf 依赖
<dependency>
    <groupId>org.springframework.boot</groupId>
    <artifactId>spring-boot-starter-thymeleaf</artifactId>
</dependency>
在resources文件夹下创建static文件夹并创建login.html文件
login.html文件如下:
<!DOCTYPE html>
<html xmlns="http://www.w3.org/1999/xhtml" xmlns:th="http://www.thymeleaf.org">
<head>
<meta charset="UTF-8">
<title>登录</title>
</head>
<style>
.login-container {
margin: 50px;
width: 100%;
}
.form-container {
margin: 0px auto;
width: 50%;
text-align: center;
box-shadow: 1px 1px 10px #888888;
height: 300px;
padding: 5px;
}
input {
margin-top: 10px;
width: 350px;
height: 30px;
border-radius: 3px;
border: 1px #E9686B solid;
padding-left: 2px;
}
.btn {
width: 350px;
height: 35px;
line-height: 35px;
cursor: pointer;
margin-top: 20px;
border-radius: 3px;
background-color: #E9686B;
color: white;
border: none;
font-size: 15px;
}
.title{
margin-top: 5px;
font-size: 18px;
color: #E9686B;
}
</style>
<body>
<div class="login-container">
<div class="form-container">
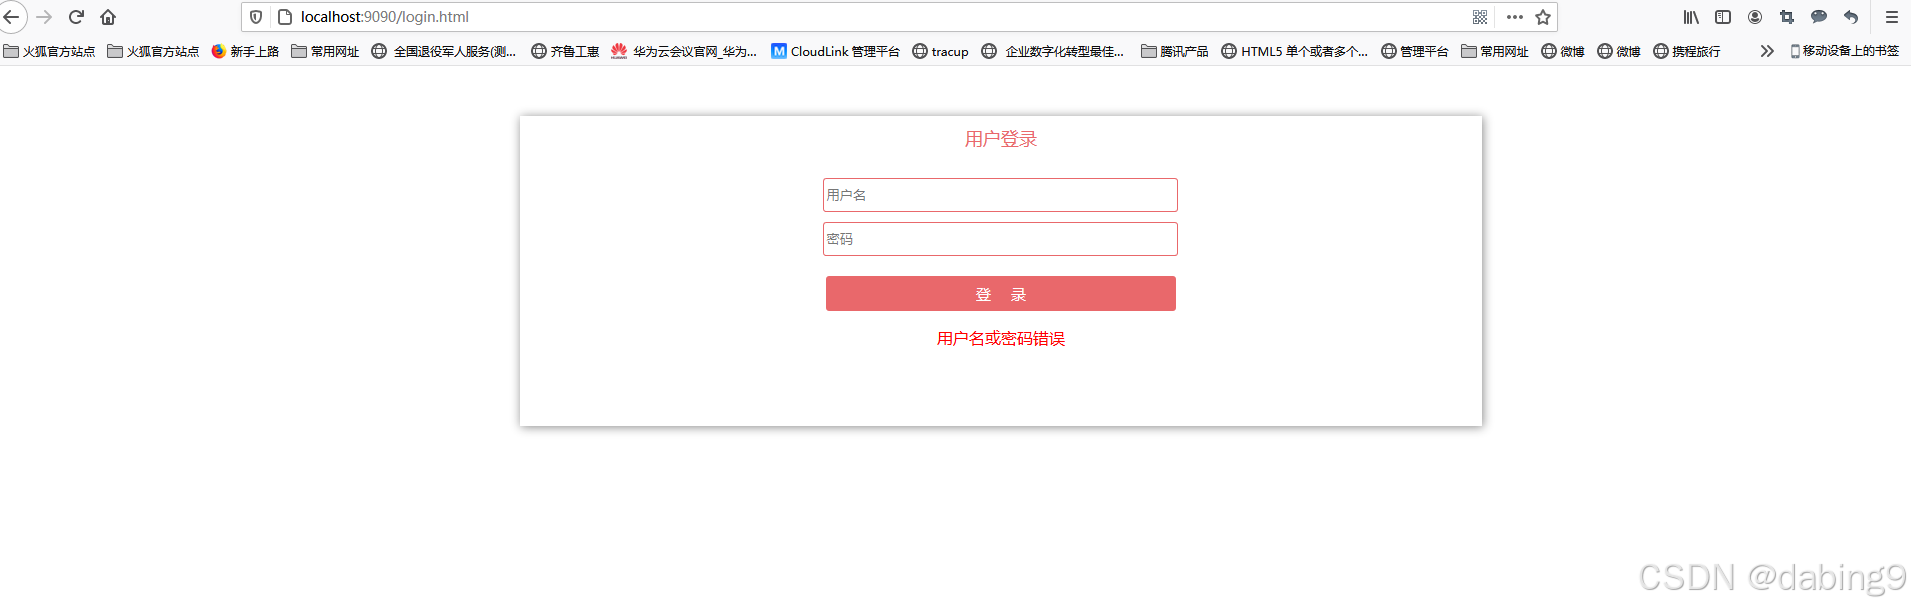
<p class="title">用户登录</p>
<form name="loginForm" method="post" th:action="login">
<input type="text" name="username" placeholder="用户名"/>
<br>
<input type="password" name="password" placeholder="密码"/>
<br>
<button type="submit" class="btn">登 录</button>
</form>
<p style="color: red" th:if="${param.error}">用户名或密码错误</p>
</div>
</div>
</body>
</html>这样我们就自定义了一个登陆页面,并且将登陆页面集成到security中
 (2)用户名密码动态设置
我们自定义了登陆页面,但是用户名/密码 是我们在内存中配置的,在实际项目中的意义不大,我们需要将用户名密码持久化,通过匹配数据库中的用户名密码进行校验。实现自定义的用户名密码验证,有一下两种方式,第一种是直接定义一个表单登陆的AuthorizationProvider,然后再AuthenticationManagerBuilder中使用我们定义的表单登陆AuthorizationProvider;第二种是通过定义一个filter,在security的过滤链中的UsernamePasswordAuthenticationFilter之前执行。第一种方式实现比较简单,先来看第一种实现。
第一种实现方式
首先自定义FormLoginAuthenticationProvider
@Component
public class FormLoginAuthenticationProvider implements AuthenticationProvider {

    @Autowired
    private CustomUserDetailService customUserDetailService;

    public Authentication authenticate(Authentication authentication) throws AuthenticationException {
        // 获取用户输入的用户名和密码
        String username = authentication.getName();
        String password = authentication.getCredentials().toString();

        UserDetails user = customUserDetailService.loadUserByUsername(username);
        // 密码校验
        String outp = user.getPassword();

        if (!outp.equals(password)) {
            throw new UsernameNotFoundException("用户名/密码错误!");
        }
        return new UsernamePasswordAuthenticationToken(user, user.getPassword(), user.getAuthorities());
    }

    public boolean supports(Class<?> aClass) {
        return true;
    }
}
①FormLoginAuthenticationProvider实现了AuthenticationProvider类,并实现该类的authenticate(Authentication authentication)方法和supports(Class aClass)方法,通过方法名我们就可以知道,authenticate(Authentication authentication)方法是用来执行用户认证的;supprot(Class aClass)是用来进行判断该provider支持那种类型的用户校验。
@该Provider中我们注入了一个CustomUserDetailService 这个类,这个是我们定义的用来加载用户信息的一个类。
③authenticate()方法中的逻辑就是进行用户名密码校验了。
接下来我们定义CustomUserDetailService
@Component
public class CustomUserDetailService implements UserDetailsService {

    public UserDetails loadUserByUsername(String s) throws UsernameNotFoundException {

        // 只是为了实验,这里的用户可以通过读取数据库获取
        if (!"1".equals(s) && !"2".equals(s) && !"3".equals(s) && !"4".equals(s)) {
            throw new UsernameNotFoundException("用户不存在");
        }
        List<GrantedAuthority> list = new ArrayList<GrantedAuthority>();
        list.add(new SimpleGrantedAuthority("admin"));

        User user = new User(s, "123456", list);
        return user;
    }
}
①该方法实现了UserDetailsService方法,实现用户自定义查询
②这里我们写死了用户名/密码,我们这里做验证没有加入数据库信息,项目中这里的用户可以通过读取数据库获取用户信息
③经过校验这里返回了一个内置的user对象
定义好provider,我们在security配置 (SecurityConfig.java)中引入FormLoginProvider进行我们自定义的用户校验
@Autowired
public FormLoginAuthenticationProvider formLoginAuthenticationProvider;

@Override
public void configure(AuthenticationManagerBuilder auth) throws Exception {
    /*BCryptPasswordEncoder encoder = new BCryptPasswordEncoder();
    auth.inMemoryAuthentication().withUser("admin")
            .password(encoder.encode("123456"))
            .authorities("ROLE_ADMIN");*/
    auth.authenticationProvider(formLoginAuthenticationProvider);
}
①之前我们定义的用户名密码是放在内存中了,现在我们通过自定义provider实现我们自己的用户逻辑判断。
这样我们就实现了自己的用户密码认证。
有个小问题就是登录页的错误信息没有返回展示出来。这里我们修改下
添加两个接口,一个登录接口,一个登录失败接口
SecurityController
@Controller
@RequestMapping("api")
public class SecurityController {

    @GetMapping("login")
    public String login() {
        return "login";
    }

    @PostMapping("loginerr")
    public String loginerr(Model mode) {
        mode.addAttribute("err", true);
        return "login";
    }
}
①使用@Controller接口时为了配合使用thymeleaf,不然返回String 是返回的一个字符串,不是指定的页面
②其他的就是定义一个登录接口,跳转到login.html;一个登录失败的接口,同样跳转到login.html,只不过失败时会带一个参数,返回给前端login.html,用于提示错误信息,这里不能展示详细的信息,如果想要展示详细信息可以自定义successhandle 和 failhandle
SecurityConfig中formLogin的loginPage需要修改下,同时添加failureForwardUrl
@Override
protected void configure(HttpSecurity http) throws Exception {

    http.authorizeRequests()
            .anyRequest().authenticated()
            .and()
            .formLogin().permitAll()
            .and()
            .logout().permitAll();

    // 自定义登录页面

    // http.formLogin()
    // 属性1 - loginPage() : 用户配置登录页面url地址
    //      (1)可以直接配置一个url  例如:loginPage("http://192.168.1.200/pc-admin")
    //      (2)配置项目中的页面   例如:
    http.formLogin()
            .loginPage("/api/login") //我们定义的登录接口
            .failureForwardUrl("/api/loginerr"); //我们定义的失败接口

    http.csrf().disable();
}
小知识点:
springboot中static文件夹和templates文件夹中的区别:
到此,方式一就算完成了。
第二种实现方式
我们自定义实现一个filter,使该filter在usernamepasswordfilter之前执行。
首先我们定义一个FormLoginAuthenticationFilter
public class FormLoginAuthenticationFilter extends AbstractAuthenticationProcessingFilter {

    /**
     * 构造方法
     * 实现父类构造方法,匹配拦截 /login url
     *
     **/
    public FormLoginAuthenticationFilter() {
        super(new AntPathRequestMatcher("/api/login", "POST"));
    }

    public Authentication attemptAuthentication(HttpServletRequest httpServletRequest, HttpServletResponse httpServletResponse) throws AuthenticationException, IOException, ServletException {

        String username = httpServletRequest.getParameter("username");
        String password = httpServletRequest.getParameter("password");

        UsernamePasswordAuthenticationToken authenticationToken = new UsernamePasswordAuthenticationToken(username, password, null);
        return this.getAuthenticationManager().authenticate(authenticationToken);
    }
①FormLoginAuthenticationFilter继承 AbstractAuthenticationProcessingFilter 实现其中最重要的一个方法: attemptAuthentication()
②attemptAuthentication()中会调用AuthenticationManager -> ProviderManager 中的 authenticate()方法,这一步时security中最核心的一部分,后面会说到。这里先知道这个点。
③实现一个无参的构造方法,指定了拦截 “/api/login” url,该方法定义了该filter的主要作用就是拦截form的登录接口。这里的“/api/login”是我们在SecurityConfig中定义的formLogin().loginPage("/api/login")
然后我们定义提供认证的provider
FormLoginAuthentication2Provider 直接复制的上面的FormLoginAuthenticationProvider
@Component
public class FormLoginAuthentication2Provider implements AuthenticationProvider {

    @Autowired
    private CustomUserDetailService customUserDetailService;

    public Authentication authenticate(Authentication authentication) throws AuthenticationException {
        // 获取用户输入的用户名和密码
        String username = authentication.getName();
        String password = authentication.getCredentials().toString();

        UserDetails user = customUserDetailService.loadUserByUsername(username);
        // 密码校验
        String outp = user.getPassword();

        if (!outp.equals(password)) {
            throw new UsernameNotFoundException("用户名/密码错误!");
        }
        return new UsernamePasswordAuthenticationToken(user, user.getPassword(), user.getAuthorities());
    }

    public boolean supports(Class<?> aClass) {
        return true;
    }
}
修改SecurityConfig配置
@Override
protected void configure(HttpSecurity http) throws Exception {
    // start 新增   定义FormLoginAuthenticationFilter,设置AuthenticationManager和FailureHandler
    FormLoginAuthenticationFilter filter = new FormLoginAuthenticationFilter();
    filter.setAuthenticationManager(authenticationManagerBean());
    filter.setAuthenticationFailureHandler(new ForwardAuthenticationFailureHandler("/api/loginerr"));
    // end

    http.authorizeRequests()
            .anyRequest().authenticated()
            .and()
            .formLogin().permitAll()
            .and()
            .logout().permitAll();

    // 自定义登录页面

    // http.formLogin()
    // 属性1 - loginPage() : 用户配置登录页面url地址
    //      (1)可以直接配置一个url  例如:loginPage("http://192.168.1.200/pc-admin")
    //      (2)配置项目中的页面   例如:formLogin().loginPage("login.html")

    // 自定义接口,实现页面错误提示,如果想要达到详细的错误信息提示,
    //  可以实现类AuthenticationSuccessHandler重写onAuthenticationSuccess方法 和
    //  实现AuthenticationFailureHandler类重写onAuthenticationFailure方法
    http.formLogin()
            .loginPage("/api/login")
            .failureForwardUrl("/api/loginerr");

    http.csrf().disable();

    // start 新增  添加filter的执行位置,在UsernamePasswordAuthenticationFilter前执行
    http.addFilterAt(filter, UsernamePasswordAuthenticationFilter.class);
    // end


    @Override
    public void configure(AuthenticationManagerBuilder auth) throws Exception {
        /*BCryptPasswordEncoder encoder = new BCryptPasswordEncoder();
        auth.inMemoryAuthentication().withUser("admin")
                .password(encoder.encode("123456"))
                .authorities("ROLE_ADMIN");*/
//        auth.authenticationProvider(formLoginAuthenticationProvider);
        // start 配置认证Provider
        auth.authenticationProvider(formLoginAuthentication2Provider);
    }
配置中做了三部分处理:
①定义了我们自己实现的FormLoginAuthenticationFilter ,并且给filter设置了AuthenticationManager和AuthenticationFailureHandler,如果不设置AuthenticationFailureHandler默认使用的是SimpleUrlAuthenticationFailureHandler
这里我们认证失败后需要跳转到我们定义的失败接口,所以我们需要让我们的filter配置ForwardAuthenticationFailureHandler该处理器,跳转到我们定义的“/api/loginerr”失败接口。
②设置我们定义的filter的执行位置,我们放在了UsernamePasswordAuthenticationFilter的前面,先进行我们判断,失败后直接返回了,不用再进行UsernamePasswordAuthenticationFilter的认证流程了。
③配置AuthenticationProvider,实现最终的认证逻辑。
两种方式比较
通过这两种方式,不管是哪种方式,最根本的用户校验是通过我们定义的 Provider (formLoginAuthentication2Provider, formLoginAuthenticationProvider)。第二种方式 虽然看起来多几个了filter有点罗嗦了,但是给我们提供了一种思路,我们可以扩展实现我们自己的认证方式,比如实现手机号验证码登陆方式,我们在filter中组织 Authentication 返回,然后在Provider中进行手机号验证码验证,从而实现符合我们自己业务的认证方式。


 被折叠的 条评论
为什么被折叠?
被折叠的 条评论
为什么被折叠?
 到【灌水乐园】发言


