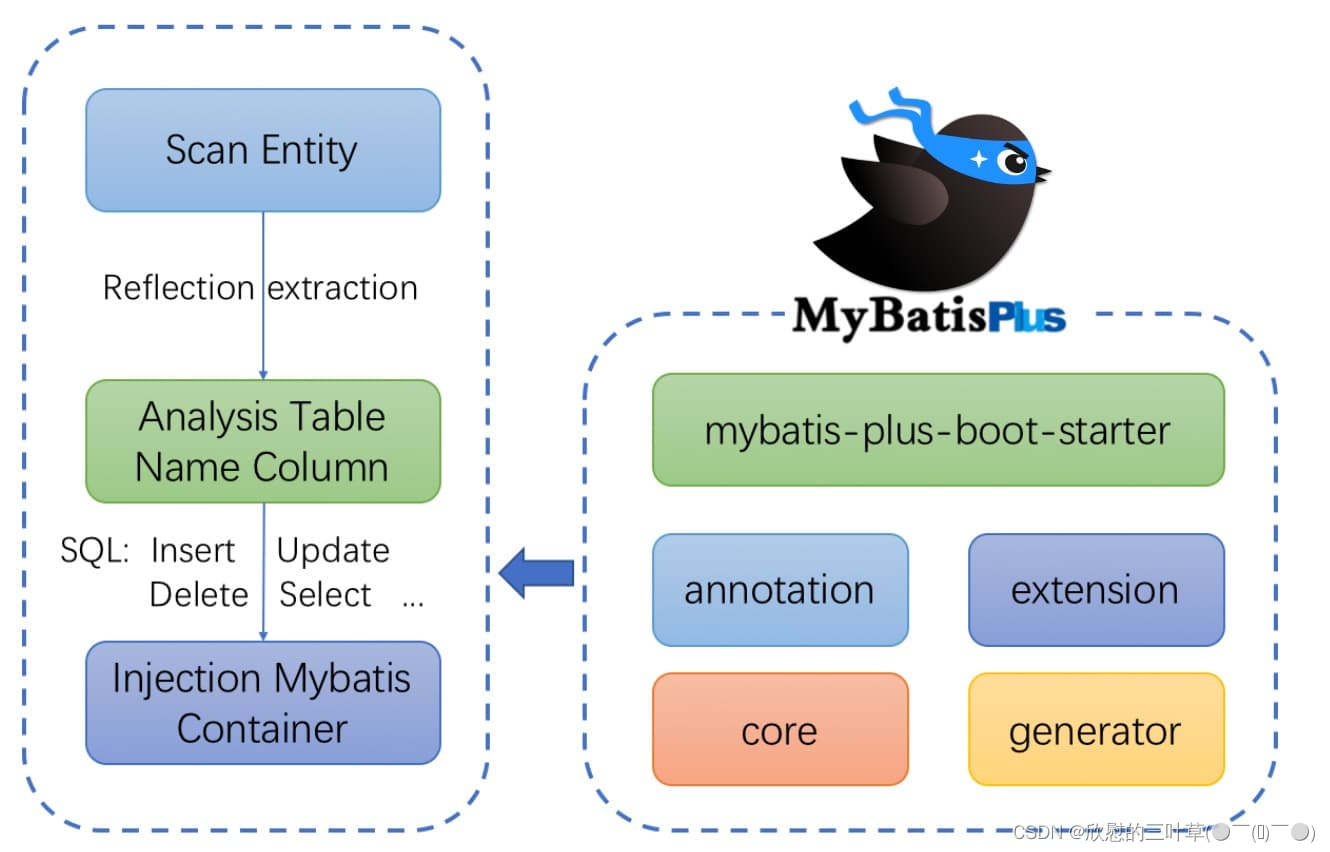
MyBatis-Plus(简称MP)是一个MyBatis的增强工具,在MyBatis的基础上只做增强不做改变,为简化开发、提高效率而生。
官网:https:/mybatis.plus/或https://baomidou.com/
愿景
无侵入:只做增强不做改变,引入它不会对现有工程产生影响,如丝般顺滑
损耗小:启动即会自动注入基本 CURD,性能基本无损耗,直接面向对象操作
强大的 CRUD 操作:内置通用 Mapper、通用 Service,仅仅通过少量配置即可实现单表大部分 CRUD 操作,更有强大的条件构造器,满足各类使用需求
支持 Lambda 形式调用:通过 Lambda 表达式,方便的编写各类查询条件,无需再担心字段写错
支持主键自动生成:支持多达 4 种主键策略(内含分布式唯一 ID 生成器 - Sequence),可自由配置,完美解决主键问题
支持 ActiveRecord 模式:支持 ActiveRecord 形式调用,实体类只需继承 Model 类即可进行强大的 CRUD 操作
支持自定义全局通用操作:支持全局通用方法注入( Write once, use anywhere )
内置代码生成器:采用代码或者 Maven 插件可快速生成 Mapper 、 Model 、 Service 、 Controller 层代码,支持模板引擎,更有超多自定义配置等您来使用
内置分页插件:基于 MyBatis 物理分页,开发者无需关心具体操作,配置好插件之后,写分页等同于普通 List 查询
分页插件支持多种数据库:支持 MySQL、MariaDB、Oracle、DB2、H2、HSQL、SQLite、Postgre、SQLServer 等多种数据库
内置性能分析插件:可输出 SQL 语句以及其执行时间,建议开发测试时启用该功能,能快速揪出慢查询
内置全局拦截插件:提供全表 delete 、 update 操作智能分析阻断,也可自定义拦截规则,预防误操作
任何能使用 MyBatis 进行 CRUD, 并且支持标准 SQL 的数据库,具体支持情况如下,如果不在下列表查看分页部分教程 PR 您的支持。
Mybatis-Plus是由baomidou(苞米豆)组织开发并且开源的,目前该组织大概有人左右。
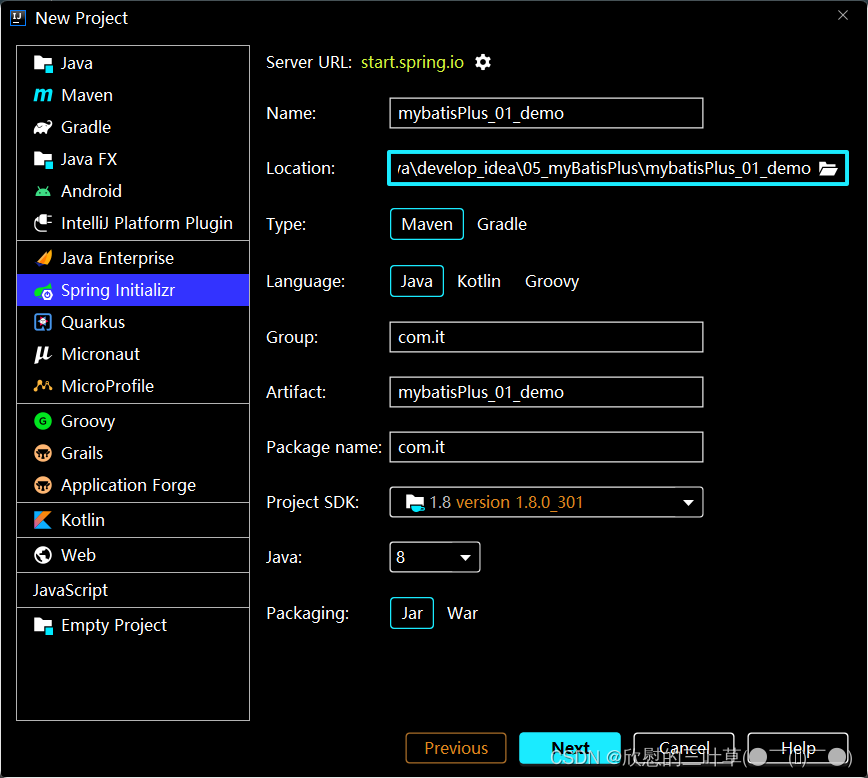
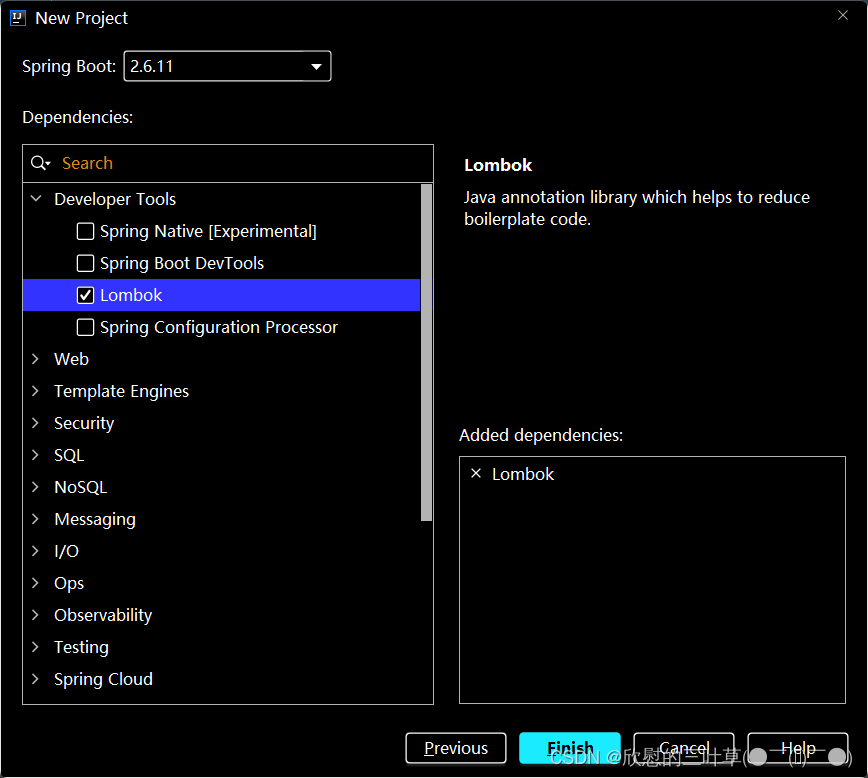
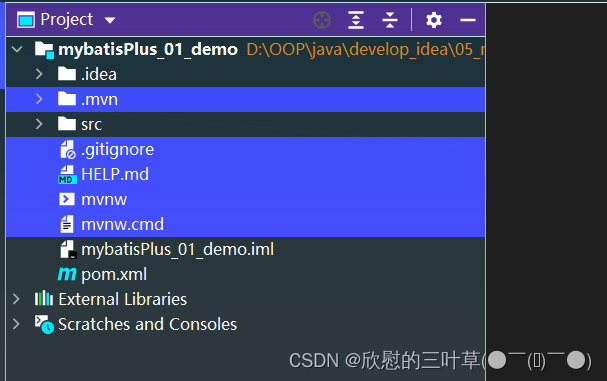
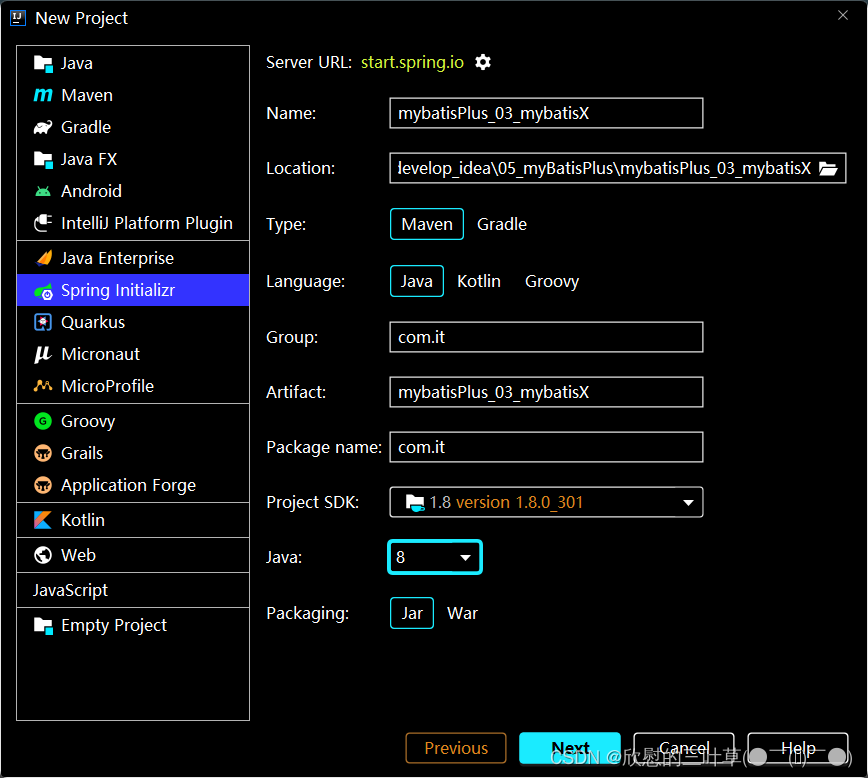
1. 使用 Spring Initializr 快速初始化一个 Spring Boot 工程
2. 删除无用文件
< dependency> < groupId> </ groupId> < artifactId> </ artifactId> < scope> </ scope> </ dependency> < dependency> < groupId> </ groupId> < artifactId> </ artifactId> < version> </ version> </ dependency>
create database mybatis_plus;
use mybatis_plus;
create table user (
id bigint ( 20 ) not null comment '主键Id' ,
name varchar ( 30 ) default null comment '姓名' ,
age int default null comment '年龄' ,
email varchar ( 50 ) default null comment '邮箱' ,
primary key ( id)
) engine = InnoDB default charset = utf8;
insert into user ( id, name, age, email) VALUES
( 1 , 'Jone' , 18 , 'coke@Anne.com' ) ,
( 2 , 'Jack' , 20 , 'test2@baomidou.com' ) ,
( 3 , 'Tom' , 28 , 'test3@baomidou.com' ) ,
( 4 , 'Sandy' , 21 , 'test4@baomidou.com' ) ,
( 5 , 'Billie' , 24 , 'test5@baomidou.com' ) ;
spring :
datasource :
type : com.zaxxer.hikari.HikariDataSource
driver-class-name : com.mysql.cj.jdbc.Driver
url : jdbc: mysql: //localhost: 3306/mybatis_plus? characterEncoding=utf- 8&userSSL=false&serverTimezone=GMT%2B8
username : root
password : root
1、驱动类driver-class-name
spring boot 2.0(内置jdbc5驱动),驱动类使用: spring boot 2.1及以上(内置jdbc8驱动),驱动类使用: 否则运行测试用例的时候会有 WARN 信息
2、连接地址url
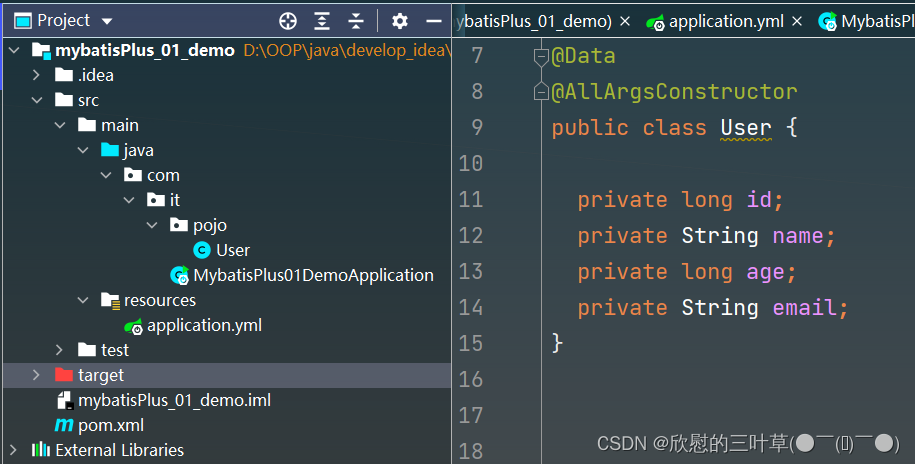
MySQL5.7版本的url: MySQL8.0版本的url: 否则运行测试用例报告如下错误: 1. 添加实体
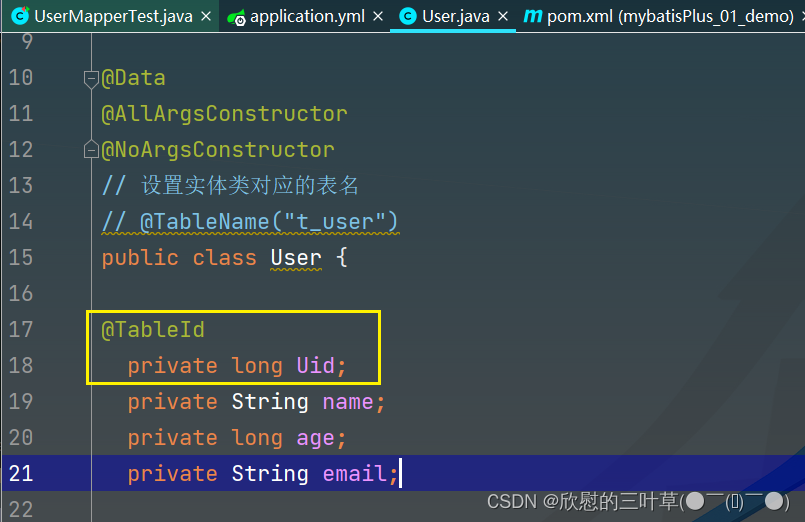
@Data
@AllArgsConstructor
public class User {

  private long id;
  private String name;
  private long age;
  private String email;
}
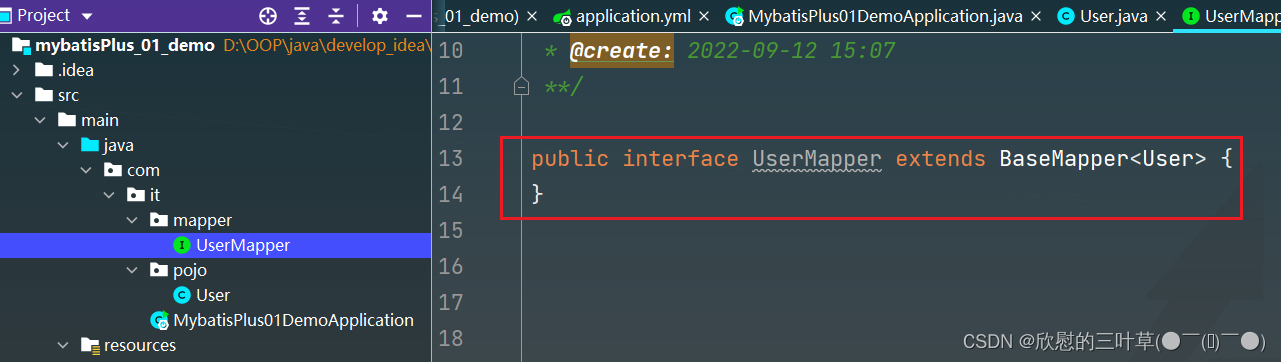
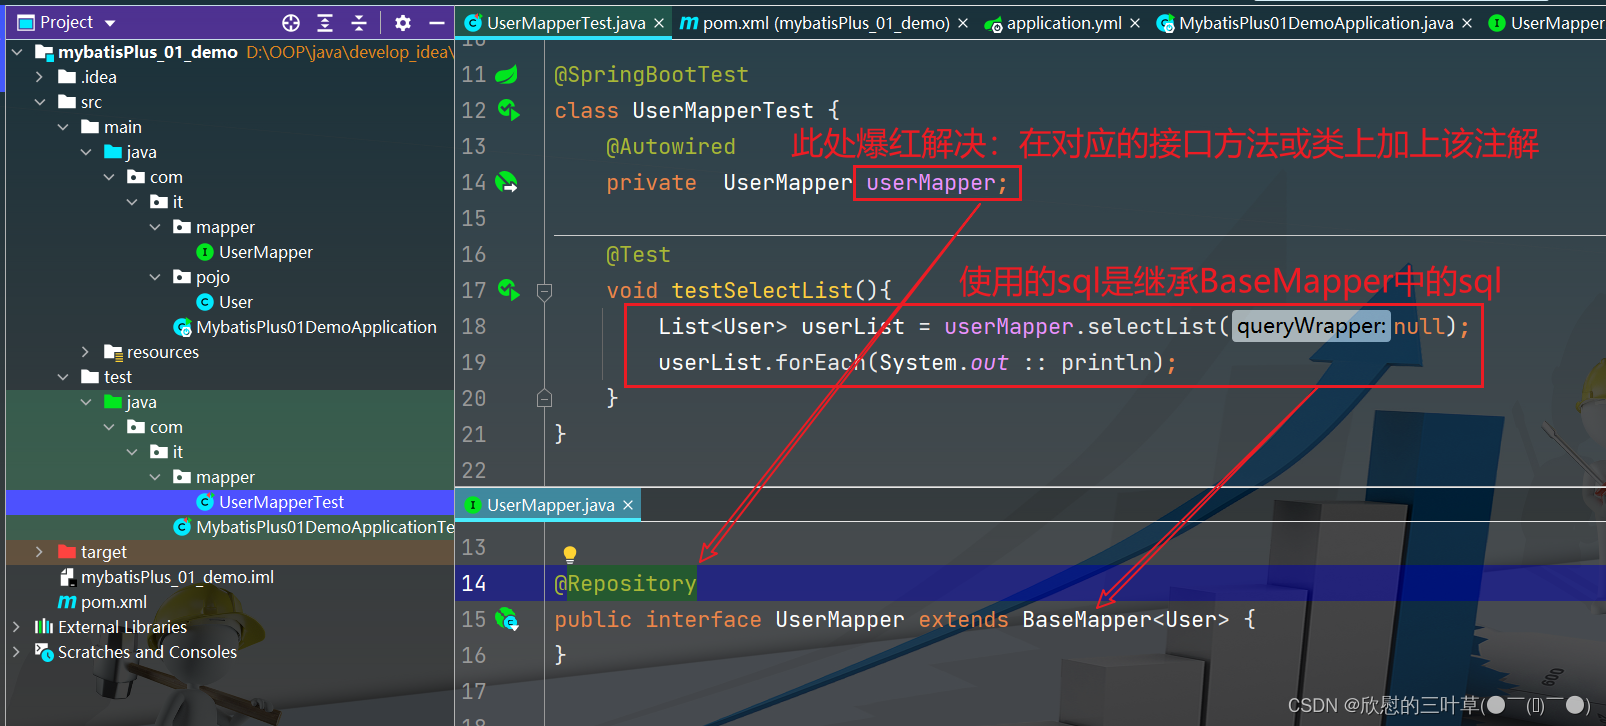
BaseMapper是MyBatis-Plus提供的模板mapper,其中包含了基本的CRUD方法,泛型为操作的实体类型
1. 创建mapper接口并继承BaseMapper
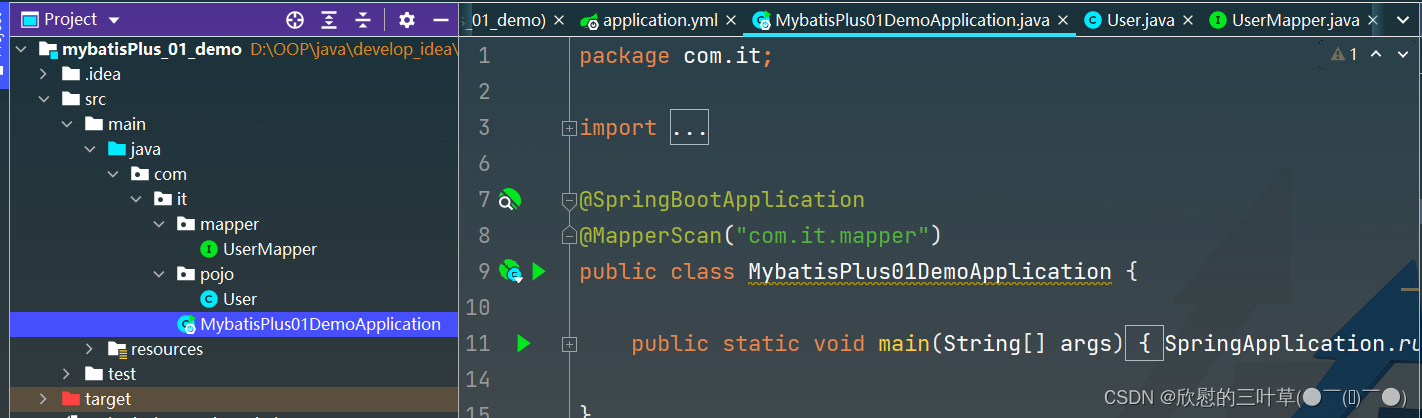
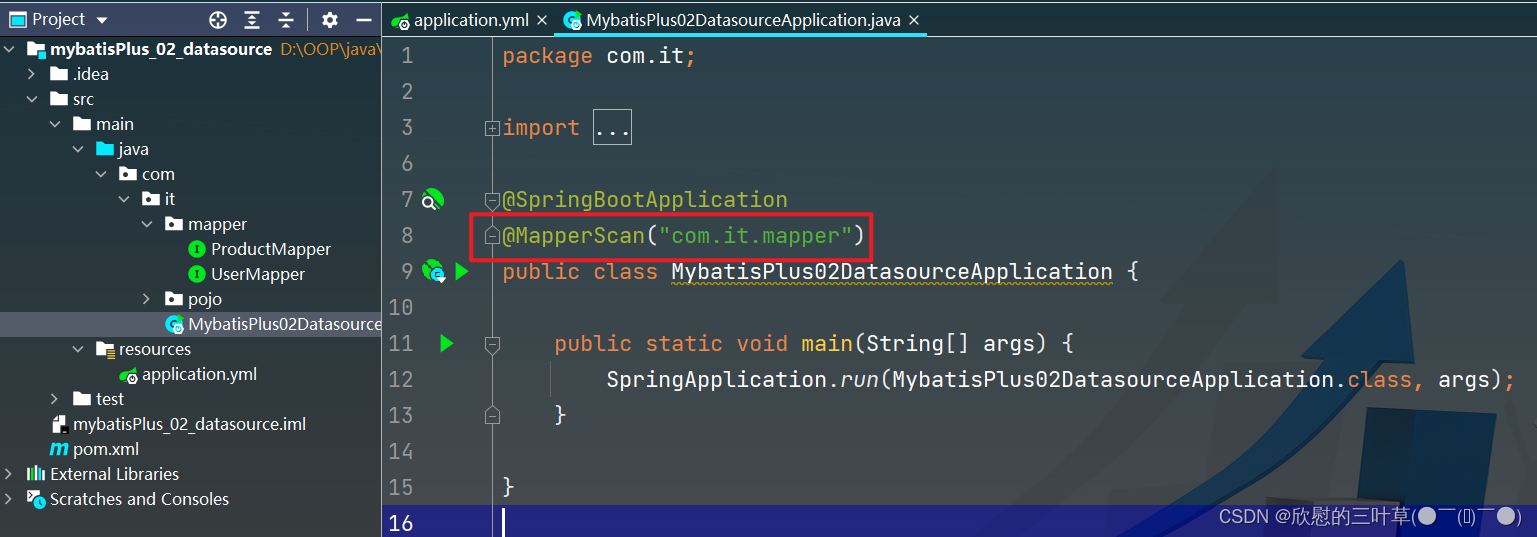
2. 在Spring Boot启动类中添加@MapperScan注解,扫描mapper包
@SpringBootApplication
@MapperScan ( "com.it.mapper" )
public class MybatisPlus01DemoApplication {
public static void main ( String [ ] args) {
SpringApplication . run ( MybatisPlus01DemoApplication . class , args) ;
}
}
1. 创建测试类
@SpringBootTest
class UserMapperTest {
@Autowired
private UserMapper userMapper;
@Test
void testSelectList ( ) {
List < User > = userMapper. selectList ( null ) ;
userList. forEach ( System . out :: println ) ;
}
}
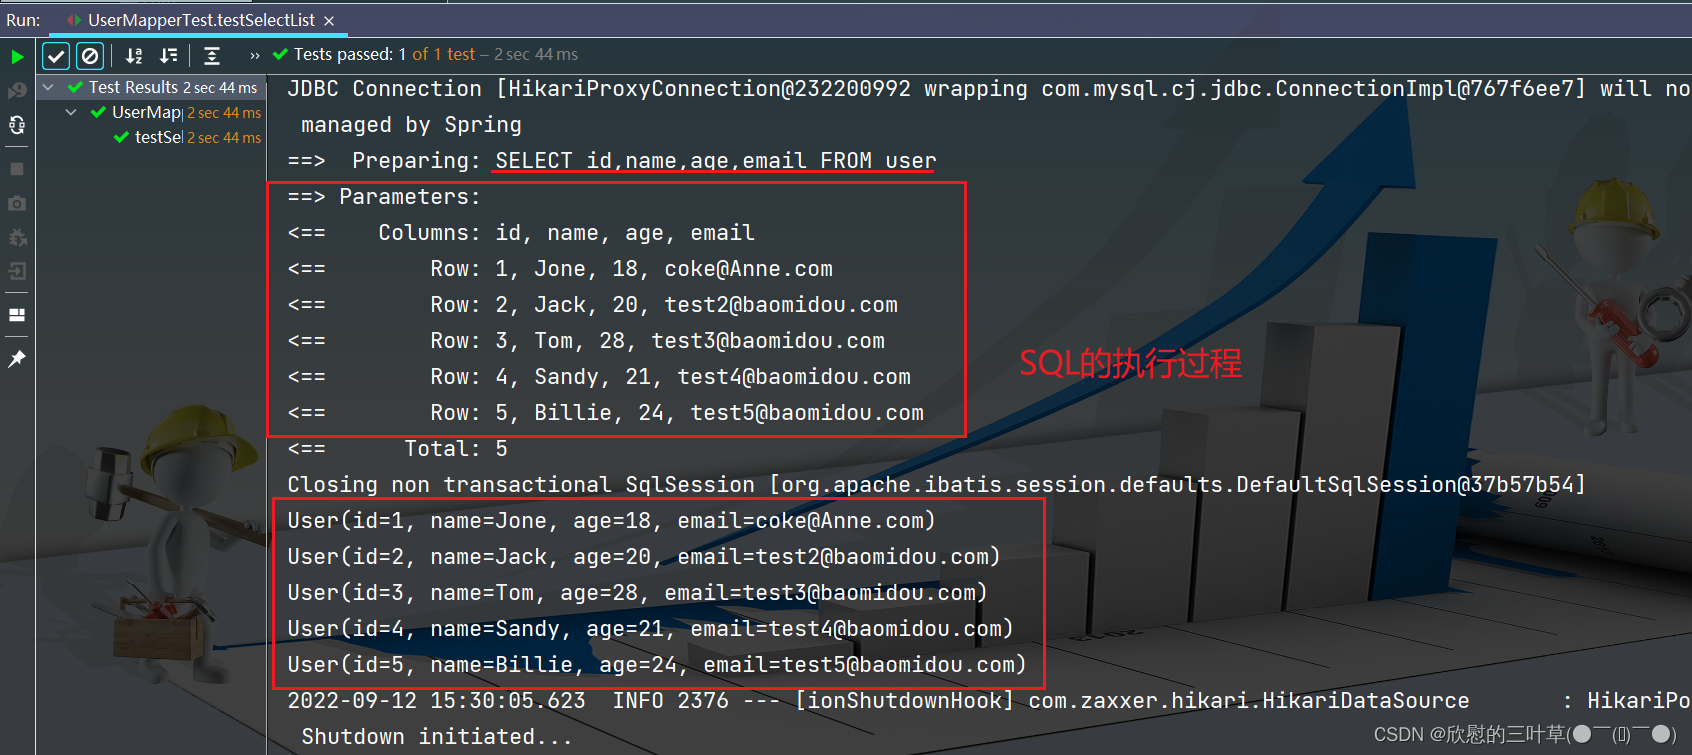
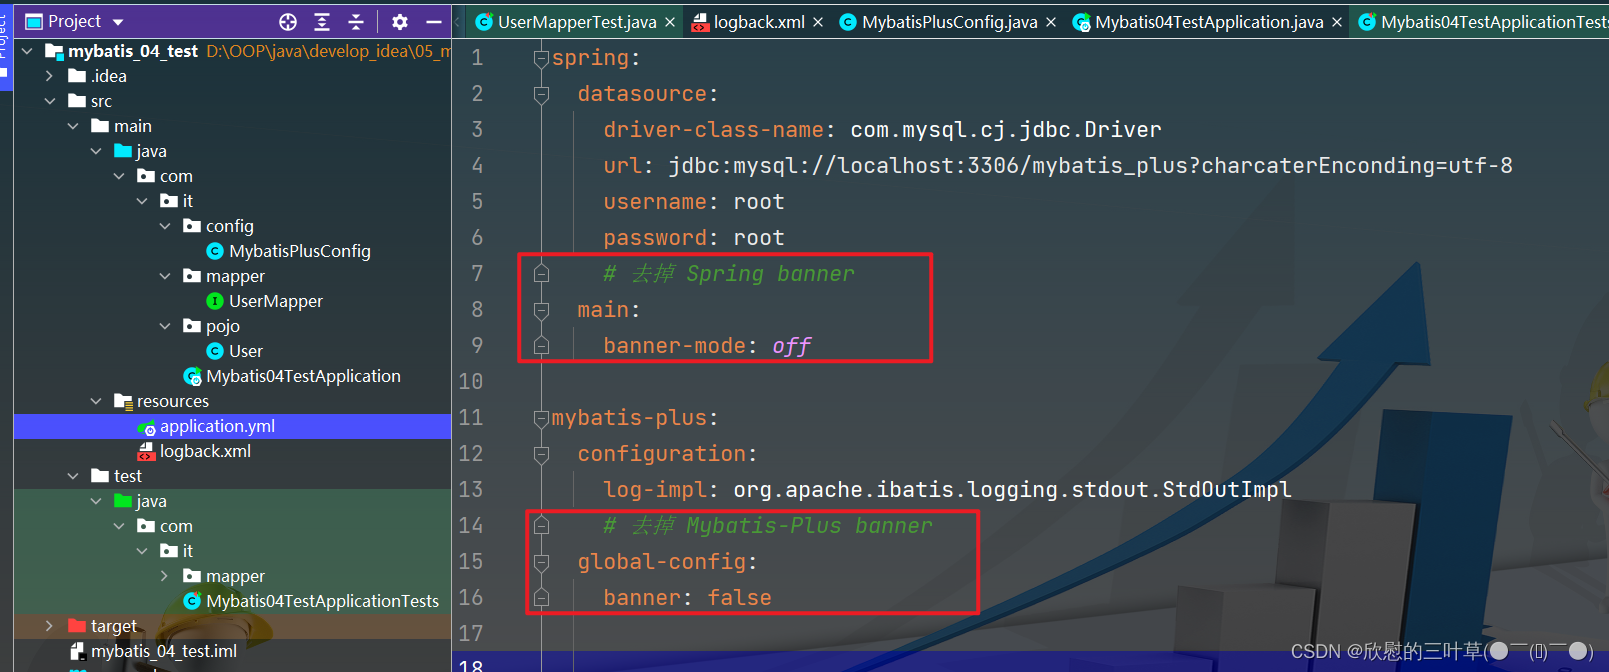
1. 在application.yml中配置日志输出
mybatis-plus :
configuration :
log-impl : org.apache.ibatis.logging.stdout.StdOutImpl
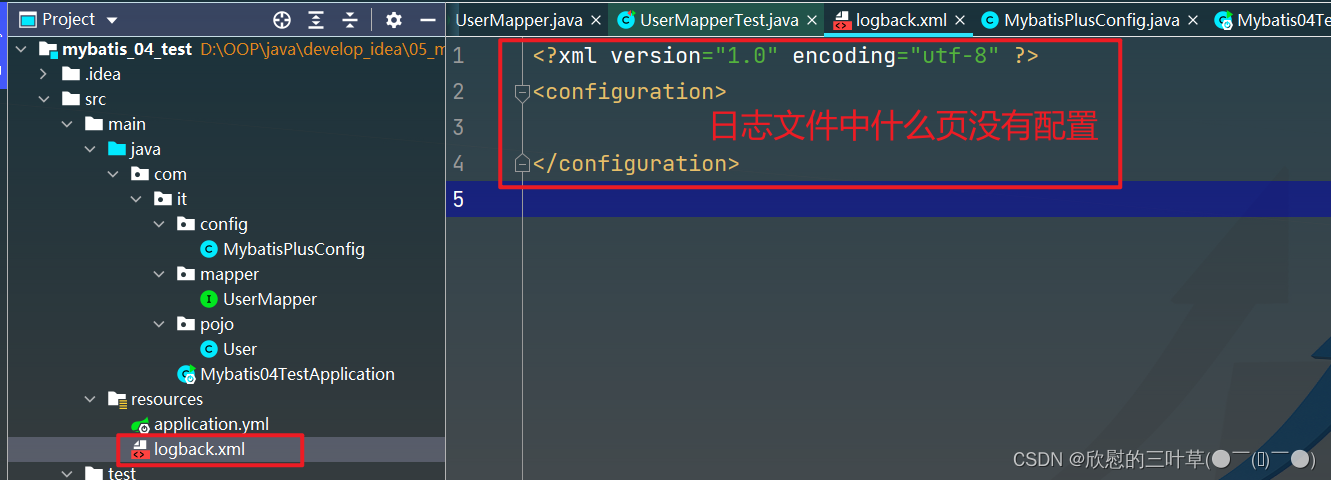
<?xml version="1.0" encoding="utf-8" ?>
< configuration> </ configuration> spring :
datasource :
driver-class-name : com.mysql.cj.jdbc.Driver
url : jdbc: mysql: //localhost: 3306/mybatis_plus? charcaterEnconding=utf- 8
username : root
password : root
main :
banner-mode : off
mybatis-plus :
configuration :
log-impl : org.apache.ibatis.logging.stdout.StdOutImpl
global-config :
banner : false
MyBatis-Plus中的基本CRUD在内置的BaseMapper中都已得到了实现,我们可以直接使用,接口如下:
public interface BaseMapper < T > extends Mapper < T > {
int insert ( T entity) ;
int deleteById ( Serializable id) ;
int deleteById ( T entity) ;
int deleteByMap ( @Param ( Constants . COLUMN_MAP) Map < String , Object > ) ;
int delete ( @Param ( Constants . WRAPPER) Wrapper < T > ) ;
int deleteBatchIds ( @Param ( Constants . COLLECTION) Collection < ? > ) ;
int updateById ( @Param ( Constants . ENTITY) T entity) ;
int update ( @Param ( Constants . ENTITY) T entity, @Param ( Constants . WRAPPER) Wrapper < T > ) ;
T selectById ( Serializable id) ;
List < T > selectBatchIds ( @Param ( Constants . COLLECTION) Collection < ? extends Serializable > ) ;
List < T > selectByMap ( @Param ( Constants . COLUMN_MAP) Map < String , Object > ) ;
default T selectOne ( @Param ( Constants . WRAPPER) Wrapper < T > ) {
List < T > = this . selectList ( queryWrapper) ;
if ( CollectionUtils . isNotEmpty ( ts) ) {
if ( ts. size ( ) != 1 ) {
throw ExceptionUtils . mpe ( "One record is expected, but the query result is multiple records" ) ;
}
return ts. get ( 0 ) ;
}
return null ;
}
default boolean exists ( Wrapper < T > ) {
Long count = this . selectCount ( queryWrapper) ;
return null != count && count > 0 ;
}
Long selectCount ( @Param ( Constants . WRAPPER) Wrapper < T > ) ;
List < T > selectList ( @Param ( Constants . WRAPPER) Wrapper < T > ) ;
List < Map < String , Object > > selectMaps ( @Param ( Constants . WRAPPER) Wrapper < T > ) ;
List < Object > selectObjs ( @Param ( Constants . WRAPPER) Wrapper < T > ) ;
< P extends IPage < T > > P selectPage ( P page, @Param ( Constants . WRAPPER) Wrapper < T > ) ;
< P extends IPage < Map < String , Object > > > P selectMapsPage ( P page, @Param ( Constants . WRAPPER) Wrapper < T > ) ;
}
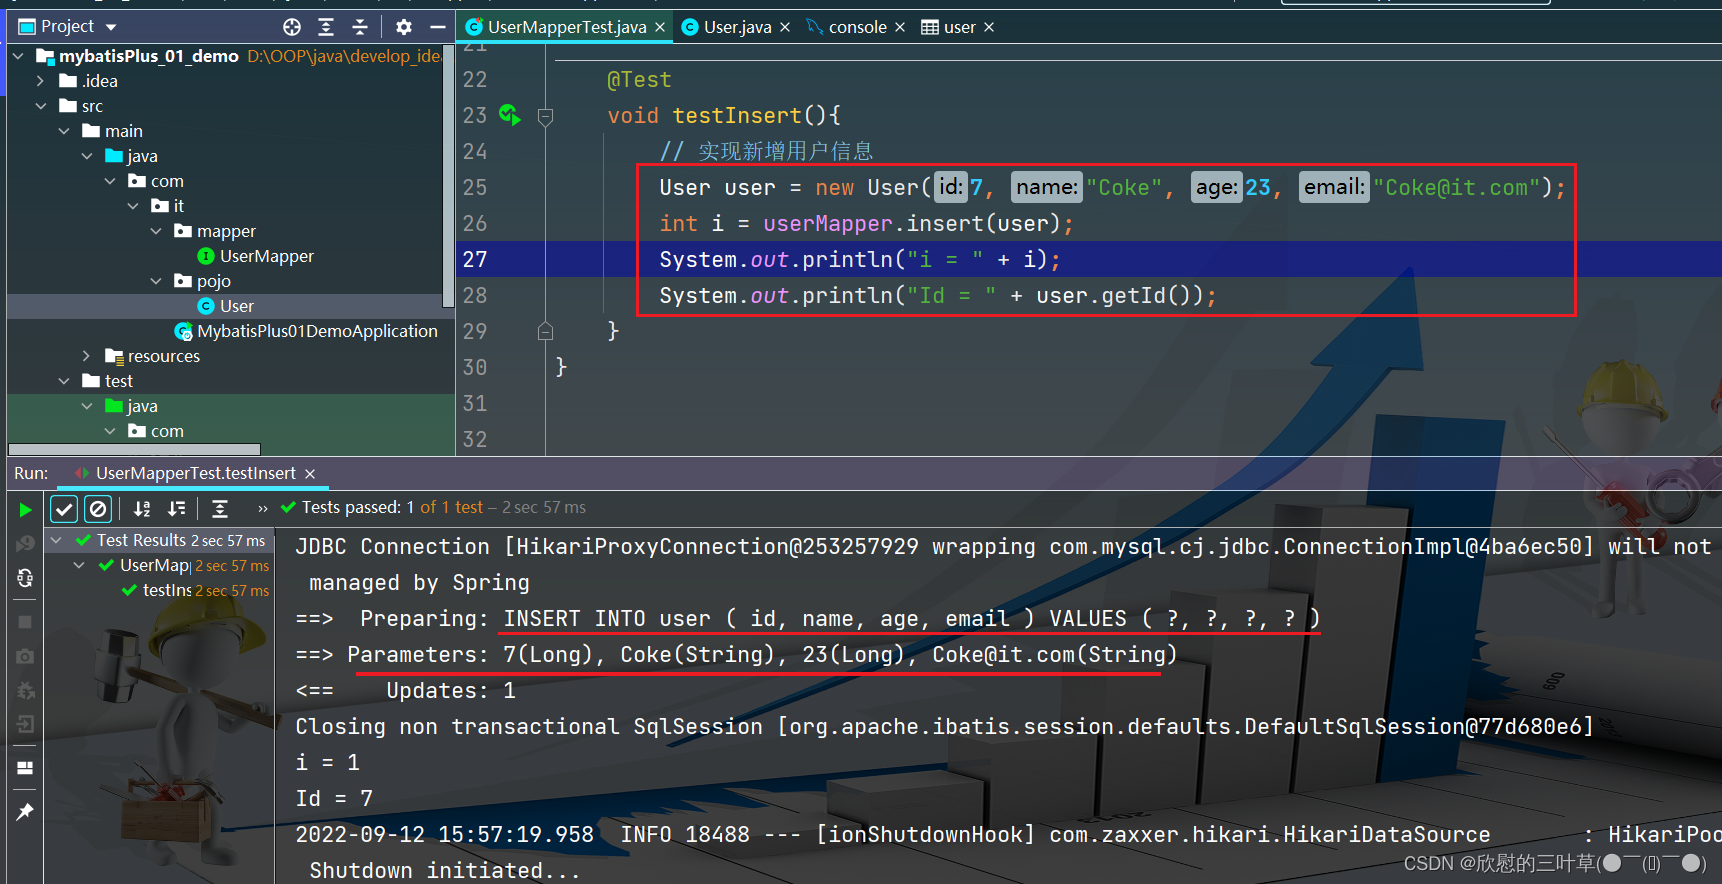
1. 插入
@Test
void testInsert ( ) {
User user = new User ( 7 , "Coke" , 23 , "Coke@it.com" ) ;
int i = userMapper. insert ( user) ;
System . out. println ( "i = " + i) ;
System . out. println ( "Id = " + user. getId ( ) ) ;
}
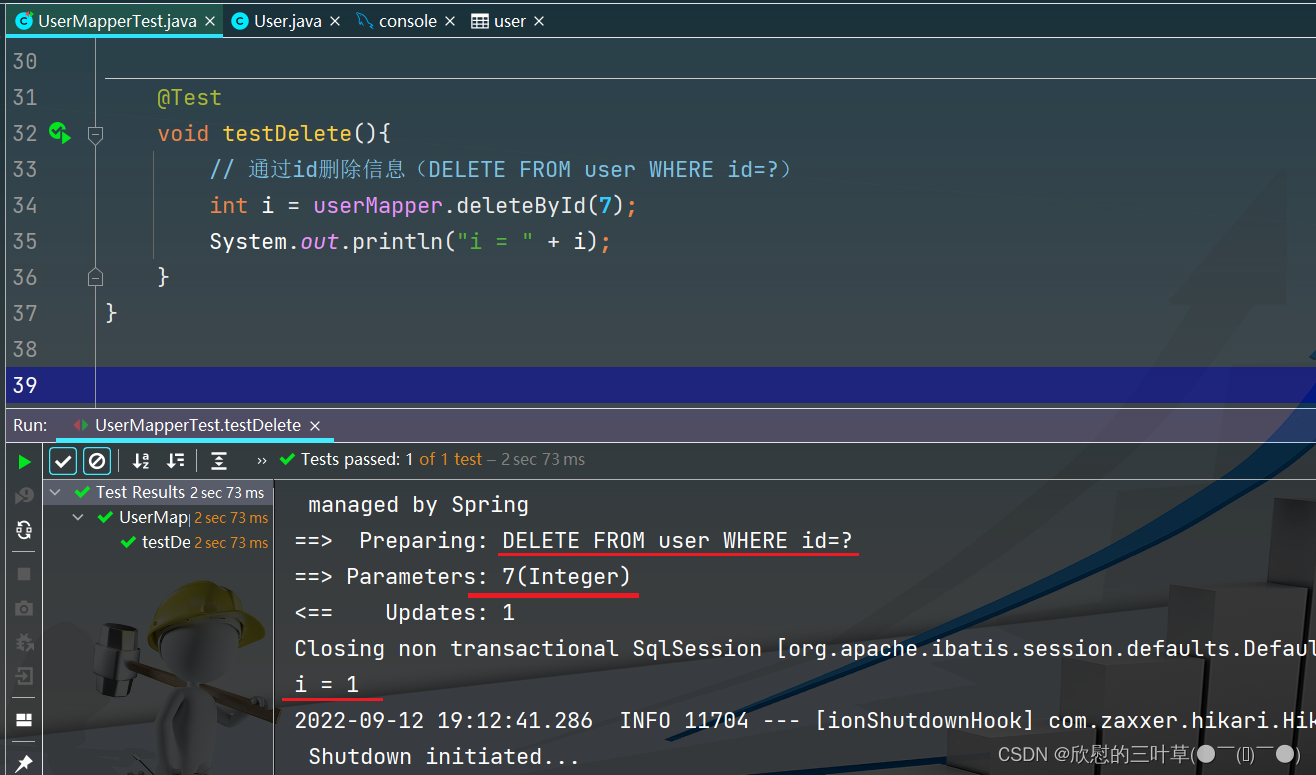
1. DELETE FROM user WHERE id=?
@Test
void testDelete ( ) {
int i = userMapper. deleteById ( 7 ) ;
System . out. println ( "i = " + i) ;
}
1.
@Test
void testDeleteByMap ( ) {
Map < String , Object > = new HashMap < > ( ) ;
map. put ( "name" , "Coke" ) ;
map. put ( "age" , 23 ) ;
int j = userMapper. deleteByMap ( map) ;
System . out. println ( "j = " + j) ;
}
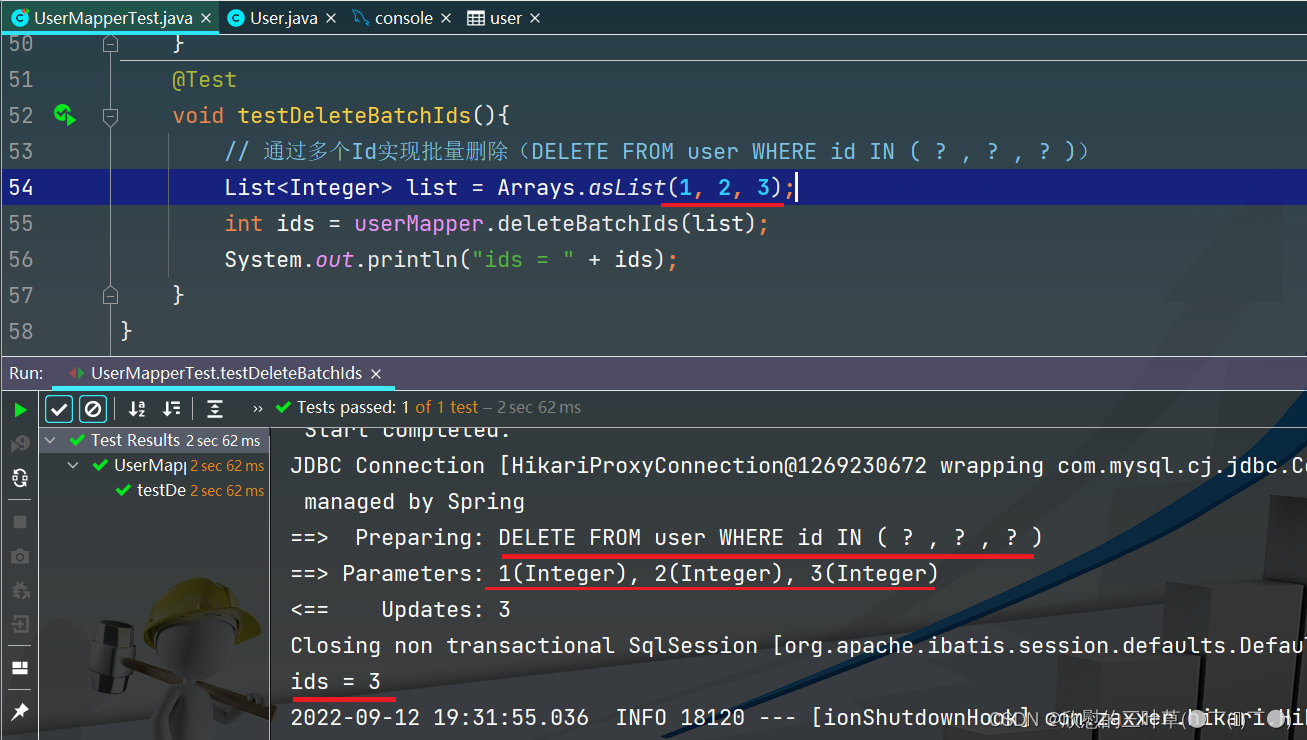
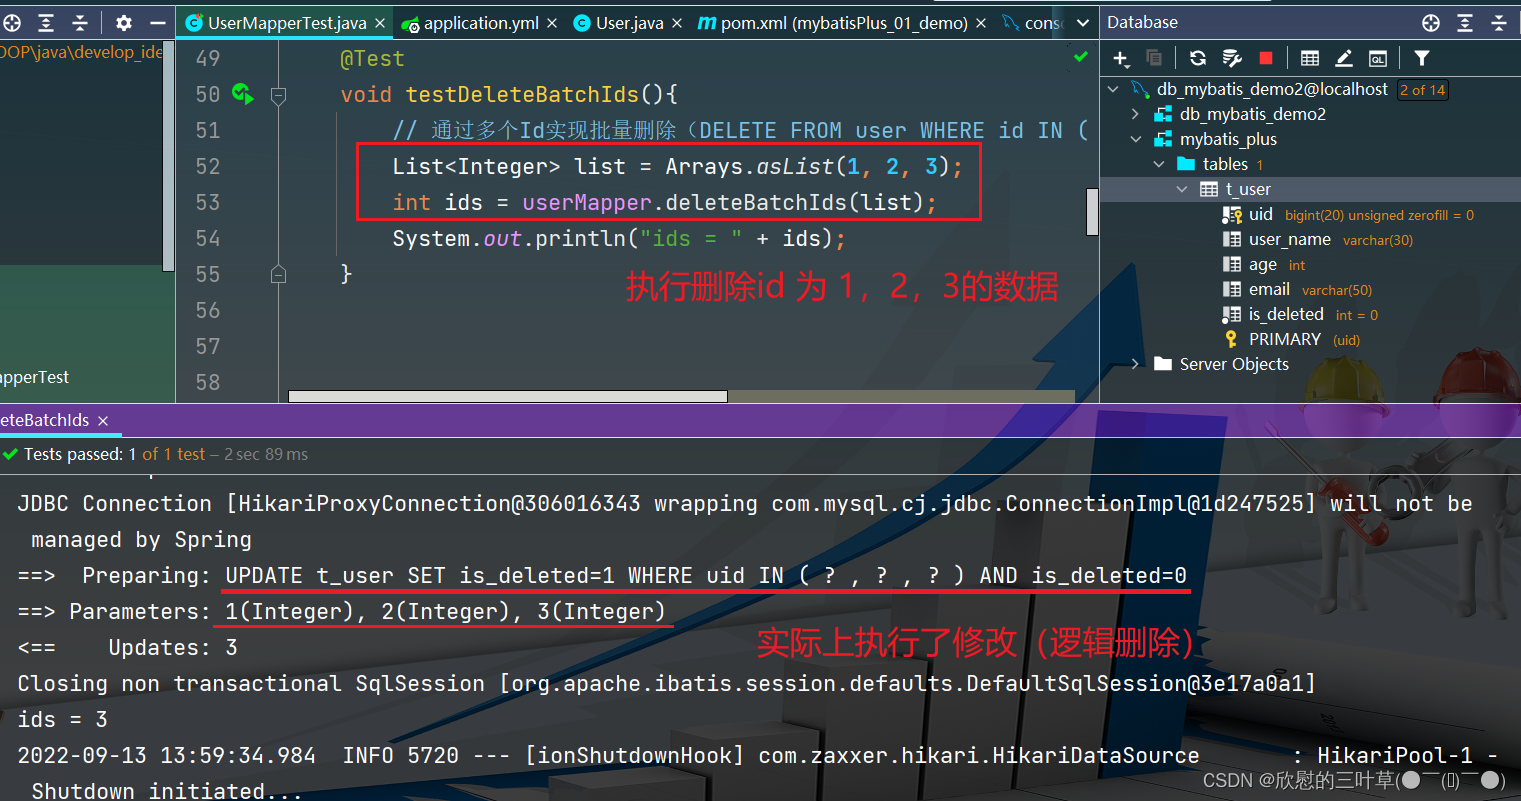
1. DELETE FROM user WHERE id IN ( ? , ? , ? )
@Test
void testDeleteBatchIds ( ) {
List < Integer > = Arrays . asList ( 1 , 2 , 3 ) ;
int ids = userMapper. deleteBatchIds ( list) ;
System . out. println ( "ids = " + ids) ;
}
1. UPDATE user SET name=?, age=?, email=? WHERE id=?
@Test
void testUpdate ( ) {
User user = new User ( 0 , "Coke" , 23 , "Coke@it.com" ) ;
int i = userMapper. updateById ( user) ;
System . out. println ( "i = " + i) ;
}
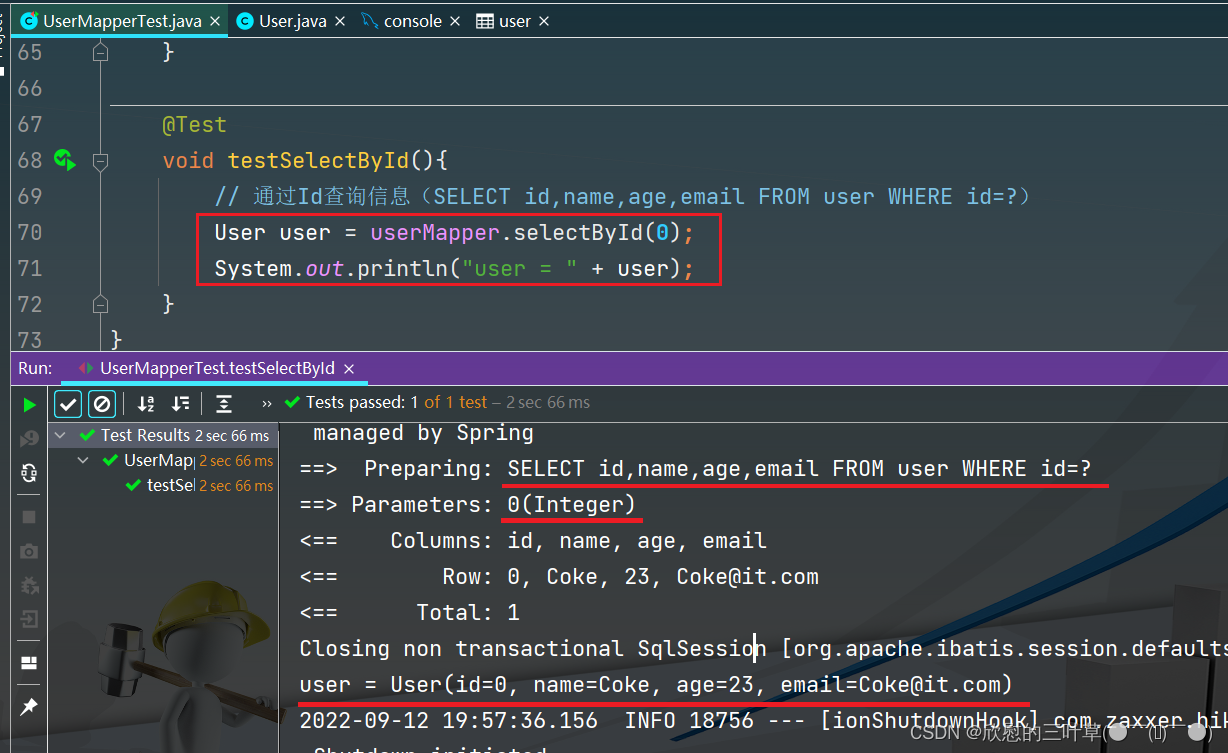
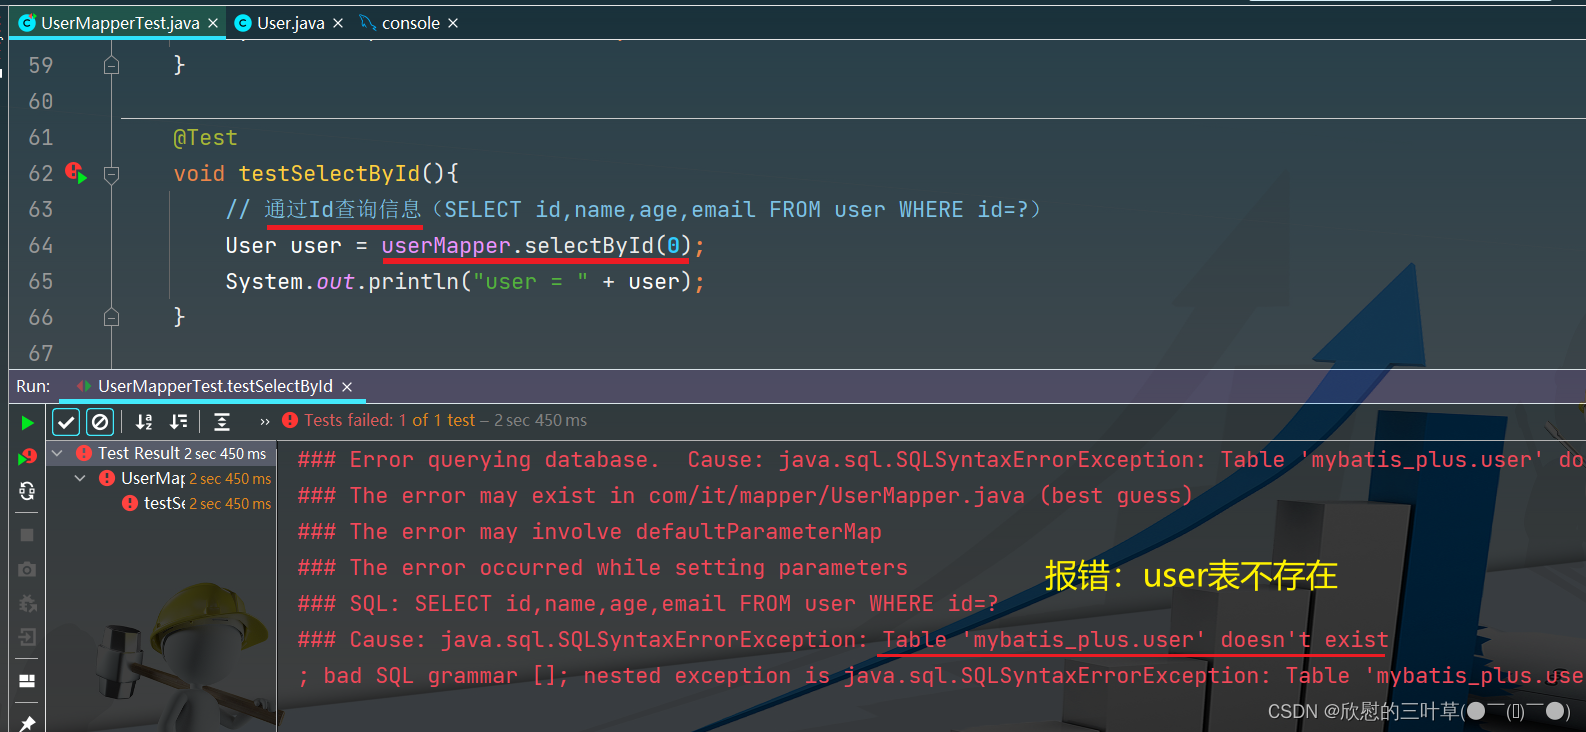
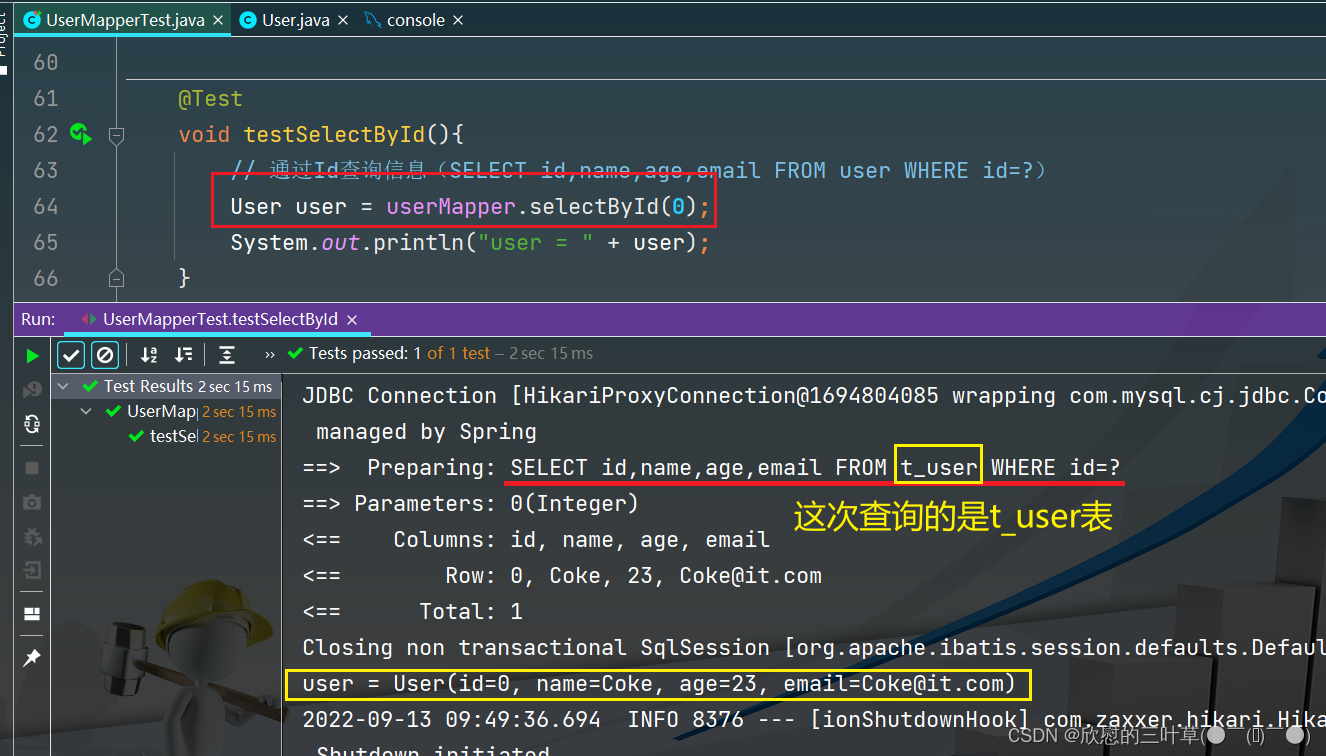
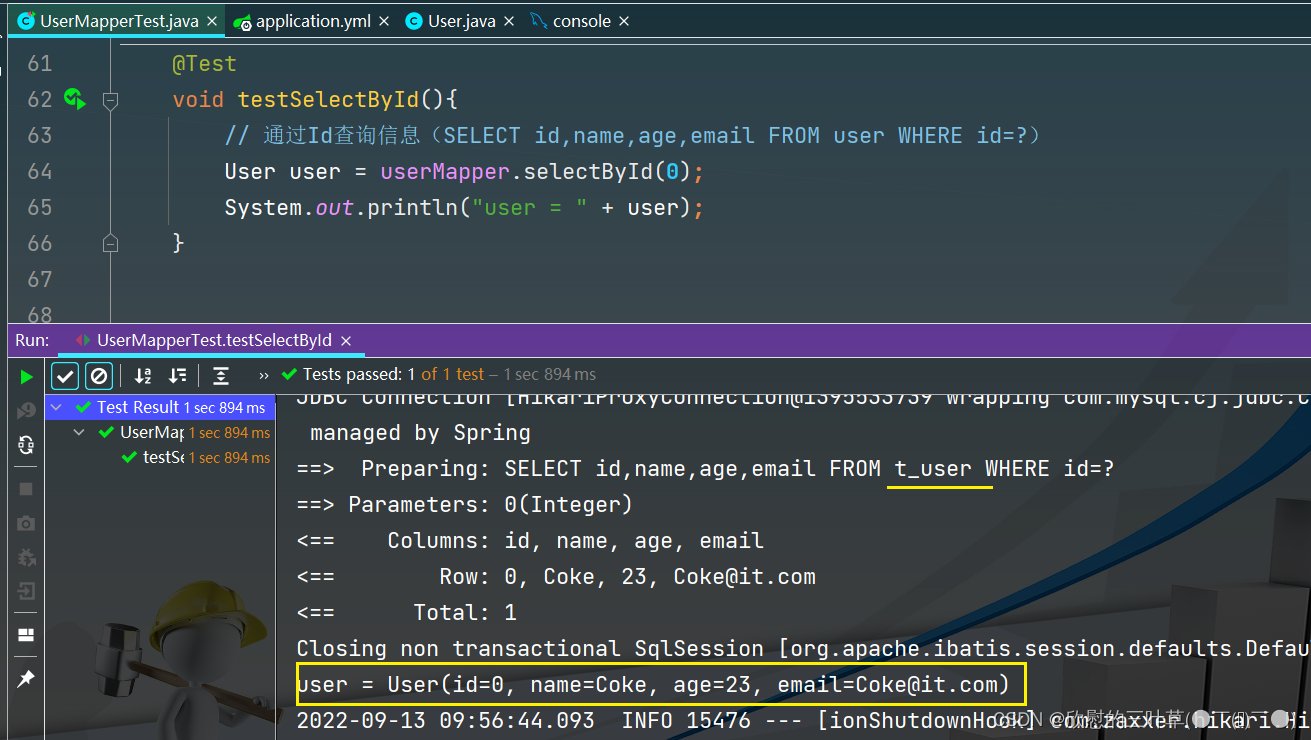
1. SELECT id,name,age,email FROM user WHERE id=?
@Test
void testSelectById ( ) {
User user = userMapper. selectById ( 0 ) ;
System . out. println ( "user = " + user) ;
}
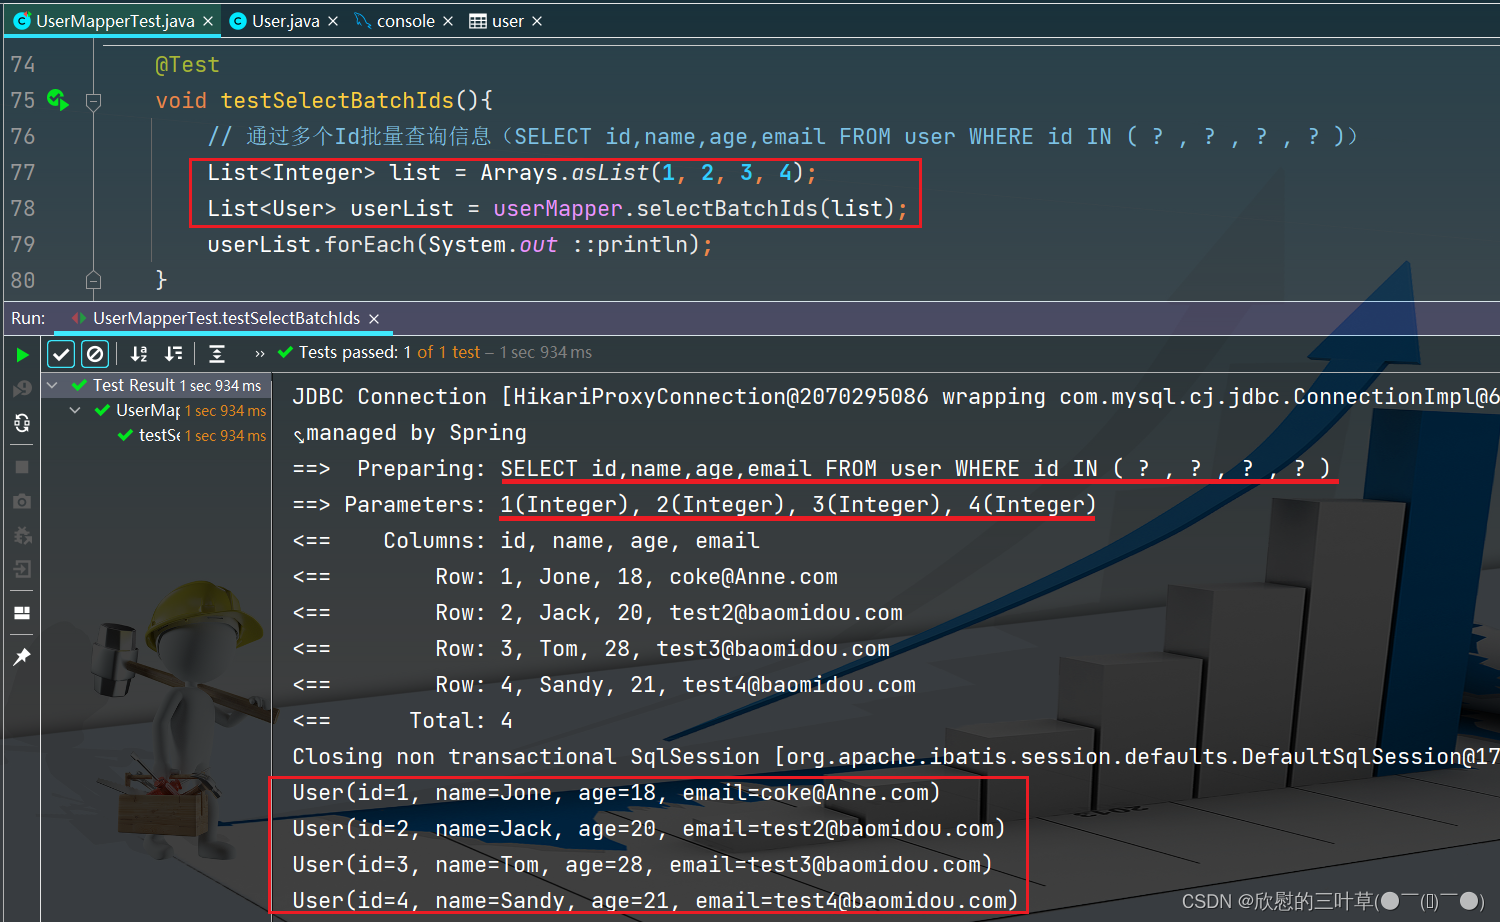
1. SELECT id,name,age,email FROM user WHERE id IN ( ? , ? , ? , ? )
@Test
void testSelectBatchIds ( ) {
List < Integer > = Arrays . asList ( 1 , 2 , 3 , 4 ) ;
List < User > = userMapper. selectBatchIds ( list) ;
userList. forEach ( System . out :: println ) ;
}
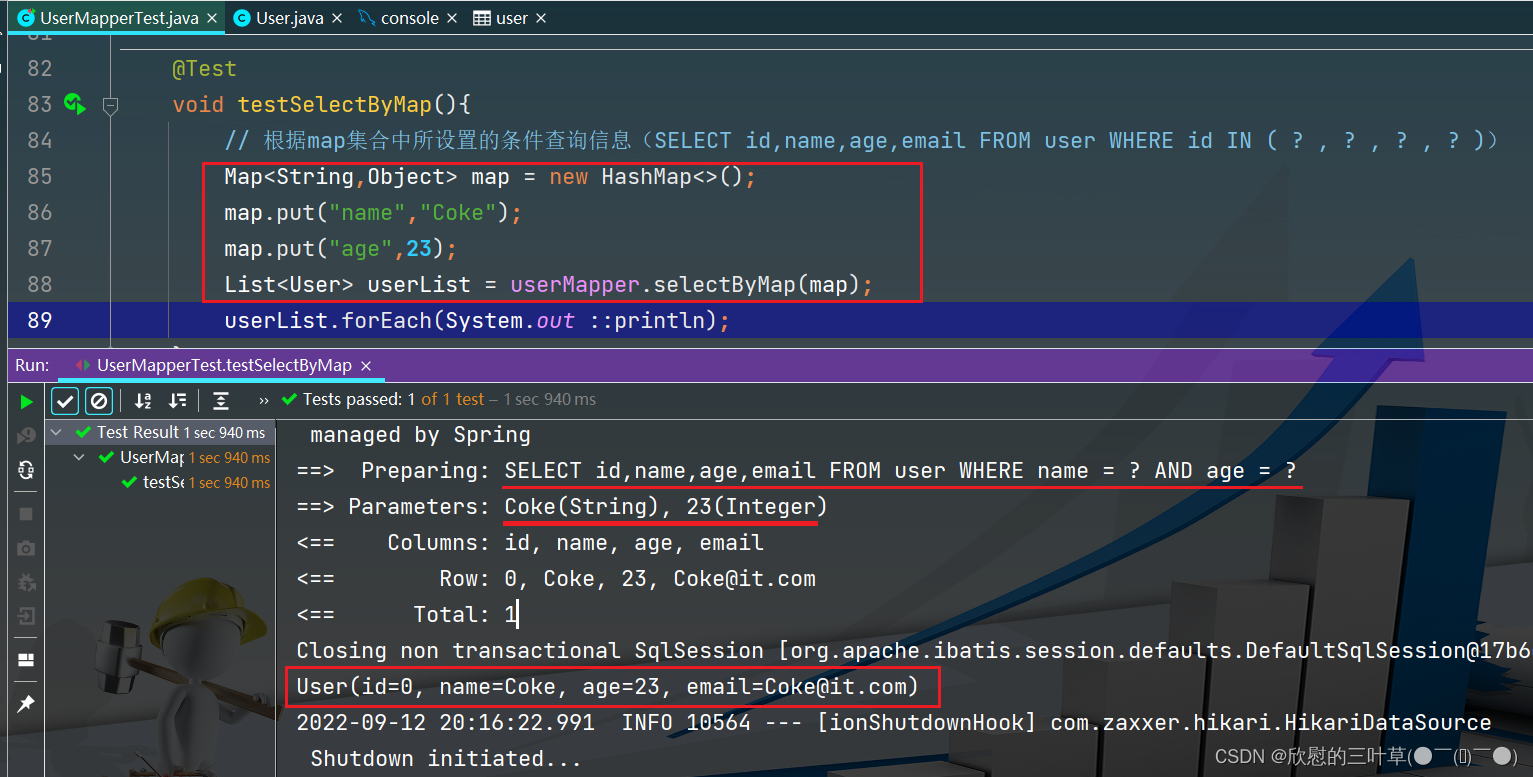
1. SELECT id,name,age,email FROM user WHERE name = ? AND age = ?
@Test
void testSelectByMap ( ) {
Map < String , Object > = new HashMap < > ( ) ;
map. put ( "name" , "Coke" ) ;
map. put ( "age" , 23 ) ;
List < User > = userMapper. selectByMap ( map) ;
userList. forEach ( System . out :: println ) ;
}
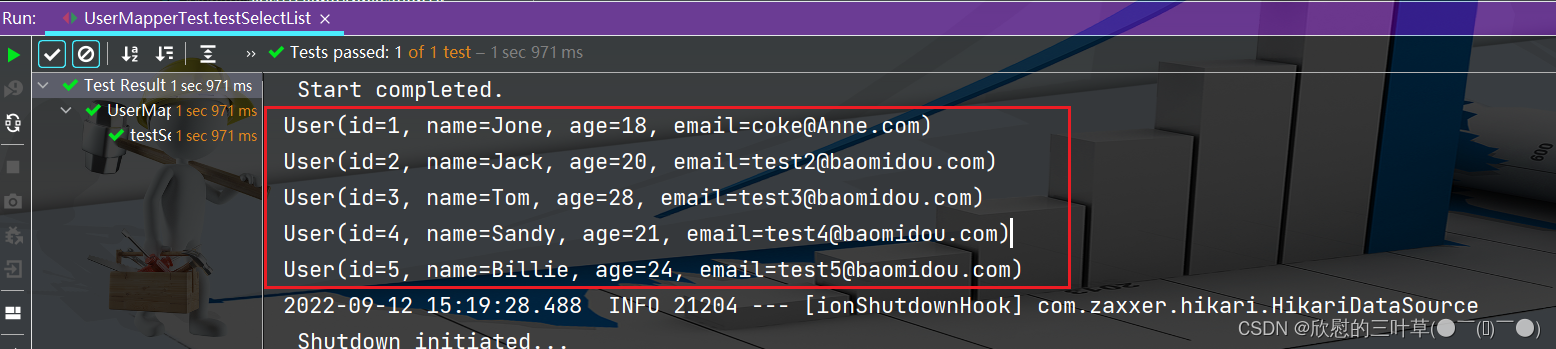
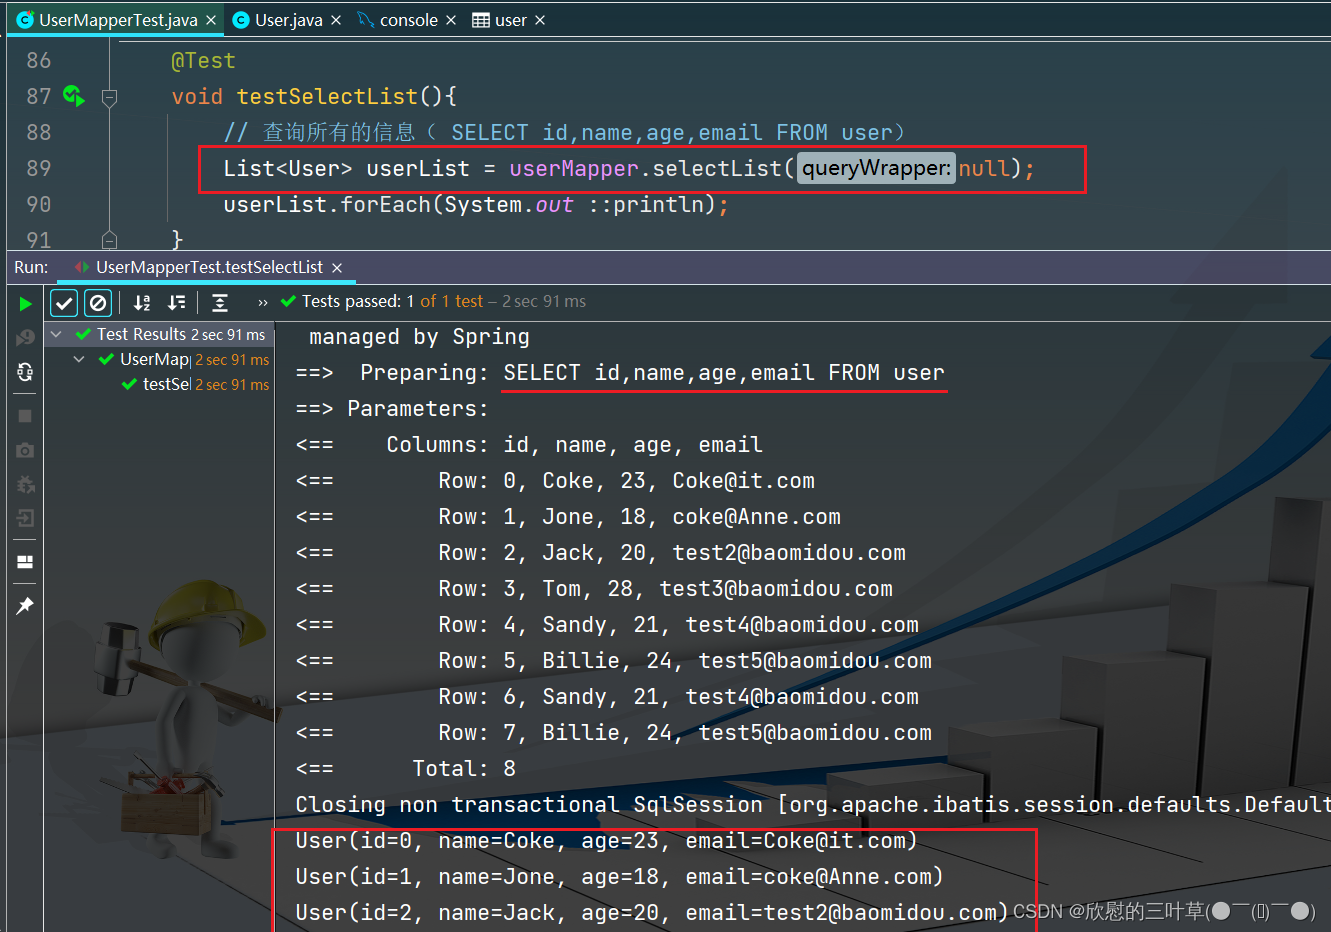
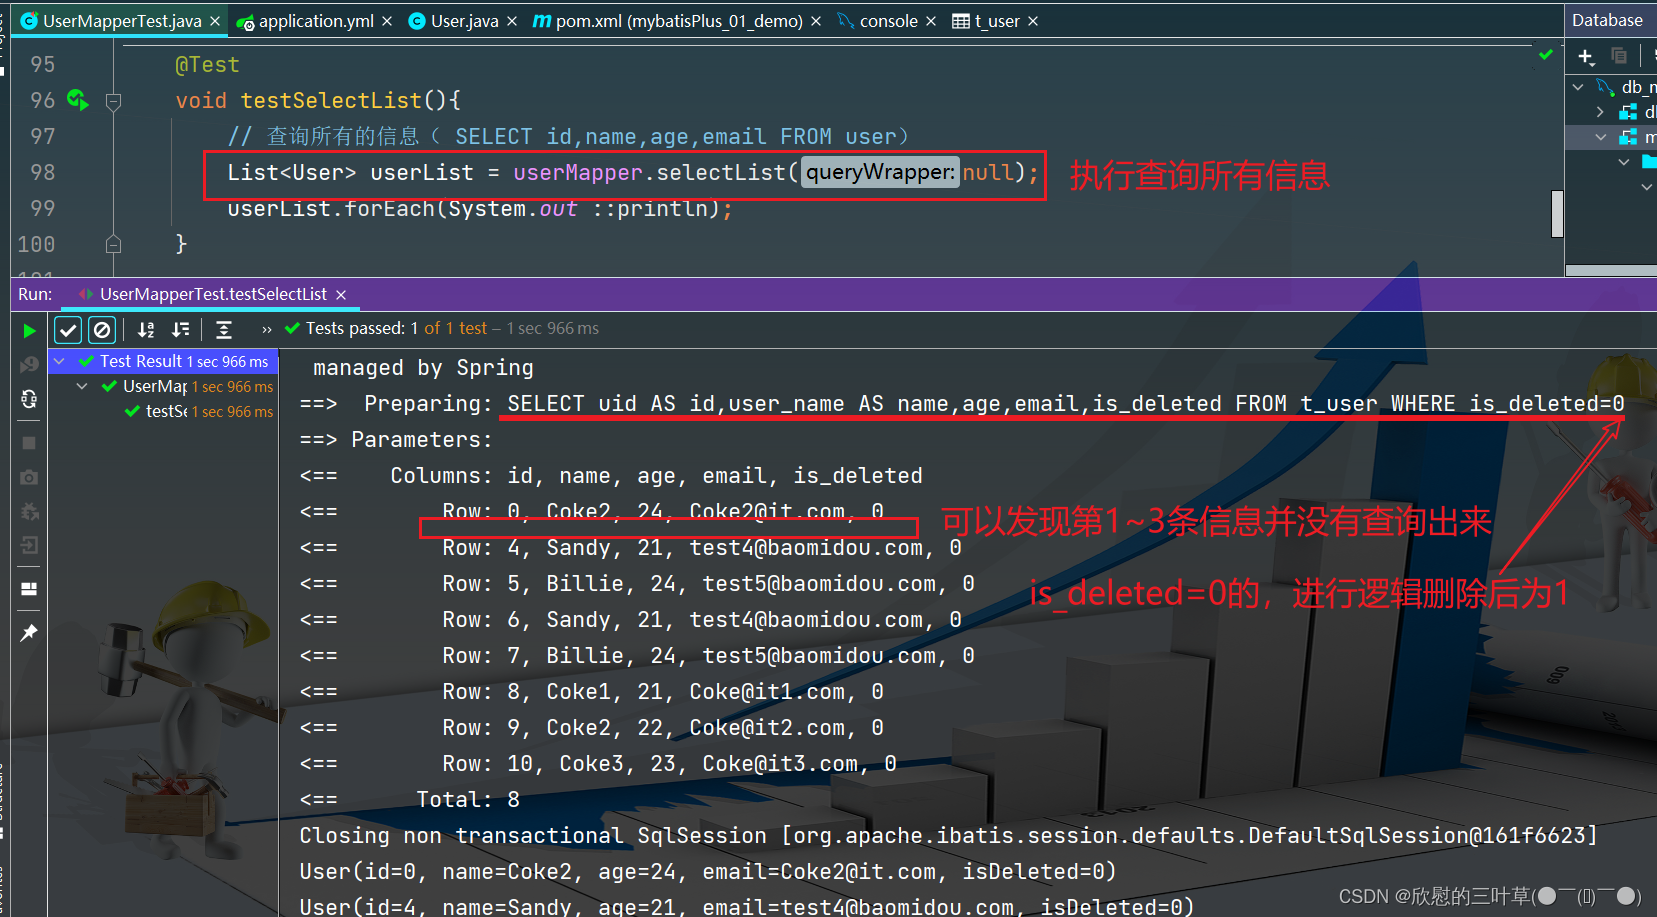
1. SELECT id,name,age,email FROM user
@Test
void testSelectList ( ) {
List < User > = userMapper. selectList ( null ) ;
userList. forEach ( System . out :: println ) ;
}
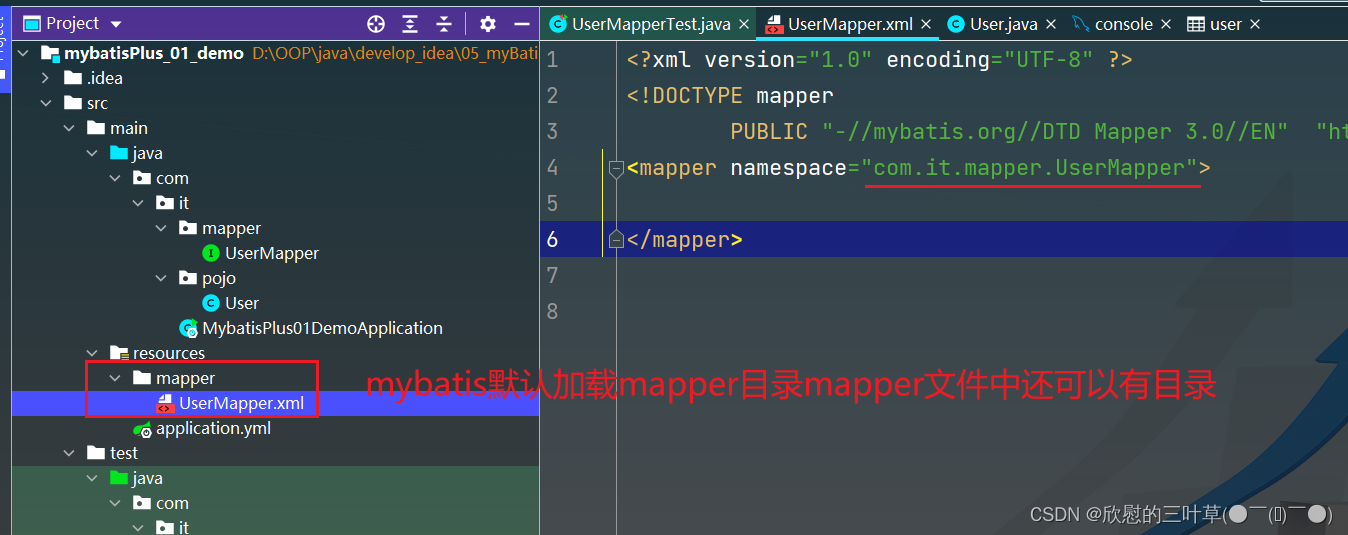
自定义查询方法(根据id查询)返回值为Map集合
1. 创建mapper目录 在mapper文件中创建xml配置文件
< ? xml version= "1.0" encoding= "UTF-8" ? >
< ! DOCTYPE mapper
PUBLIC "-//mybatis.org//DTD Mapper 3.0//EN" "http://mybatis.org/dtd/mybatis-3-mapper.dtd" >
< mapper namespace= "com.it.mapper.UserMapper" >
< / mapper>
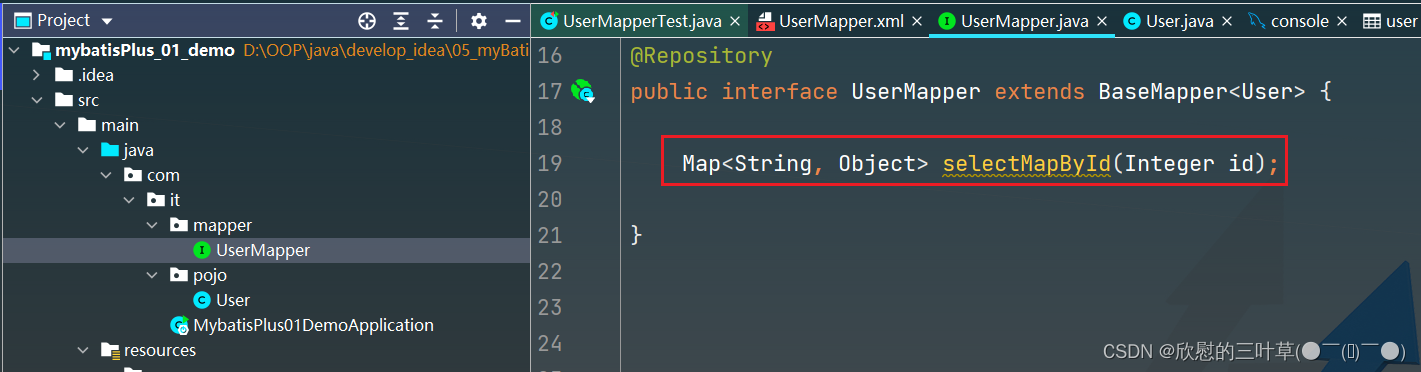
2. 在Mapper接口中定义查询方法
Map < String , Object > selectMapById ( Integer id) ;
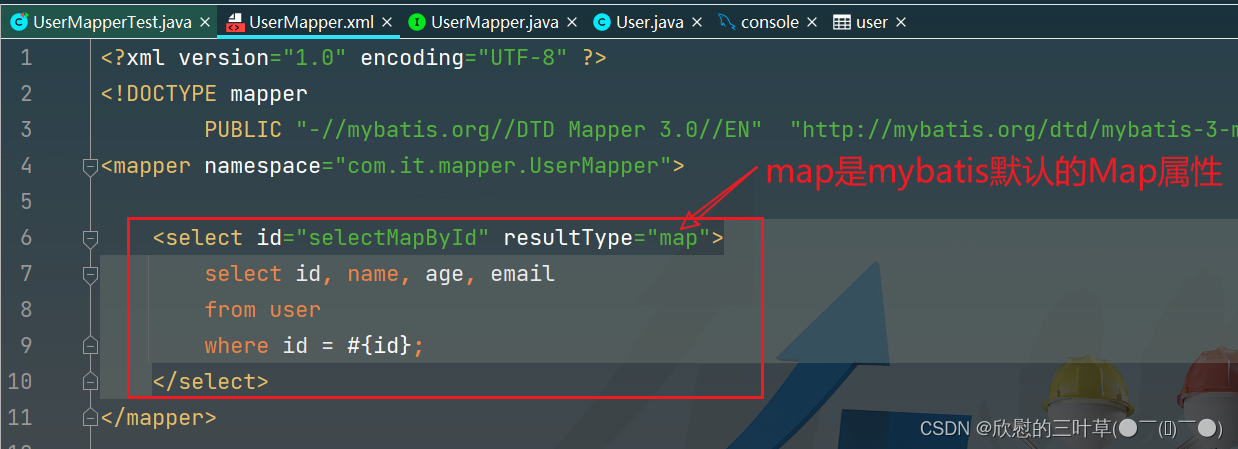
3. 在xml中编写SQL语句
< selectid = " selectMapById" resultType = " map" > </ select> 4. 测试
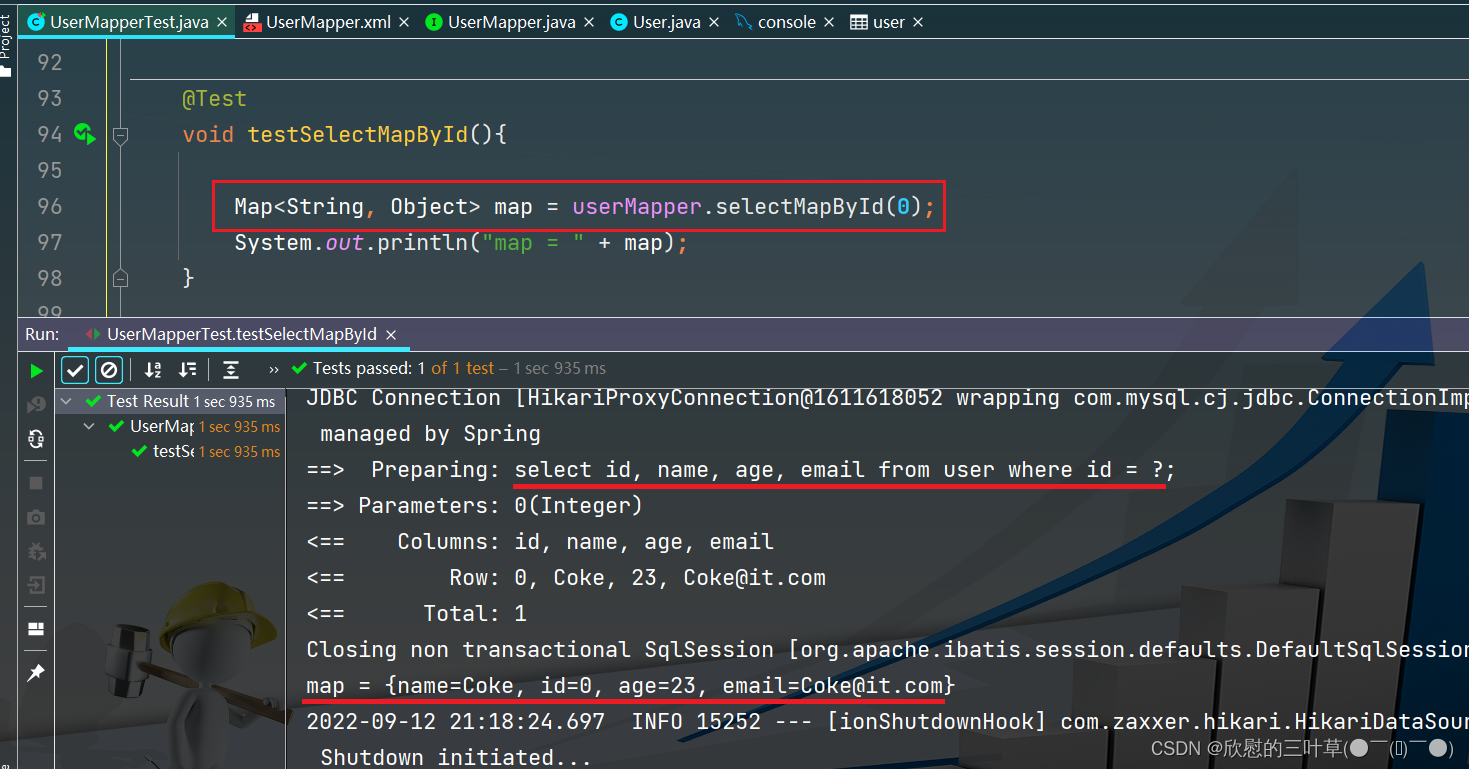
@Test
void testSelectMapById ( ) {
Map < String , Object > = userMapper. selectMapById ( 0 ) ;
System . out. println ( "map = " + map) ;
}
说明:
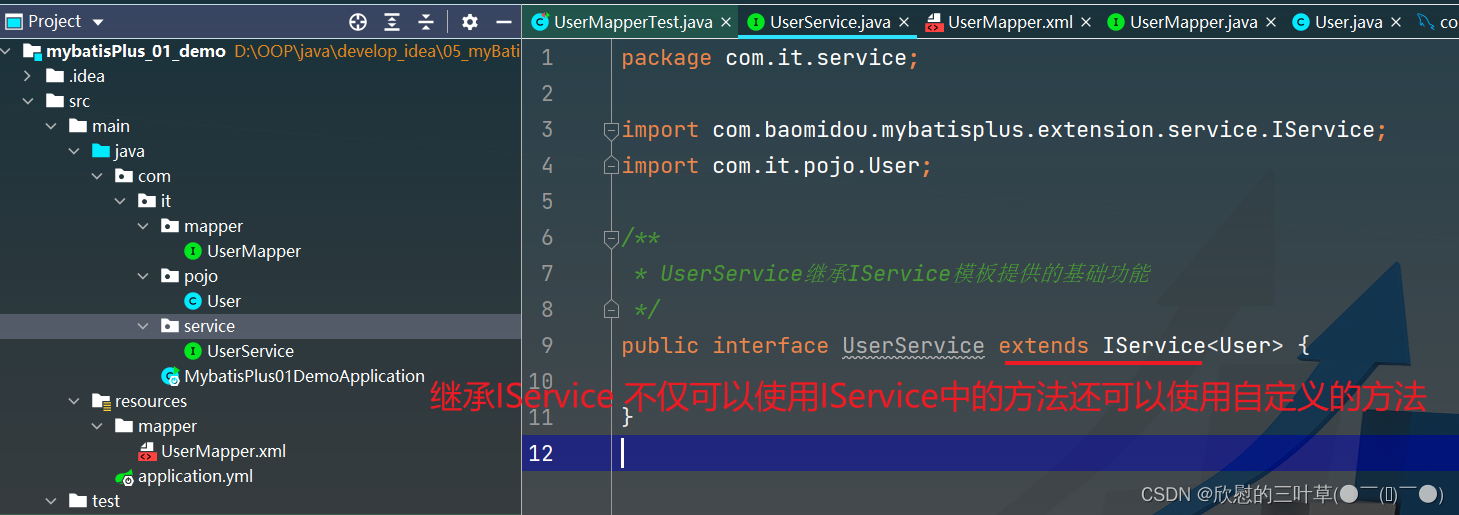
MyBatis-Plus中有一个接口 IService和其实现类 ServiceImpl,封装了常见的业务层逻辑
1. 创建Service接口
public interface UserService extends IService < User > {
}
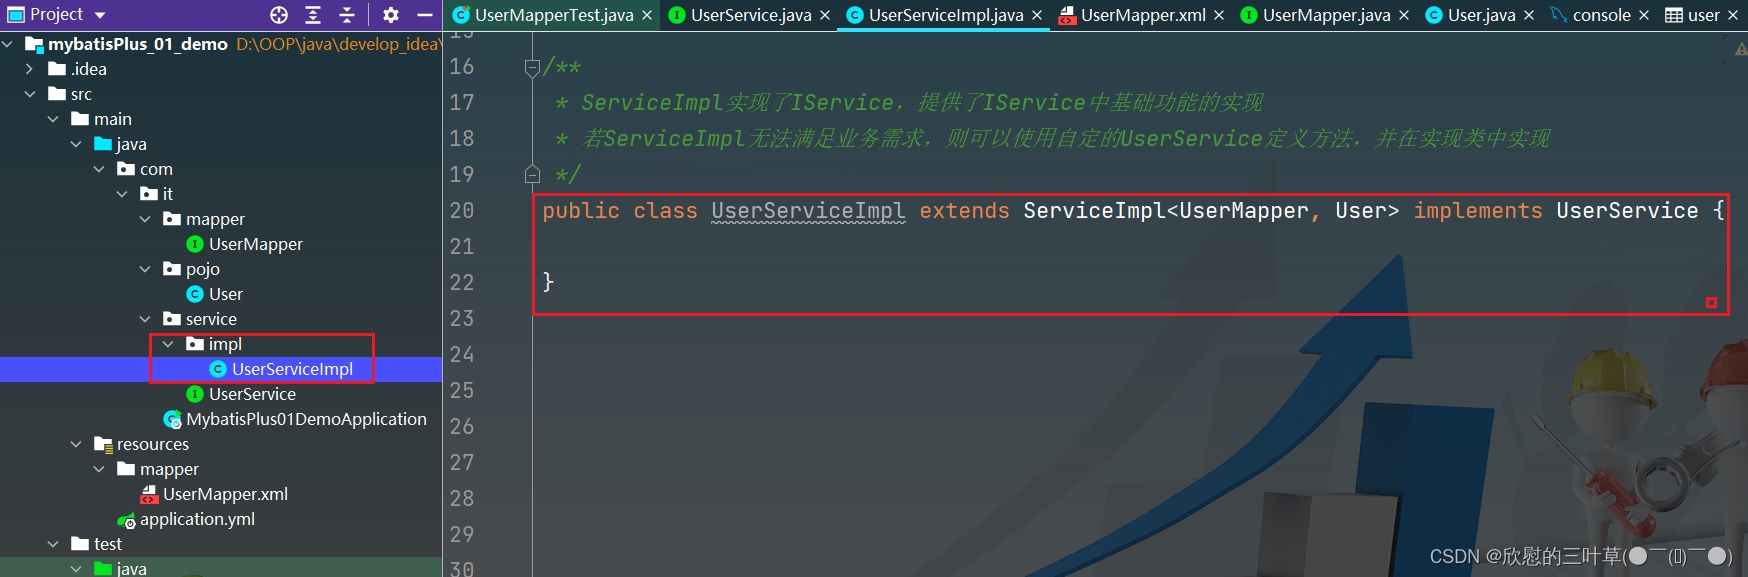
2. 创建实现类
public class UserServiceImpl extends ServiceImpl < UserMapper , User > implements UserService {
}
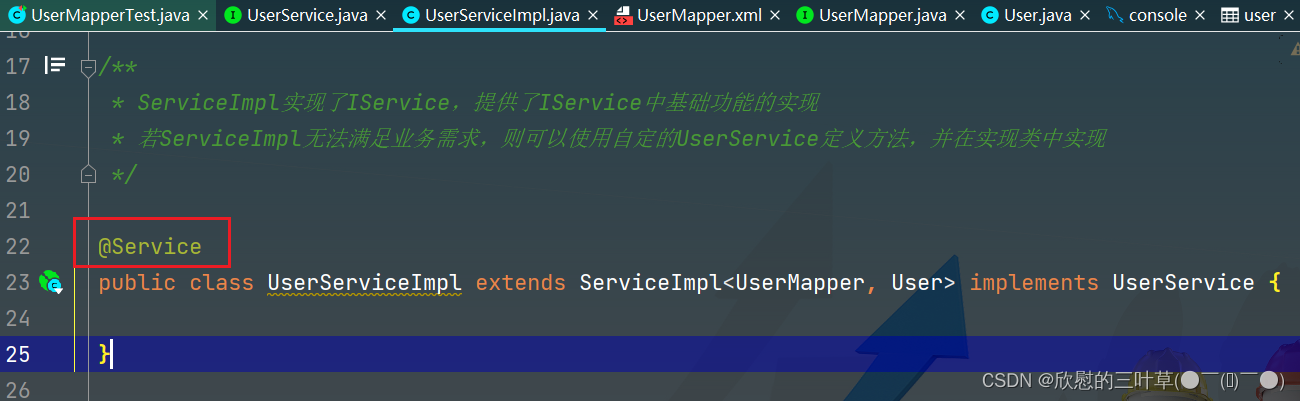
1. 在Service实现类上添加@Service注解
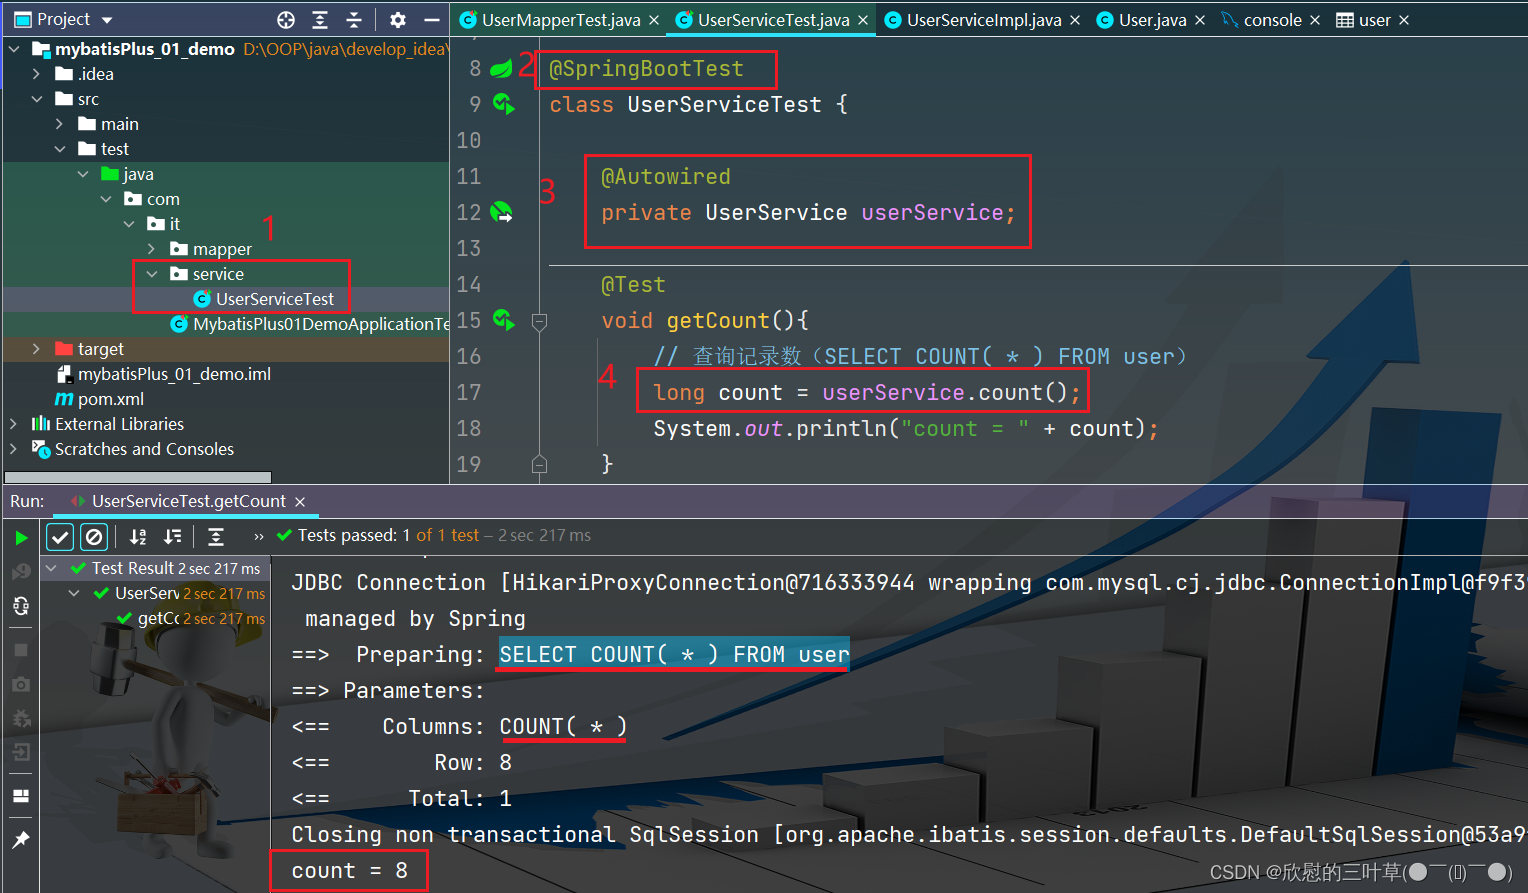
2. 创建测试类
@SpringBootTest
class UserServiceTest {
@Autowired
private UserService userService;
@Test
void getCount ( ) {
long count = userService. count ( ) ;
System . out. println ( "count = " + count) ;
}
}
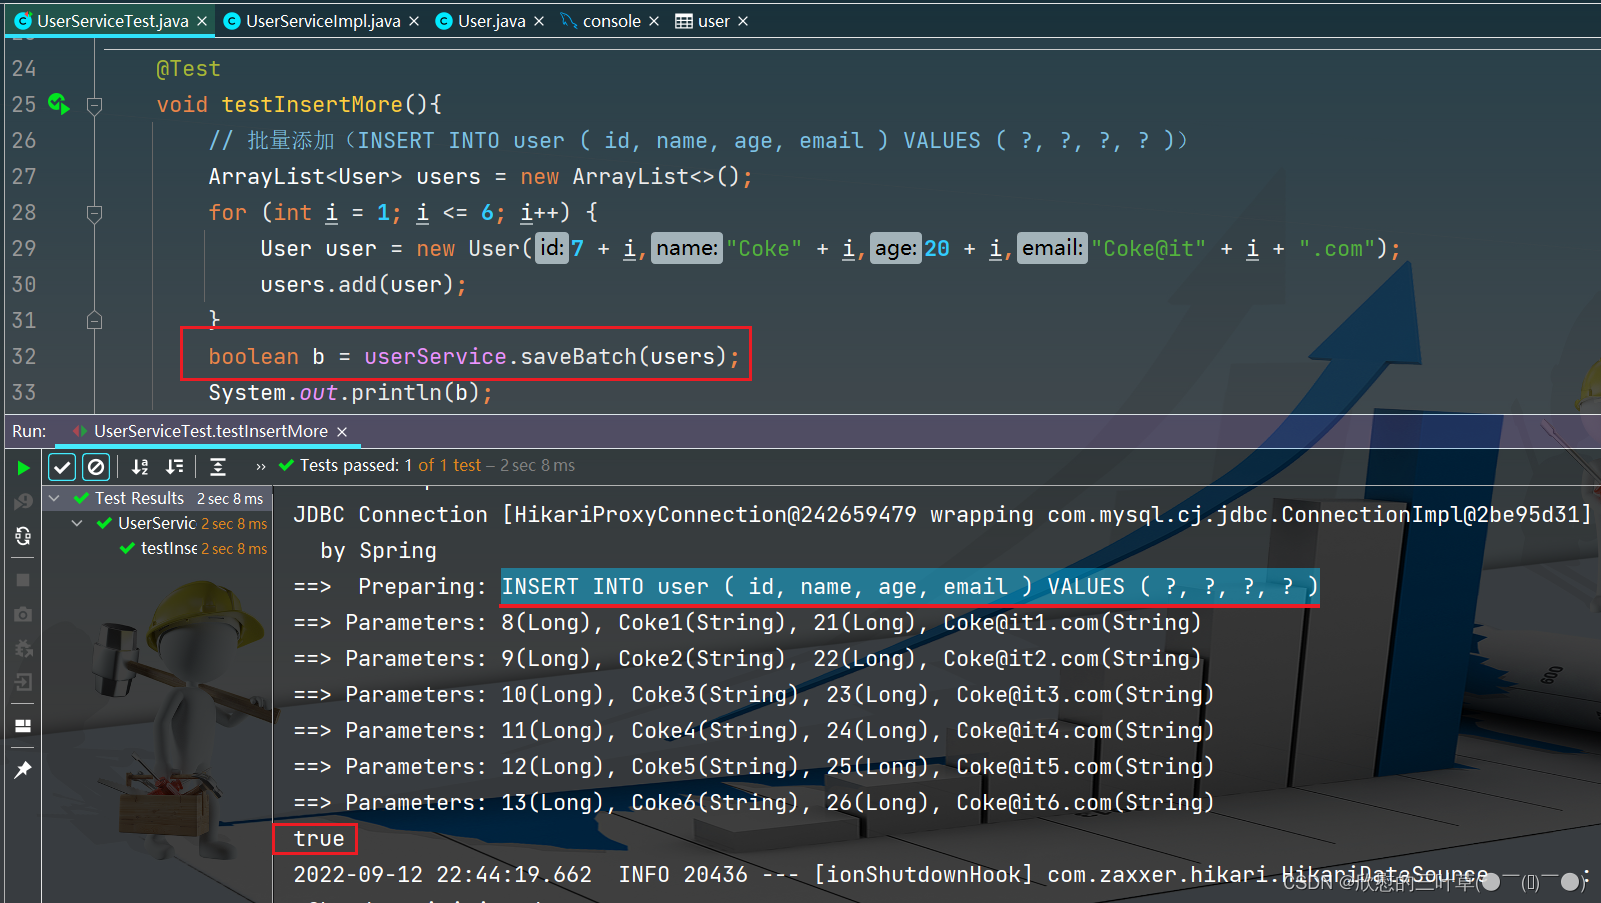
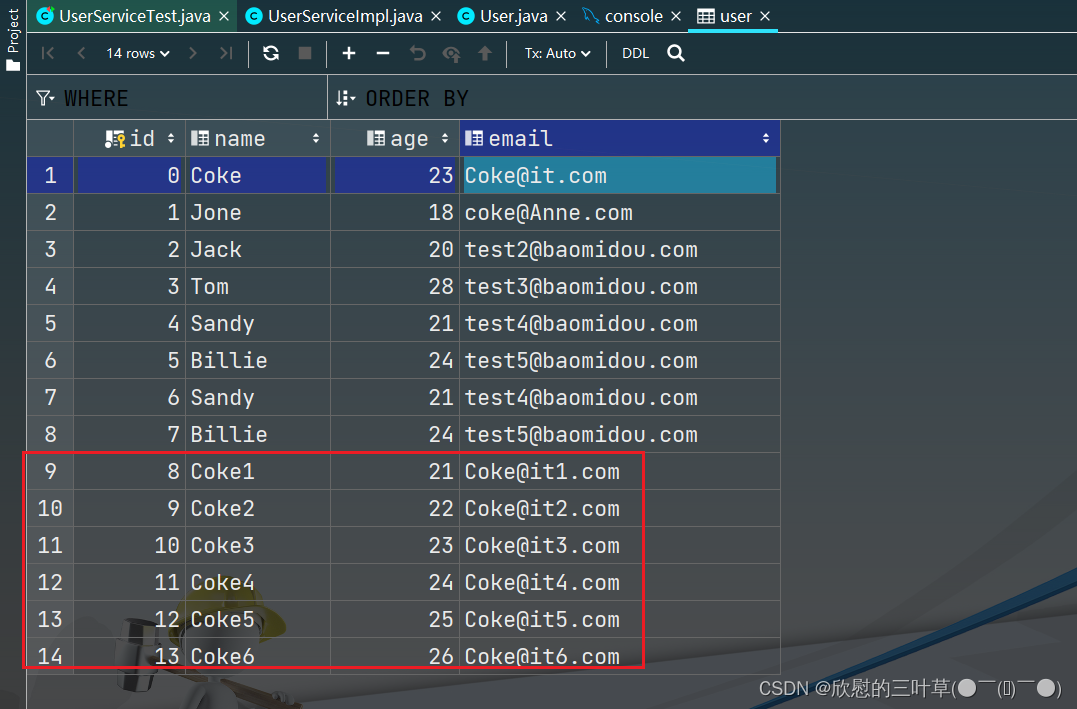
1. 测试
@Test
void testInsertMore ( ) {
ArrayList < User > = new ArrayList < > ( ) ;
for ( int i = 1 ; i <= 6 ; i++ ) {
User user = new User ( 7 + i, "Coke" + i, 20 + i, "Coke@it" + i + ".com" ) ;
users. add ( user) ;
}
boolean b = userService. saveBatch ( users) ;
System . out. println ( b) ;
}
alter table user rename t_user;
1. 修改表名之后直接测试(会报错)
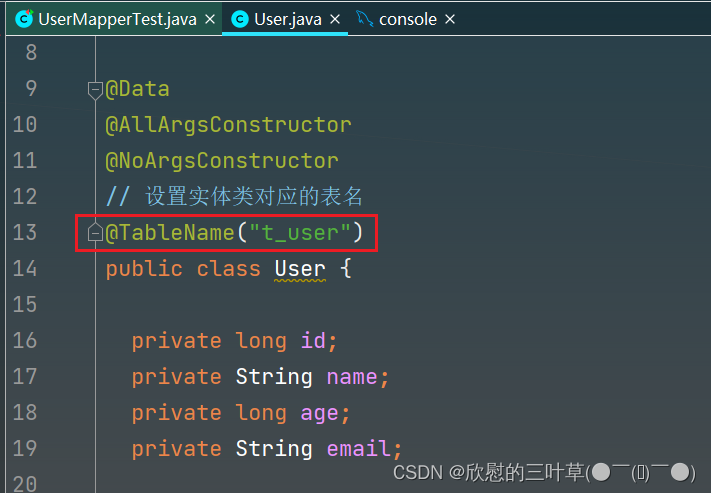
2. 解决方法一: 在实体类上加注解@TableName()
3. 测试
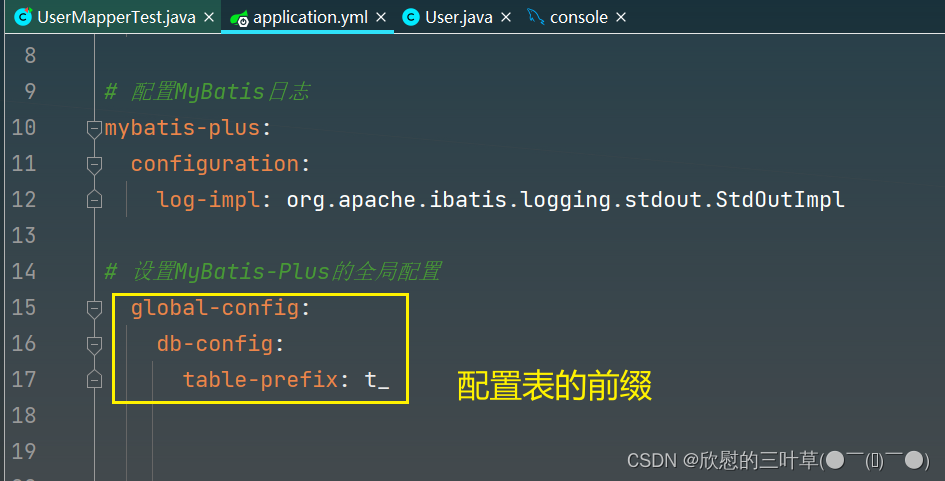
1. 在配置文件中配置全局配置
mybatis-plus :
global-config :
db-config :
table-prefix : t_
2. 测试
alter table t_user add primary key ( id) ;
alter table t_user modify id bigint auto_increment ;
alter table t_user change id id bigint auto_increment primary key ;
当我用SQLyog尝试修改已有记录的mysql数据表的主键为自动增长时,报出以下错误
ALTER TABLE causes auto_increment resequencing, resulting in duplicate entry ’1′ for key ‘PRIMARY’
解决方法:
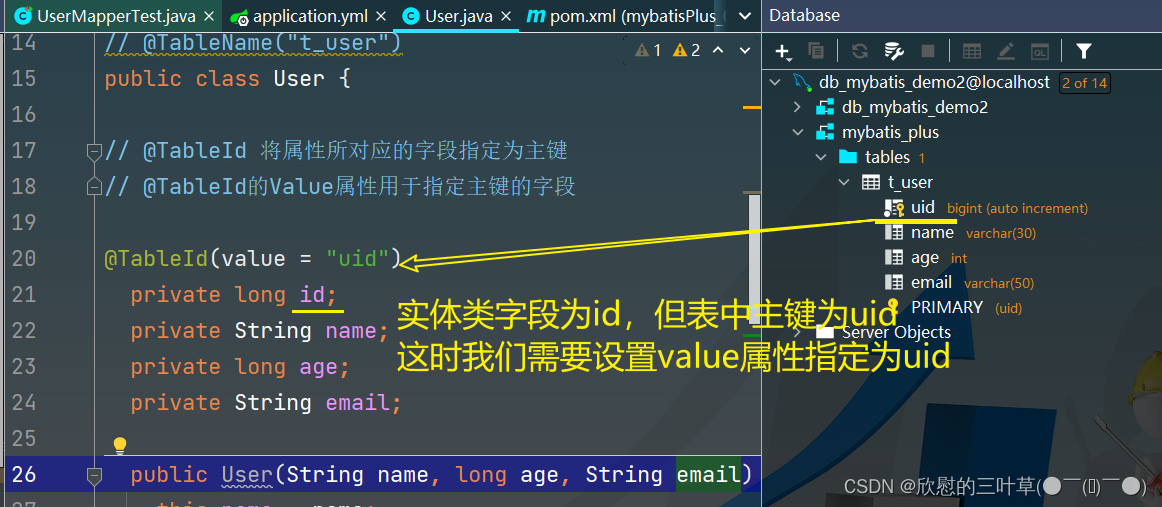
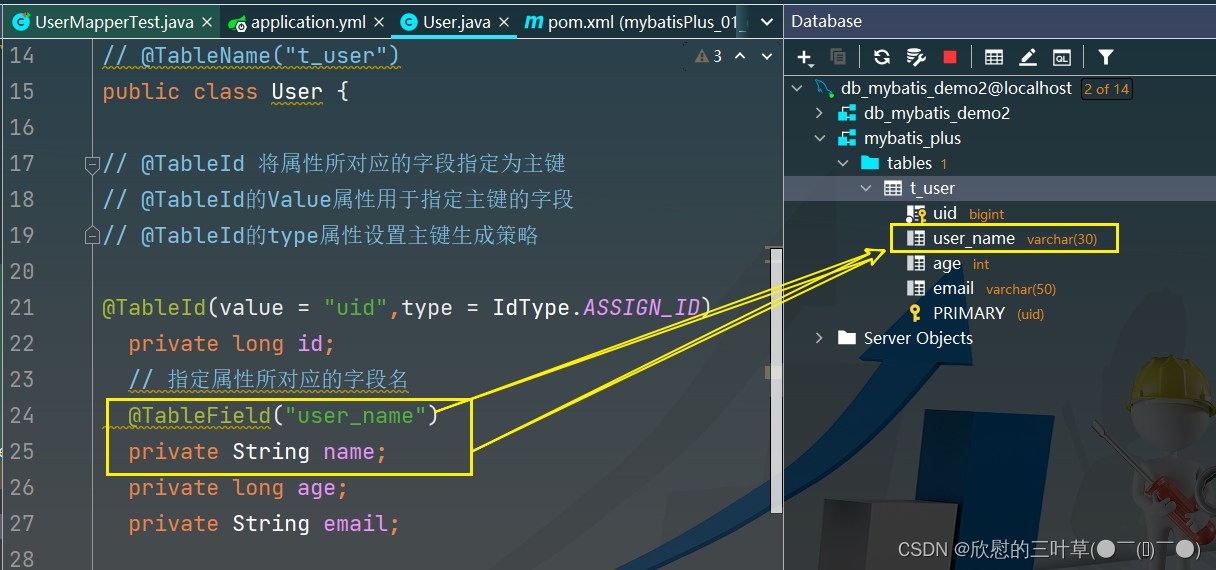
主键专属
比如数据中的表中的字段是id
但是实体类是uId
那么就需要在uId上打上这个注解@TableId
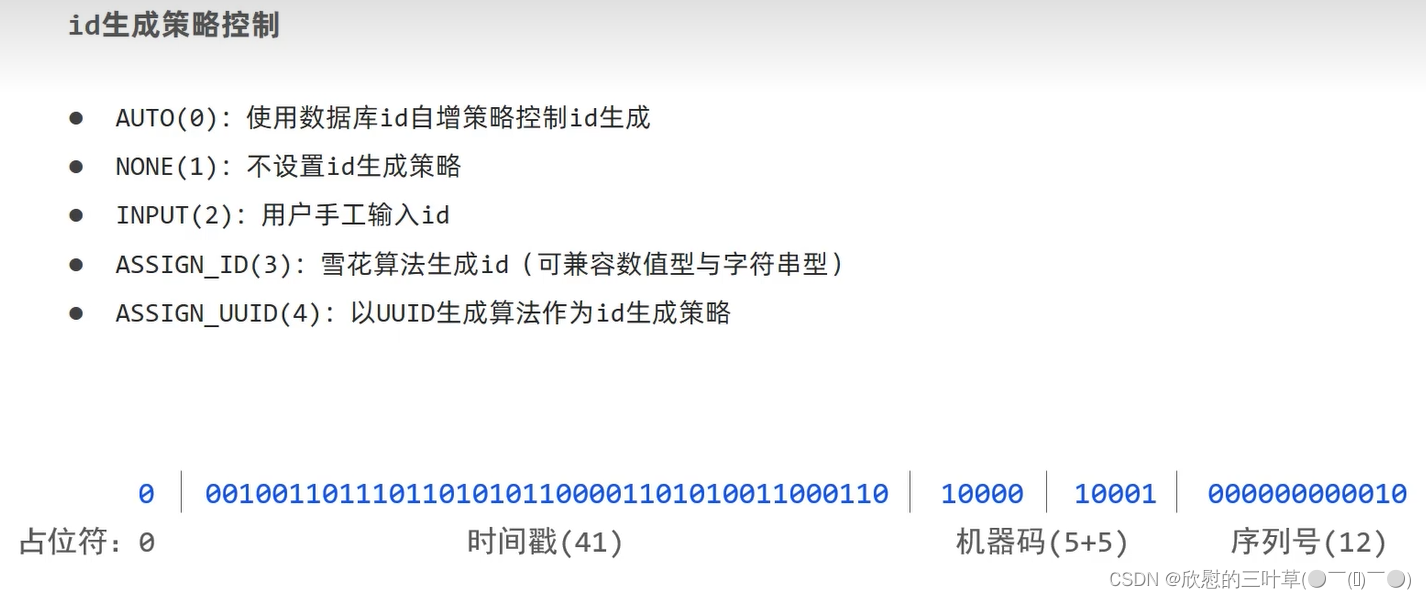
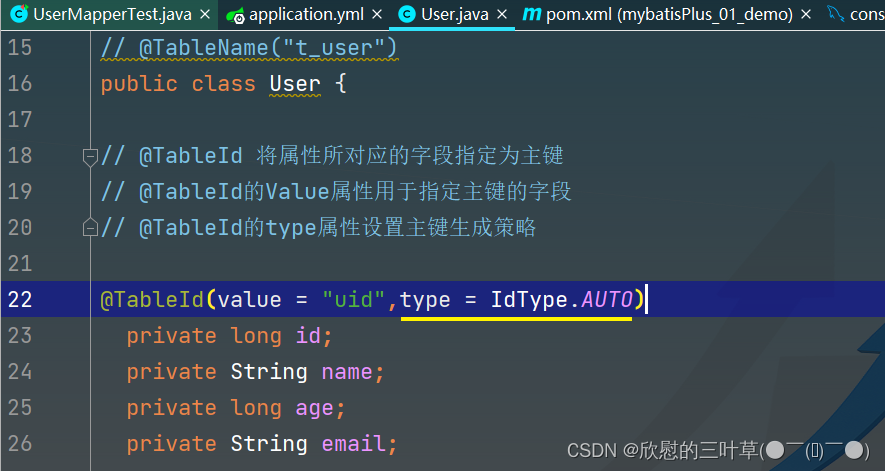
type属性用来定义主键策略
常用的主键策略:
值 描述 IdType.ASSIGN_ID(默认) 基于雪花算法的策略生成数据id,与数据库id是否设置自增无关 IdType.AUTO 使用数据库的自增策略,注意,该类型请确保数据库设置了id自增,否则无效
mybatis-plus :
configuration :
log-impl : org.apache.ibatis.logging.stdout.StdOutImpl
global-config :
db-config :
table-prefix : t_
id-type : auto
需要选择合适的方案去应对数据规模的增长,以应对逐渐增长的访问压力和数据量。
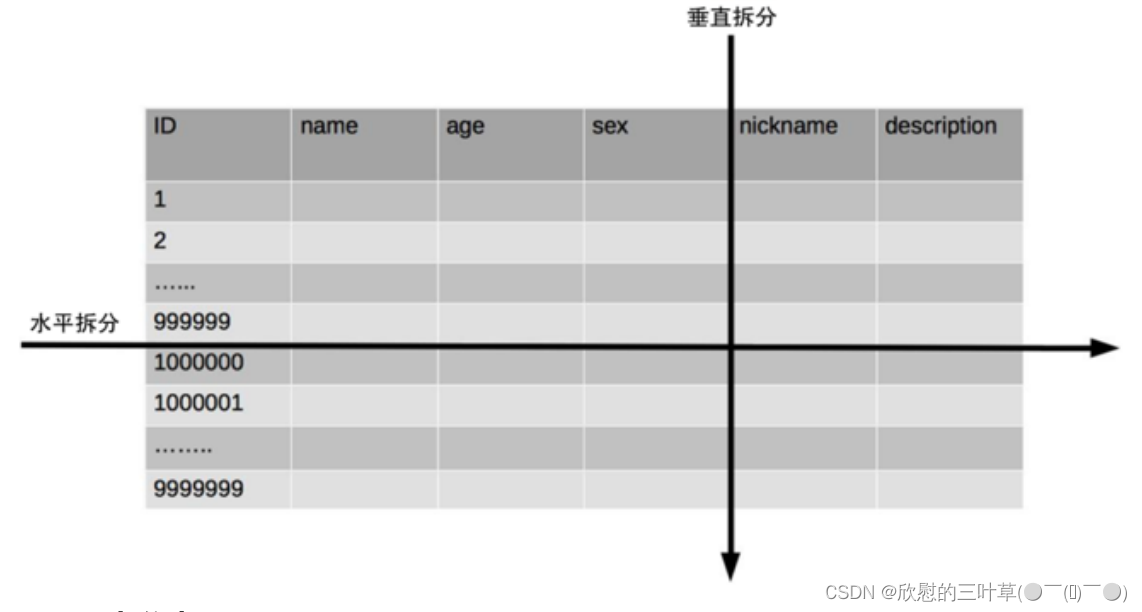
将不同业务数据分散存储到不同的数据库服务器,能够支撑百万甚至千万用户规模的业务,但如果业务继续发展,同一业务的单表数据也会达到单台数据库服务器的处理瓶颈。例如,淘宝的几亿用户数据,如果全部存放在一台数据库服务器的一张表中,肯定是无法满足性能要求的,此时就需要对单表数据进行拆分。
垂直分表适合将表中某些不常用且占了大量空间的列拆分出去。
例如,前面示意图中的 nickname 和 description 字段,假设我们是一个婚恋网站,用户在筛选其他用户的时候,主要是用 age 和 sex 两个字段进行查询,而 nickname 和 description 两个字段主要用于展示,一般不会在业务查询中用到。description 本身又比较长,因此我们可以
将这两个字段独立到另外一张表中,这样在查询 age 和 sex 时,就能带来一定的性能提升。
水平分表适合表行数特别大的表,有的公司要求单表行数超过 5000 万就必须进行分表,这个数字可以作为参考,但并不是绝对标准,关键还是要看表的访问性能。对于一些比较复杂的表,可能超过 1000万就要分表了;而对于一些简单的表,即使存储数据超过 1 亿行,也可以不分表。
但不管怎样,当看到表的数据量达到千万级别时,作为架构师就要警觉起来,因为这很可能是架构的性能瓶颈或者隐患。
水平分表相比垂直分表,会引入更多的复杂性,例如要求全局唯一的数据id该如何处理
主键自增
①以最常见的用户 ID 为例,可以按照 1000000 的范围大小进行分段,1 ~ 999999 放到表 1中,1000000 ~ 1999999 放到表2中,以此类推。
②复杂点:分段大小的选取。分段太小会导致切分后子表数量过多,增加维护复杂度;分段太大可能会导致单表依然存在性能问题,一般建议分段大小在 100 万至 2000 万之间,具体需要根据业务选取合适的分段大小。
③优点:可以随着数据的增加平滑地扩充新的表。例如,现在的用户是 100 万,如果增加到 1000 万,只需要增加新的表就可以了,原有的数据不需要动。
④缺点:分布不均匀。假如按照 1000 万来进行分表,有可能某个分段实际存储的数据量只有 1 条,而另外一个分段实际存储的数据量有 1000 万条。
取模
①同样以用户 ID 为例,假如我们一开始就规划了 10 个数据库表,可以简单地用 user_id % 10 的值来表示数据所属的数据库表编号,ID 为 985 的用户放到编号为 5 的子表中,ID 为 10086 的用户放到编号为 6 的子表中。
②复杂点:初始表数量的确定。表数量太多维护比较麻烦,表数量太少又可能导致单表性能存在问题。
③优点:表分布比较均匀。
④缺点:扩充新的表很麻烦,所有数据都要重分布。
雪花算法
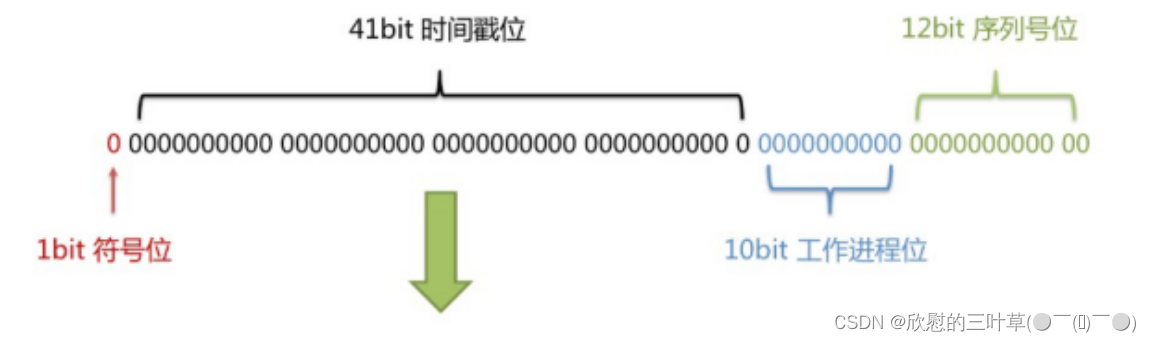
雪花算法是由Twitter公布的分布式主键生成算法,它能够保证不同表的主键的不重复性,以及相同表的主键的有序性。
①核心思想:
长度共64bit(一个long型)。
首先是一个符号位,1bit标识,由于long基本类型在Java中是带符号的,最高位是符号位,正数是0,负数是1,所以id一般是正数,最高位是0。
41bit时间截(毫秒级),存储的是时间截的差值(当前时间截 - 开始时间截),结果约等于69.73年。
10bit作为机器的ID(5个bit是数据中心,5个bit的机器ID,可以部署在1024个节点)。
12bit作为毫秒内的流水号(意味着每个节点在每毫秒可以产生 4096 个 ID)。
经过以上的测试,我们可以发现,MyBatis-Plus在执行SQL语句时,要保证实体类中的属性名和
若实体类中的属性使用的是驼峰命名风格,而表中的字段使用的是下划线命名风格
若实体类中的属性和表中的字段不满足情况1
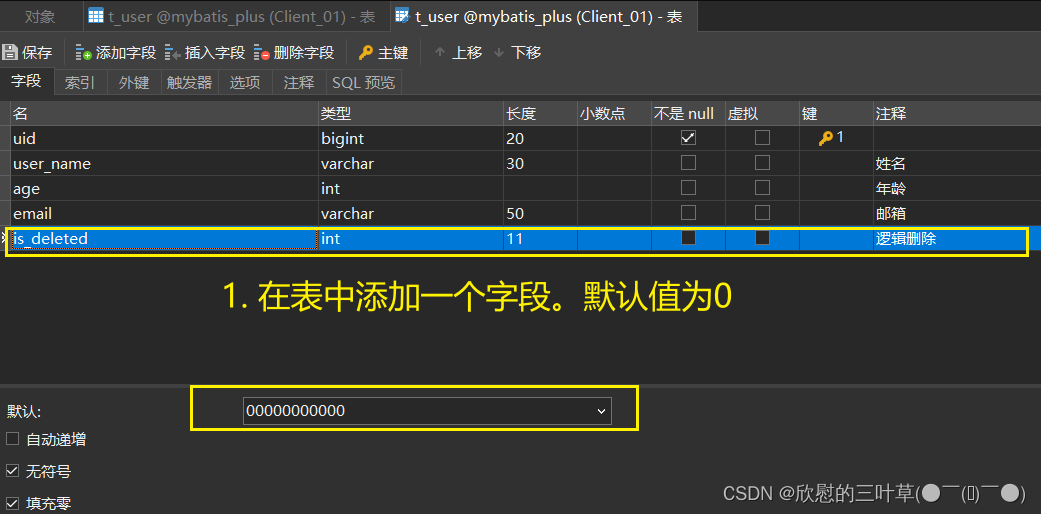
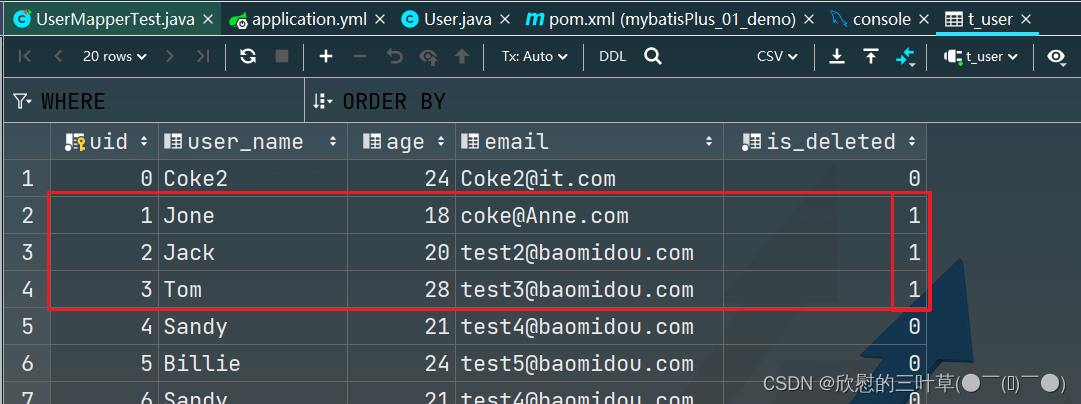
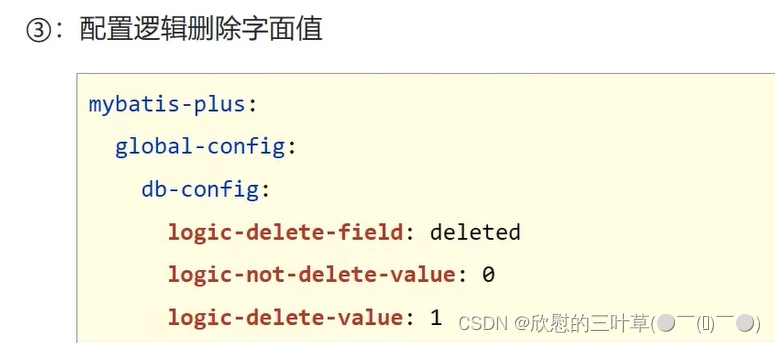
物理删除:真实删除,将对应数据从数据库中删除,之后查询不到此条被删除的数据 逻辑删除:假删除,将对应数据中代表是否被删除字段的状态修改为“被删除状态”,之后在数据库中仍旧能看到此条数据记录 使用场景:可以进行数据恢复 1. 在数据表中添加一个字段默认值为0
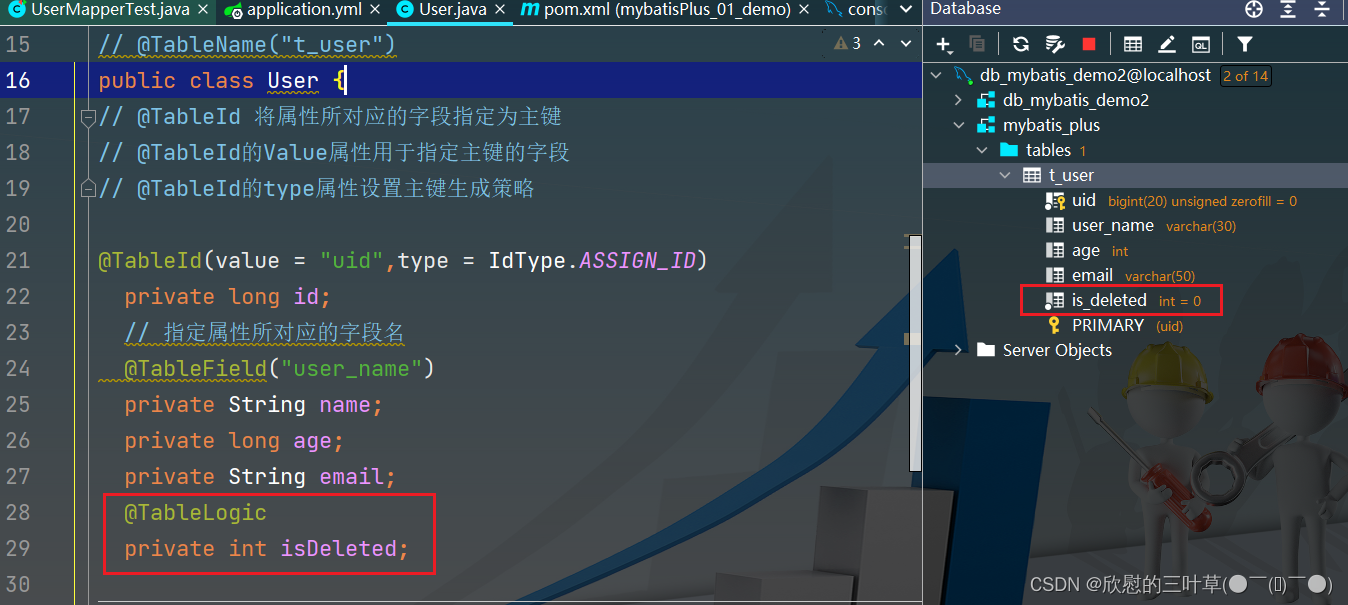
2. 在实体类中添加对应属性(并标记为逻辑删除)
3. 测试 删除一些信息
4. 测试(查询信息)
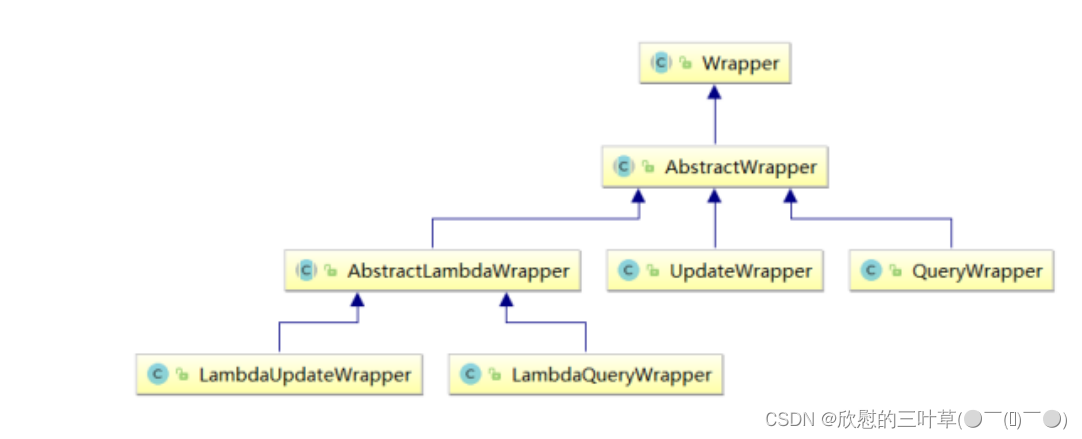
Wrapper : 条件构造抽象类,最顶端父类
AbstractWrapper : 用于查询条件封装,生成 sql 的 where 条件
QueryWrapper : 查询条件封装 UpdateWrapper : Update 条件封装 AbstractLambdaWrapper : 使用Lambda 语法
LambdaQueryWrapper :用于Lambda语法使用的查询Wrapper LambdaUpdateWrapper : Lambda 更新封装Wrapper
参考文档:https://baomidou.com/pages/10c804/#eq
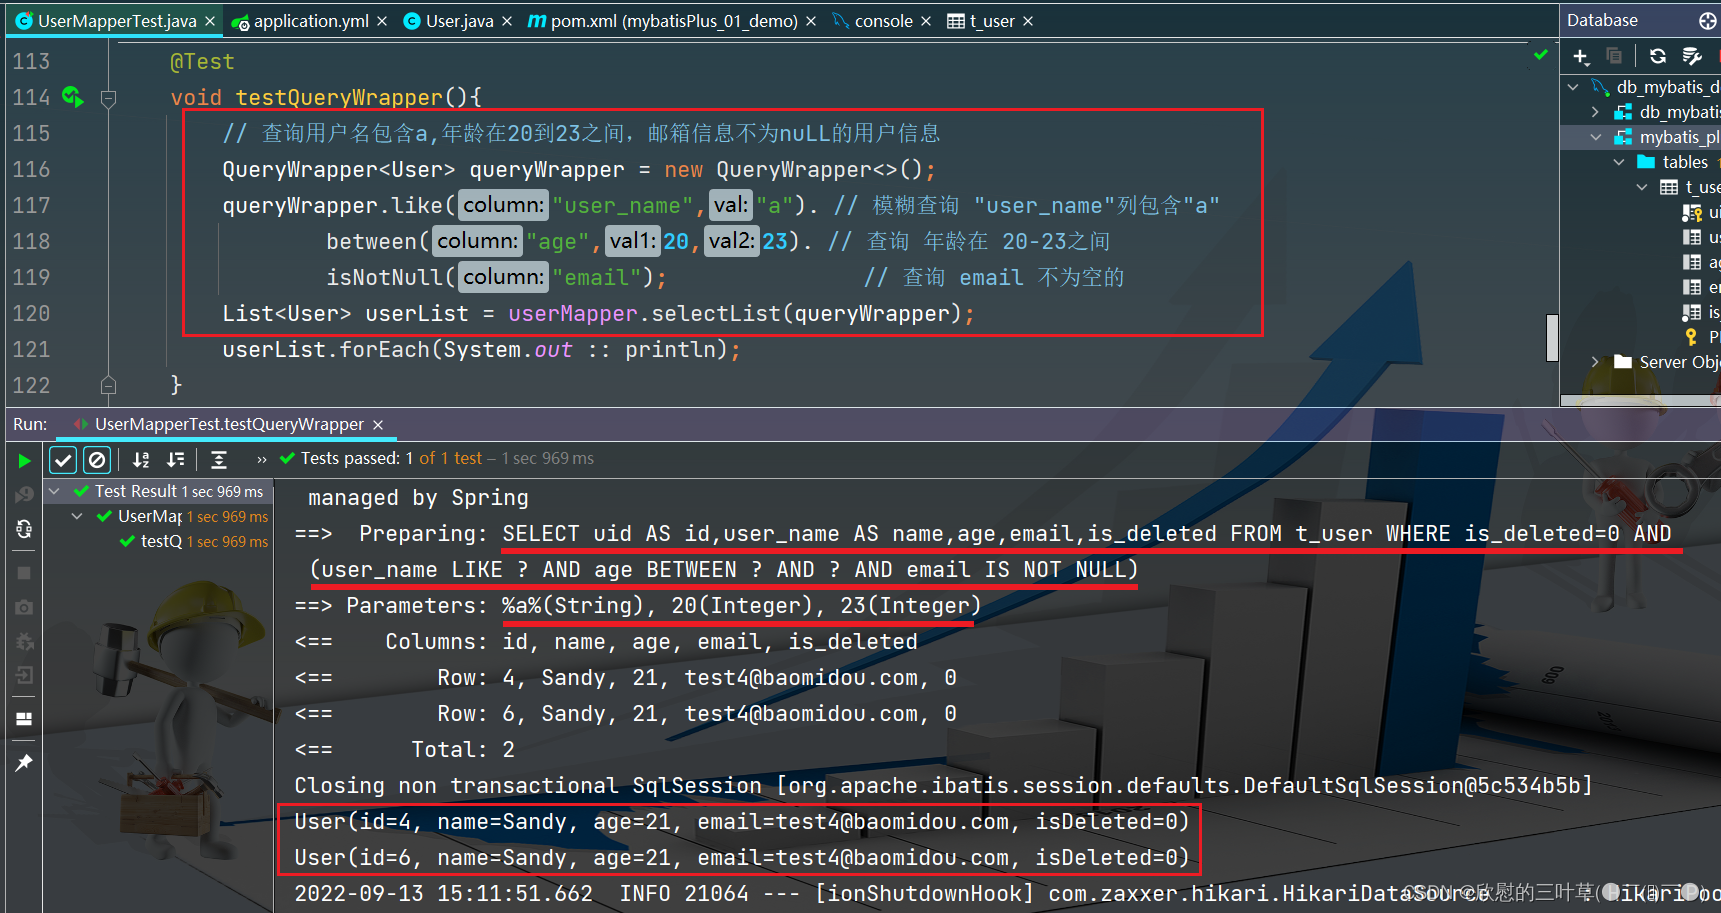
@Test
void testQueryWrapper ( ) {
QueryWrapper < User > = new QueryWrapper < > ( ) ;
queryWrapper. like ( "user_name" , "a" ) .
between ( "age" , 20 , 23 ) .
isNotNull ( "email" ) ;
List < User > = userMapper. selectList ( queryWrapper) ;
userList. forEach ( System . out :: println ) ;
}
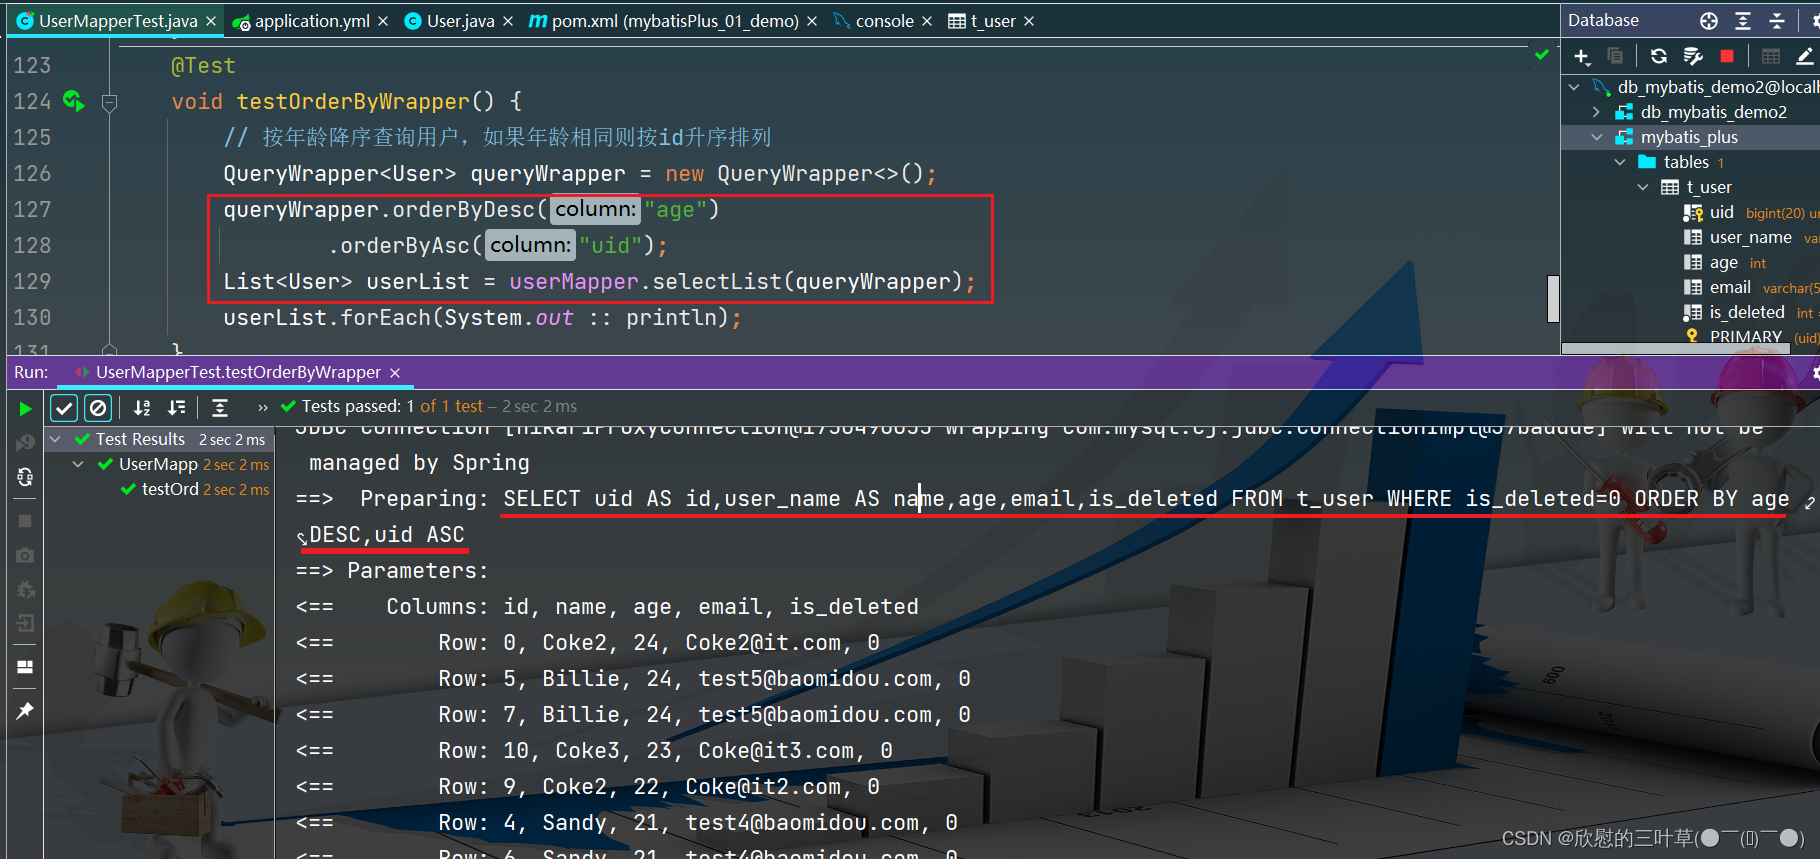
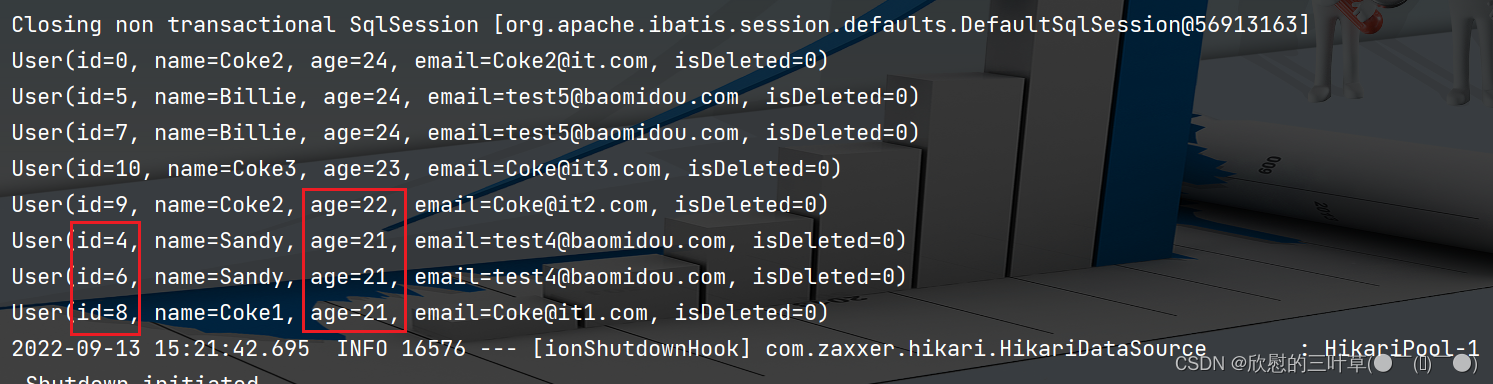
1. 创建测试方法
@Test
void testOrderByWrapper ( ) {
QueryWrapper < User > = new QueryWrapper < > ( ) ;
queryWrapper. orderByDesc ( "age" )
. orderByAsc ( "uid" ) ;
List < User > = userMapper. selectList ( queryWrapper) ;
userList. forEach ( System . out :: println ) ;
}
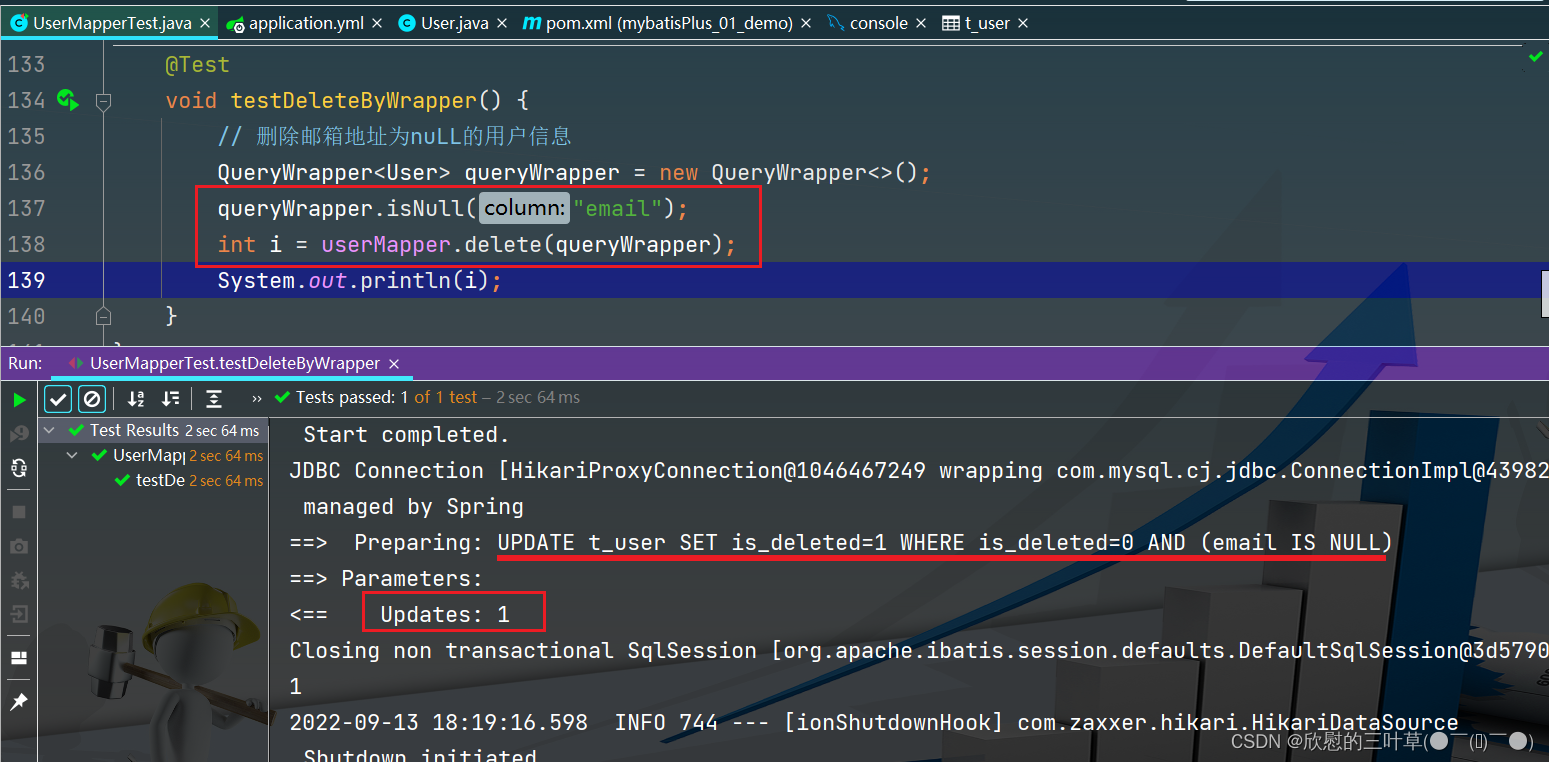
1. 添加测试方法
@Test
void testDeleteByWrapper ( ) {
QueryWrapper < User > = new QueryWrapper < > ( ) ;
queryWrapper. isNull ( "email" ) ;
int i = userMapper. delete ( queryWrapper) ;
System . out. println ( i) ;
}
1. 添加测试方法
@Test
void testUpdateByMrapper ( ) {
QueryWrapper < User > = new QueryWrapper < > ( ) ;
queryWrapper. gt ( "age" , 20 )
. like ( "user_name" , "a" )
. or ( )
. isNull ( "email" ) ;
User user = new User ( 21 , "雪碧" , 22 , "email@qq.com" , 0 ) ;
int update = userMapper. update ( user, queryWrapper) ;
System . out. println ( update) ;
}
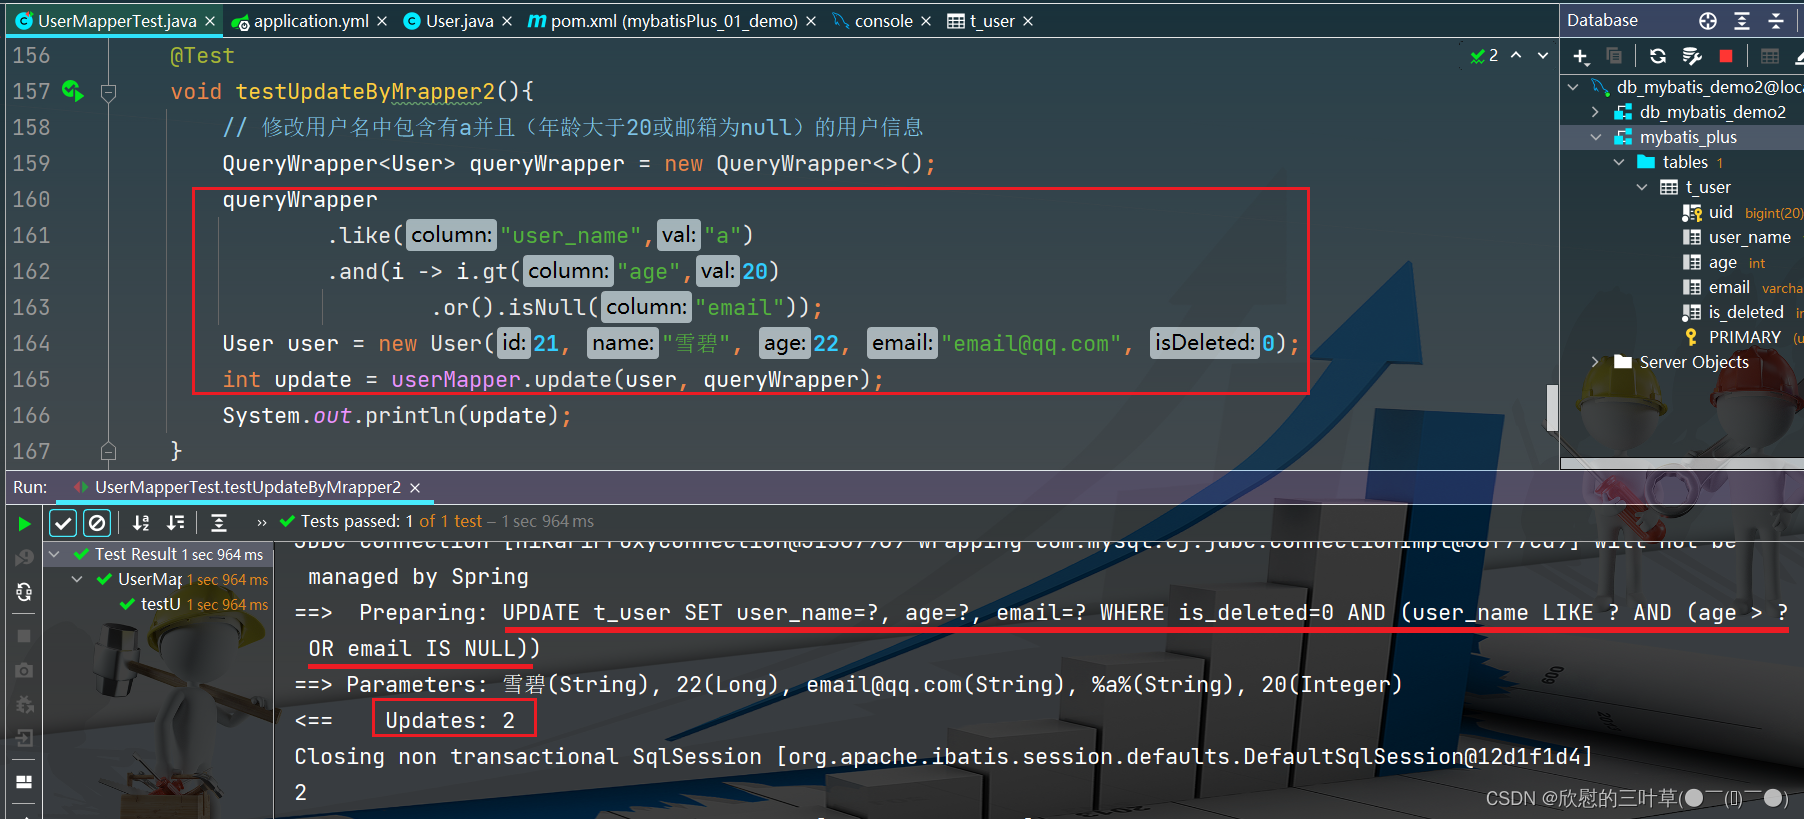
1. 添加测试
@Test
void testUpdateByMrapper2 ( ) {
QueryWrapper < User > = new QueryWrapper < > ( ) ;
queryWrapper
. like ( "user_name" , "a" )
. and ( i -> i. gt ( "age" , 20 )
. or ( ) . isNull ( "email" ) ) ;
User user = new User ( 21 , "雪碧" , 22 , "email@qq.com" , 0 ) ;
int update = userMapper. update ( user, queryWrapper) ;
System . out. println ( update) ;
}
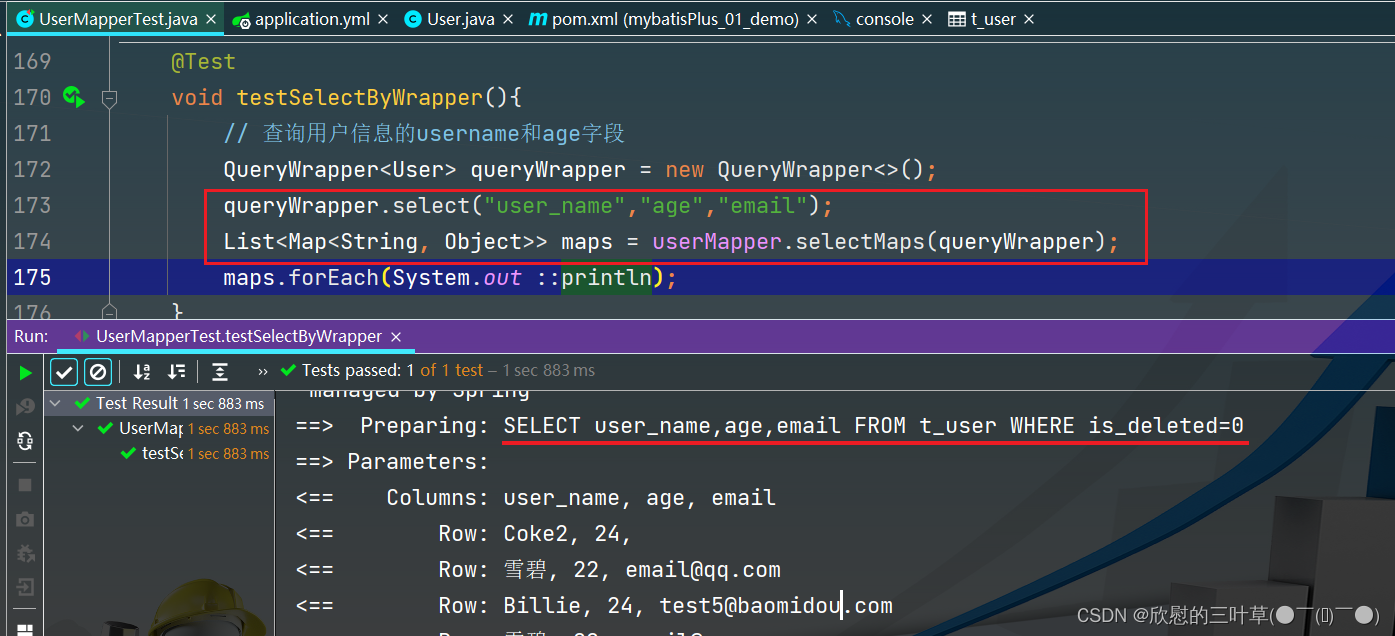
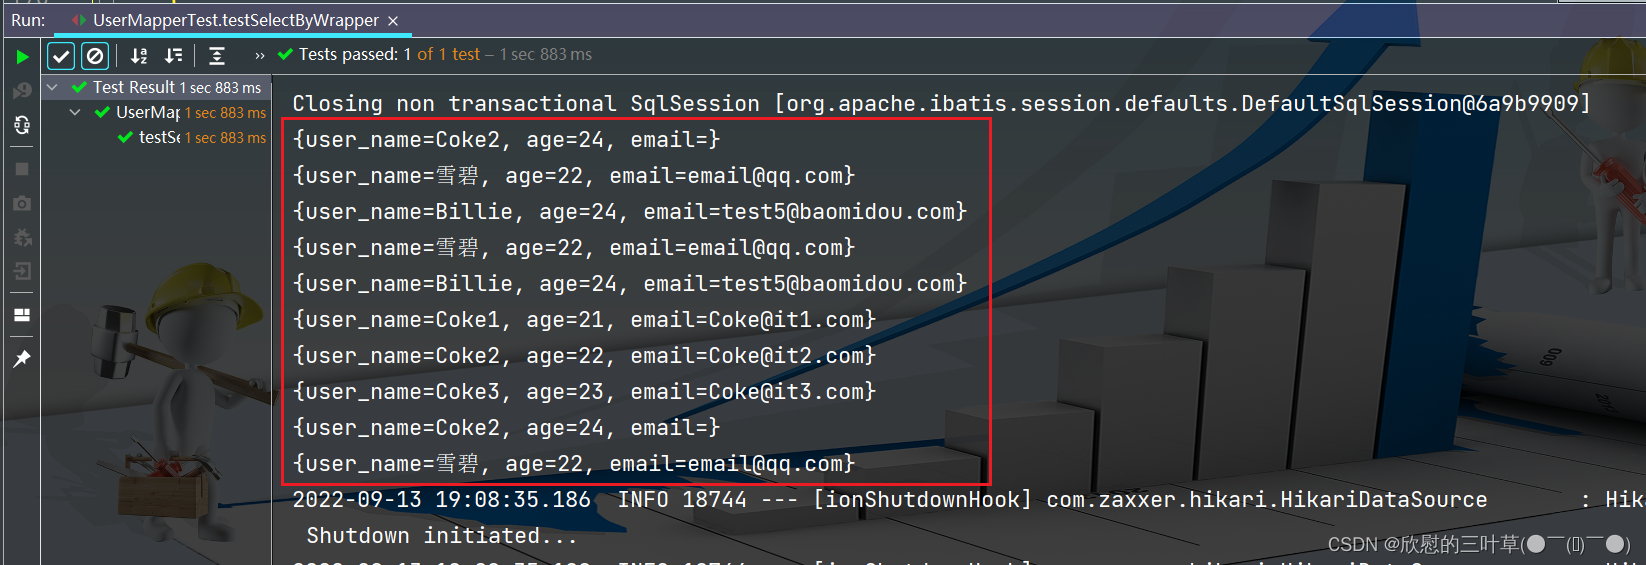
1. 测试
方法一: 不使用Lambda表达式
@Test
void testSelectByWrapper ( ) {
QueryWrapper < User > = new QueryWrapper < > ( ) ;
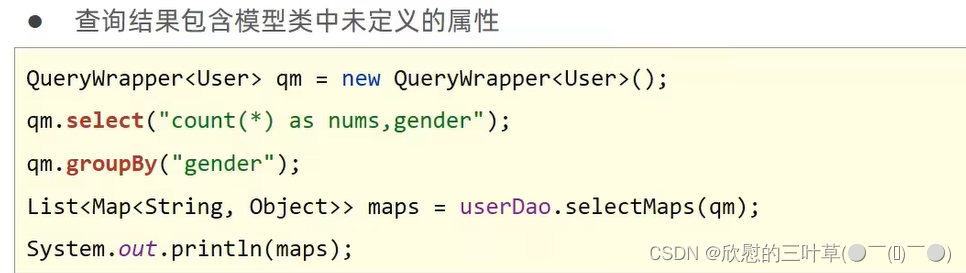
queryWrapper. select ( "user_name" , "age" , "email" ) ;
List < Map < String , Object > > = userMapper. selectMaps ( queryWrapper) ;
maps. forEach ( System . out :: println ) ;
}
1. 测试
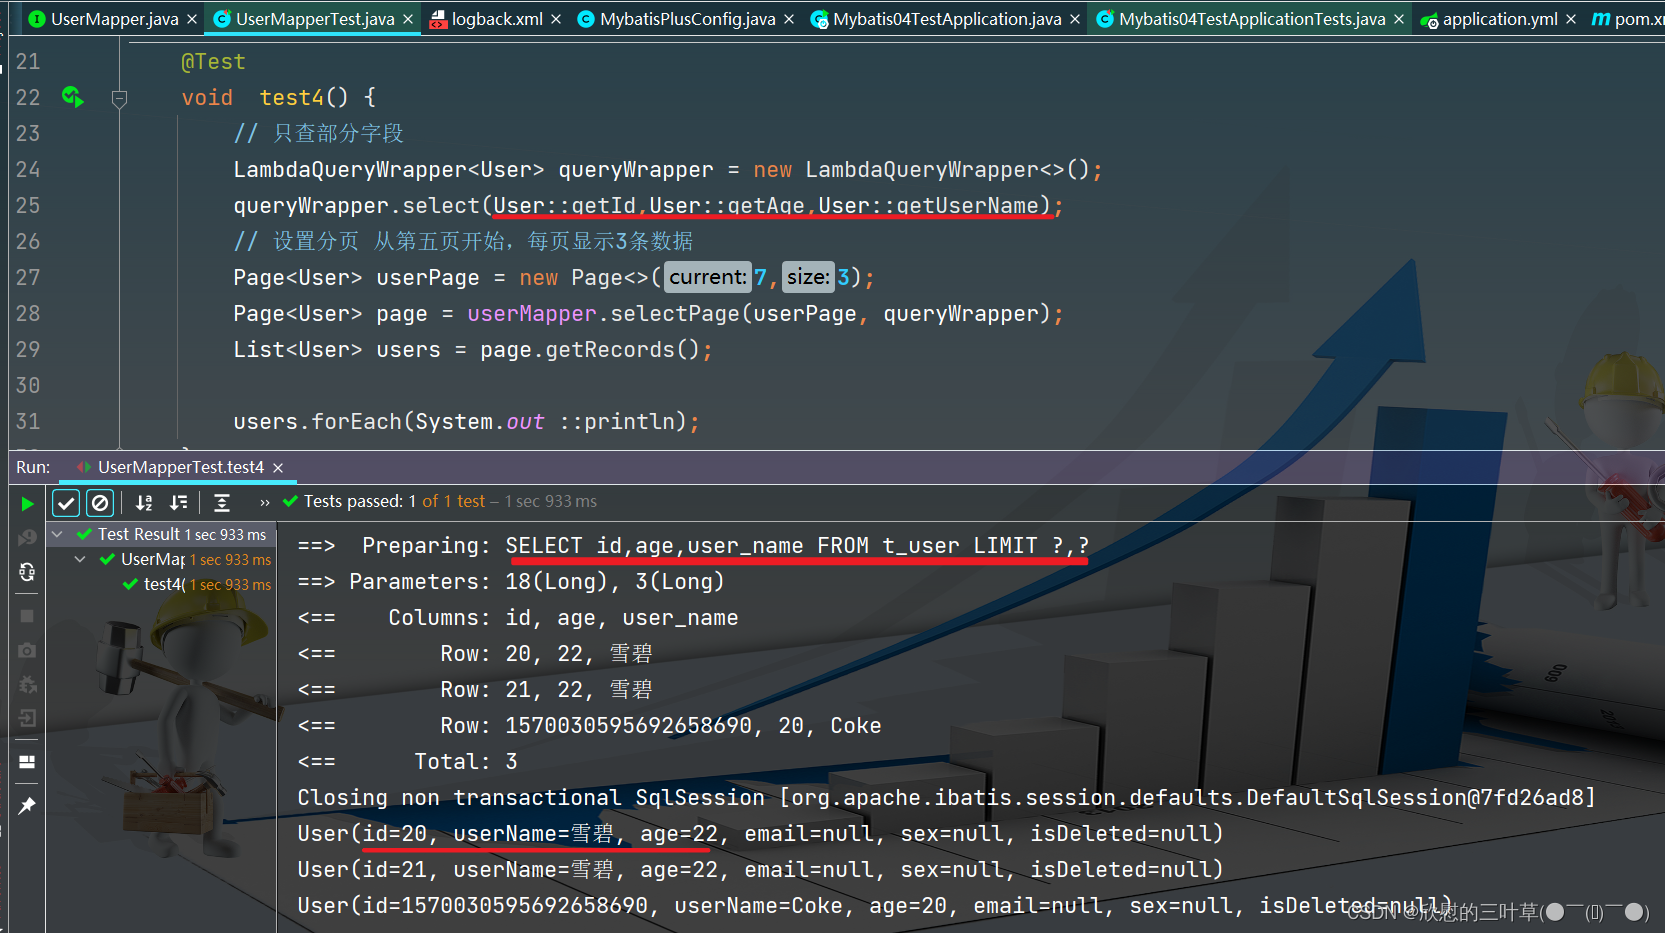
方二一: 使用Lambda表达式 (补)
@Autowired ( required = false )
private UserMapper userMapper;
@Test
void test4 ( ) {
LambdaQueryWrapper < User > = new LambdaQueryWrapper < > ( ) ;
queryWrapper. select ( User :: getId , User :: getAge , User :: getUserName ) ;
Page < User > = new Page < > ( 7 , 3 ) ;
Page < User > = userMapper. selectPage ( userPage, queryWrapper) ;
List < User > = page. getRecords ( ) ;
users. forEach ( System . out :: println ) ;
}
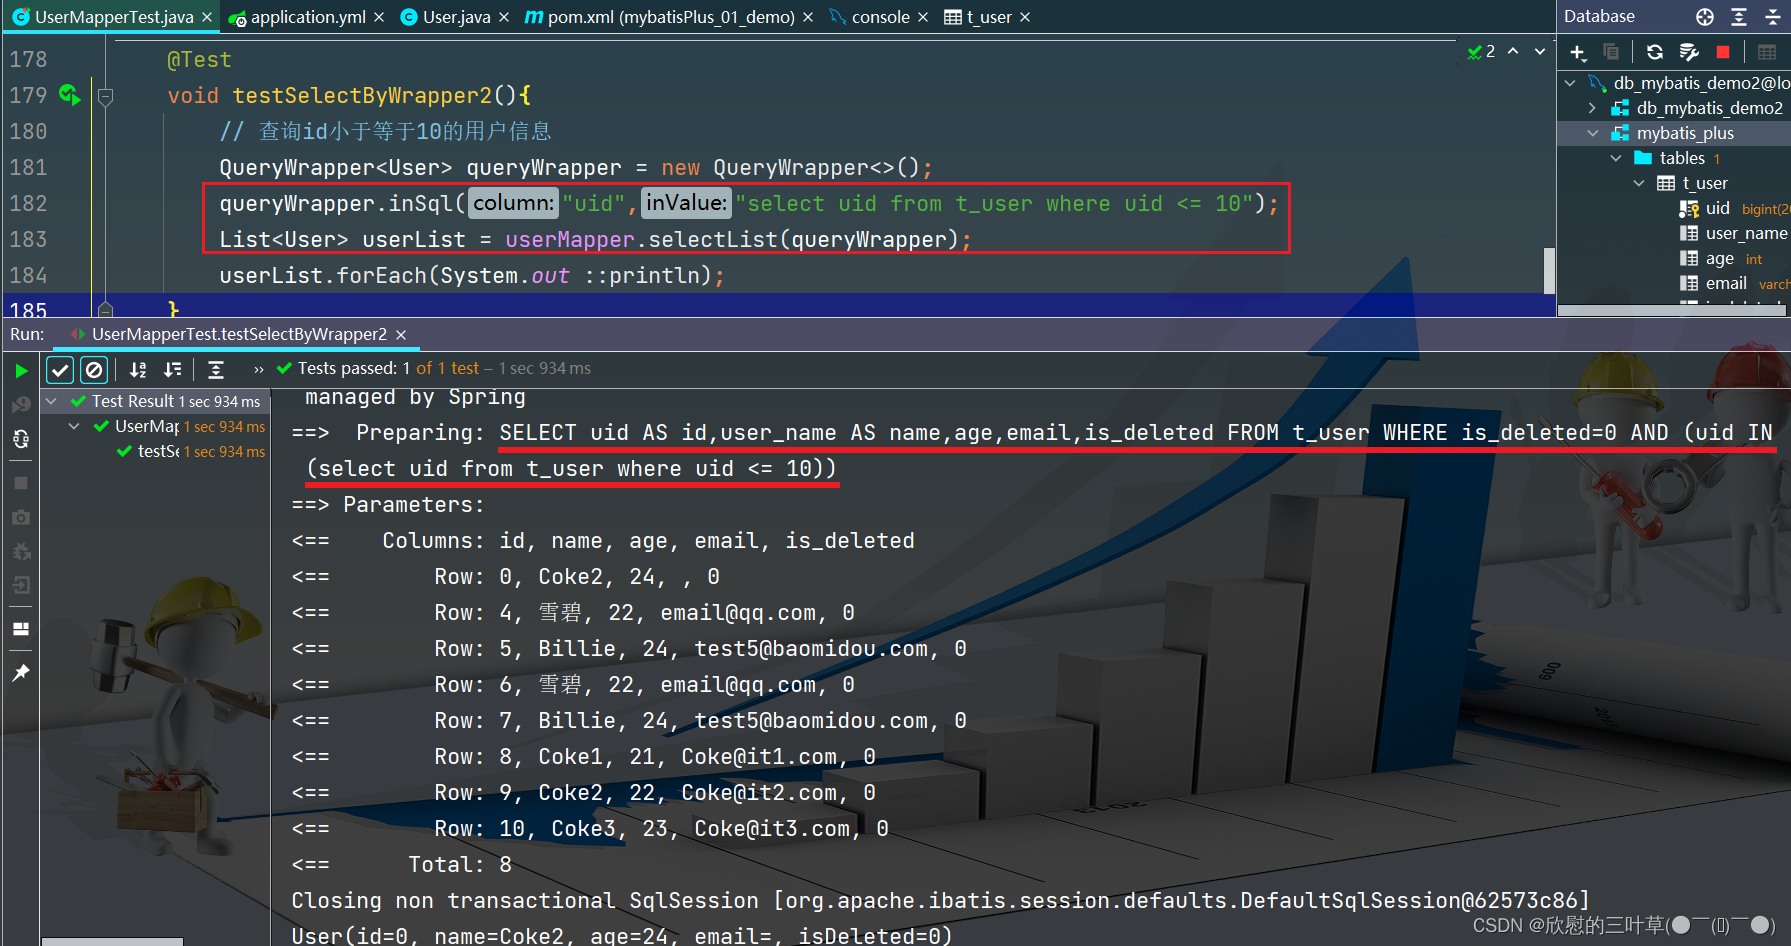
@Test
void testSelectByWrapper2 ( ) {
QueryWrapper < User > = new QueryWrapper < > ( ) ;
queryWrapper. inSql ( "uid" , "select uid from t_user where uid <= 10" ) ;
List < User > = userMapper. selectList ( queryWrapper) ;
userList. forEach ( System . out :: println ) ;
}
1. 测试
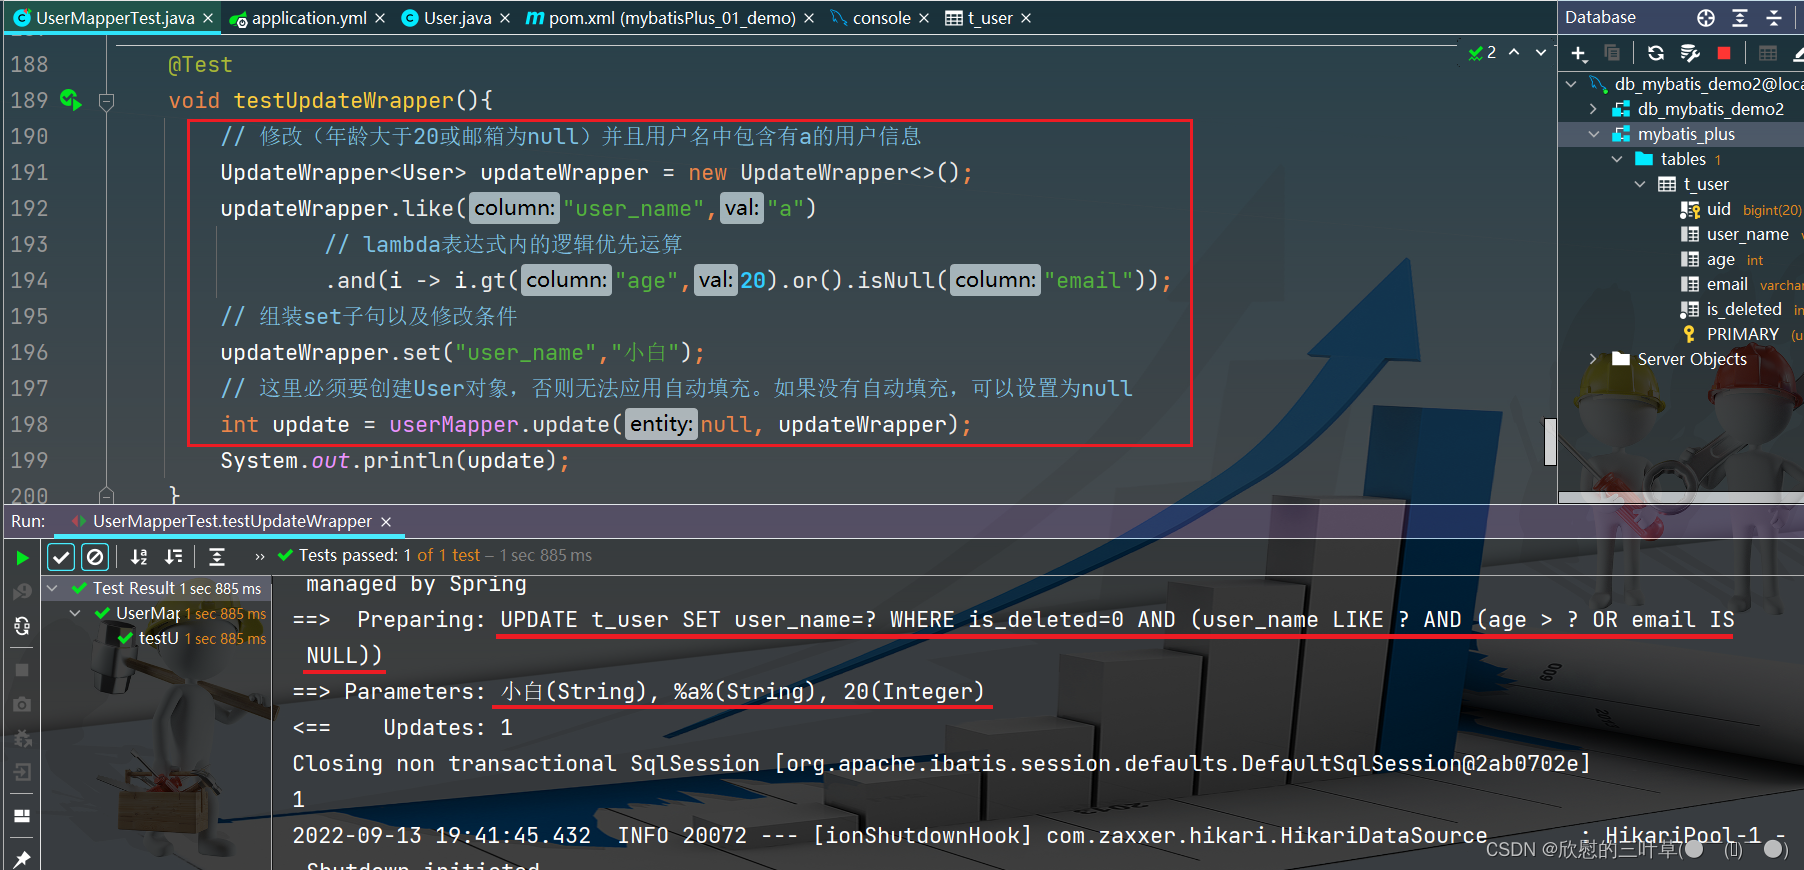
@Test
void testUpdateWrapper ( ) {
UpdateWrapper < User > = new UpdateWrapper < > ( ) ;
updateWrapper. like ( "user_name" , "a" )
. and ( i -> i. gt ( "age" , 20 ) . or ( ) . isNull ( "email" ) ) ;
updateWrapper. set ( "user_name" , "小白" ) ;
int update = userMapper. update ( null , updateWrapper) ;
System . out. println ( update) ;
}
1. 测试
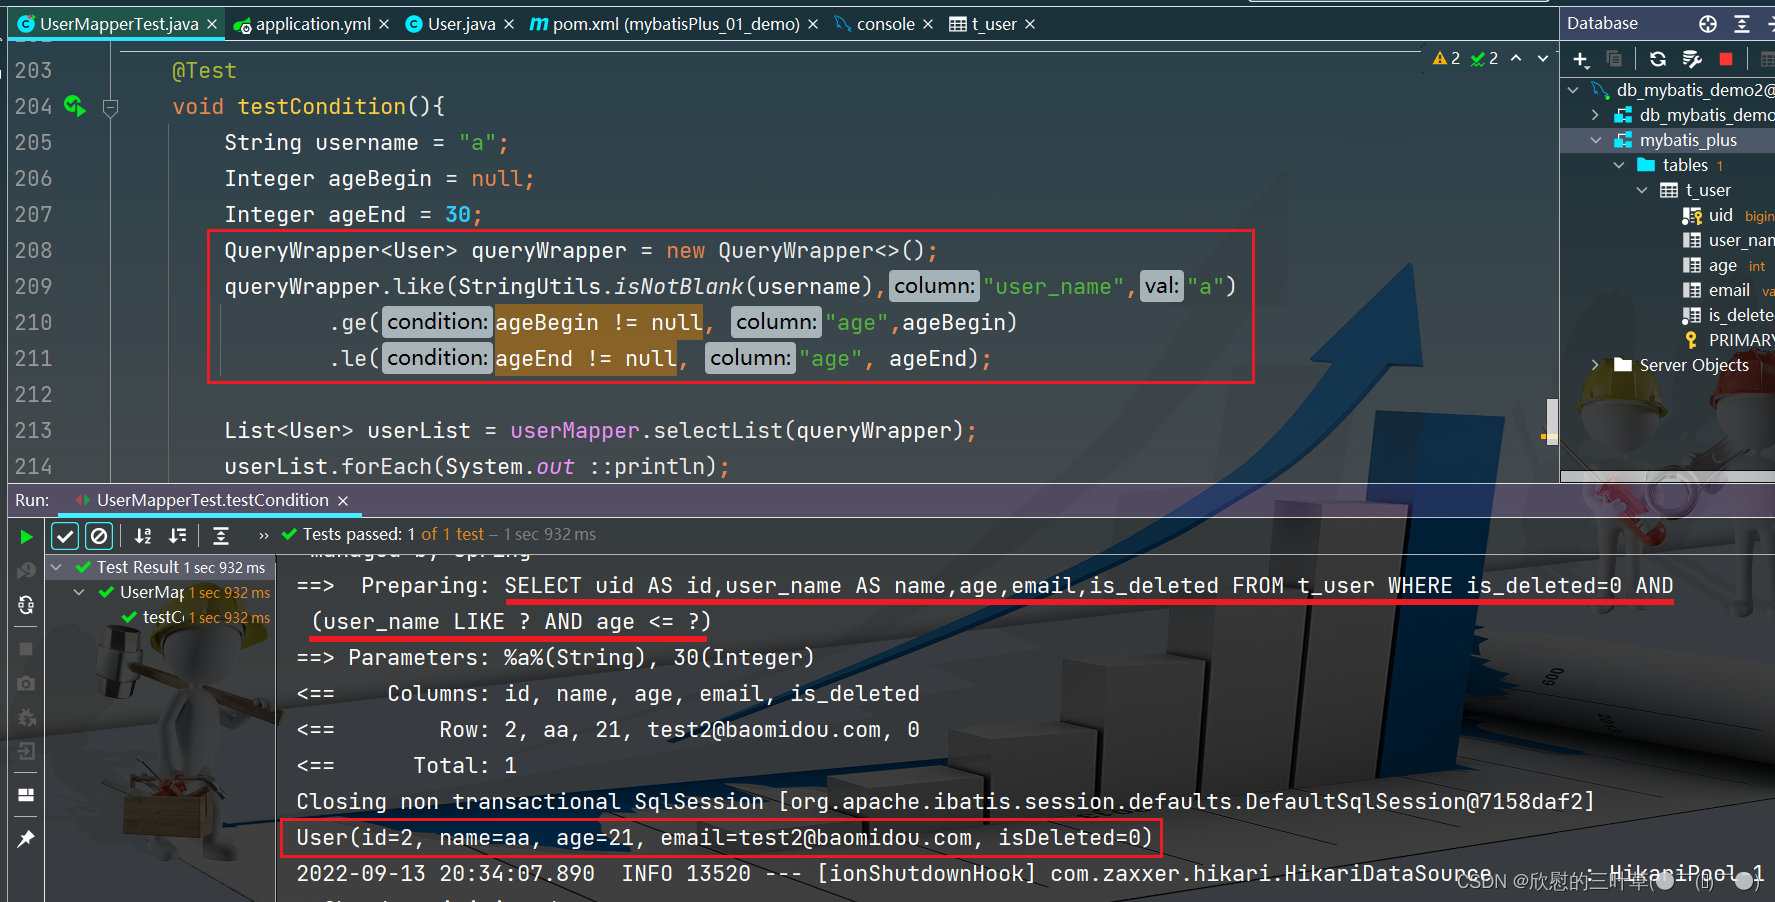
在真正开发的过程中,组装条件是常见的功能,而这些条件数据来源于用户输入,是可选的,因此我们在组装这些条件时,必须先判断用户是否选择了这些条件,若选择则需要组装该条件,若没有选择则一定不能组装,以免影响SQL执行的结果
@Test
void testCondition ( ) {
String username = "a" ;
Integer ageBegin = null ;
Integer ageEnd = 30 ;
QueryWrapper < User > = new QueryWrapper < > ( ) ;
queryWrapper. like ( StringUtils . isNotBlank ( username) , "user_name" , "a" )
. ge ( ageBegin != null , "age" , ageBegin)
. le ( ageEnd != null , "age" , ageEnd) ;
List < User > = userMapper. selectList ( queryWrapper) ;
userList. forEach ( System . out :: println ) ;
}
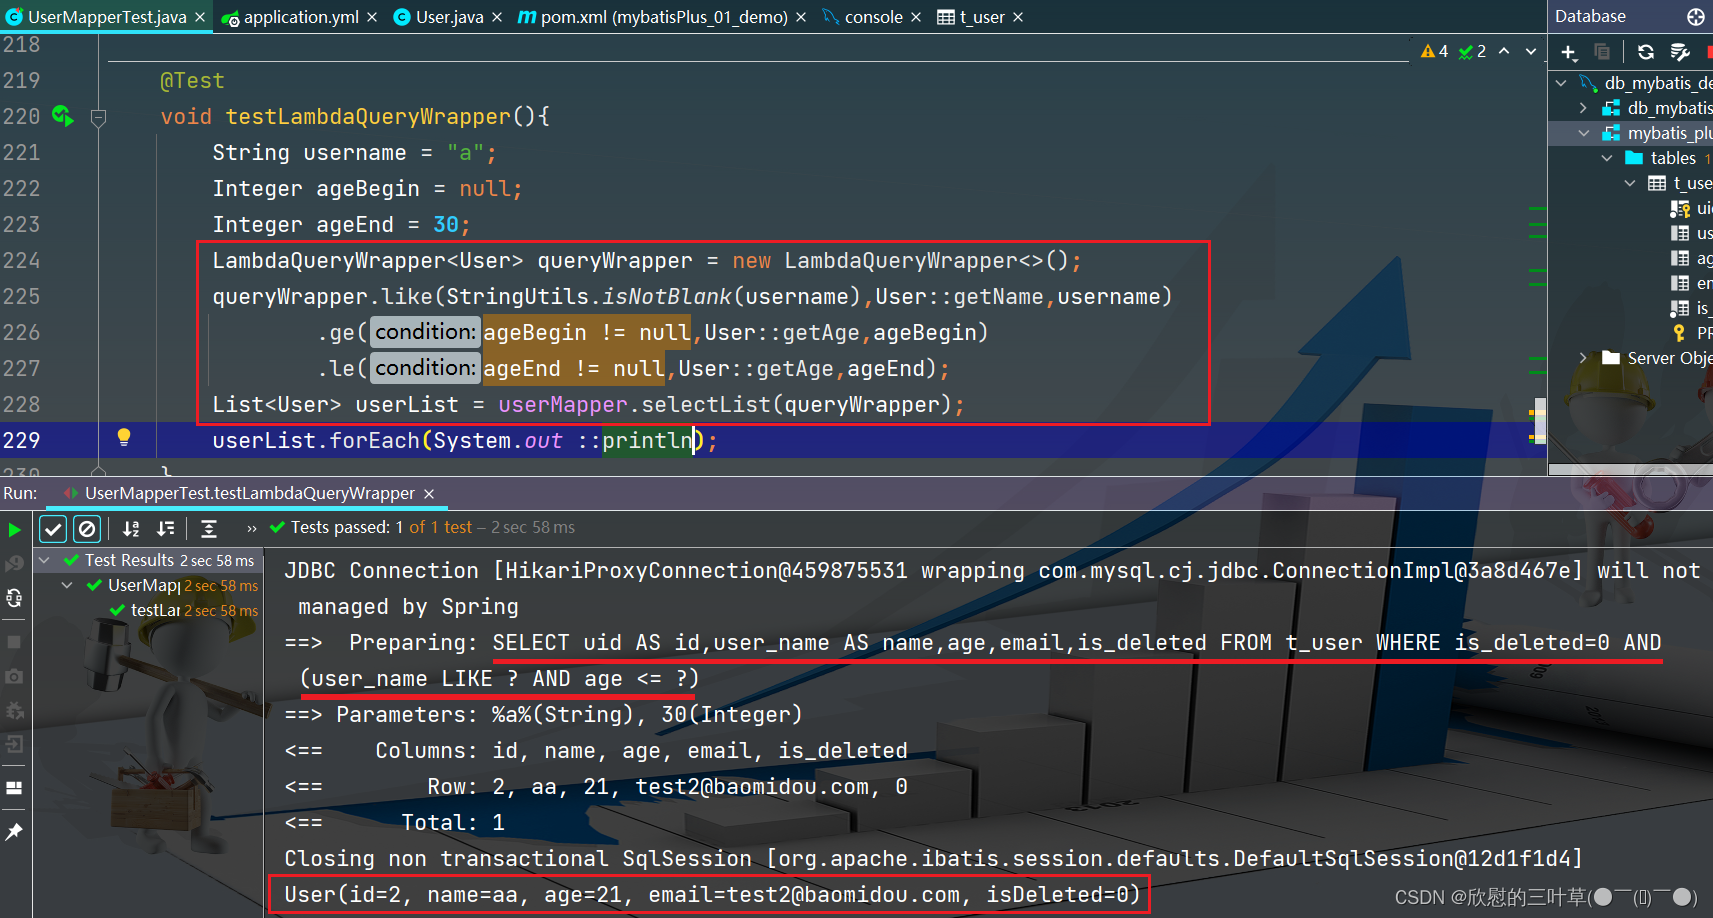
1. 测试
@Test
void testLambdaQueryWrapper ( ) {
String username = "a" ;
Integer ageBegin = null ;
Integer ageEnd = 30 ;
LambdaQueryWrapper < User > = new LambdaQueryWrapper < > ( ) ;
queryWrapper. like ( StringUtils . isNotBlank ( username) , User :: getName , username)
. ge ( ageBegin != null , User :: getAge , ageBegin)
. le ( ageEnd != null , User :: getAge , ageEnd) ;
List < User > = userMapper. selectList ( queryWrapper) ;
userList. forEach ( System . out :: println ) ;
}
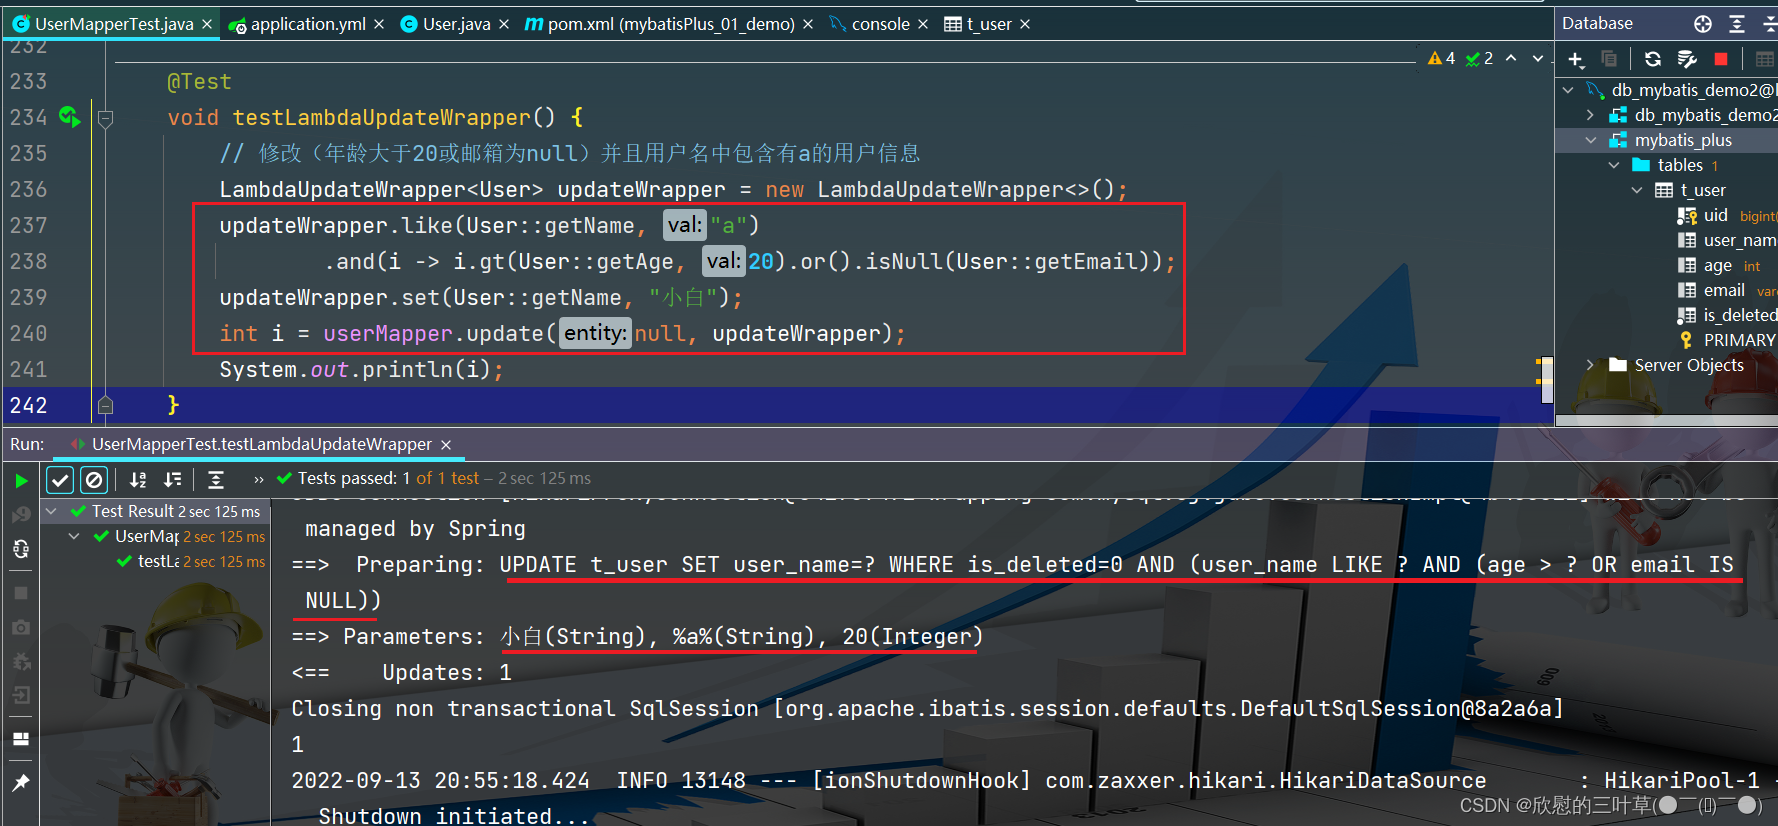
1. 测试
@Test
void testLambdaUpdateWrapper ( ) {
LambdaUpdateWrapper < User > = new LambdaUpdateWrapper < > ( ) ;
updateWrapper. like ( User :: getName , "a" )
. and ( i -> i. gt ( User :: getAge , 20 ) . or ( ) . isNull ( User :: getEmail ) ) ;
updateWrapper. set ( User :: getName , "小白" ) ;
int i = userMapper. update ( null , updateWrapper) ;
System . out. println ( i) ;
}
1. 测试
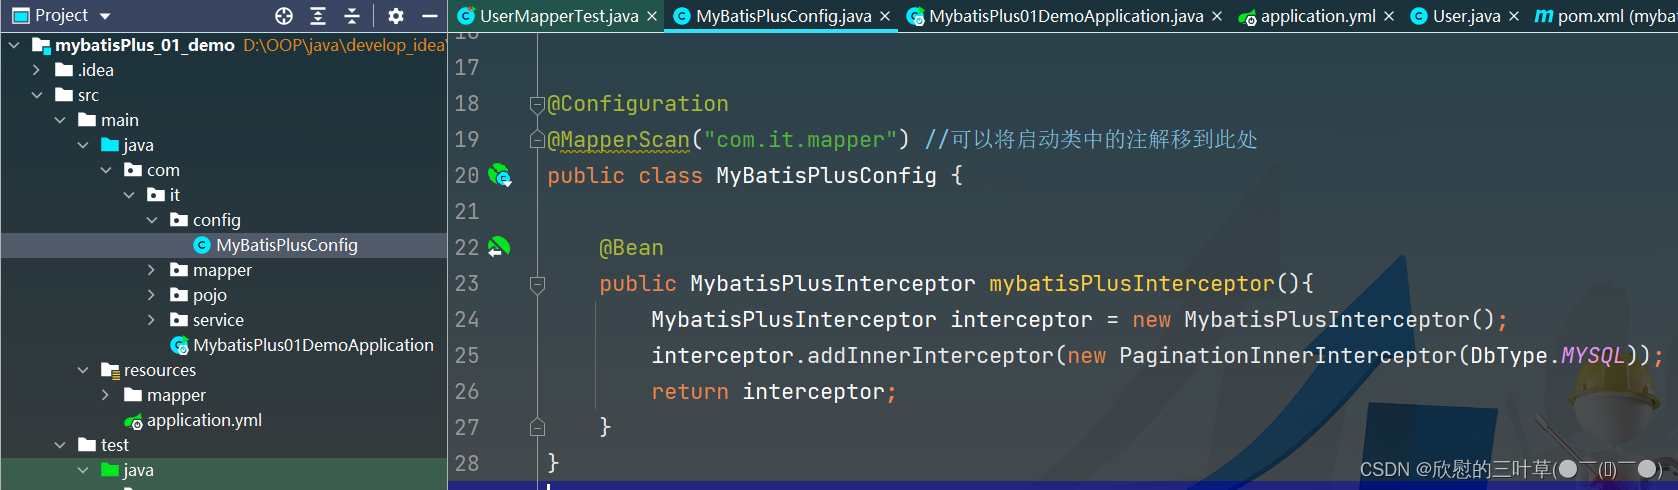
MyBatis Plus自带分页插件,只要简单的配置即可实现分页功能
@Configuration
@MapperScan ( "com.it.mapper" )
public class MyBatisPlusConfig {
@Bean
public MybatisPlusInterceptor mybatisPlusInterceptor ( ) {
MybatisPlusInterceptor interceptor = new MybatisPlusInterceptor ( ) ;
interceptor. addInnerInterceptor ( new PaginationInnerInterceptor ( DbType . MYSQL) ) ;
return interceptor;
}
}
1. 创建config目录并在目录中创建MyBatisPlusConfig类
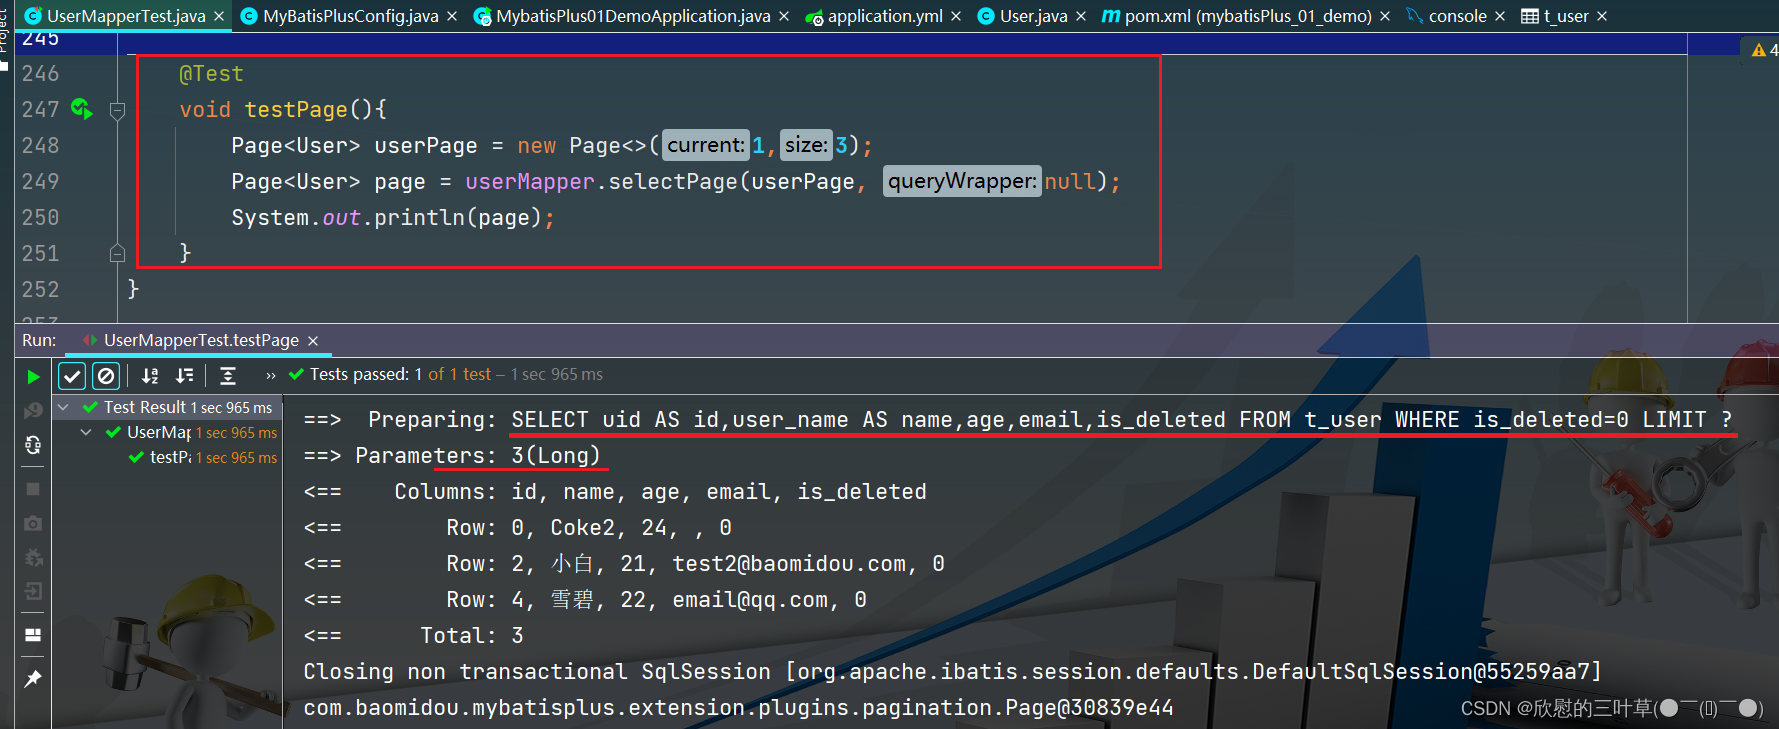
1. 测试(查询第一页)
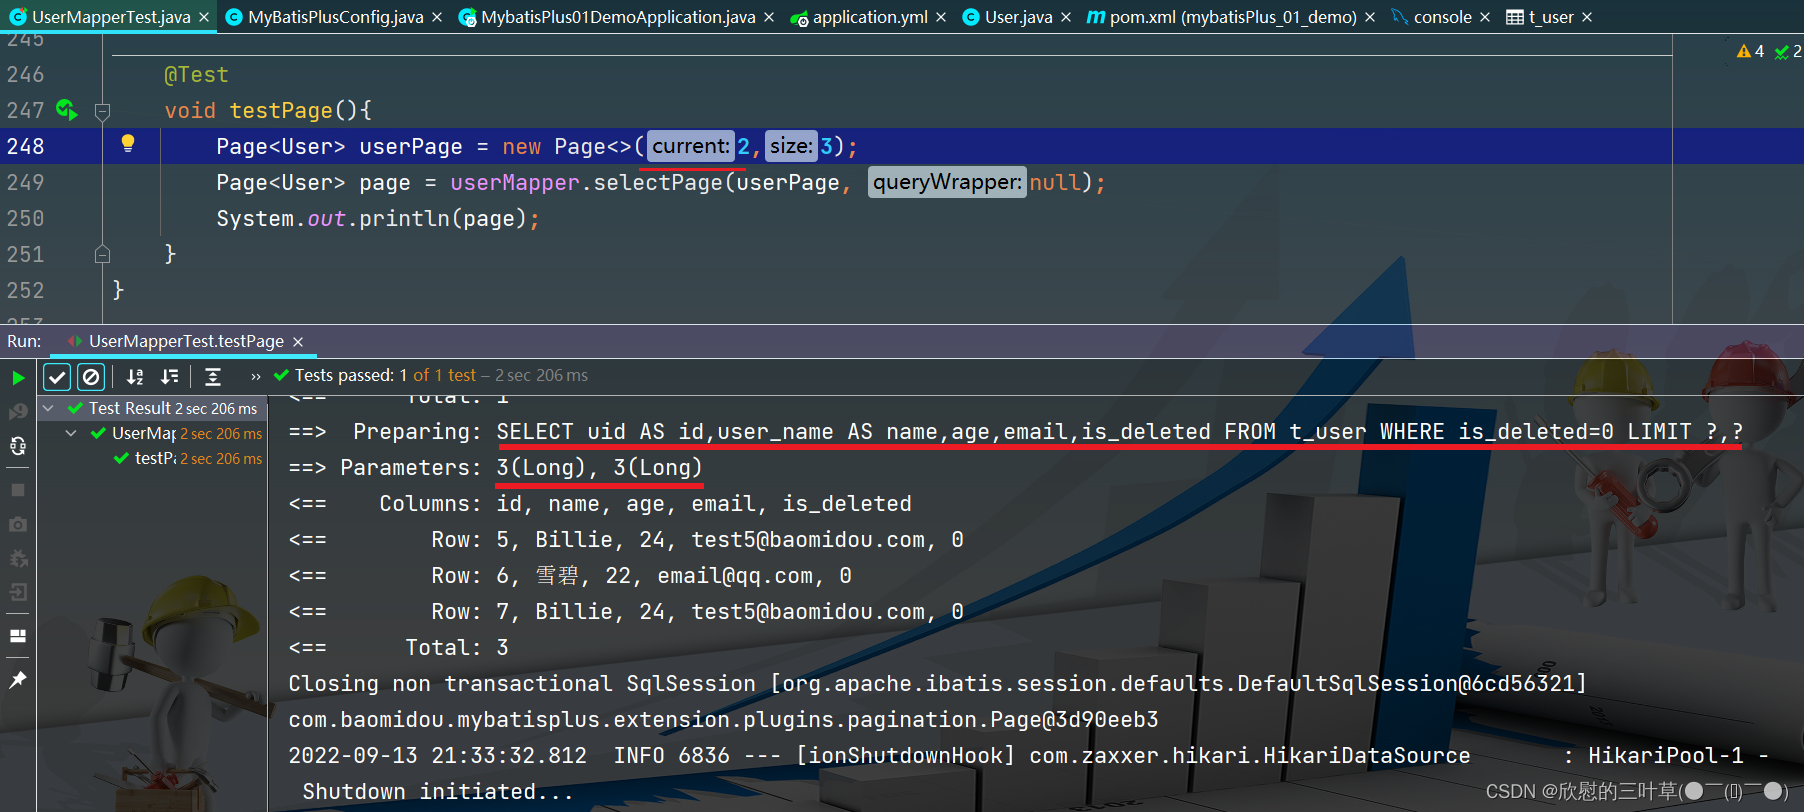
2. 查询第二页
@Test
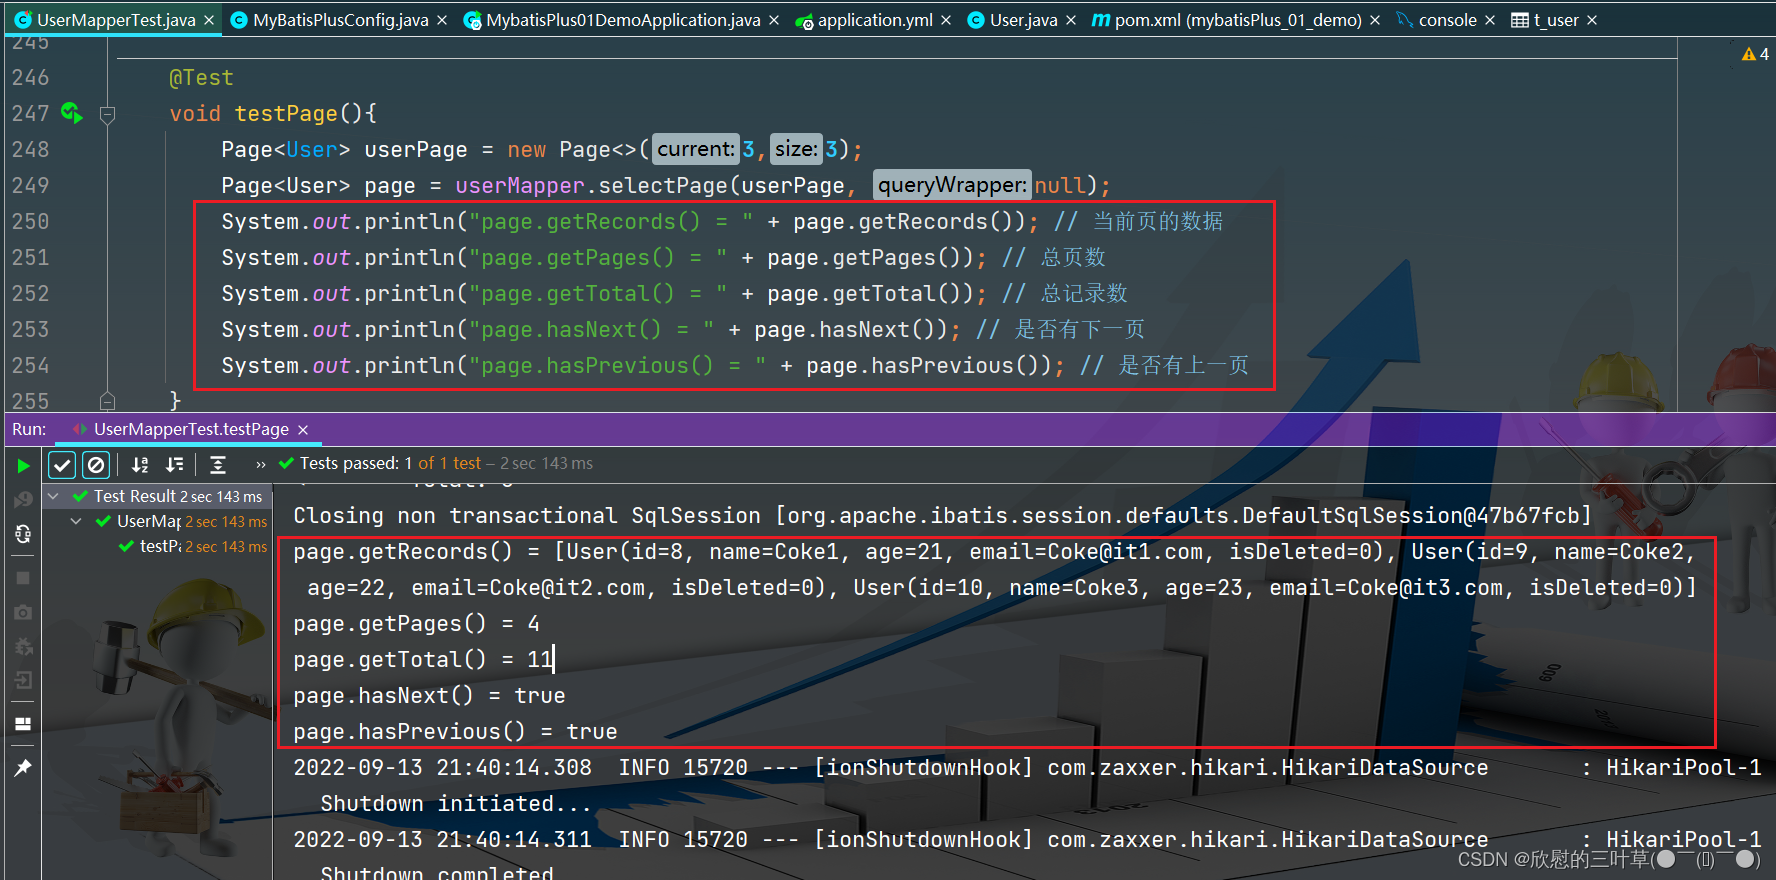
void testPage ( ) {
Page < User > = new Page < > ( 3 , 3 ) ;
Page < User > = userMapper. selectPage ( userPage, null ) ;
System . out. println ( "page.getRecords() = " + page. getRecords ( ) ) ;
System . out. println ( "page.getPages() = " + page. getPages ( ) ) ;
System . out. println ( "page.getTotal() = " + page. getTotal ( ) ) ;
System . out. println ( "page.hasNext() = " + page. hasNext ( ) ) ;
System . out. println ( "page.hasPrevious() = " + page. hasPrevious ( ) ) ;
}
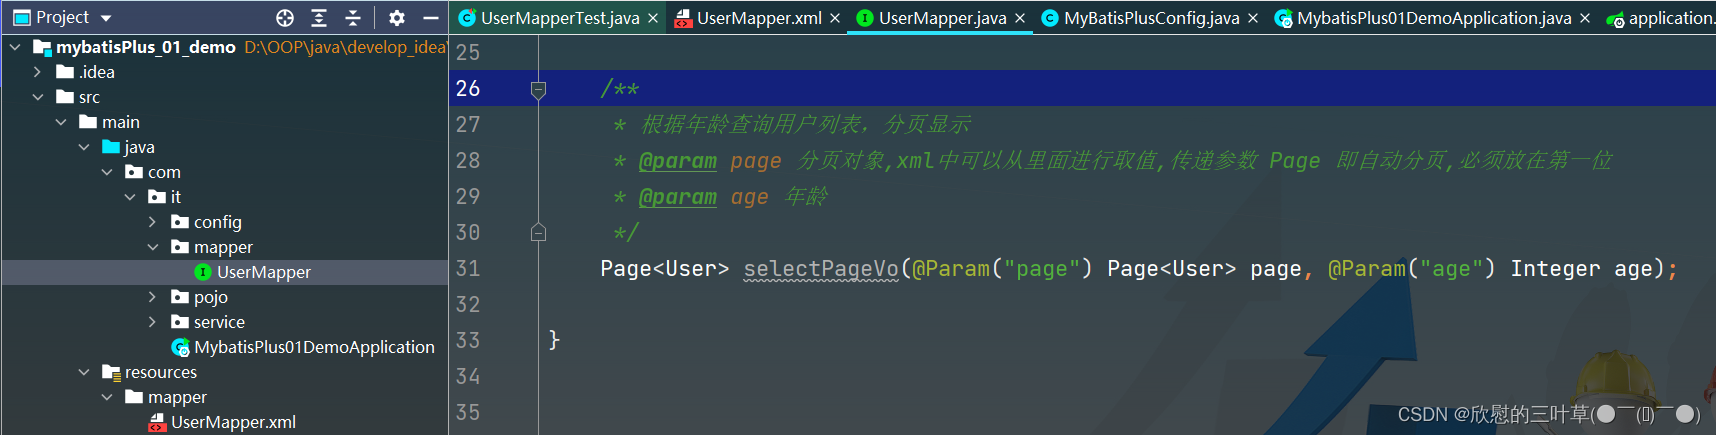
1. 测试
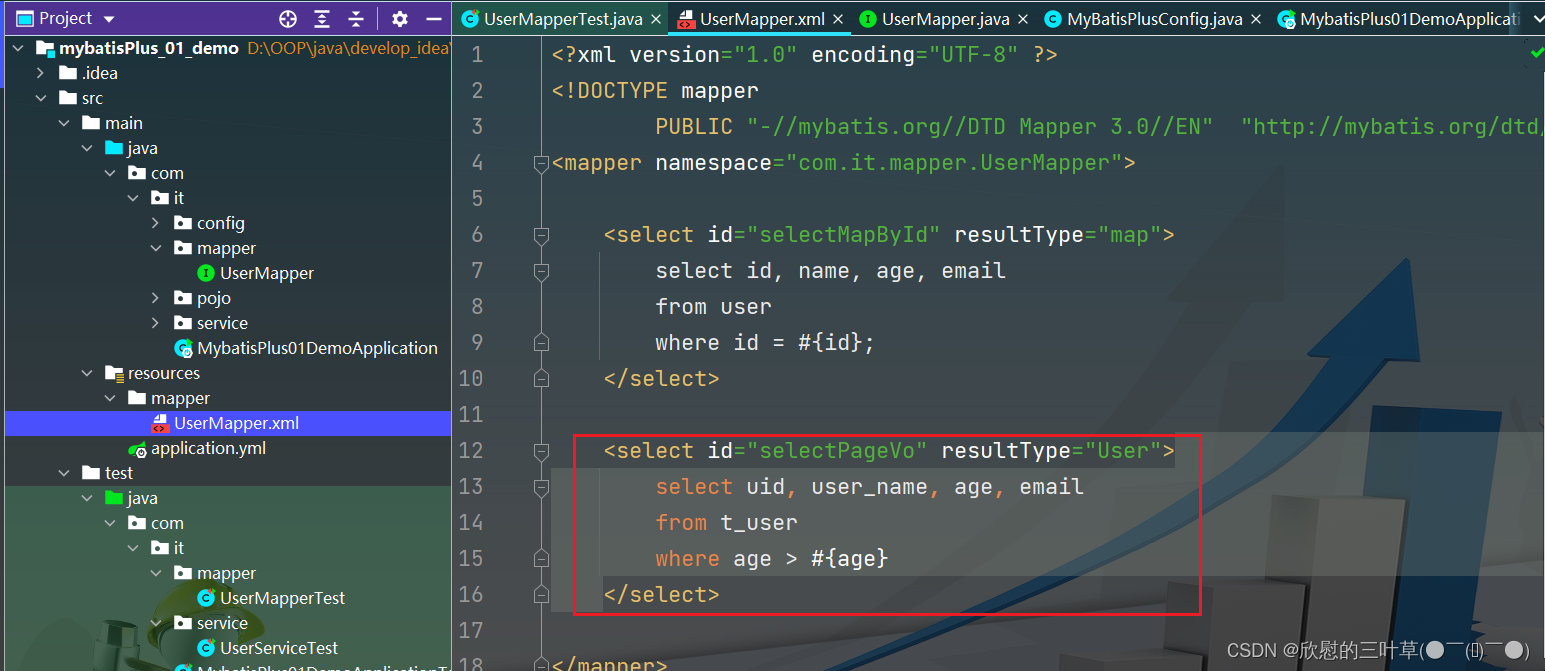
Page < User > selectPageVo ( @Param ( "page" ) Page < User > , @Param ( "age" ) Integer age) ;
< select id= "selectPageVo" resultType= "User" >
select uid, user_name, age, email
from t_user
where age >
< / select >
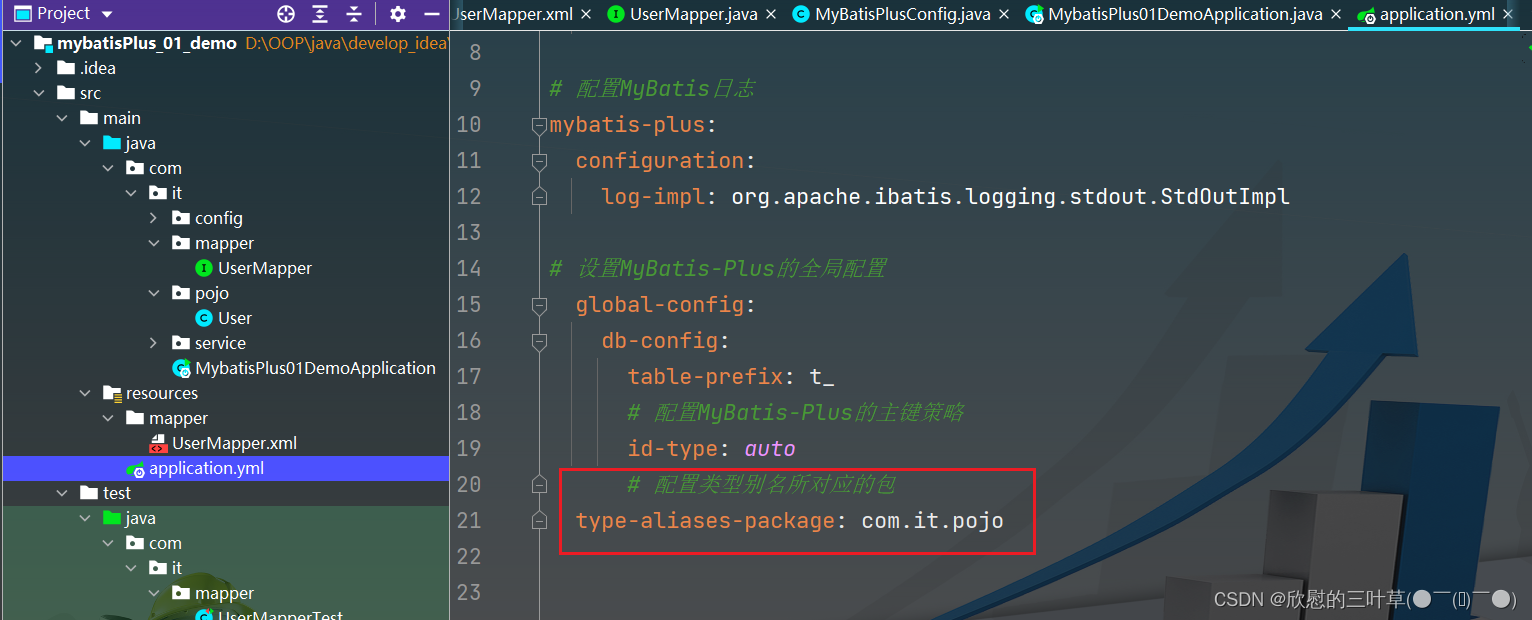
mybatis-plus :
configuration :
log-impl : org.apache.ibatis.logging.stdout.StdOutImpl
global-config :
db-config :
table-prefix : t_
id-type : auto
type-aliases-package : com.it.pojo
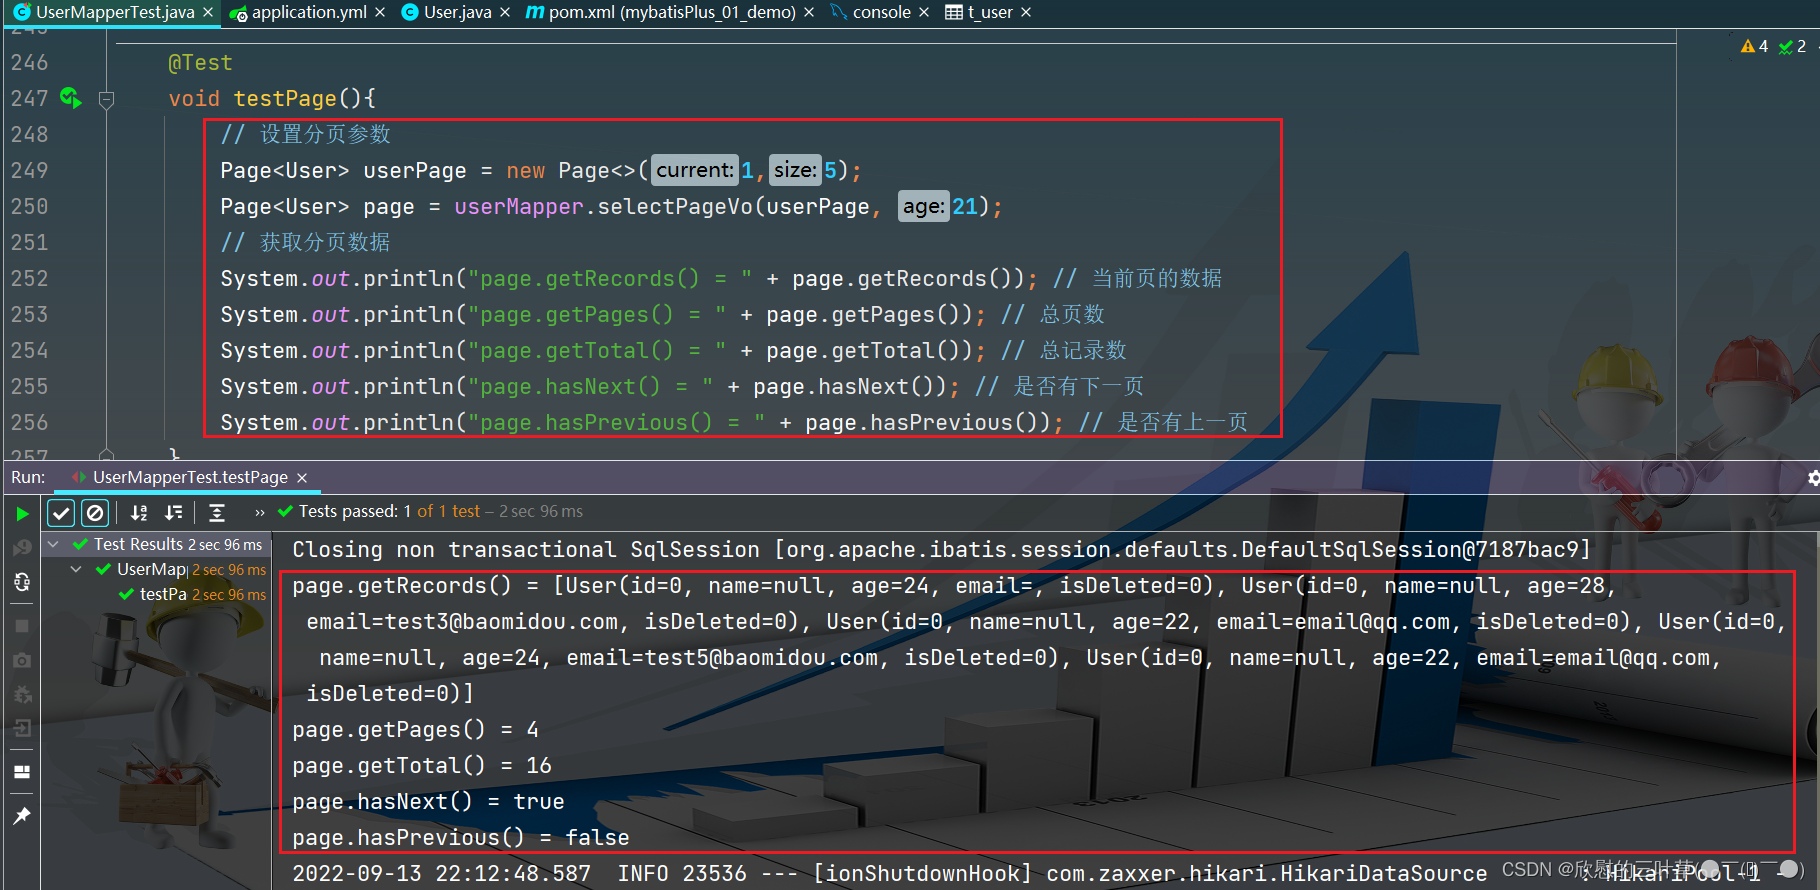
@Test
void testPage ( ) {
Page < User > = new Page < > ( 1 , 5 ) ;
Page < User > = userMapper. selectPageVo ( userPage, 21 ) ;
System . out. println ( "page.getRecords() = " + page. getRecords ( ) ) ;
System . out. println ( "page.getPages() = " + page. getPages ( ) ) ;
System . out. println ( "page.getTotal() = " + page. getTotal ( ) ) ;
System . out. println ( "page.hasNext() = " + page. hasNext ( ) ) ;
System . out. println ( "page.hasPrevious() = " + page. hasPrevious ( ) ) ;
}
一件商品,成本价是80元,售价是100元。老板先是通知小李,说你去把商品价格增加50元。小李正在玩游戏,耽搁了一个小时。正好一个小时后,老板觉得商品价格增加到150元,价格太高,可能会影响销量。又通知小王,你把商品价格降低30元。
此时,小李和小王同时操作商品后台系统。小李操作的时候,系统先取出商品价格100元;小王也在操作,取出的商品价格也是100元。小李将价格加了50元,并将100+50=150元存入了数据库;小王将商品减了30元,并将100-30=70元存入了数据库。是的,如果没有锁,小李的操作就完全被小王的覆盖了。
现在商品价格是70元,比成本价低10元。几分钟后,这个商品很快出售了1千多件商品,老板亏1万多。
上面的故事,如果是乐观锁,小王保存价格前,会检查下价格是否被人修改过了。如果被修改过了,则重新取出的被修改后的价格,150元,这样他会将120元存入数据库。
如果是悲观锁,小李取出数据后,小王只能等小李操作完之后,才能对价格进行操作,也会保证最终的价格是120元。
create table t_product
(
id bigint ( 20 ) primary key not null comment '主键' ,
name varchar ( 30 ) not null comment '商品名称' ,
price int ( 11 ) default 0 comment '价格' ,
version int ( 11 ) default 0 comment '乐观锁版本号'
) ;
insert into t_product ( id, name, price)
VALUES ( 1 , '外星人笔记本' , 100 ) ;
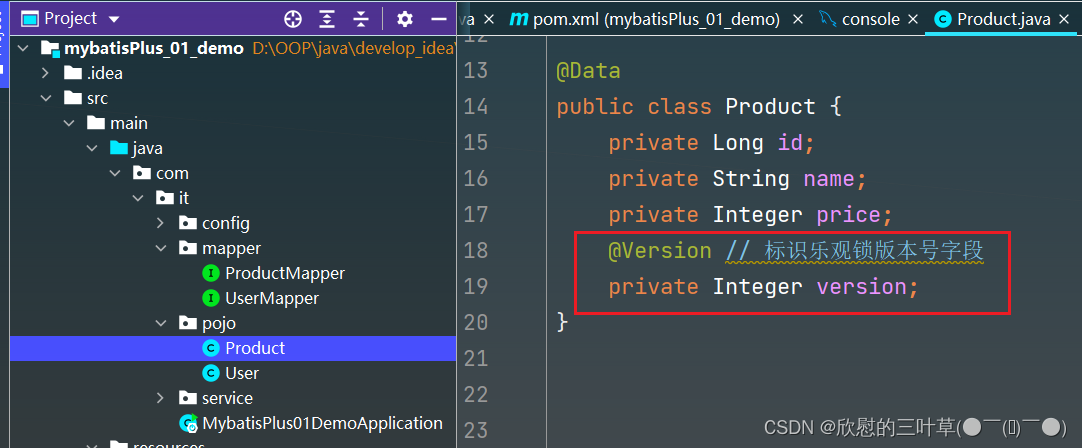
@Data
public class Product {
    private Long id;
    private String name;
    private Integer price;
    private Integer version;
}
4. 添加mapper
public interface ProductMapper extends BaseMapper < Product > {
}
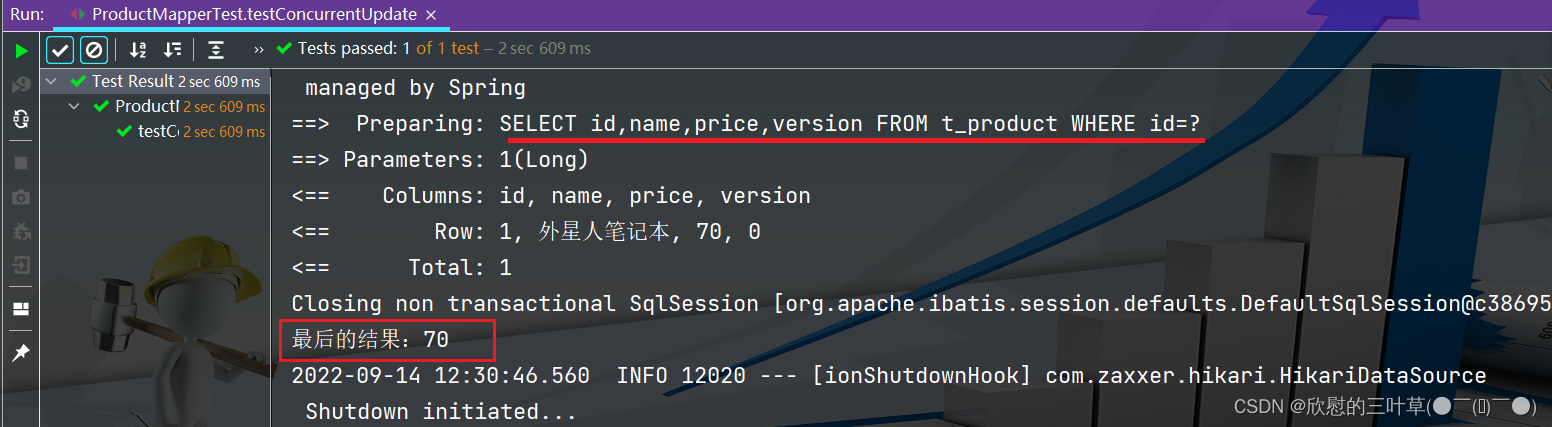
5. 测试
@SpringBootTest
class ProductMapperTest {
@Autowired ( required = false )
private ProductMapper productMapper;
@Test
void testConcurrentUpdate ( ) {
Product p1 = productMapper. selectById ( 1 ) ;
System . out. println ( "小李取出的价格:" + p1. getPrice ( ) ) ;
Product p2 = productMapper. selectById ( 1 ) ;
System . out. println ( "小王取出的价格:" + p2. getPrice ( ) ) ;
p1. setPrice ( p1. getPrice ( ) + 50 ) ;
int result1 = productMapper. updateById ( p1) ;
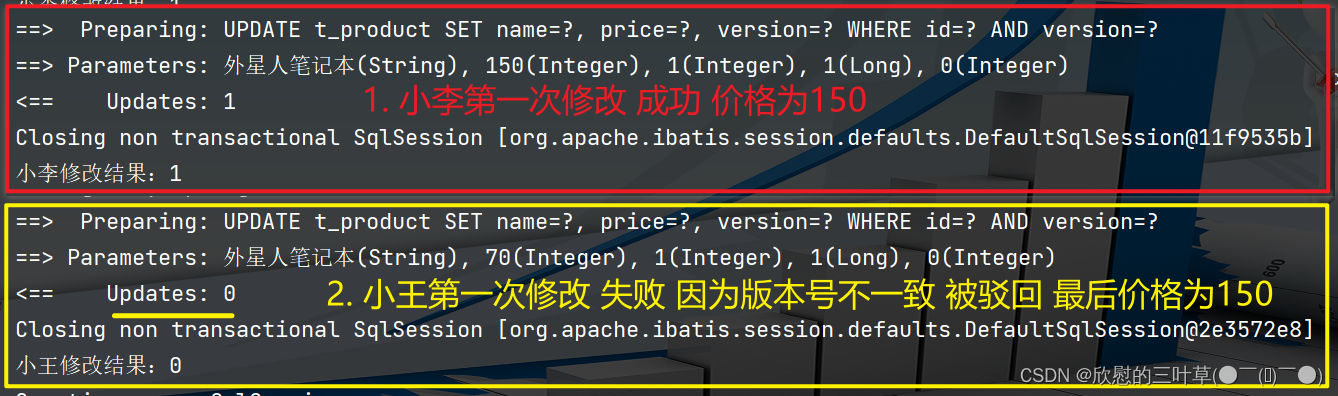
System . out. println ( "小李修改结果:" + result1) ;
p2. setPrice ( p2. getPrice ( ) - 30 ) ;
int result2 = productMapper. updateById ( p2) ;
System . out. println ( "小王修改结果:" + result2) ;
Product p3 = productMapper. selectById ( 1L ) ;
System . out. println ( "最后的结果:" + p3. getPrice ( ) ) ;
}
}
1. 数据库中添加version字段
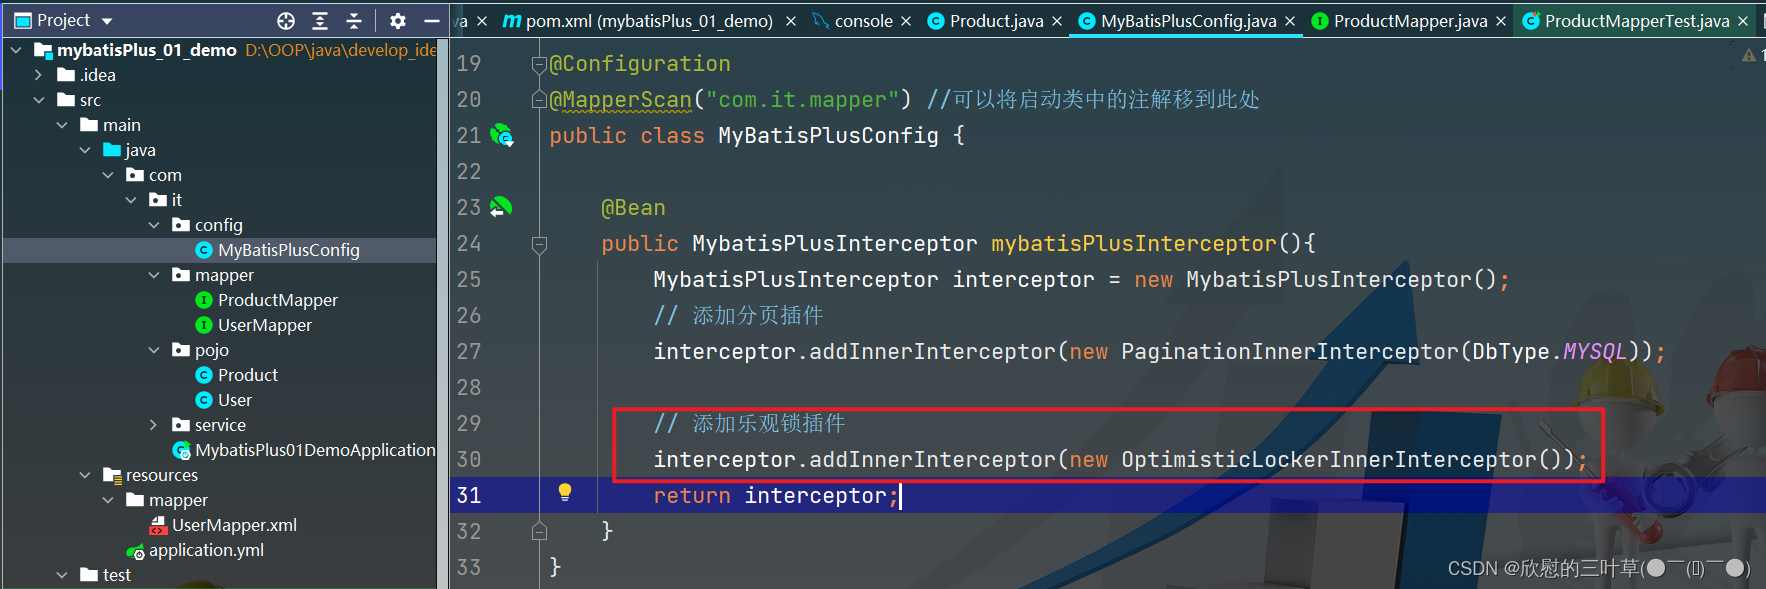
2. 添加乐观锁插件配置
@Configuration
@MapperScan ( "com.it.mapper" )
public class MyBatisPlusConfig {
@Bean
public MybatisPlusInterceptor mybatisPlusInterceptor ( ) {
MybatisPlusInterceptor interceptor = new MybatisPlusInterceptor ( ) ;
interceptor. addInnerInterceptor ( new PaginationInnerInterceptor ( DbType . MYSQL) ) ;
interceptor. addInnerInterceptor ( new OptimisticLockerInnerInterceptor ( ) ) ;
return interceptor;
}
}
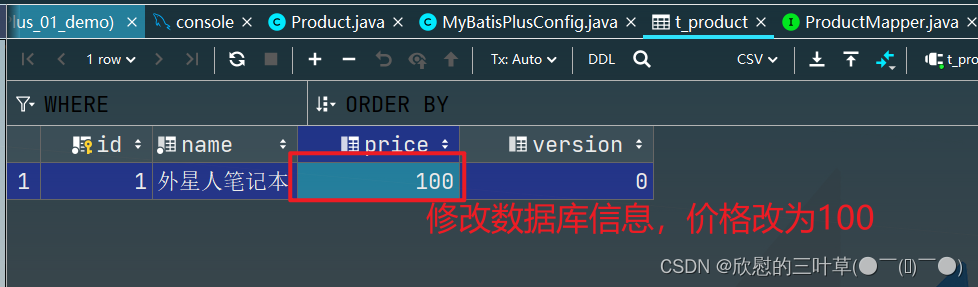
3. 修改数据库信息
4. 测试
@SpringBootTest
class ProductMapperTest {
@Autowired ( required = false )
private ProductMapper productMapper;
@Test
void testConcurrentUpdate ( ) {
Product p1 = productMapper. selectById ( 1 ) ;
System . out. println ( "小李取出的价格:" + p1. getPrice ( ) ) ;
Product p2 = productMapper. selectById ( 1 ) ;
System . out. println ( "小王取出的价格:" + p2. getPrice ( ) ) ;
p1. setPrice ( p1. getPrice ( ) + 50 ) ;
int result1 = productMapper. updateById ( p1) ;
System . out. println ( "小李修改结果:" + result1) ;
p2. setPrice ( p2. getPrice ( ) - 30 ) ;
int result2 = productMapper. updateById ( p2) ;
System . out. println ( "小王修改结果:" + result2) ;
Product p3 = productMapper. selectById ( 1L ) ;
System . out. println ( "最后的结果:" + p3. getPrice ( ) ) ;
}
}
1. 修改数据库信息
2. 测试
@SpringBootTest
class ProductMapperTest {
@Autowired ( required = false )
private ProductMapper productMapper;
@Test
void testConcurrentUpdate ( ) {
Product p1 = productMapper. selectById ( 1 ) ;
System . out. println ( "小李取出的价格:" + p1. getPrice ( ) ) ;
Product p2 = productMapper. selectById ( 1 ) ;
System . out. println ( "小王取出的价格:" + p2. getPrice ( ) ) ;
p1. setPrice ( p1. getPrice ( ) + 50 ) ;
int result1 = productMapper. updateById ( p1) ;
System . out. println ( "小李修改结果:" + result1) ;
p2. setPrice ( p2. getPrice ( ) - 30 ) ;
int result2 = productMapper. updateById ( p2) ;
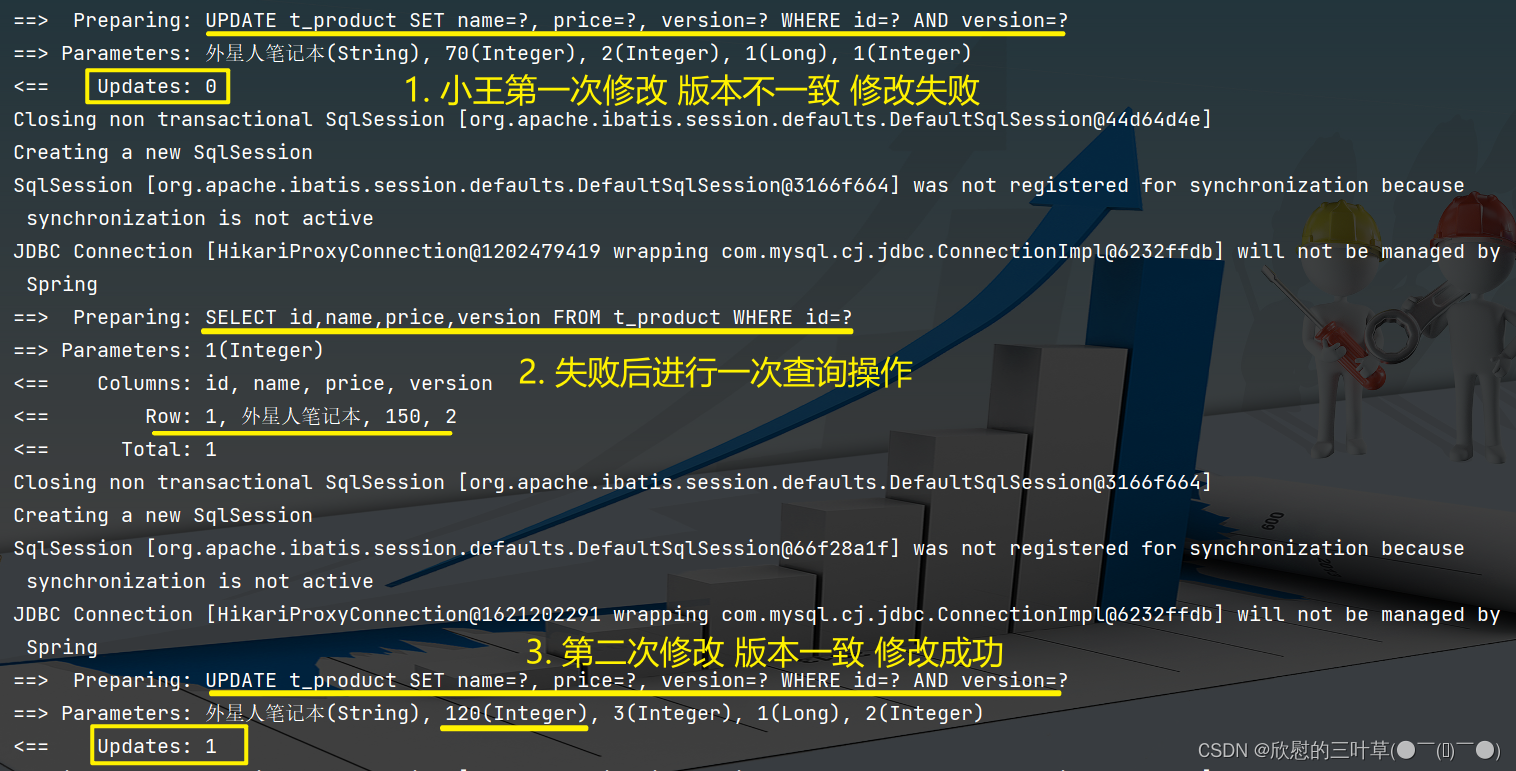
if ( result2 == 0 ) {
Product productNew = productMapper. selectById ( 1 ) ;
productNew. setPrice ( productNew. getPrice ( ) - 30 ) ;
result2 = productMapper. updateById ( productNew) ;
}
System . out. println ( "小王修改结果:" + result2) ;
Product p3 = productMapper. selectById ( 1L ) ;
System . out. println ( "最后的结果:" + p3. getPrice ( ) ) ;
}
}
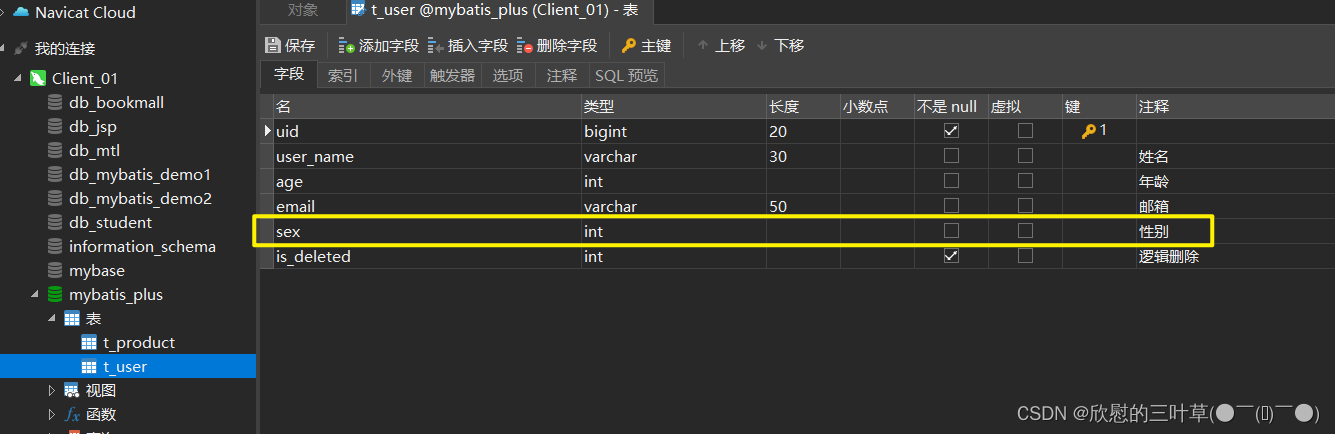
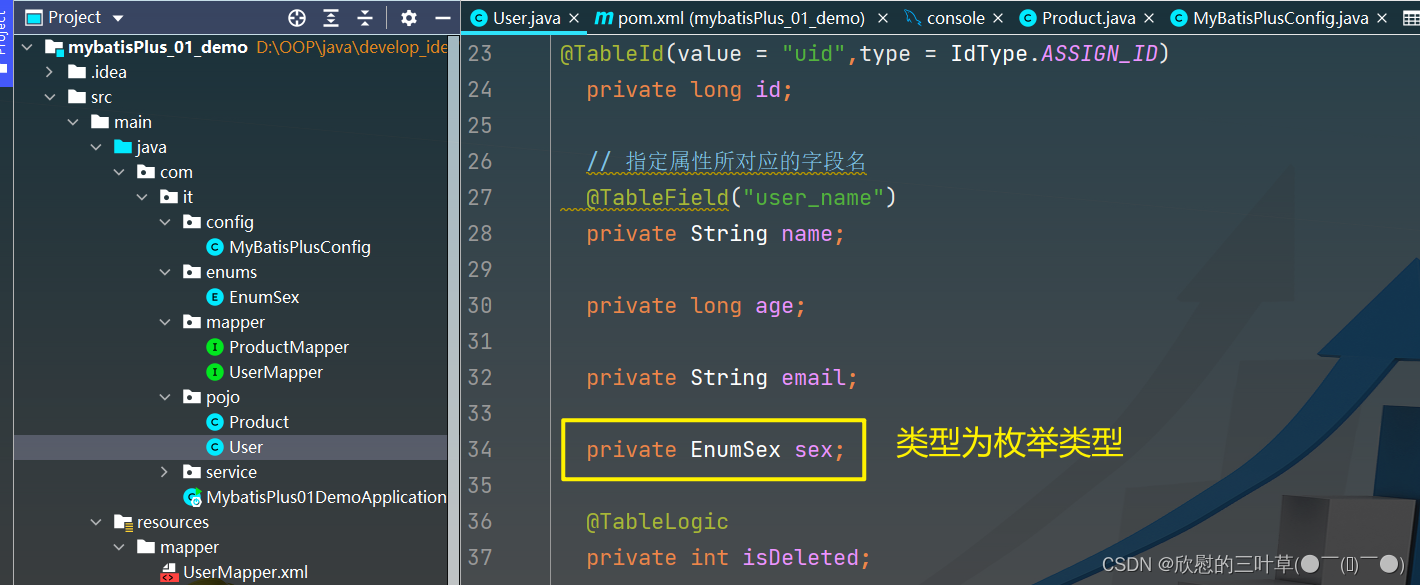
1. 数据库表添加字段sex
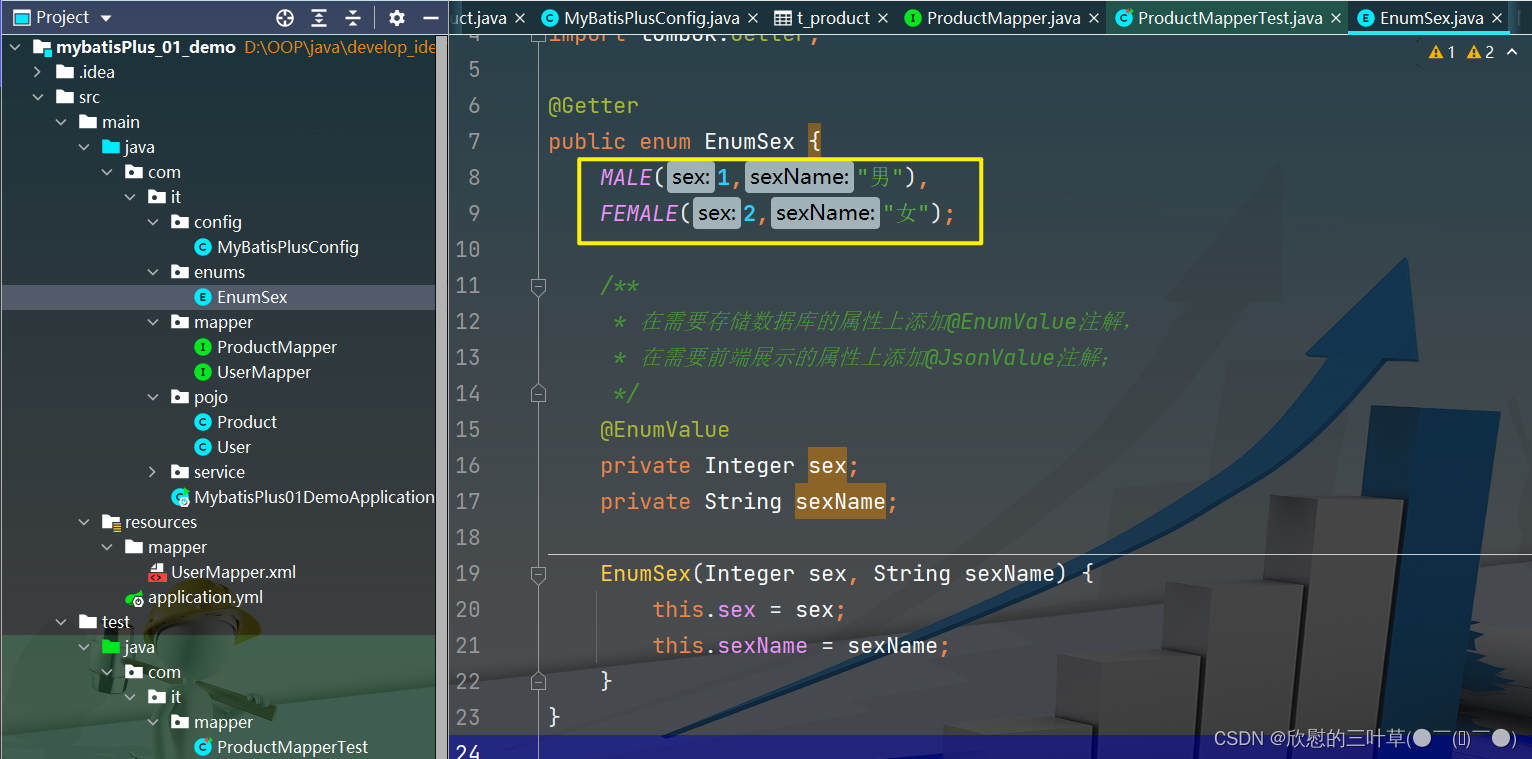
@Getter
public enum EnumSex {
MALE ( 1 , "男" ) ,
FEMALE ( 2 , "女" ) ;
@EnumValue
private Integer sex;
private String sexName;
EnumSex ( Integer sex, String sexName) {
this . sex = sex;
this . sexName = sexName;
}
}
1. 创建通用枚举类型
1.
mybatis-plus :
configuration :
log-impl : org.apache.ibatis.logging.stdout.StdOutImpl
global-config :
db-config :
table-prefix : t_
id-type : auto
type-aliases-package : com.it.pojo
type-enums-package : com.it.enums
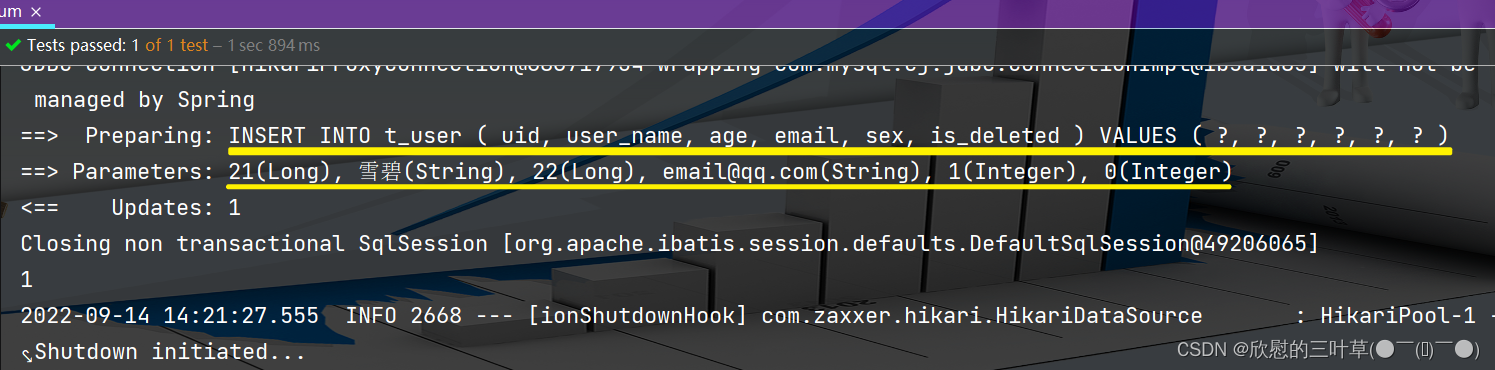
@Test
void testEnum ( ) {
User user = new User ( 21 , "雪碧" , 22 , "email@qq.com" , EnumSex . MALE, 0 ) ;
int i = userMapper. insert ( user) ;
System . out. println ( i) ;
}
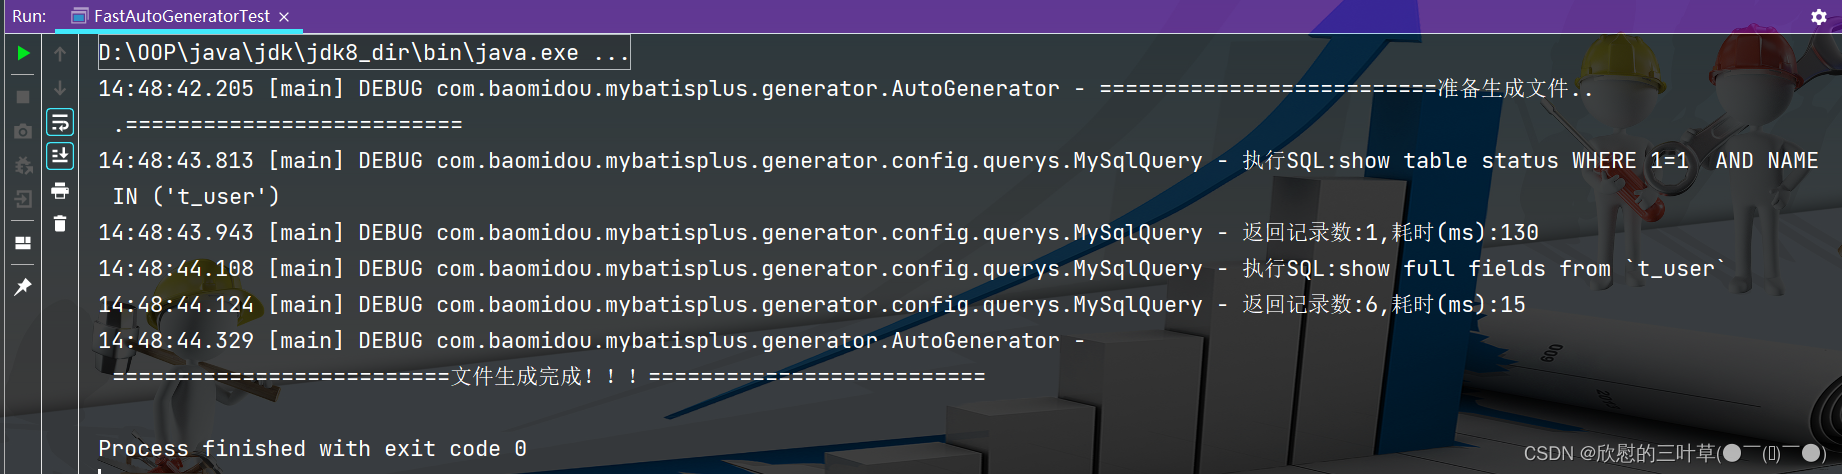
< dependency> < groupId> </ groupId> < artifactId> </ artifactId> < version> </ version> </ dependency> < dependency> < groupId> </ groupId> < artifactId> </ artifactId> < version> </ version> </ dependency> public class FastAutoGeneratorTest {
public static void main ( String [ ] args) {
FastAutoGenerator . create ( "jdbc:mysql://localhost:3306/mybatis_plus?characterEncoding=utf-8&userSSL=false&serverTimezone=GMT%2B8" , "root" , "root" )
. globalConfig ( builder -> {
builder. author ( "coke" )
. fileOverride ( )
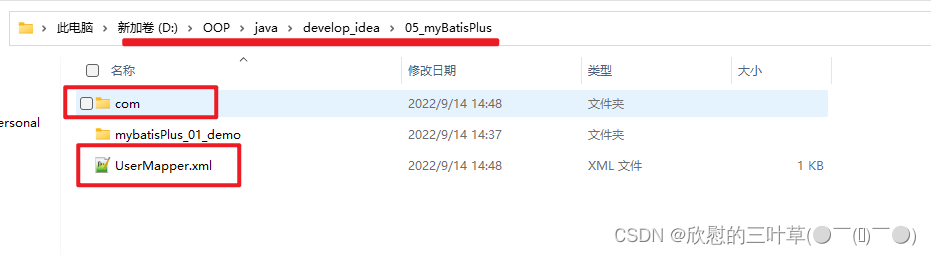
. outputDir ( "D://OOP//java//develop_idea//05_myBatisPlus" ) ;
} )
. packageConfig ( builder -> {
builder. parent ( "com.it" )
. moduleName ( "mybatisplus" )
. pathInfo ( Collections . singletonMap ( OutputFile . mapperXml, "D://OOP//java//develop_idea//05_myBatisPlus" ) ) ;
} )
. strategyConfig ( builder -> {
builder. addInclude ( "t_user" )
. addTablePrefix ( "t_" , "c_" ) ;
} )
. templateEngine ( new FreemarkerTemplateEngine ( ) )
. execute ( ) ;
}
}
适用于多种场景:纯粹多库、 读写分离、 一主多从、 混合模式等
目前我们就来模拟一个纯粹多库的一个场景,其他场景类似
场景说明:
我们创建两个库,分别为:mybatis_plus(以前的库不动)与mybatis_plus_1(新建),将
1. 创建数据库mybatis_plus_1和表product
CREATE DATABASE mybatis_plus_1;
USE mybatis_plus_1;
CREATE TABLE product(
id BIGINT ( 20 ) not NULL PRIMARY KEY COMMENT '主键' ,
name VARCHAR ( 30 ) not NULL COMMENT '商品名称' ,
price INT ( 11 ) DEFAULT 0 COMMENT '价格' ,
VERSION INT ( 11 ) DEFAULT 0 COMMENT '乐观锁版本号'
) ;
INSERT INTO product ( id, NAME, price) VALUES ( 1 , '外星人笔记本' , 100 ) ;
3. 删除mybatis_plus库product表
use mybatis_plus;
DROP TABLE IF EXISTS t_product;
1. 创建工程
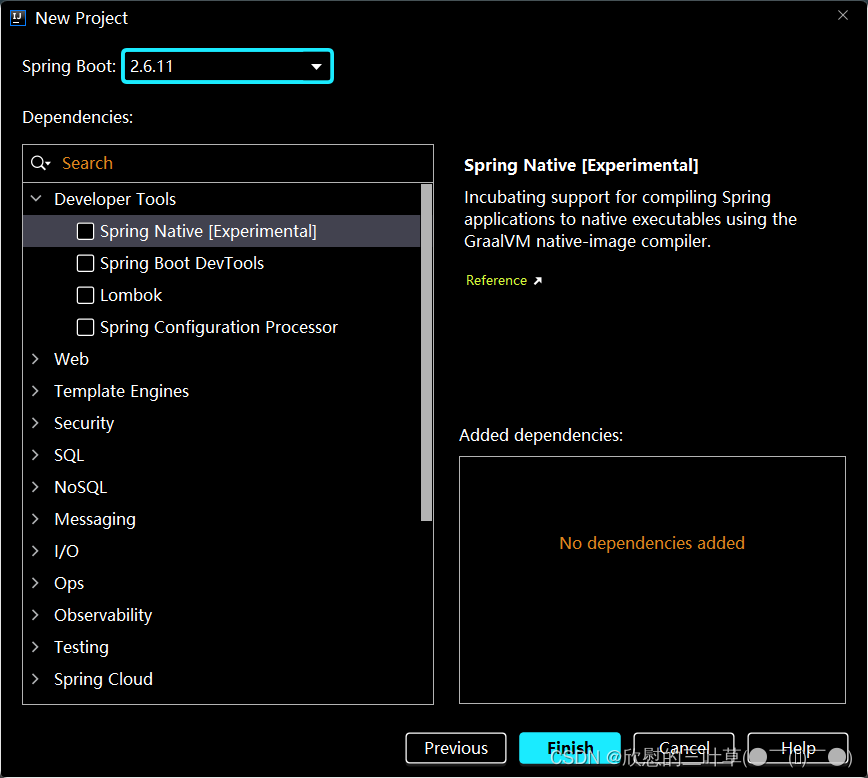
2. 选择SpringBoot版本
3. 删除不需要的配置
< dependency> < groupId> </ groupId> < artifactId> </ artifactId> < optional> </ optional> </ dependency> < dependency> < groupId> </ groupId> < artifactId> </ artifactId> < scope> </ scope> </ dependency> < dependency> < groupId> </ groupId> < artifactId> </ artifactId> < version> </ version> </ dependency> < dependency> < groupId> </ groupId> < artifactId> </ artifactId> < version> </ version> </ dependency> spring :
datasource :
dynamic :
primary : master
strict : false
datasource :
master :
url : jdbc: mysql: //localhost: 3306/mybatis_plus? characterEncoding=utf- 8&userSSL=false&serverTimezone=GMT%2B8
driver-class-name : com.mysql.cj.jdbc.Driver
username : root
password : root
slave_1 :
url : jdbc: mysql: //localhost: 3306/mybatis_plus_1? characterEncoding=utf- 8&userSSL=false&serverTimezone=GMT%2B8
driver-class-name : com.mysql.cj.jdbc.Driver
username : root
password : root
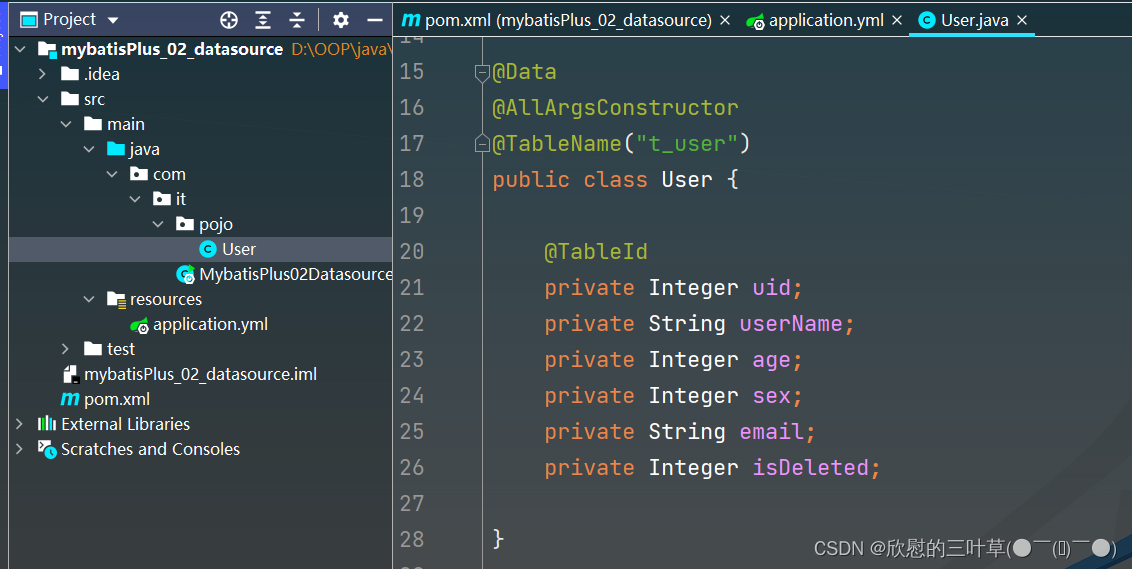
1. 创建User实体类
@Data
@AllArgsConstructor
@TableName ( "t_user" )
public class User {
@TableId
private Integer uid;
private String userName;
private Integer age;
private Integer sex;
private String email;
private Integer isDeleted;
}
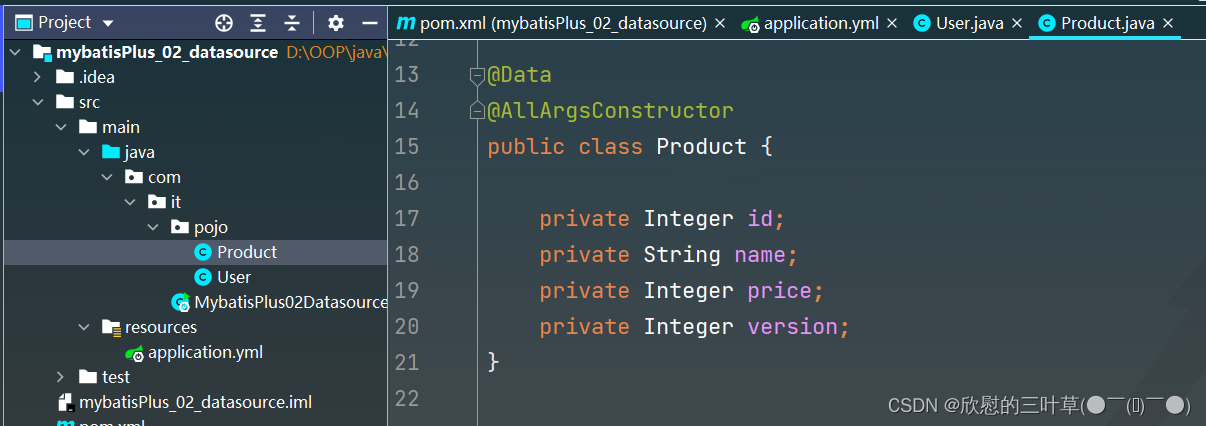
2. 创建Product实体类
@Data
@AllArgsConstructor
public class Product {

    private Integer id;
    private String name;
    private Integer price;
    private Integer version;
}
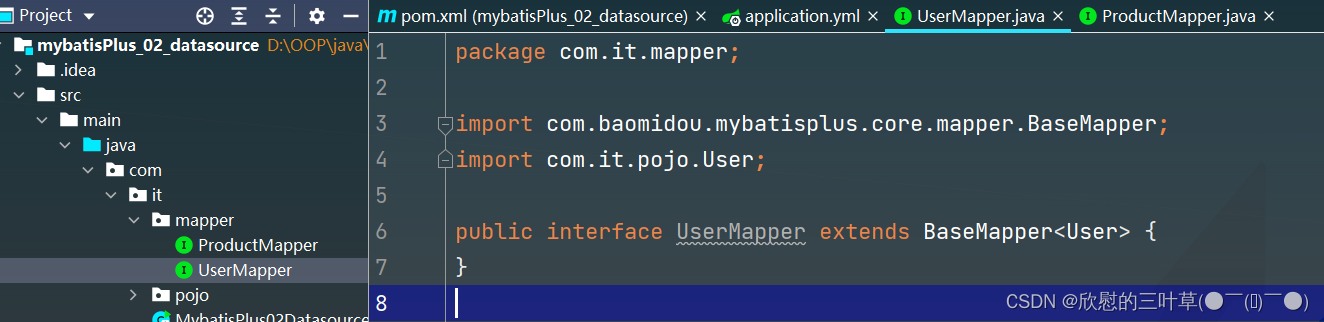
1. 创建UserMapper
public interface UserMapper extends BaseMapper < User > {
}
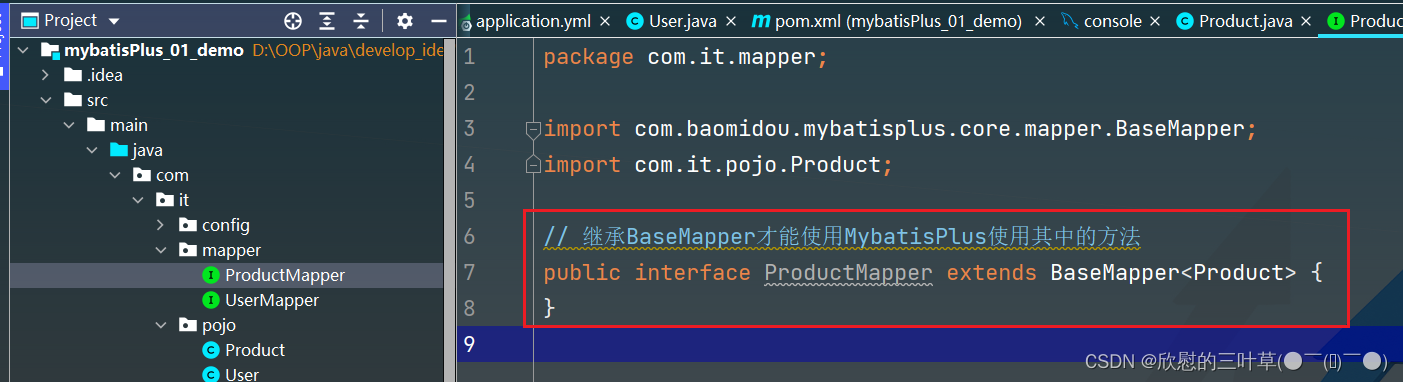
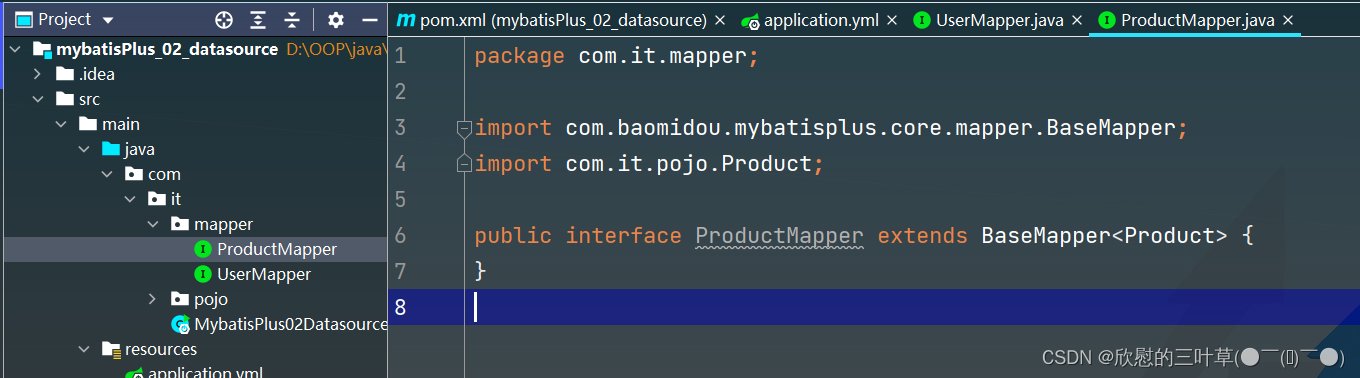
2. 创建ProductMapper
public interface ProductMapper extends BaseMapper < Product > {
}
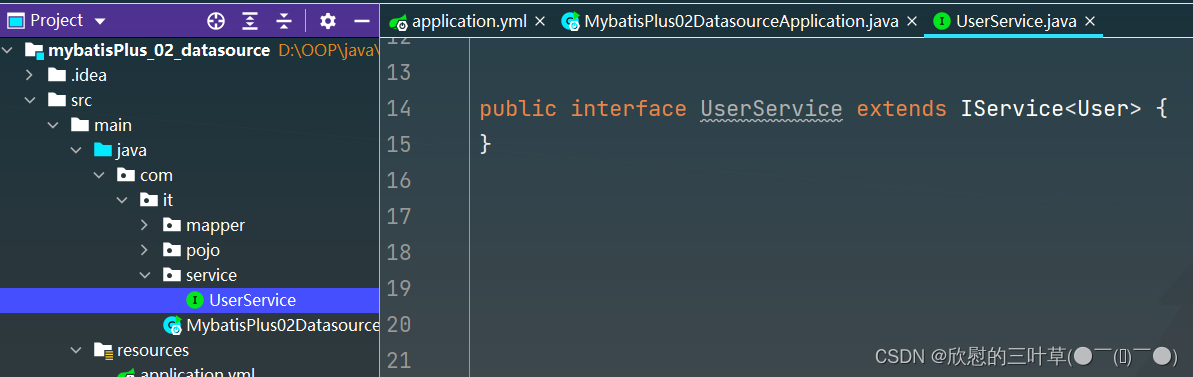
1. 创建UserService
public interface UserService extends IService < User > {
}
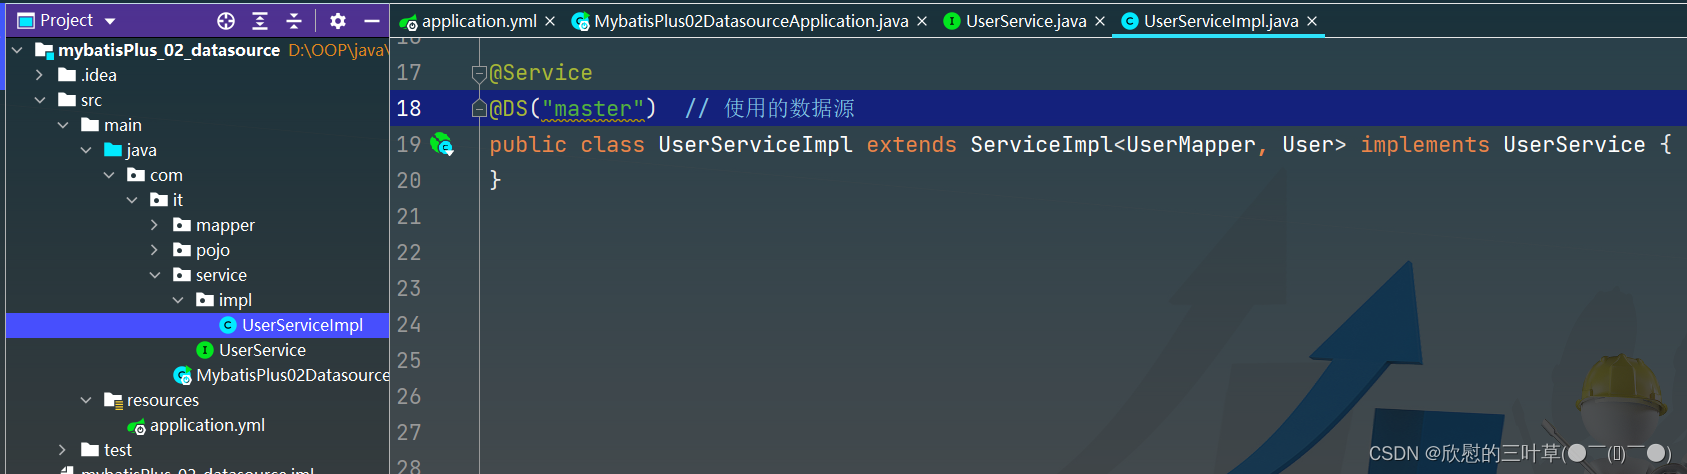
2. 创建UserService实现类UserServiceImpl
@Service
@DS ( "master" )
public class UserServiceImpl extends ServiceImpl < UserMapper , User > implements UserService {
}
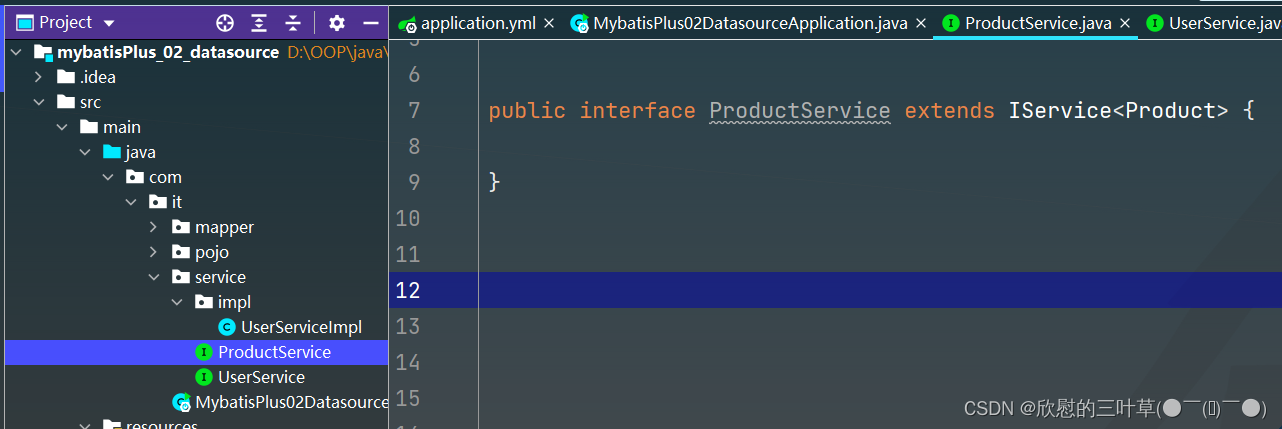
3. 创建Product接口
public interface ProductService extends IService < Product > {
}
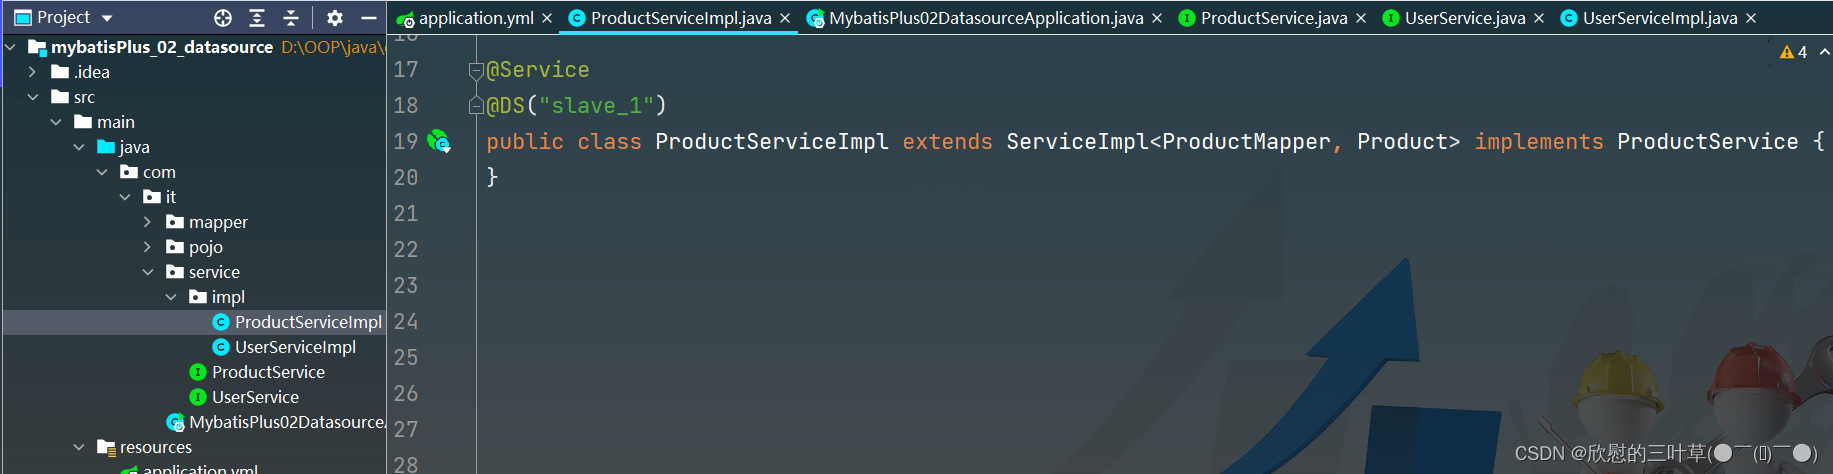
4. 创建ProductService接口实现类ProductServiceImpl
@Service
@DS ( "slave_1" )
public class ProductServiceImpl extends ServiceImpl < ProductMapper , Product > implements ProductService {
}
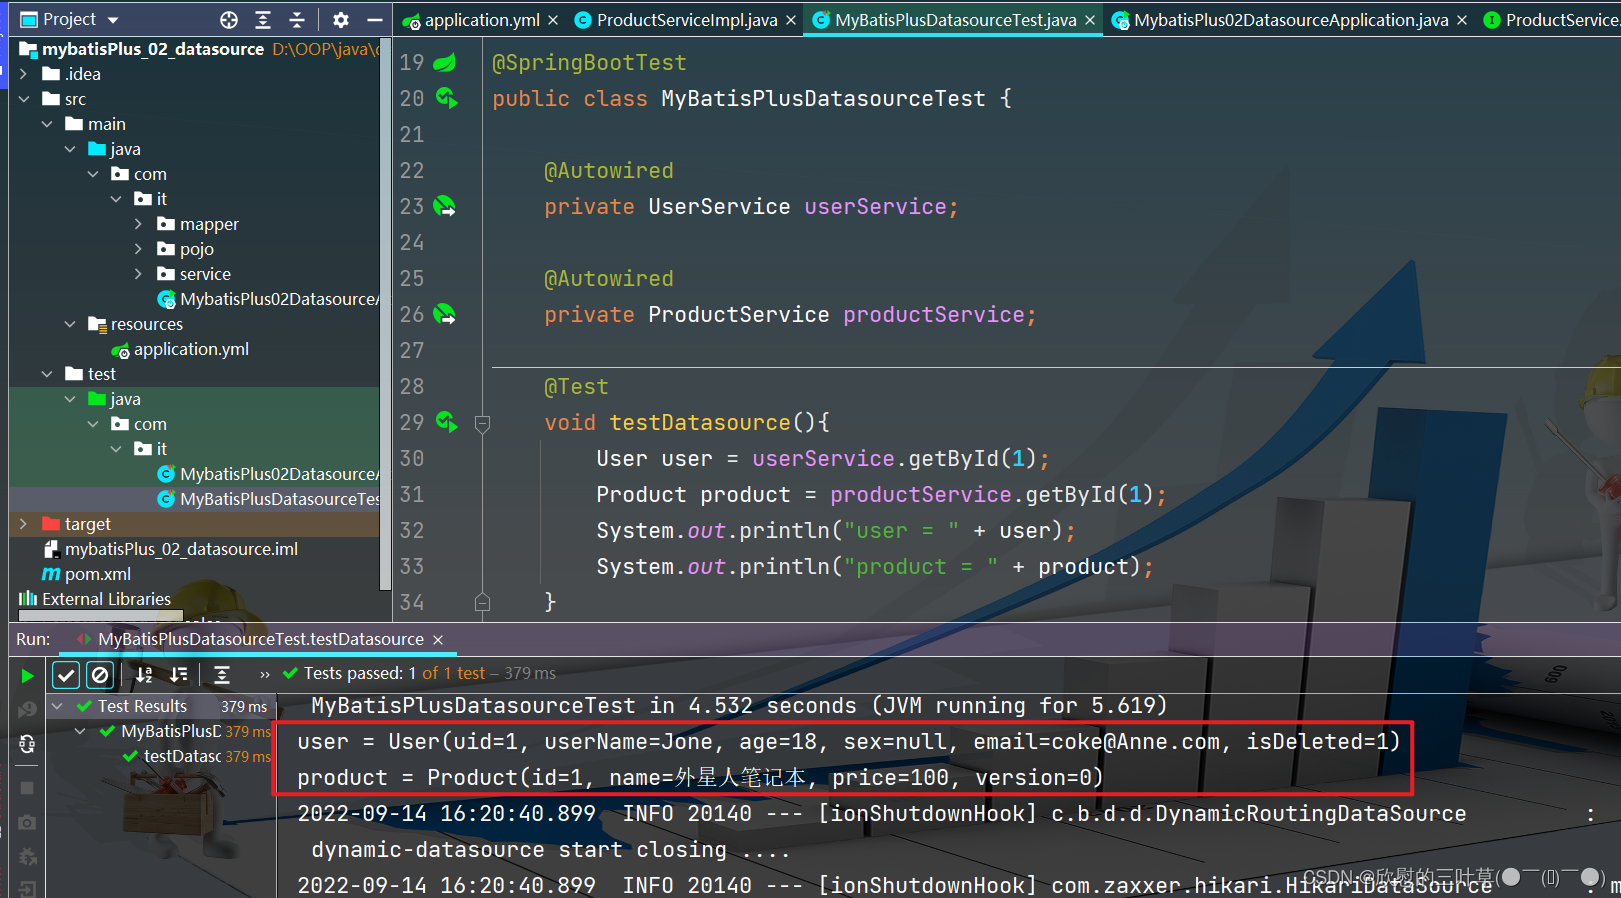
@SpringBootTest
public class MyBatisPlusDatasourceTest {
@Autowired
private UserService userService;
@Autowired
private ProductService productService;
@Test
void testDatasource ( ) {
User user = userService. getById ( 1 ) ;
Product product = productService. getById ( 1 ) ;
System . out. println ( "user = " + user) ;
System . out. println ( "product = " + product) ;
}
}
1. 测试
结果:
1、都能顺利获取对象,则测试成功
2、如果我们实现读写分离,将写操作方法加上主库数据源,读操作方法加上从库数据源,自动切换,是不是就能实现读写分离?
MyBatis-Plus为我们提供了强大的mapper和service模板,能够大大的提高开发效率
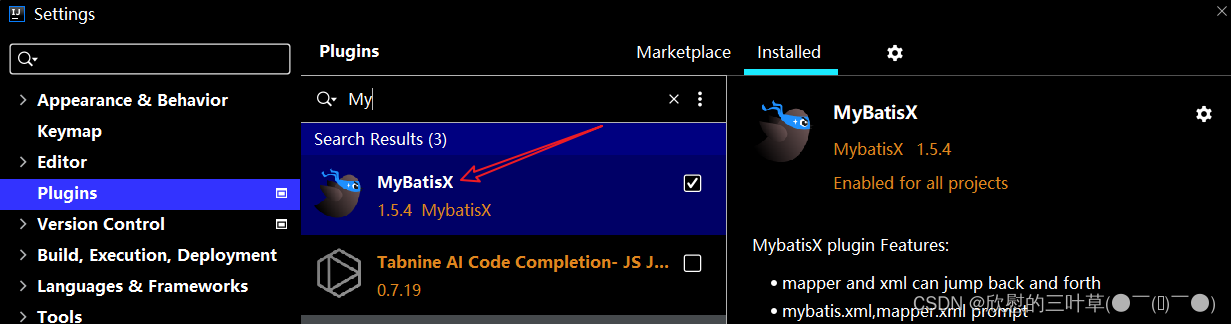
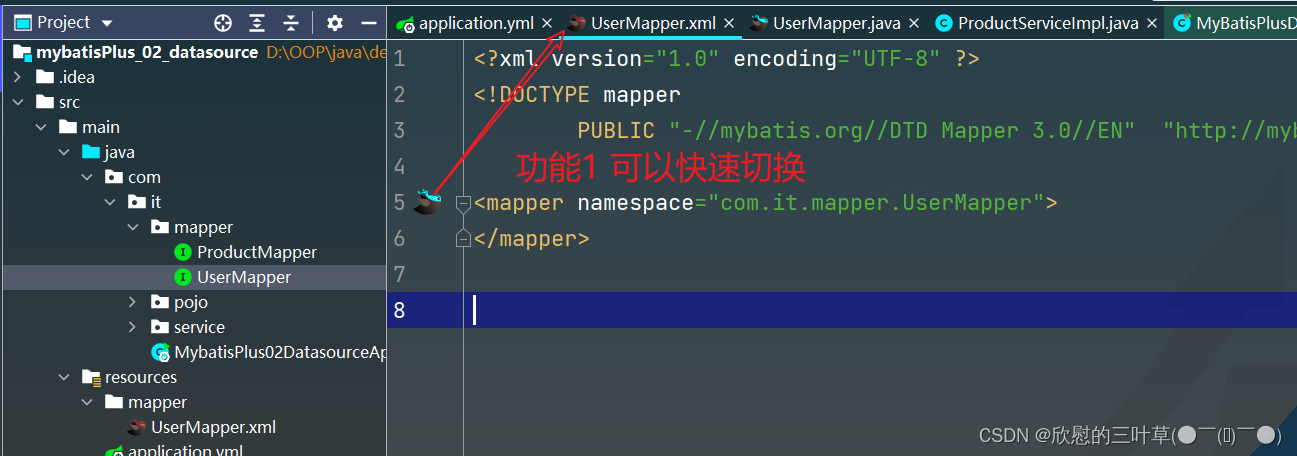
但是在真正开发过程中,MyBatis-Plus并不能为我们解决所有问题,例如一些复杂的SQL,多表联查,我们就需要自己去编写代码和SQL语句,我们该如何快速的解决这个问题呢,这个时候可以使用MyBatisX插件
MyBatisX一款基于 IDEA 的快速开发插件,为效率而生。
1. 安装
2. 创建UserMapper.xml文件
<?xml version="1.0" encoding="UTF-8" ?>
<! DOCTYPE mapper
PUBLIC "-//mybatis.org//DTD Mapper 3.0//EN" "http://mybatis.org/dtd/mybatis-3-mapper.dtd" > < mappernamespace = " com.it.mapper.UserMapper" > </ mapper> 1. 创建工程
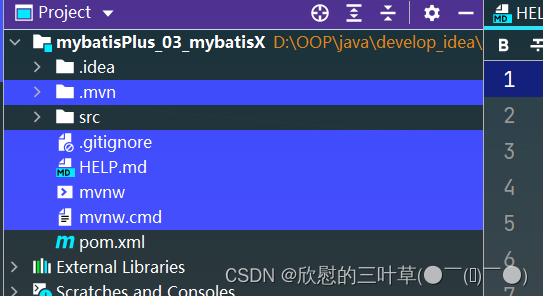
2. 删除不需要的文件
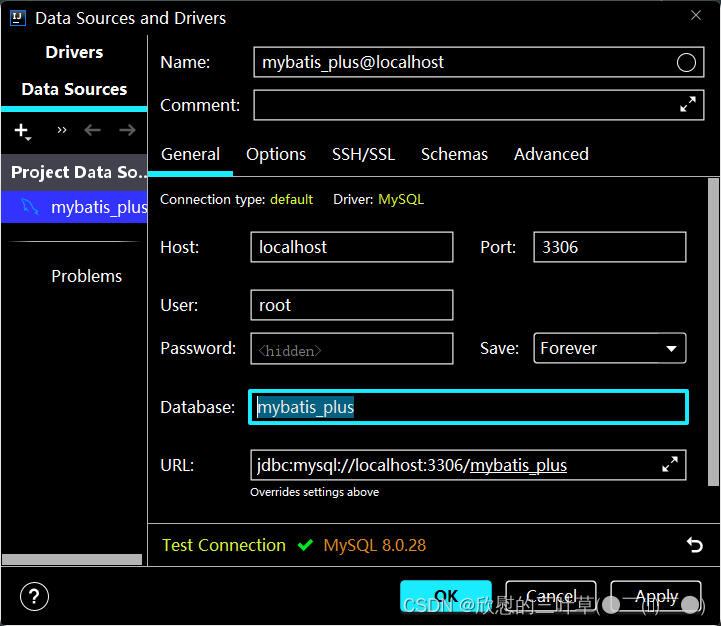
< dependency> < groupId> </ groupId> < artifactId> </ artifactId> < optional> </ optional> </ dependency> < dependency> < groupId> </ groupId> < artifactId> </ artifactId> < scope> </ scope> </ dependency> < dependency> < groupId> </ groupId> < artifactId> </ artifactId> < version> </ version> </ dependency> < dependency> < groupId> </ groupId> < artifactId> </ artifactId> < version> </ version> </ dependency> spring :
datasource :
type : com.zaxxer.hikari.HikariDataSource
driver-class-name : com.mysql.cj.jdbc.Driver
url : jdbc: mysql: //localhost: 3306/mybatis_plus? characterEncoding=utf- 8&userSSL=false&serverTimezone=GMT%2B8
username : root
password : root
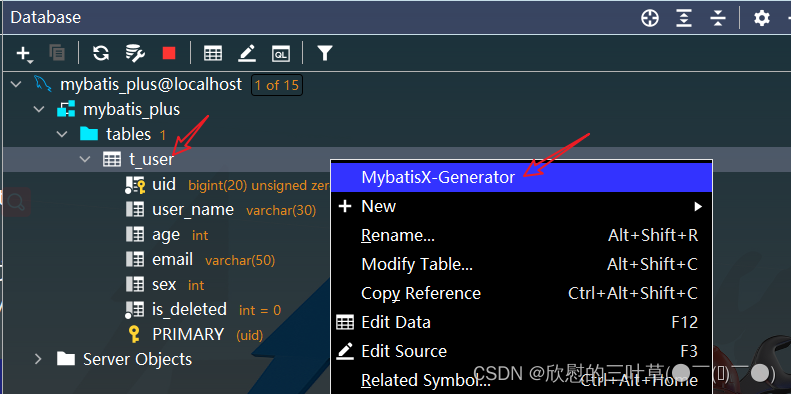
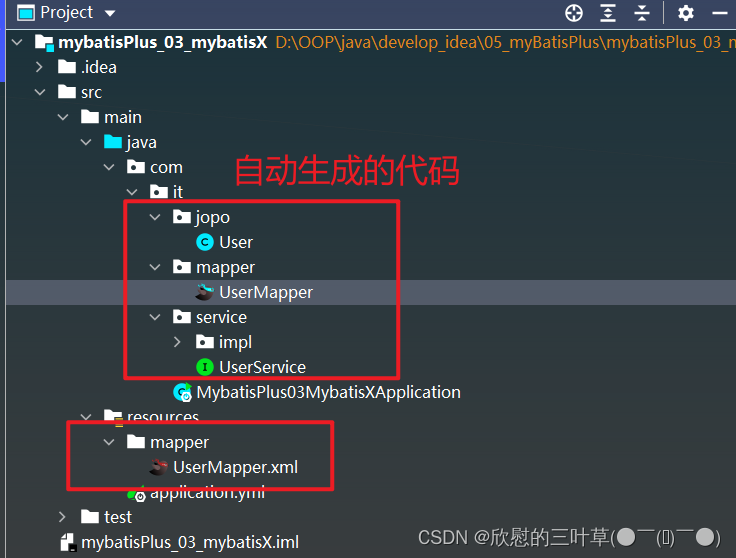
1. 点击MybatisX-Generator(生成器)
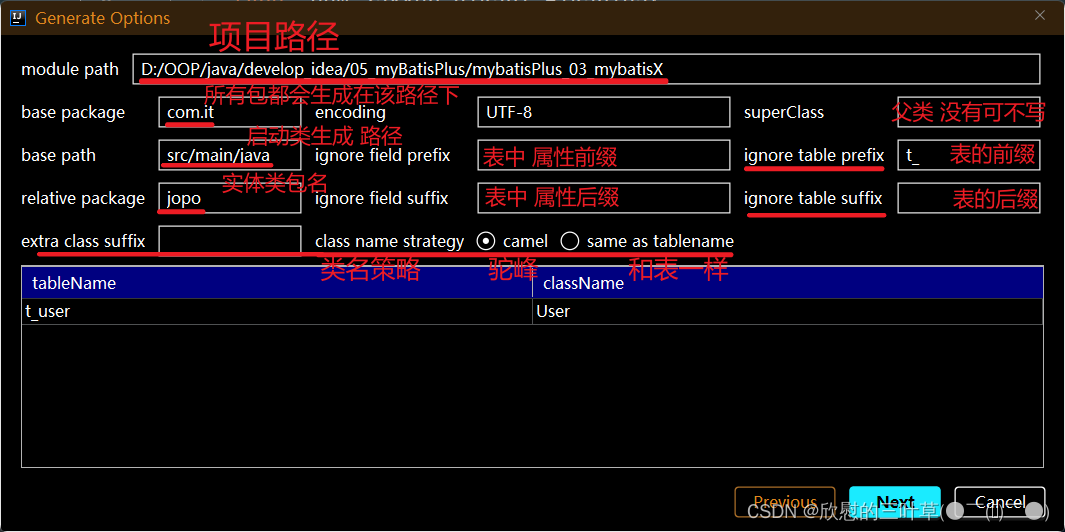
2.
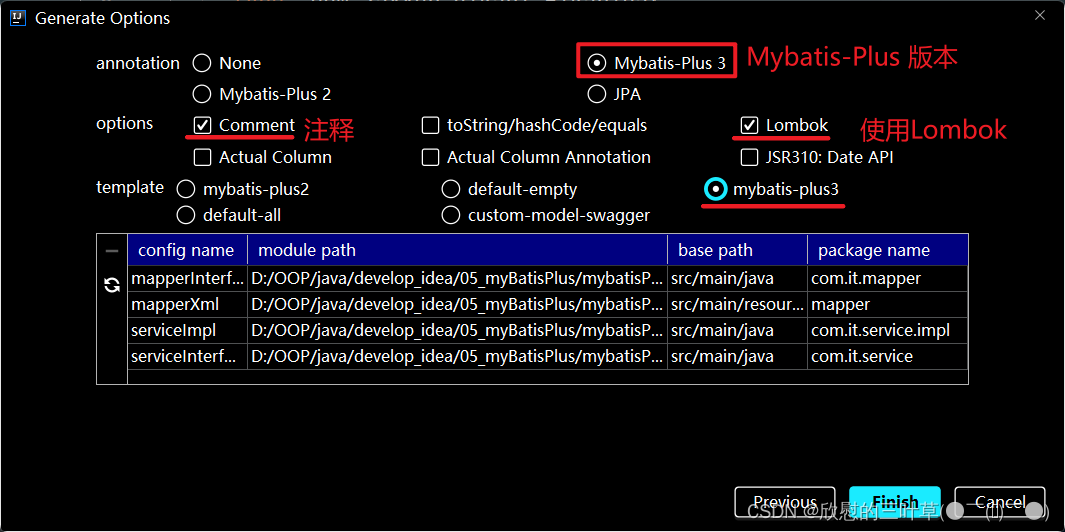
3.
4.
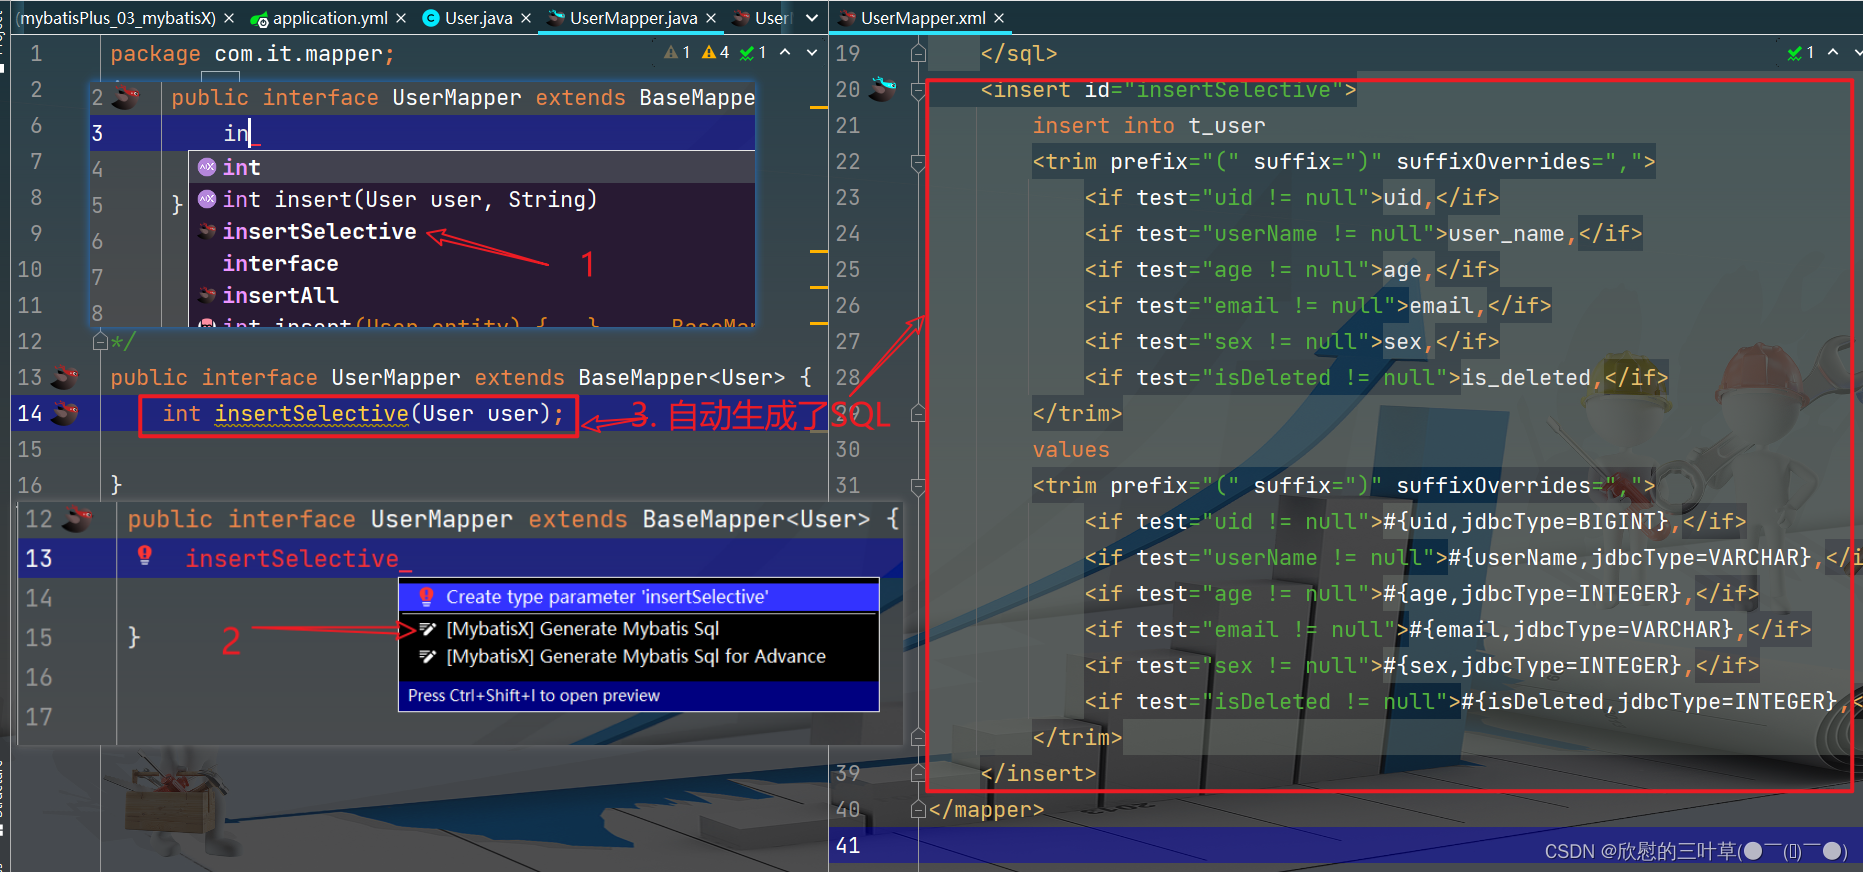
1. 生成添加方法


 3485
3485


 到【灌水乐园】发言


