


In enterprise Java application development, perhaps Spring and Hibernate integration is one of the most-demanded topic which most programmers are looking for and are facing with. Spring is the leading enterprise application framework, and Hibernate is the leading ORM framework so combination of these two guys would be a preferable choice in order to develop robust enterprise applications.
This is a step-by-step tutorial that helps you build a Spring-Hibernate application easily in a clear and concise way. In this first part, we demonstrate how to code a simple Spring MVC application that displays a list of users from MySQL database. The DAO implementation uses Hibernate’s SessionFactory to query against the database, instead of using JdbcTemplate .
The following configuration approaches are used in the demo application:
- Spring MVC: Annotations for controller and XML for bean definitions.
- Hibernate: XML mapping for model class.
- Web Application: using web.xml deployment descriptor file.
- Java 7
- Spring framework 4.0.3.RELEASED
- Hibernate ORM 4.3.5.Final
- Spring Tool Suite IDE 3.5.1
- Maven 3
- Tomcat 7

1. How Spring supports Hibernate Integration
Basically, in order to support Hibernate integration, Spring provides two key beans available in the org.springframework.orm.hibernate4 package:
- LocalSessionFactoryBean: creates a Hibernate’s SessionFactory which is injected into Hibernate-based DAO classes.
- HibernateTransactionManager: provides transaction support code for a SessionFactory. Programmers can use @Transactional annotation in DAO methods to avoid writing boiler-plate transaction code explicitly.
2. Setting up Project
Let’s create a Spring MVC project using Spring Tool Suite IDE (See example:
Spring MVC beginner tutorial with Spring Tool Suite IDE
), name it as
SpringMvcHibernateXML
.
Execute the following MySQL script in order to create a database named usersdb with a table named users :
|
1
2
3
4
5
6
7
8
9
|
create database usersdb;
CREATE TABLE `users` (
`user_id` int(11) NOT NULL AUTO_INCREMENT,
`username` varchar(45) NOT NULL,
`password` varchar(45) NOT NULL,
`email` varchar(45) NOT NULL,
PRIMARY KEY (`user_id`)
) ENGINE=InnoDB AUTO_INCREMENT=16 DEFAULT CHARSET=latin1
|
Project Structure
The following screenshot shows final structure of the project:
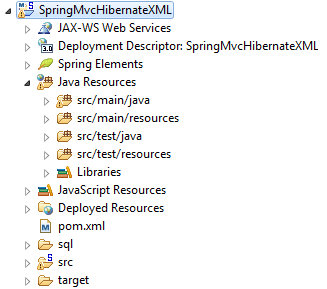
NOTE: After completing this tutorial, you will create a project structure looks like the above.
Maven Dependencies
Declare versions for Java and Spring framework:
|
1
2
3
4
|
<
properties
>
<
java-version
>1.7</
java-version
>
<
org.springframework-version
>4.0.3.RELEASE</
org.springframework-version
>
</
properties
>
|
- Spring framework dependencies:
123456789101112131415161718
<dependency><groupId>org.springframework</groupId><artifactId>spring-context</artifactId><version>${org.springframework-version}</version></dependency><dependency><groupId>org.springframework</groupId><artifactId>spring-webmvc</artifactId><version>${org.springframework-version}</version></dependency><dependency><groupId>org.springframework</groupId><artifactId>spring-orm</artifactId><version>${org.springframework-version}</version><type>jar</type><scope>compile</scope></dependency> - Hibernate ORM framework dependencies:
12345
<dependency><groupId>org.hibernate</groupId><artifactId>hibernate-core</artifactId><version>4.3.5.Final</version></dependency> - Java Servlet and JSP dependencies (for compilation only):
123456789101112
<dependency><groupId>javax.servlet</groupId><artifactId>javax.servlet-api</artifactId><version>3.1.0</version><scope>provided</scope></dependency><dependency><groupId>javax.servlet.jsp</groupId><artifactId>javax.servlet.jsp-api</artifactId><version>2.3.1</version><scope>provided</scope></dependency> - JSTL dependency:
12345
<dependency><groupId>jstl</groupId><artifactId>jstl</artifactId><version>1.2</version></dependency> - Apache Commons DBCP dependency (for database connection pooling):
12345
<dependency><groupId>org.apache.commons</groupId><artifactId>commons-dbcp2</artifactId><version>2.0</version></dependency> - MySQL Connector Java dependency (JDBC driver for MySQL):
12345
<dependency><groupId>mysql</groupId><artifactId>mysql-connector-java</artifactId><version>5.1.30</version></dependency>
This book:
Getting started with Spring Framework helps you master all major concepts like Spring core modules, dependency injection, Spring AOP, annotation-driven development, and more.
3. Coding Model Class Configuring Hibernate Mapping
Writing Model Class
Create a new class named User.java in the package net.codejava.spring.model with the following source code:
|
1
2
3
4
5
6
7
8
9
10
11
|
package
net.codejava.spring.model;
public
class
User {
private
int
id;
private
String username;
private
String password;
private
String email;
// getters and setters are removed for brevity
}
|
Creating Hibernate XML Mapping for the Model Class
We need to create a Hibernate XML mapping file to map the User class to the users table in database. Create a User.hbm.xml file under the same package as the User class with the following XML code:
|
1
2
3
4
5
6
7
8
9
10
11
12
13
14
|
<?
xml
version
=
"1.0"
encoding
=
"UTF-8"
?>
<!DOCTYPE hibernate-mapping PUBLIC
"-//Hibernate/Hibernate Mapping DTD 3.0//EN"
"http://www.hibernate.org/dtd/hibernate-mapping-3.0.dtd">
<
hibernate-mapping
package
=
"net.codejava.spring.model"
>
<
class
name
=
"User"
table
=
"USERS"
>
<
id
name
=
"id"
column
=
"USER_ID"
>
<
generator
class
=
"native"
/>
</
id
>
<
property
name
=
"username"
column
=
"USERNAME"
/>
<
property
name
=
"password"
column
=
"PASSWORD"
/>
<
property
name
=
"email"
column
=
"EMAIL"
/>
</
class
>
</
hibernate-mapping
>
|
Creating Hibernate XML Configuration File
Create hibernate.cfg.xml file under the root of classpath (right in src directory in the project) with the following XML code:
|
1
2
3
4
5
6
7
8
9
10
11
|
<?
xml
version
=
'1.0'
encoding
=
'utf-8'
?>
<!DOCTYPE hibernate-configuration PUBLIC
"-//Hibernate/Hibernate Configuration DTD 3.0//EN"
"http://www.hibernate.org/dtd/hibernate-configuration-3.0.dtd">
<
hibernate-configuration
>
<
session-factory
>
<
property
name
=
"dialect"
>org.hibernate.dialect.MySQLDialect</
property
>
<
property
name
=
"show_sql"
>true</
property
>
<
mapping
resource
=
"net/codejava/spring/model/User.hbm.xml"
/>
</
session-factory
>
</
hibernate-configuration
>
|
4. Coding DAO Classes
Writing UserDAO interface
Create a very simple DAO interface for the User class as the following UserDAO.java class:
|
1
2
3
4
5
6
7
8
9
|
package
net.codejava.spring.dao;
import
java.util.List;
import
net.codejava.spring.model.User;
public
interface
UserDAO {
public
List<User> list();
}
|
Writing UserDAO implementation
Here’s we code an implementation of the UserDAO interface, the UserDAOImpl class as follows:
|
1
2
3
4
5
6
7
8
9
10
11
12
13
14
15
16
17
18
19
20
21
22
23
24
25
26
27
28
29
|
package
net.codejava.spring.dao;
import
java.util.List;
import
net.codejava.spring.model.User;
import
org.hibernate.Criteria;
import
org.hibernate.SessionFactory;
import
org.springframework.transaction.annotation.Transactional;
public
class
UserDAOImpl
implements
UserDAO {
private
SessionFactory sessionFactory;
public
UserDAOImpl(SessionFactory sessionFactory) {
this
.sessionFactory = sessionFactory;
}
@Override
@Transactional
public
List<User> list() {
@SuppressWarnings
(
"unchecked"
)
List<User> listUser = (List<User>) sessionFactory.getCurrentSession()
.createCriteria(User.
class
)
.setResultTransformer(Criteria.DISTINCT_ROOT_ENTITY).list();
return
listUser;
}
}
|
Pay attention to the @Transactional annotation provided by Spring - when a method is annotated by this annotation, Spring will inject transaction support code into the method - thus we don’t have two write any code to handle transaction explicitly.
5. Configuring Spring Application Context
Now, we come to the most important part that wires Spring and Hibernate together through some XML configuration. Open the
servlet-context.xml
file under
src/main/webapp/WEB-INF/spring/appServlet
and update its content as follows.
Configuring Spring MVC View Resolvers
As usual, add the following declarations for Spring MVC annotation driven approach:
|
1
2
3
|
<
mvc:annotation-driven
/>
<
mvc:resources
mapping
=
"/resources/**"
location
=
"/resources/"
/>
<
context:component-scan
base-package
=
"net.codejava.spring"
/>
|
|
1
2
3
4
|
<
bean
class
=
"org.springframework.web.servlet.view.InternalResourceViewResolver"
>
<
property
name
=
"prefix"
value
=
"/WEB-INF/views/"
/>
<
property
name
=
"suffix"
value
=
".jsp"
/>
</
bean
>
|
We use Apache Commons DBCP for a data source with connection pooling capability:
|
1
2
3
4
5
6
|
<
bean
id
=
"dataSource"
class
=
"org.apache.commons.dbcp2.BasicDataSource"
destroy-method
=
"close"
>
<
property
name
=
"driverClassName"
value
=
"com.mysql.jdbc.Driver"
/>
<
property
name
=
"url"
value
=
"jdbc:mysql://localhost:3306/usersdb"
/>
<
property
name
=
"username"
value
=
"root"
/>
<
property
name
=
"password"
value
=
"secret"
/>
</
bean
>
|
Configuring SessionFactory Bean
Spring 4 provides support for Hibernate 4’s SessionFactory through a LocalSessionFactoryBean which is actually a FactoryBean that creates a Hibernate’s SessionFactory which is then injected to Hibernate-based DAO beans. Here’s the bean declaration:
|
1
2
3
4
5
|
<
bean
id
=
"sessionFactory"
class
=
"org.springframework.orm.hibernate4.LocalSessionFactoryBean"
>
<
property
name
=
"dataSource"
ref
=
"dataSource"
/>
<
property
name
=
"configLocation"
value
=
"classpath:hibernate.cfg.xml"
/>
</
bean
>
|
Configuring TransactionManager Bean
The following declaration is for automatic transaction support for the SessionFactory :
|
1
2
3
4
5
|
<
tx:annotation-driven
/>
<
bean
id
=
"transactionManager"
class
=
"org.springframework.orm.hibernate4.HibernateTransactionManager"
>
<
property
name
=
"sessionFactory"
ref
=
"sessionFactory"
/>
</
bean
>
|
Configuring DAO Bean
And finally, configuration for our UserDAOImpl bean - pretty simple:
|
1
2
3
4
5
|
<
bean
id
=
"userDao"
class
=
"net.codejava.spring.dao.UserDAOImpl"
>
<
constructor-arg
>
<
ref
bean
=
"sessionFactory"
/>
</
constructor-arg
>
</
bean
>
|
NOTE: For the whole content of Spring application context configuration file, see the corresponding file in the attached project.
6. Coding Controller Classes
Write our Spring MVC controller class (
HomeController.java
) under the
net.codejava.spring
package with the following code:
|
1
2
3
4
5
6
7
8
9
10
11
12
13
14
15
16
17
18
19
20
21
22
23
24
25
26
27
28
29
30
|
package
net.codejava.spring;
import
java.util.List;
import
net.codejava.spring.dao.UserDAO;
import
net.codejava.spring.model.User;
import
org.springframework.beans.factory.annotation.Autowired;
import
org.springframework.stereotype.Controller;
import
org.springframework.web.bind.annotation.RequestMapping;
import
org.springframework.web.servlet.ModelAndView;
/**
* Handles requests for the application home page.
*/
@Controller
public
class
HomeController {
@Autowired
private
UserDAO userDao;
@RequestMapping
(value=
"/"
)
public
ModelAndView home() {
List<User> listUsers = userDao.list();
ModelAndView model =
new
ModelAndView(
"home"
);
model.addObject(
"userList"
, listUsers);
return
model;
}
}
|
7. Coding View Page
Create a
home.jsp
under the
src/main/webapp/WEB-INF/views
directory with the following content:
|
1
2
3
4
5
6
7
8
9
10
11
12
13
14
15
16
17
18
19
20
21
22
23
24
25
26
27
28
29
30
|
<%@page contentType="text/html" pageEncoding="UTF-8"%>
<!DOCTYPE HTML PUBLIC "-//W3C//DTD HTML 4.01 Transitional//EN"
"http://www.w3.org/TR/html4/loose.dtd">
<%@ taglib uri="http://java.sun.com/jsp/jstl/core" prefix="c" %>
<
html
>
<
head
>
<
meta
http-equiv
=
"Content-Type"
content
=
"text/html; charset=UTF-8"
>
<
title
>Home</
title
>
</
head
>
<
body
>
<
div
align
=
"center"
>
<
h1
>Contact List</
h1
>
<
table
border
=
"1"
>
<
th
>No</
th
>
<
th
>Username</
th
>
<
th
>Email</
th
>
<
c:forEach
var
=
"user"
items
=
"${userList}"
varStatus
=
"status"
>
<
tr
>
<
td
>${status.index + 1}</
td
>
<
td
>${user.username}</
td
>
<
td
>${user.email}</
td
>
</
tr
>
</
c:forEach
>
</
table
>
</
div
>
</
body
>
</
html
>
|
This book:
Spring in Practice covers 66 Spring development techniques that help you solve practical issues you will encounter when using Spring framework.
8. Testing the Application
Deploy the
SpringMvcHibernateXML
application on Tomcat server and access its default page via the following URL:
http://localhost:8080/SpringMvcHibernateXML
If everything is going fine, you would see the following result:
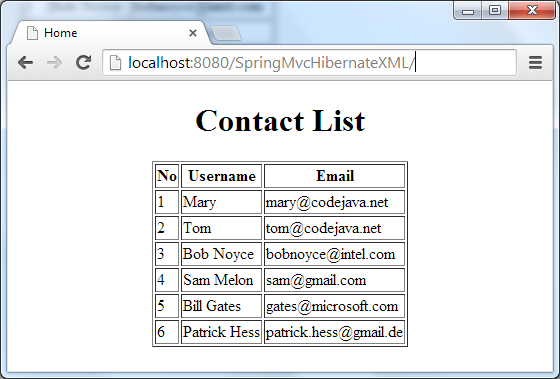
Congratulations! You have completed our first part of Spring-Hibernate Integration series. You can download the attached project and experiment yourself. A deployable WAR file is also provided for your convenience.


 被折叠的 条评论
为什么被折叠?
被折叠的 条评论
为什么被折叠?
 到【灌水乐园】发言


