


学习在 Spring Boot 如何实现自定义异常处理,及其中的原理。
在 Spring Boot 中,关于异常的统一处理,可以使用 @ControllerAdvice ,具体见 Spring Boot 使用 @ControllerAdvice,也可以自己来定义异常处理方案。
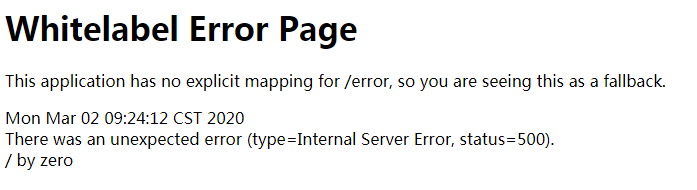
Spring Boot 有一个默认的异常页面,如下:
上面提到了 /error 路径,会去寻找默认的异常页面。我们可以自定义异常页面,这样就可以覆盖默认的页面。一般分为两种:静态异常页面、动态异常页面。
1 静态异常页面
自定义静态异常页面的默认位置为:classpath:/static/error/。命名方式一般分为两种:
- 使用 HTTP 响应码来命名页面,定义 404.html、405.html、500.html 等。
- 定义 4xx.html(对应 400-499 的响应码)、5xx.html(对应 500-5999 的响应码)。
优先级是第一种高于第二种,即如果抛出 500 错误,会优先展示 500.html ,而不是 5xx.html 。
在 src/main/resources/static/error 下新建 500.html ,如下:
<!DOCTYPE html>
<html lang="en">
<head>
    <meta charset="UTF-8">
    <title>Title</title>
</head>
<body>
<h1>static/error/500</h1>
</body>
</html>
新建 HelloController 测试类,如下:
@RestController
public class HelloController {
    // 默认的错误页面查找顺序:发生了500错误 –> 查找动态 500.html –> 查找静态 500.html –> 查找动态 5xx.html –> 查找静态 5xx.html
    @GetMapping("/hello")
    public String hello() {
        int i = 1 / 0;
        return "hello";
    }
}
启动项目,访问 http://120.0.0.1:8080/hello 来验证。
2 动态异常页面
自定义动态异常页面的默认位置为:classpath:/templates/error/,可以使用的页面模板有 thymeleaf、freemarker、jsp ,下面以 thymeleaf 为例。命名方式一般分为两种:
- 使用 HTTP 响应码来命名页面,定义 404.html、405.html、500.html 等。
- 定义 4xx.html(对应 400-499 的响应码)、5xx.html(对应 500-5999 的响应码)。一般采用这种,因为可以在页面中动态展示响应码,没必要按文件列出每种错误。
优先级是第一种高于第二种,即如果抛出 500 错误,会优先展示 500.html ,而不是 5xx.html 。
使用自定义动态异常页面时,我们只需要定义页面,不用自己去写 Controller ,因为 Spring Boot 自带的异常处理器会自动查找到异常页面。
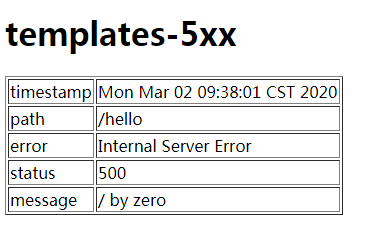
在 src/main/resources/templates/error 下新建 5xx.html ,如下:
<!DOCTYPE html>
<html lang="en" xmlns:th="http://www.thymeleaf.org">
<head>
    <meta charset="UTF-8">
    <title>Title</title>
</head>
<body>
<h1>templates/error/5xx</h1>
<table border="1">
    <tr>
        <td>timestamp</td>
        <td th:text="${timestamp}"></td>
    </tr>
    <tr>
        <td>path</td>
        <td th:text="${path}"></td>
    </tr>
    <tr>
        <td>error</td>
        <td th:text="${error}"></td>
    </tr>
    <tr>
        <td>status</td>
        <td th:text="${status}"></td>
    </tr>
    <tr>
        <td>message</td>
        <td th:text="${message}"></td>
    </tr>
</table>
</body>
</html>
启动项目,访问 http://120.0.0.1:8080/hello 来验证。最终效果如下:
另外,如果静态/动态异常页面同时存在时,发生了 500 错误,优先级如下:查找动态 500.html –> 查找静态 500.html –> 查找动态 5xx.html –> 查找静态 5xx.html 。
3 自定义异常数据
默认情况下,异常数据只包括:path/error/message/timestamp/status ,它们被定义在 org.springframework.boot.web.reactive.error.DefaultErrorAttributes 类的 getErrorAttributes 方法中,源码如下:
@Override
public Map<String, Object> getErrorAttributes(ServerRequest request,
                boolean includeStackTrace) {
        Map<String, Object> errorAttributes = new LinkedHashMap<>();
        errorAttributes.put("timestamp", new Date());
        errorAttributes.put("path", request.path());
        Throwable error = getError(request);
        HttpStatus errorStatus = determineHttpStatus(error);
        errorAttributes.put("status", errorStatus.value());
        errorAttributes.put("error", errorStatus.getReasonPhrase());
        errorAttributes.put("message", determineMessage(error));
        handleException(errorAttributes, determineException(error), includeStackTrace);
        return errorAttributes;
}
上述 DefaultErrorAttributes 类是在 org.springframework.boot.autoconfigure.web.servlet.error.ErrorMvcAutoConfiguration 异常自动配置类中定义的,是 Spring Boot 默认提供的,我们可以自己提供 1 个 ErrorAttributes 实例来覆盖默认的,从而实现自定义异常数据,一般有两种方式:
- 实现
ErrorAttributes接口。 - 继承
DefaultErrorAttributes(推荐),这样的话DefaultErrorAttributes原来的那些配置都还有效。
在 src/main/java 下新建 MyErrorAttributes ,如下:
@Component
public class MyErrorAttribute extends DefaultErrorAttributes {
@Override
public Map<String, Object> getErrorAttributes(WebRequest webRequest, boolean includeStackTrace) {
Map<String, Object> map = super.getErrorAttributes(webRequest, includeStackTrace);
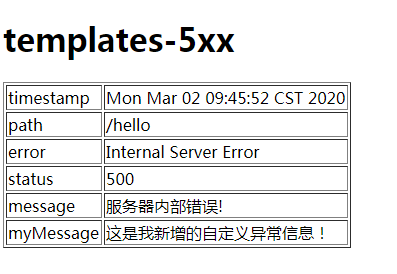
if ((Integer)map.get("status") == 500) {
map.put("message", "服务器内部错误!");
}
map.put("myMessage", "这是我新增的自定义异常信息!");
return map;
}
}
在 src/main/resources/templates/error 下修改 5xx.html ,增加如下展示内容:
<tr>
    <td>myMessage</td>
    <td th:text="${myMessage}"></td>
</tr>
启动项目,访问 http://120.0.0.1:8080/hello 来验证。最终效果如下:
4 自定义异常视图
默认的异常视图加载逻辑在 org.springframework.boot.autoconfigure.web.servlet.error.BasicErrorController 类的 errorHtml 方法中,这个方法用来返回异常页面 + 数据,还有另外一个 error 方法,这个方法用来返回异常数据(如果是 ajax 请求,则该方法会被触发)。
@RequestMapping(produces = MediaType.TEXT_HTML_VALUE)
public ModelAndView errorHtml(HttpServletRequest request,
                HttpServletResponse response) {
        HttpStatus status = getStatus(request);
        Map<String, Object> model = Collections.unmodifiableMap(getErrorAttributes(
                        request, isIncludeStackTrace(request, MediaType.TEXT_HTML)));
        response.setStatus(status.value());
        ModelAndView modelAndView = resolveErrorView(request, response, status, model);
        return (modelAndView != null) ? modelAndView : new ModelAndView("error", model);
}
在该方法中,首先会通过 getErrorAttributes 方法去获取异常数据(实际上会调用到 ErrorAttributes 实例的 getErrorAttributes 方法),然后调用 resolveErrorView 去创建一个 ModelAndView ,如果这里创建失败,那么用户将会看到默认的错误提示页面。正常情况下, resolveErrorView 方法会来到 DefaultErrorViewResolver 类中的 resolveErrorView 方法:
@Override
public ModelAndView resolveErrorView(HttpServletRequest request, HttpStatus status,
                Map<String, Object> model) {
        ModelAndView modelAndView = resolve(String.valueOf(status.value()), model);
        if (modelAndView == null && SERIES_VIEWS.containsKey(status.series())) {
                modelAndView = resolve(SERIES_VIEWS.get(status.series()), model);
        }
        return modelAndView;
}
这里先以异常响应码作为视图名分别去查找动态页面和静态页面,如果没有查找到,则再以 4xx 或者 5xx 作为视图名分别查找动态或者静态页面。
上述 DefaultErrorViewResolver 类是在 org.springframework.boot.autoconfigure.web.servlet.error.ErrorMvcAutoConfiguration 异常自动配置类中定义的,是 Spring Boot 默认提供的,我们可以自己提供 1 个 ErrorViewResolver 实例来覆盖默认的,从而实现自定义异常视图。
在 src/main/java 下新建 MyErrorViewResolver ,如下:
@Component
public class MyErrorViewResolver extends DefaultErrorViewResolver {
    public MyErrorViewResolver(ApplicationContext applicationContext, ResourceProperties resourceProperties) {
        super(applicationContext, resourceProperties);
    }

    @Override
    public ModelAndView resolveErrorView(HttpServletRequest request, HttpStatus status, Map<String, Object> model) {
        ModelAndView mv = new ModelAndView();
        // 对应视图:src/main/resources/templates/cxy35.html
        mv.setViewName("cxy35");
        mv.addAllObjects(model);
        return mv;
    }
}
其实在这里的 resolveErrorView 方法中也可以实现自定义异常数据。
在 src/main/resources/templates 下新建 cxy35.html ,如下:
<!DOCTYPE html>
<html lang="en" xmlns:th="http://www.thymeleaf.org">
<head>
    <meta charset="UTF-8">
    <title>Title</title>
</head>
<body>
<h1>templates/cxy35</h1>
<table border="1">
    <tr>
        <td>timestamp</td>
        <td th:text="${timestamp}"></td>
    </tr>
    <tr>
        <td>path</td>
        <td th:text="${path}"></td>
    </tr>
    <tr>
        <td>error</td>
        <td th:text="${error}"></td>
    </tr>
    <tr>
        <td>status</td>
        <td th:text="${status}"></td>
    </tr>
    <tr>
        <td>message</td>
        <td th:text="${message}"></td>
    </tr>
    <tr>
        <td>myMessage</td>
        <td th:text="${myMessage}"></td>
    </tr>
</table>
</body>
</html>
启动项目,访问 http://120.0.0.1:8080/hello 来验证。
- Spring Boot 教程合集(微信左下方阅读全文可直达)。
- Spring Boot 教程合集示例代码:https://github.com/cxy35/spring-boot-samples
- 本文示例代码:https://github.com/cxy35/spring-boot-samples/tree/master/spring-boot-web/spring-boot-exception
扫码关注微信公众号 程序员35 ,获取最新技术干货,畅聊 #程序员的35,35的程序员# 。独立站点:https://cxy35.com


 1265
1265

 被折叠的 条评论
为什么被折叠?
被折叠的 条评论
为什么被折叠?
 到【灌水乐园】发言


