百度地图里面,只有折线、多边形和圆形, 那么怎么去绘制矩形,并且实现矩形可以整体拖动呢?
首先,我们知道,矩形四个点的规律,分别是
左下角:{lng:this.mapCenter.lng - 0.01,lat:this.mapCenter.lat -0.01},
左上角:{lng:this.mapCenter.lng - 0.01,lat:this.mapCenter.lat + 0.01},
右上角:{lng:this.mapCenter.lng + 0.01,lat:this.mapCenter.lat + 0.01},
右下角:{lng:this.mapCenter.lng + 0.01,lat:this.mapCenter.lat - 0.01}
因此,可以通过这种方式去初始化一个正方形,如果你要自己去绘制的话,可以借助drawManage
编辑原理:
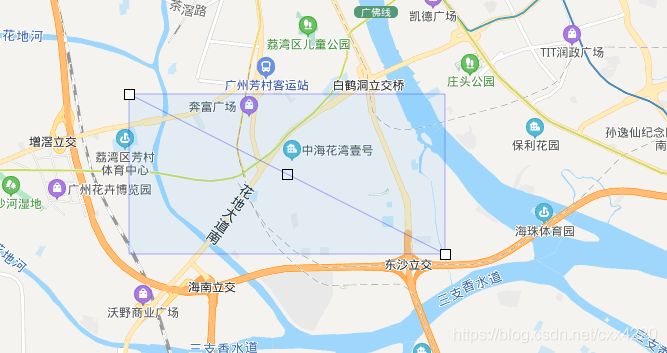
绘制出来的矩形如果随意编辑,就会变成多边形,因此,我们限制初始化的矩形不可编辑,给矩形添加一条对角线,通过编辑对角线,拖动对角线,让矩形根据对角线的变化来变化,实现举行的编辑,效果如图:
完整代码:
<div :style="{height: tableHeight + 'px'}">
<baidu-map style="height: 100%" class="map" :center="mapCenter" :zoom="18" :scroll-wheel-zoom="true"
@ready="handler" :map-click="false" @mousemove="moveEvent" :dragging="mapDragging">
<bm-polygon :path="overlays" stroke-color="#0000ff" :stroke-opacity="0.3" fill-color="#39B1FC" :fill-opacity="0.1"
:stroke-weight="1" :editing="false" @lineupdate="updatePolygonPath" @mouseover="mapDragging=false"
@mouseout="mapDragging=true"
@mousedown="areaDragging=true;mapDragging=false"
@mouseup="areaDragging=false"/>
<bm-polyline :path="polylinePath" stroke-color="#0000ff" :stroke-opacity="0.3" :stroke-weight="1" :editing="true"
@lineupdate="updatePolylinePath"></bm-polyline>
</baidu-map>
</div>
<script>
import {BaiduMap,BmPolyline,BmPolygon} from 'vue-baidu-map';
export default {
name: 'face',
components: {BaiduMap,BmPolyline,BmPolygon},
data() {
return {
mapDragging: true,//允许地图拖动
areaDragging: false,//允许区域拖动
mouseLocation: {lng: 0, lat: 0},
tableHeight: 500,
mapCenter: {lng: 113.23726062635106, lat: 23.09034633025317},
polylinePath: [],
overlays:[],
map: null
}
},
watch: {
},
computed: {},
methods: {
// 初始化地图
handler ({BMap, map}) {
map.getPanes().labelPane.className += 'image-container'; //在原来的后面加这个
this.map = map;
// 初始化一个矩形
this.overlays = [
{lng:this.mapCenter.lng - 0.01,lat:this.mapCenter.lat -0.01},
{lng:this.mapCenter.lng - 0.01,lat:this.mapCenter.lat + 0.01},
{lng:this.mapCenter.lng + 0.01,lat:this.mapCenter.lat + 0.01},
{lng:this.mapCenter.lng + 0.01,lat:this.mapCenter.lat - 0.01},
]
//初始化矩形对角线
this.polylinePath = [
{lng:this.mapCenter.lng + 0.01,lat:this.mapCenter.lat + 0.01},
{lng:this.mapCenter.lng - 0.01,lat:this.mapCenter.lat - 0.01}
]
},
/*更新矩形对角线 */
updatePolylinePath (e) {
this.polylinePath = e.target.getPath();
//对角线中间有可编辑点,也可以拖动进行编辑,为了防止异常,保证对角线始终是一条直线,我们只取折线的起点和终点两个点
this.polylinePath = [this.polylinePath[0],this.polylinePath[this.polylinePath.length-1]]
if(!this.polylinePath || !this.polylinePath.length){
return
}
let ysMarker = this.polylinePath[0]
let zxMarker = this.polylinePath[this.polylinePath.length-1]
// 根据对角线的两个点,计算出矩形的四点,更新矩形
this.overlays = [{
lat: ysMarker.lat,
lng: ysMarker.lng
},{
lat: ysMarker.lat,
lng: zxMarker.lng
},{
lat: zxMarker.lat,
lng: zxMarker.lng
},{
lat: zxMarker.lat,
lng: ysMarker.lng
}]
},
/**矩形拖动
* 计算出鼠标移动的起点和终点的位置,计算出经纬度差,再给原始矩形的四个点加上拖动的经纬度差
*/
moveEvent(e){
if(this.areaDragging){
if(this.mouseLocation.lng == 0 && this.mouseLocation.lat == 0){
this.mouseLocation.lng = e.point.lng
this.mouseLocation.lat = e.point.lat
return
}
const newLng = e.point.lng,
newLat = e.point.lat,
lngDiff = newLng - this.mouseLocation.lng,
latDiff = newLat - this.mouseLocation.lat
this.overlays.forEach((item)=>{
item.lng += lngDiff
item.lat += latDiff
item.lng = Math.floor(item.lng * 100000) / 100000
item.lat = Math.floor(item.lat * 100000) / 100000
})
this.polylinePath.forEach((item)=>{
item.lng += lngDiff
item.lat += latDiff
item.lng = Math.floor(item.lng * 100000) / 100000
item.lat = Math.floor(item.lat * 100000) / 100000
})
this.mouseLocation.lng = newLng
this.mouseLocation.lat = newLat
return
}
if(this.mouseLocation.lng != 0 || this.mouseLocation.lat != 0){
this.mouseLocation.lng = 0
this.mouseLocation.lat = 0
}
},
},
created() {
},
mounted() {
},
destroyed() {
}
}
</script>