


首先找到你需要用到的 backbone,一般有名的backbone 都会在github有相应的代码开源和预训练权重提供
本文以mobilenetv3 + fastercnn 作为举例,在mmdetection中并未提供 mobilenetv3,提供的仅有 mobilenetv2;
在github上找到 mobilenetv3 实现和权重,下载到本地;本文使用参考为:https://github.com/d-li14/mobilenetv3.pytorch
为了能够用在mmdetection体系中,我们要对代码进行修改,以适应mmdetection 配置式构建网络
如有问题,欢迎留言、或加群【392784757】交流
增加 init_weigths函数
 def init_weights(self, pretrained=None):
     logger = get_root_logger()
     if self.init_cfg is None and pretrained is None:
         logger.warn(f'No pre-trained weights for '
                     f'{self.__class__.__name__}, '
                     f'training start from scratch')
         pass
     else:
         assert 'checkpoint' in self.init_cfg, f'Only support ' \
                                               f'specify `Pretrained` in ' \
                                               f'`init_cfg` in ' \
                                               f'{self.__class__.__name__} '
         if self.init_cfg is not None:
             ckpt_path = self.init_cfg['checkpoint']
         elif pretrained is not None:
             ckpt_path = pretrained

         ckpt = _load_checkpoint(
             ckpt_path, logger=logger, map_location='cpu')
         if 'state_dict' in ckpt:
             _state_dict = ckpt['state_dict']
         elif 'model' in ckpt:
             _state_dict = ckpt['model']
         else:
             _state_dict = ckpt

         state_dict = _state_dict
         missing_keys, unexpected_keys = \
             self.load_state_dict(state_dict, False)
         logger.info(f"Miss {missing_keys}")
         logger.info(f"Unexpected {unexpected_keys}")
修改 模型参数列表
可以看到上面用到了 self.init_cfg ,但原始模型并没有,因此需要
修改模型参数列表,添加 init_cfg,out_indices,等
并初始化
修改forward 【结合模型特点、网络结构 进行修改,将out_indices 对应的输出取出来】
def forward(self, x):
        outs = []
        # x = self.features(x)
        for i,f in enumerate(self.features):
            x = f(x)
            if i in self.out_indices:
                outs.append(x)
        assert (len(outs) == 4)
        return outs
有些网络的实现并不是直接使用,而是使用配置,来提供不同类型的网络模型,这里就有 small large 两种
由于我们上面的 模型类 修改了参数列表,因此也需要对 这种二次配置的函数 参数列表进行修改 添加 init_cfg,out_indices 等,原有参数尽量保持不变
def mobilenetv3_large(pretrained=False, num_classes = 1000, distillation=False, init_cfg=None, out_indices=[],**kwargs):
    # ...
    cfgs = []
    return MobileNetV3(cfgs, mode='large',init_cfg=init_cfg, out_indices=out_indices,**kwargs)
添加注解
然后,我们要将他们添加到 mmdet 中的 registry 中,
mmdet提供了一种 装饰器的模式 用于将我们自定义的模型 加入到其中
# 导入
from mmdet.models.builder import BACKBONES,MODELS,Necks # 这里定义了mmdetection 的各种组件

# 添加 注解
@BACKBONES.register_module()
def mobilenetv3_large():
    #...

@BACKBONES.register_module()
def mobilenetv3_small():
    #...
这个时候,我们的文件基本修改完成
注意事项
注意这个时候 其实只是配置完成,但在运行时 不会真正加载到 registry 中 ,运行就会发现报错
'mobilenetv3_large is not in the models registry'"
解决方法 就是运行时引入,在train.py 导入这个文件
import mobilenetv3
我在配置时就遇到了这样情况,感谢 https://blog.youkuaiyun.com/Kiki_soda/article/details/137491803 提醒
debug
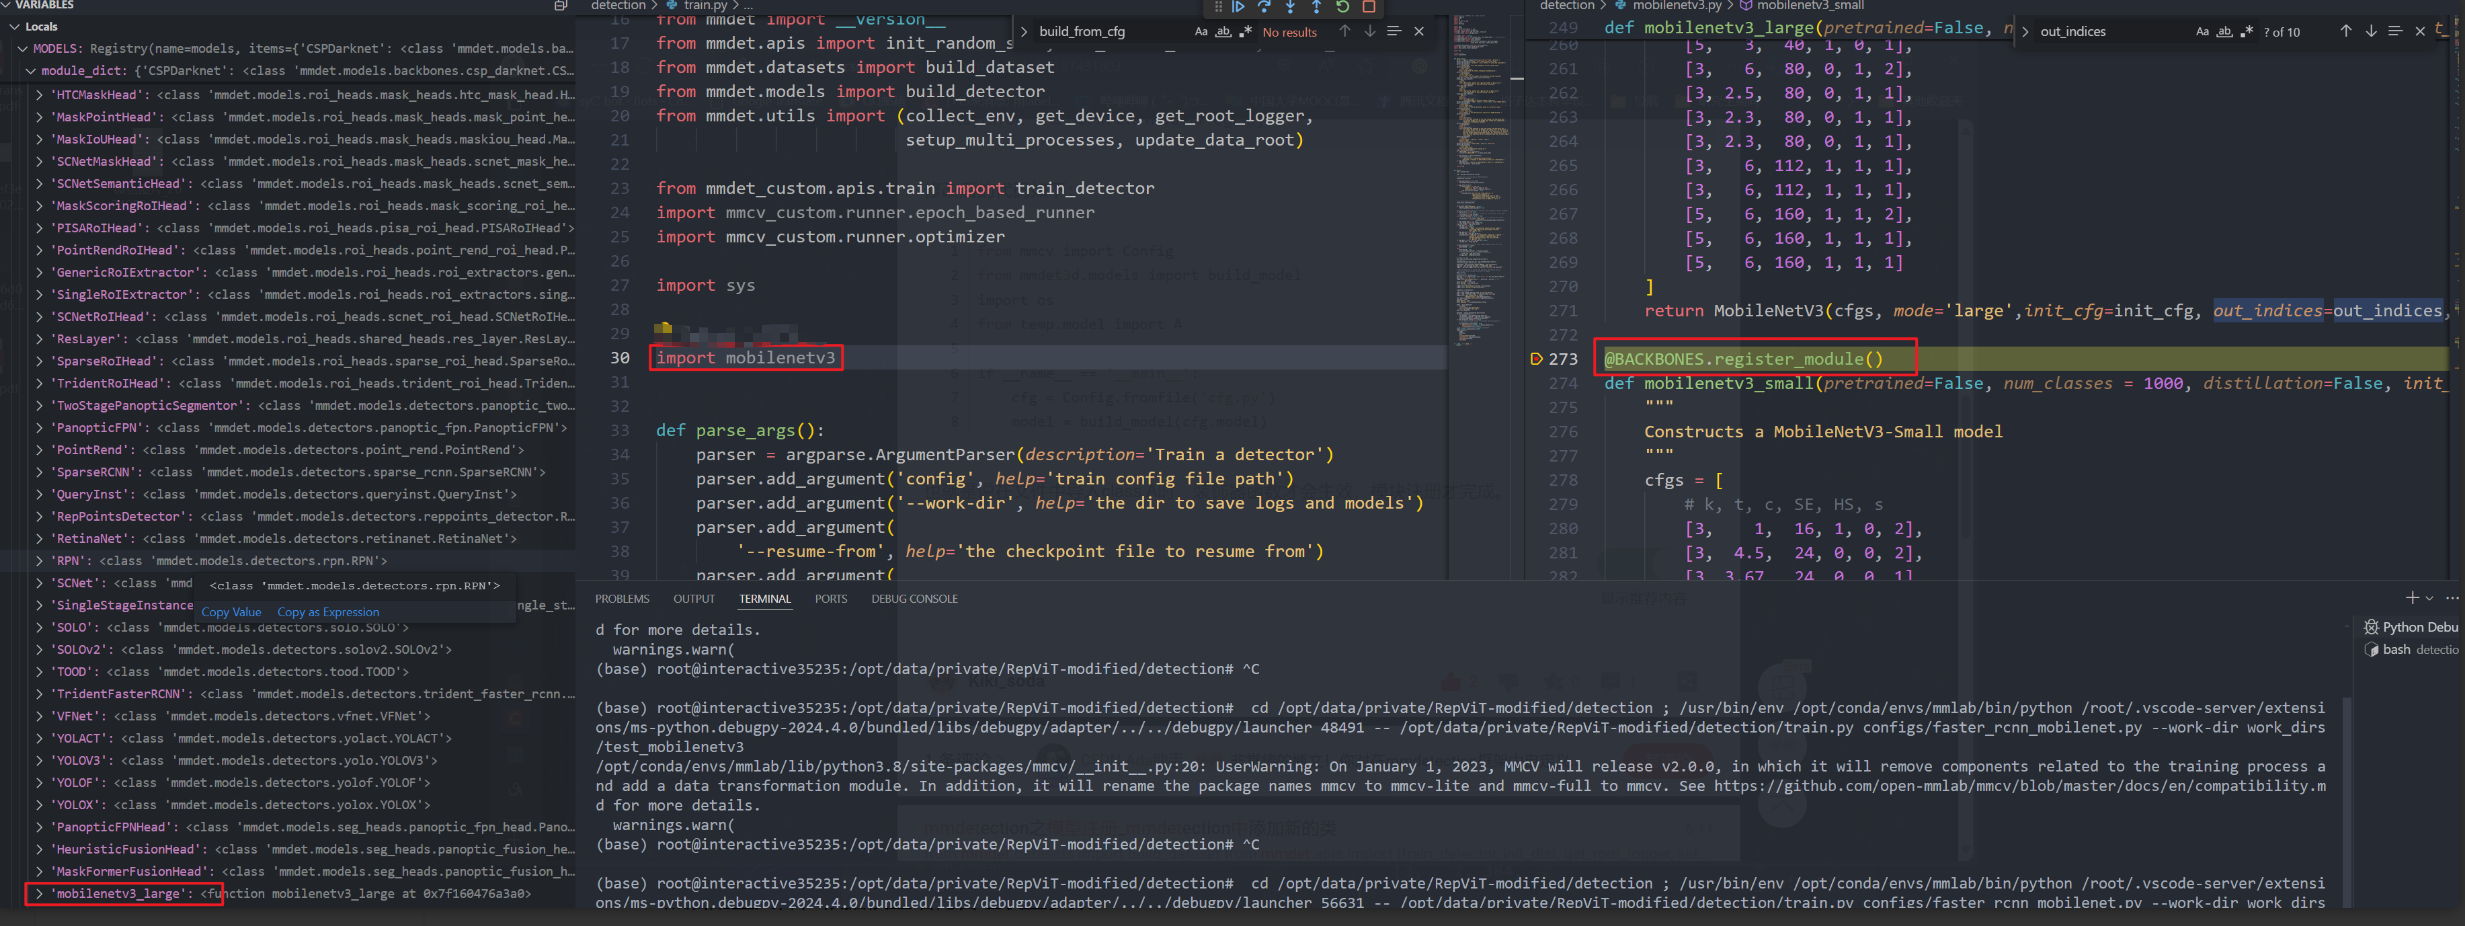
可以看到 我们的模型已经被加载进去
其他方法
官方提供的方法
- 一种是 修改源码层中的 init 文件,这个也要求你的mobilenet文件也要定义在源码文件中
- 使用一种 custom_imports 【尝试未成功】
具体参考官方文档 https://mmdetection.readthedocs.io/zh-cn/v2.21.0/tutorials/customize_models.html
配置文件
然后配置文件,根据模型结构合理设置参数
_base_ = [
    './_base_/models/faster_rcnn_r50_fpn.py',
    './_base_/datasets/coco_detection.py',
    './_base_/schedules/schedule_1x.py', './_base_/default_runtime.py'
]


model = dict(
    backbone=dict(
        type='mobilenetv3_large',
        init_cfg=dict(
            type='Pretrained',
            checkpoint='pretrain/mobilenetv3-large-1cd25616.pth', # 预训练权重位置
        ),
        out_indices = [2, 5, 9, 14], # 根据模型来设置
    ),
    neck=dict(
        type='FPN',
        in_channels=[24, 40, 80, 160], # 根据模型来设置 和out_indices 对应
        out_channels=256, # 修改这个会牵动 下面很多配置; 如需修改 其他后续参数也需修改
        num_outs=5))
完成!就可以开始训练了
对于如何设置 out_indices,可以参考 timm 提供的模型 特征输出情况,进而设置
参考:
https://blog.youkuaiyun.com/Kiki_soda/article/details/137491803
https://mmdetection.readthedocs.io/zh-cn/v2.21.0/tutorials/customize_models.html
https://www.cnblogs.com/qiulinzhang/p/12252033.html


 1562
1562


 到【灌水乐园】发言


