


 本文介绍了在微服务架构中如何处理高并发查询操作,避免多表联查,并通过服务间调用来实现业务逻辑。重点讲述了在文章列表展示时,如何在【user】服务中创建接口查询用户信息,然后在【article】服务中通过远程调用获取用户昵称和头像,以此提高系统性能和解耦。
说明:
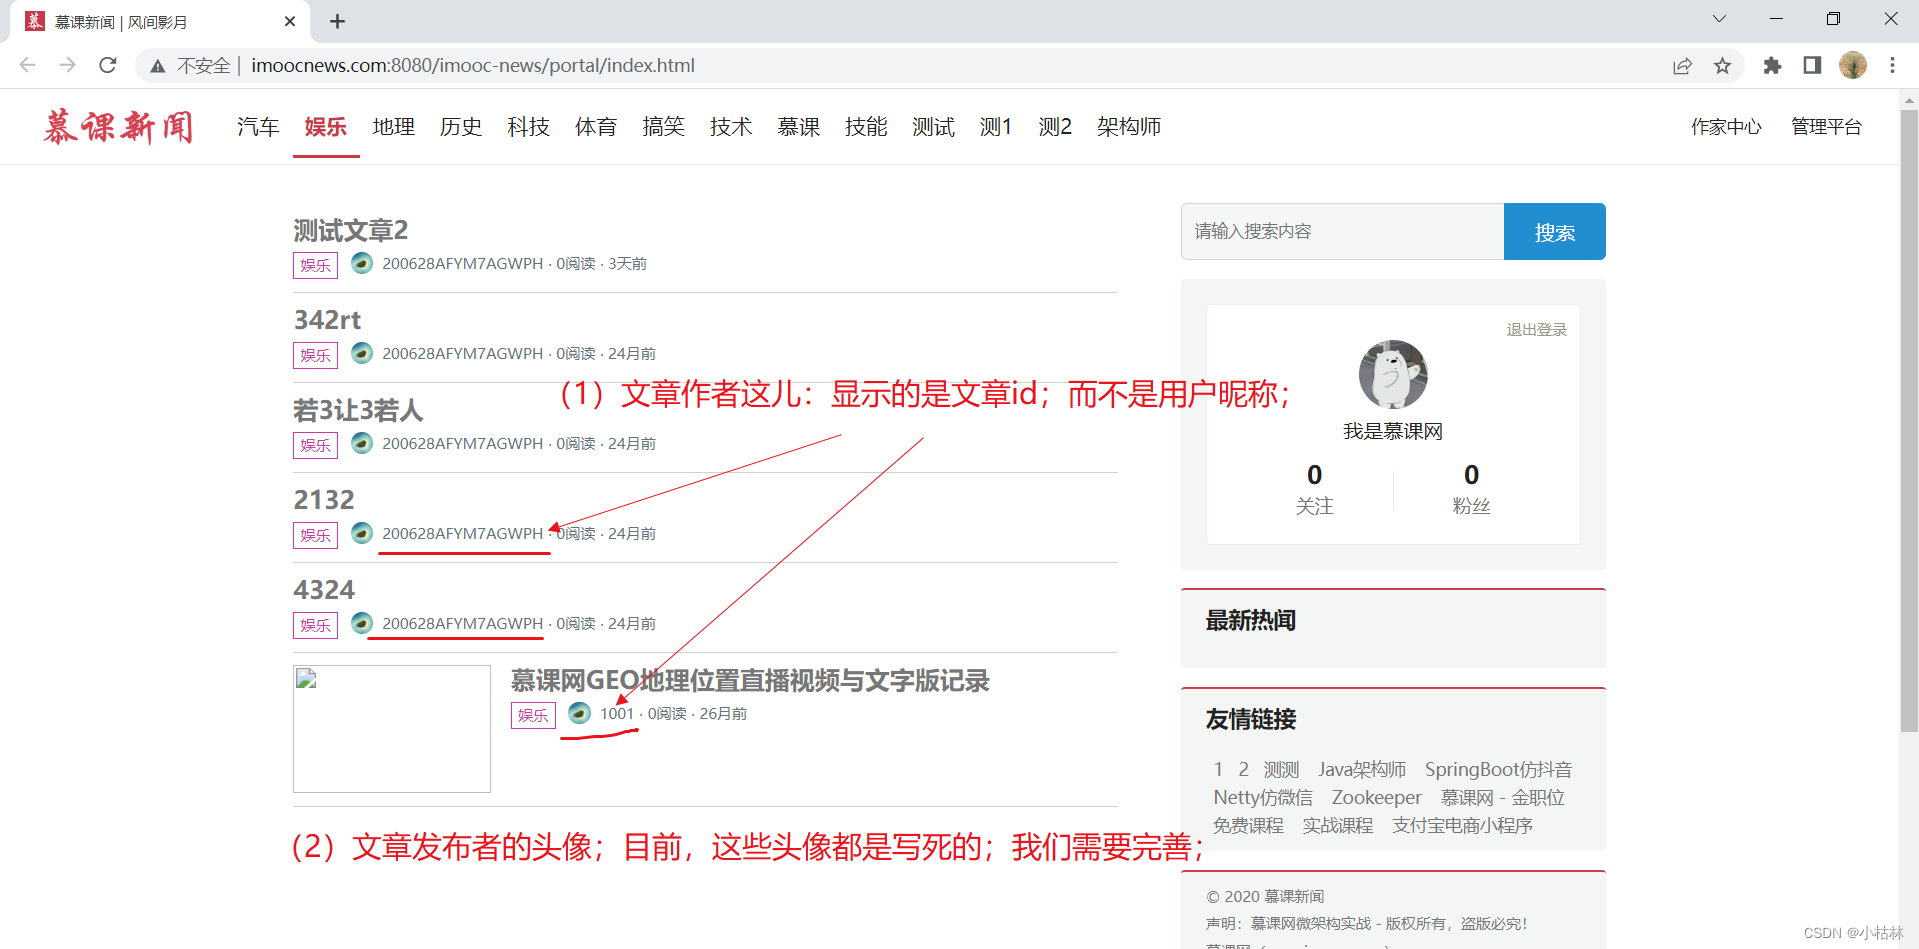
(1)本篇博客内容:完善"前台首页(根据条件)展示文章列表",显示用户昵称和头像;
(2)本篇博客需要注意的点:
● 一些需要查询多张表的业务,如果该业务并发量很高的话;尽量不要直接去数据库多表查询;而应该在业务层对其进行分开查询,然后在合并;
● 服务远程调用;
目录
二:开发方式,分析:(1)不建议多表关联查询,而应该在业务代码中处理;(2)不同服务之间边界要明确,所以要通过服务之间的调用,来实现一些复杂业务;
三:在【user】用户服务中,编写一个【根据用户ids,查询用户的接口】;(这个接口,会被【article】文章服务调用)
1.在【api】接口工程的UserControllerApi接口中,定义一个【根据用户ids,查询用户的接口】;
2.在【user】用户服务的UserController类中,去实现【根据用户ids,查询用户的接口】;
四:在【article】文章服务的【前台门户端,查询文章列表,接口】处,去调用在【user】用户服务中编写的【根据用户ids,查询用户的接口】:即发起一个远程调用;
1.首先,需要在【article】文章服务的ArticlePortalController类中,注入RestTemplate对象;
2.去远程调用在【user】用户服务中编写的【根据用户ids,查询用户的接口】;然后,再拼凑返回给前端的值;
一:本篇博客内容:
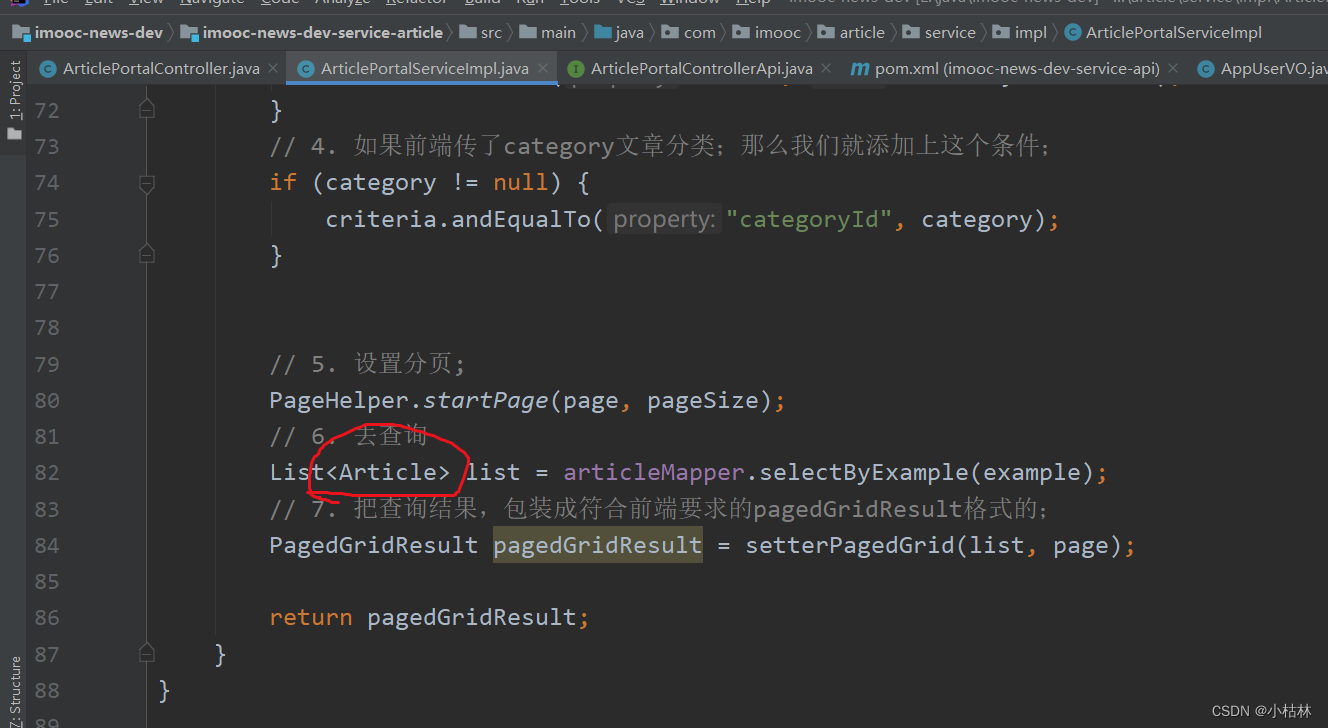
二:开发方式,分析:(1)不建议多表关联查询,而应该在业务代码中处理;(2)不同服务之间边界要明确,所以要通过服务之间的调用,来实现一些复杂业务;
(1)针对我们这儿的业务,一般来说,可以做一个多表关联查询;
(2)但是在【82:第七章:开发前台首页、作家个人展示页、粉丝等功能:3:前台首页(根据条件)展示文章列表;】我们仅仅是堆article表做了单表查询;
(3)其实,对于那种并发量很大(千万及以上)的查询,一般不建议多表关联查询;有的公司规定,面对这种高并发量的查询业务,如果非得要关联查询数据表,尽量不要超过2张或者3张表;
(4)一个做法是:先对article表做单表查询;然后,在根据查出来的publist_user_id去查app_user表;然后,我们在Service层或者Controller层把两次查询的结果作合并处理;(关于这一点:以前自己做其他项目的时候,已经意识到并应用这个处理方式)
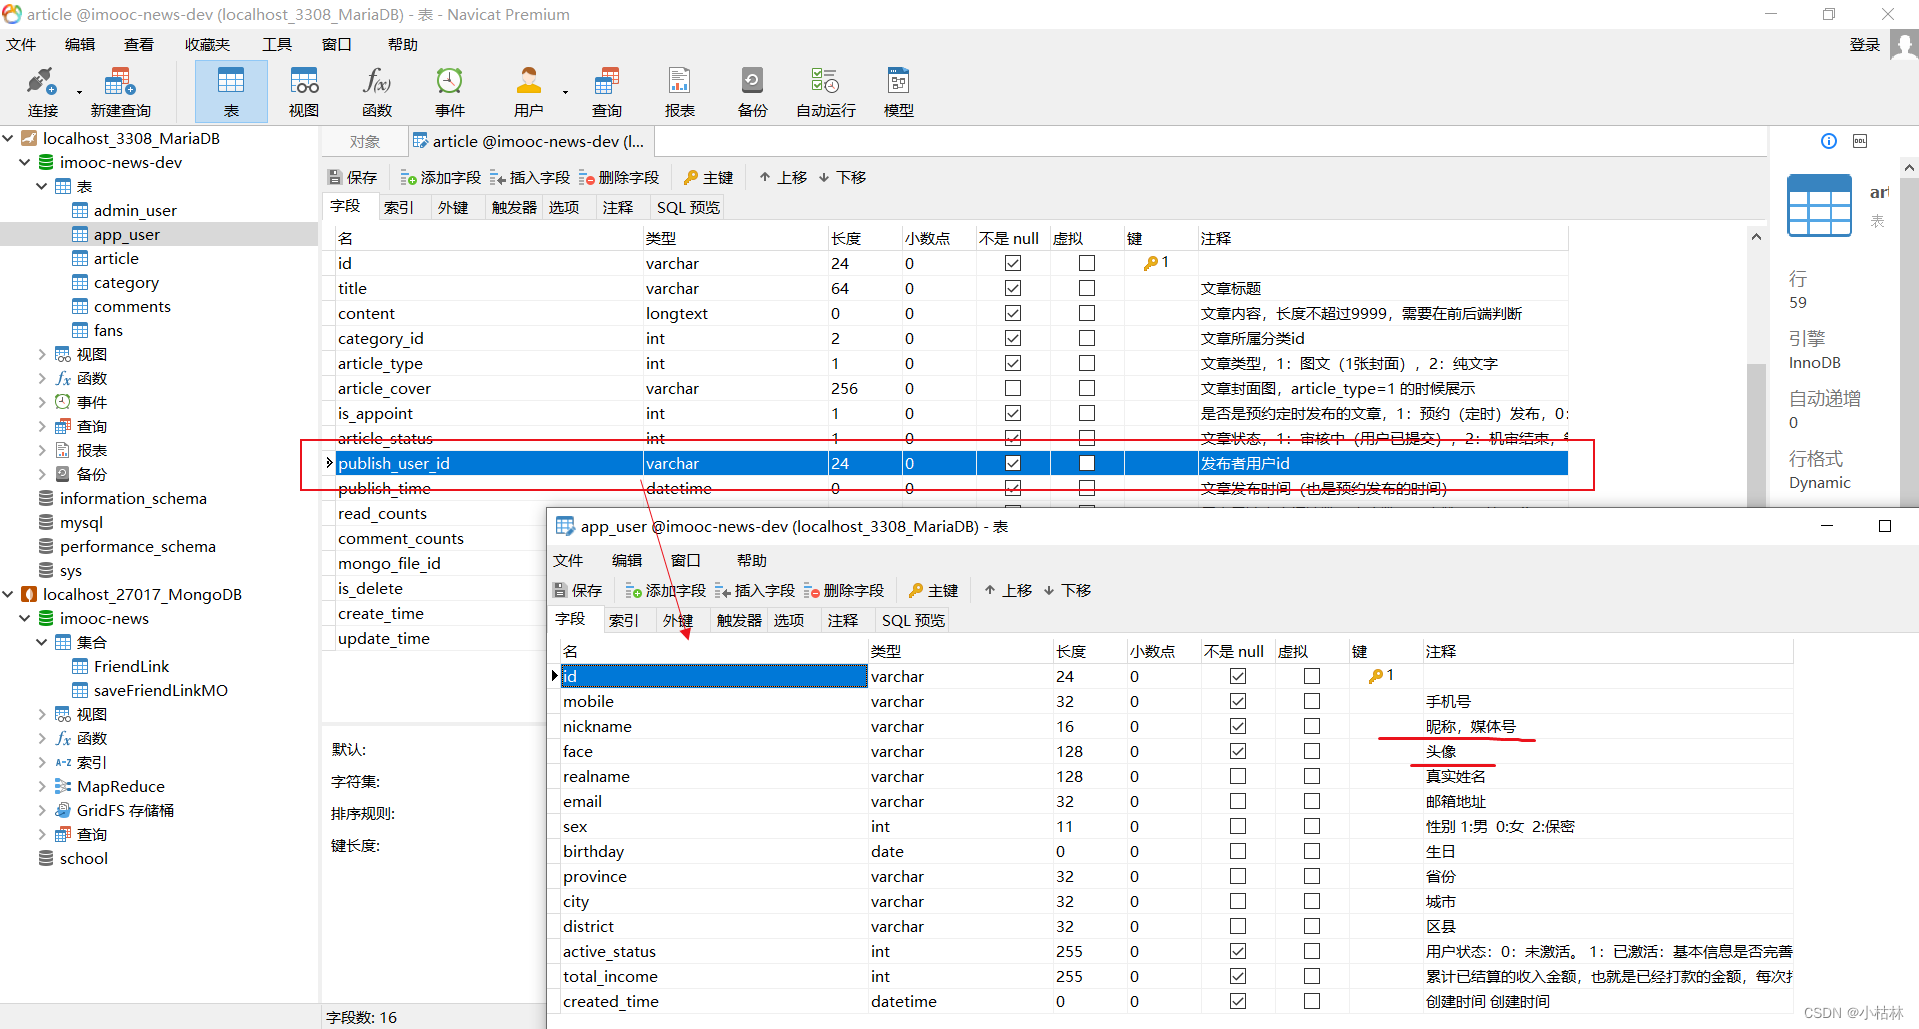
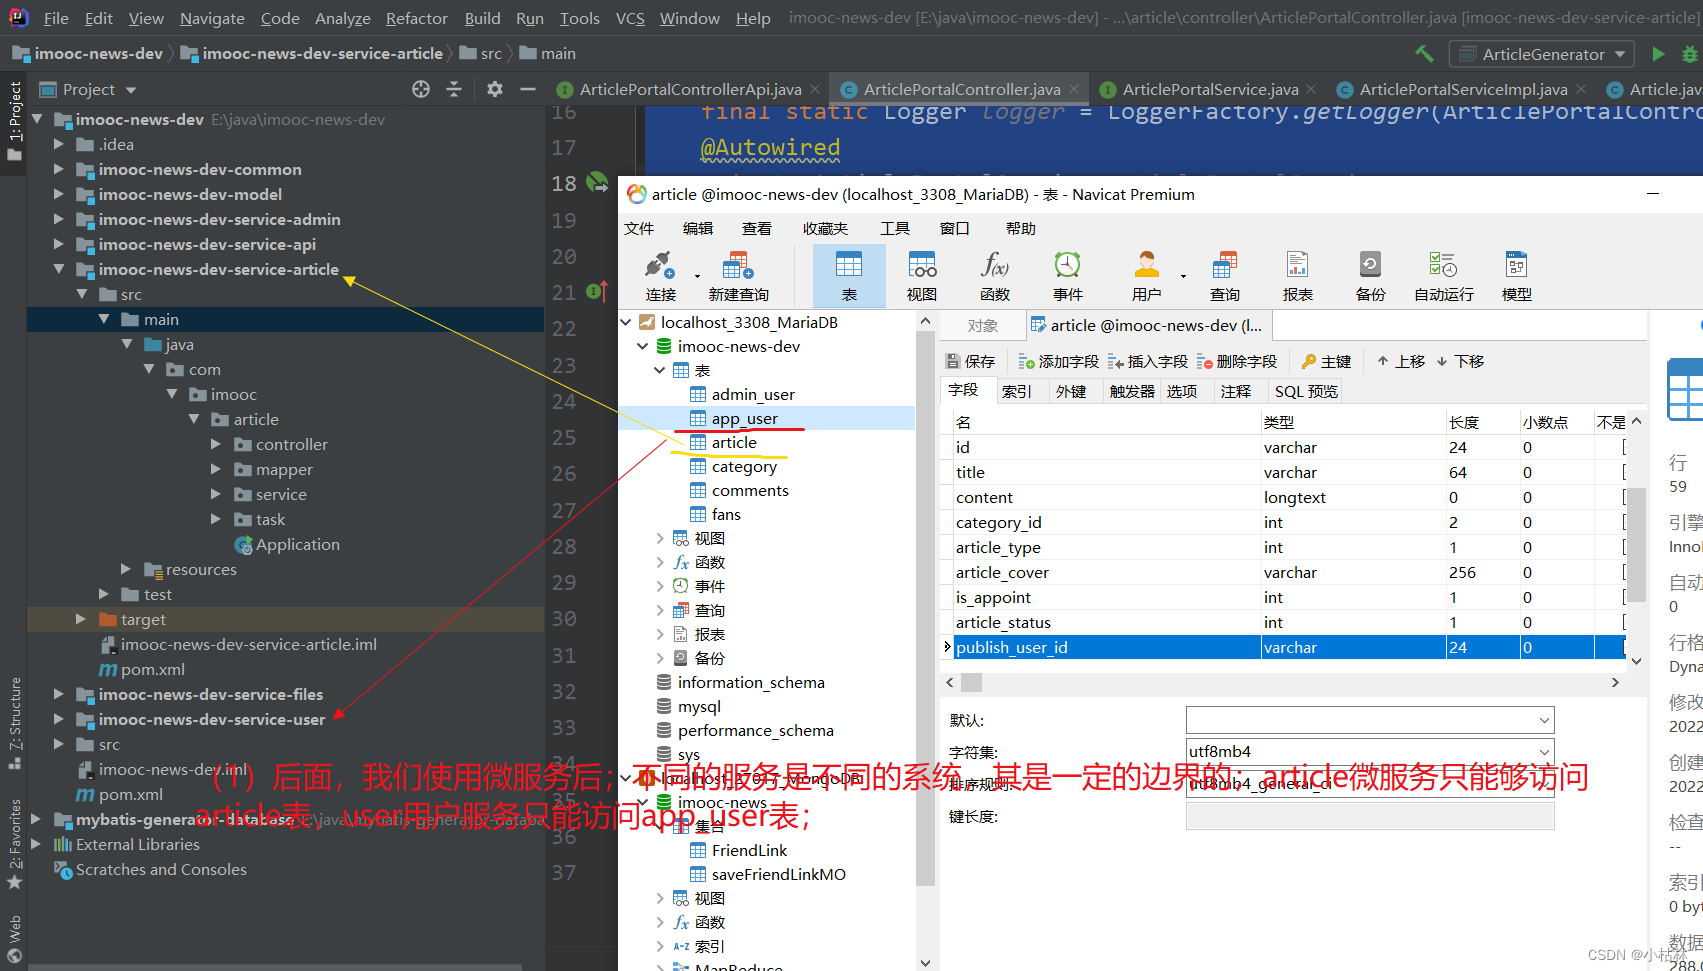
(5)同时,在微服务规定下,我们也不应该在【article】文章微服务中去访问app_user表;
● 哪些微服务,可以访问哪些表,是有一定的限制的;
● 所以,正确的做法是:在【article】文章微服务中发起一个新的远程调用,去调用【user】用户服务中的相关接口;
三:在【user】用户服务中,编写一个【根据用户ids,查询用户的接口】;(这个接口,会被【article】文章服务调用)
1.在【api】接口工程的UserControllerApi接口中,定义一个【根据用户ids,查询用户的接口】;
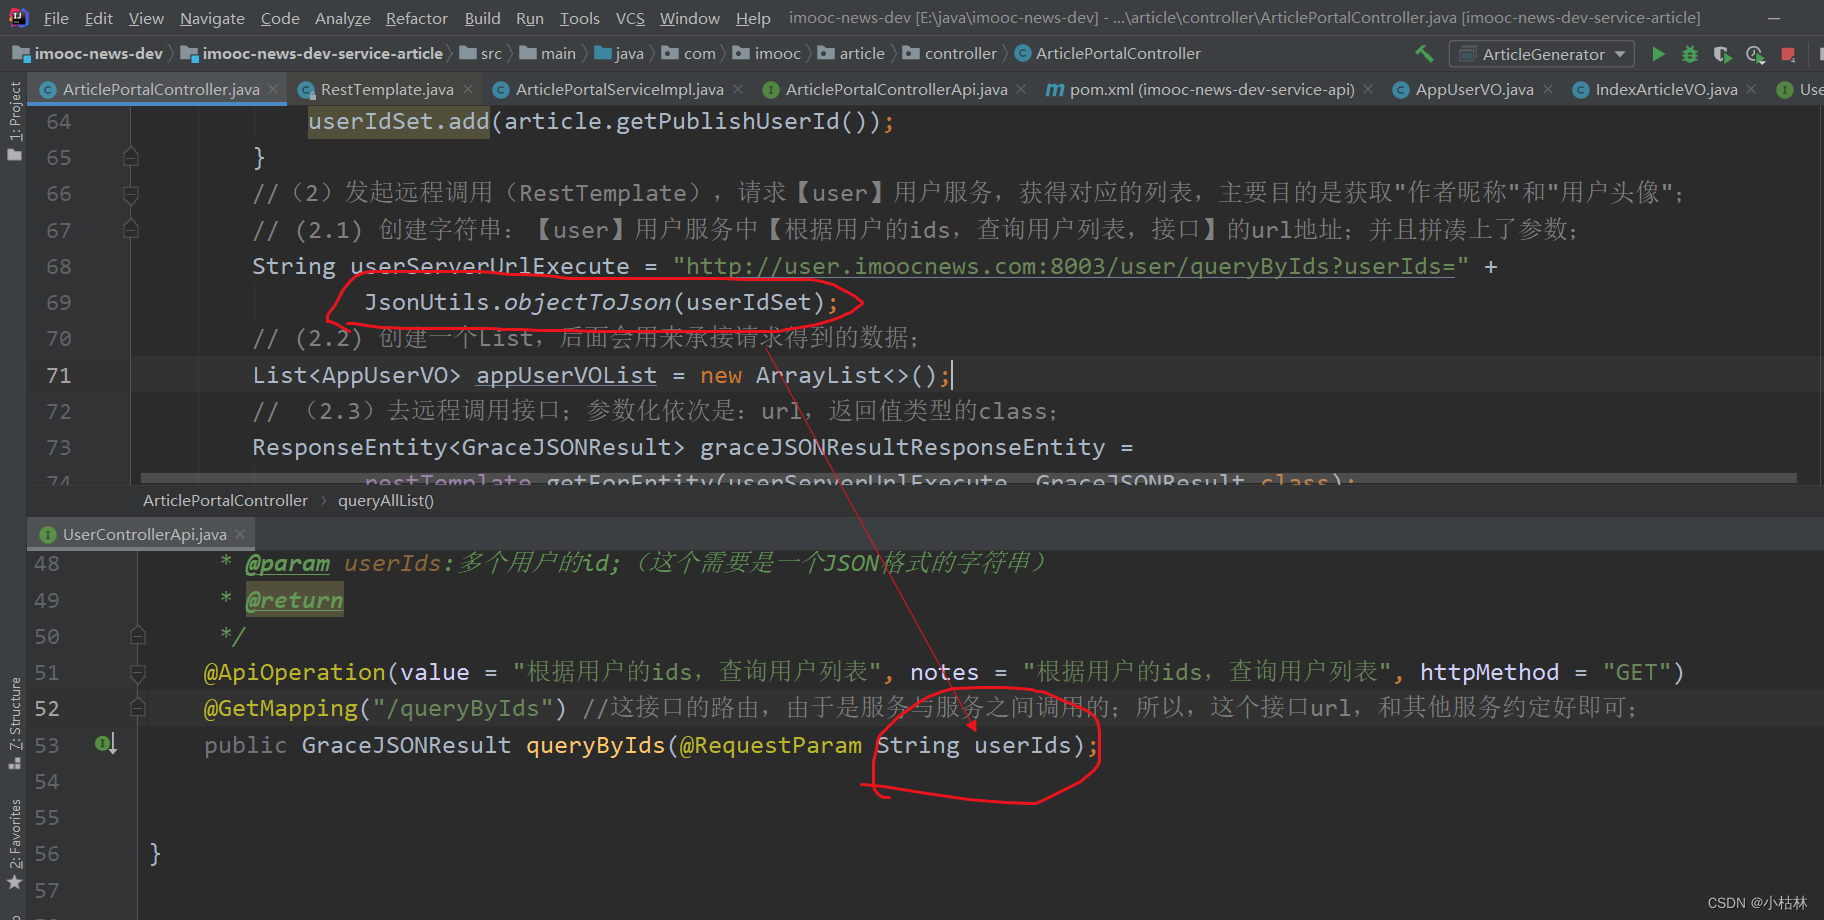
    /**
     * 【根据用户的ids,查询用户列表,接口】
     * @param userIds:多个用户的id;(这个需要是一个JSON格式的字符串)
     * @return
     */
    @ApiOperation(value = "根据用户的ids,查询用户列表", notes = "根据用户的ids,查询用户列表", httpMethod = "GET")
    @GetMapping("/queryByIds") //这接口的路由,由于是服务与服务之间调用的;所以,这个接口url,和其他服务约定好即可;
    public GraceJSONResult queryByIds(@RequestParam String userIds);
2.在【user】用户服务的UserController类中,去实现【根据用户ids,查询用户的接口】;
    /**
     * 【根据用户的ids,查询用户列表,接口】
     * @param userIds:多个用户的id;
     * @return
     */
    @Override
    public GraceJSONResult queryByIds(String userIds) {
        if (StringUtils.isBlank(userIds)) {
            //如果传的参数为空;直接返回给调用方,一个信息是"用户不存在!"的GraceJSONResult;
            return GraceJSONResult.errorCustom(ResponseStatusEnum.USER_NOT_EXIT_ERROR);
        }

        /**
         * 1. 创建List<AppUserVO>;
         * AppUserVO是我们创建的、包含一些用户的非隐私的(可以给其他人看的)信息的实体类;
         */
        List<AppUserVO> list = new ArrayList<>();
        /**
         * 2.利用JsonUtils工具类的方法,JSON格式的、多个用户id的ids,转成List<String>;
         * 这样一来,List<String>中每一个元素,都是一个用户id
         */
        List<String> userIdList = JsonUtils.jsonToList(userIds, String.class);

        /**
         * 遍历所有的用户id,去查询用户信息;并放入到List<AppUserVO> 中;
         */
        for (String userId : userIdList) {
            AppUserVO appUserVO = getBasicUserInfo(userId);
            list.add(appUserVO);
        }

        return GraceJSONResult.ok(list);
    }

    /**
     * 工具方法:根据userId,查询该用户的基本信息;(包含一些用户的非隐私的(可以给其他人看的)信息;即AppUserVO)
     * @param userId
     * @return
     */
    private AppUserVO getBasicUserInfo(String userId) {
        // 根据userId,去查询用户信息;
        AppUser user = getUser(userId);//自然,这儿我么也是利用redis的了;
        // 把user中的【user和appUserVO,共有的属性的,属
        AppUserVO appUserVO = new AppUserVO();
        BeanUtils.copyProperties(user,appUserVO);
        return appUserVO;
    }
说明:
(1) 根据用户id查询用户基本信息的功能,我们单独抽成了一个方法;
(2)该接口如果处理成功,其返回的具体数据就是List<AppUserVO>;
四:在【article】文章服务的【前台门户端,查询文章列表,接口】处,去调用在【user】用户服务中编写的【根据用户ids,查询用户的接口】:即发起一个远程调用;
在【58:第五章:开发admin管理服务:11:开发【管理员人脸登录,接口】;(未实测)(使用了阿里AI人脸识别)(演示了,使用RestTemplate实现接口调用接口;)】中,第一次演示了接口调用和RestTemplate;可以去参考;
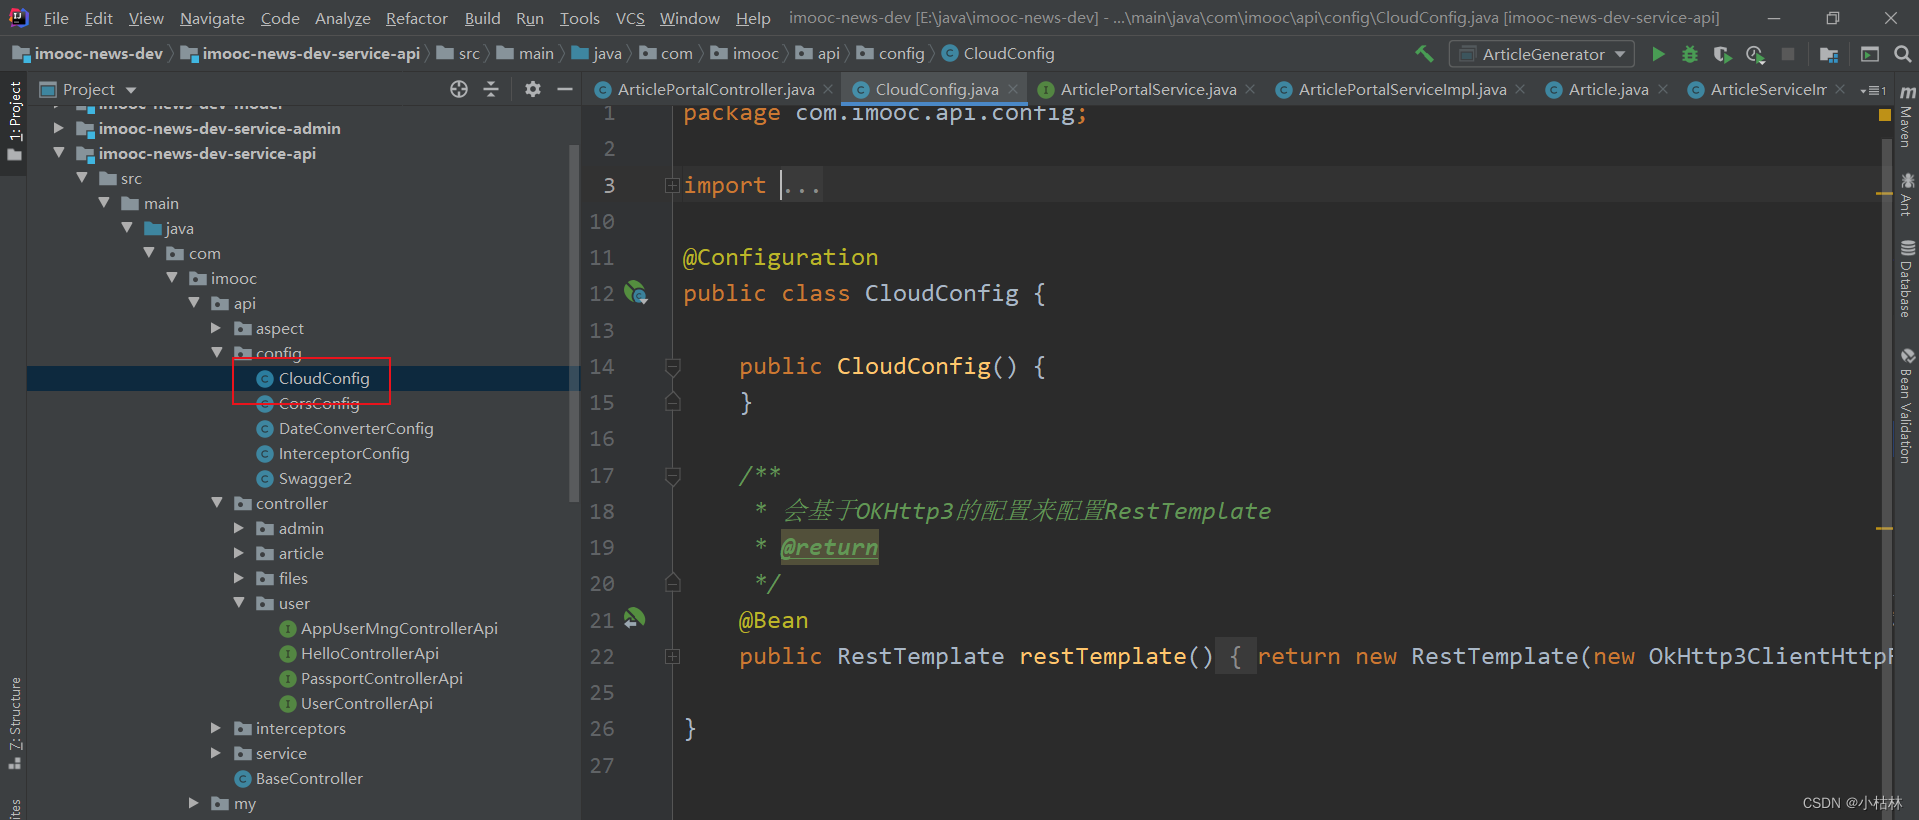
1.首先,需要在【article】文章服务的ArticlePortalController类中,注入RestTemplate对象;
    @Autowired
    private RestTemplate restTemplate;
我们需要在【api】接口工程中,创建CloudConfig类:实例化一个RestTemplate对象,到IoC容器中;
2.去远程调用在【user】用户服务中编写的【根据用户ids,查询用户的接口】;然后,再拼凑返回给前端的值;
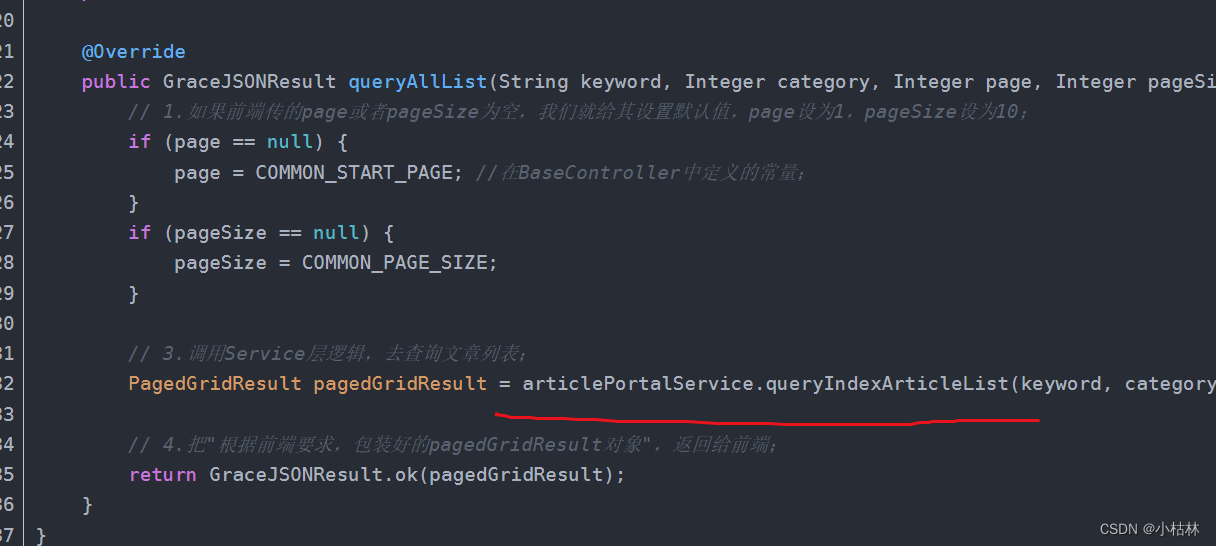
【前台门户端,根据条件,查询文章列表,接口;】 完善后,如下;
 @Override
    public GraceJSONResult queryAllList(String keyword, Integer category, Integer page, Integer pageSize) {
        // 1.如果前端传的page或者pageSize为空,我们就给其设置默认值,page设为1,pageSize设为10;
        if (page == null) {
            page = COMMON_START_PAGE; //在BaseController中定义的常量;
        }
        if (pageSize == null) {
            pageSize = COMMON_PAGE_SIZE;
        }

        // 3.调用Service层逻辑,去查询文章列表;
        PagedGridResult pagedGridResult = articlePortalService.queryIndexArticleList(keyword, category, page, pageSize);

        // START:完善文章列表查询结果中的"作者昵称"和"用户头像";
        // (1) 构建id列表;
        // (1.1)首先,从PagedGridResult分页对象中,获取具体的文章数据的List;
        List<Article> list = (List<Article>) pagedGridResult.getRows();
        // (1.2)因为,有的文章的作者,可能一样;所以,这儿我么利用set,去重获取文章的作者id;
        Set userIdSet = new HashSet();
        for (Article article : list) {
            userIdSet.add(article.getPublishUserId());
        }
        //(2)发起远程调用(RestTemplate),请求【user】用户服务,获得对应的列表,主要目的是获取"作者昵称"和"用户头像";
        // (2.1) 创建字符串:【user】用户服务中【根据用户的ids,查询用户列表,接口】的url地址;并且拼凑上了参数;
        String userServerUrlExecute = "http://user.imoocnews.com:8003/user/queryByIds?userIds=" +
                JsonUtils.objectToJson(userIdSet);
        // (2.2) 创建一个List,后面会用来承接请求得到的数据;
        List<AppUserVO> appUserVOList = new ArrayList<>();
        // (2.3)去远程调用接口;参数化依次是:url,返回值类型的class;
        ResponseEntity<GraceJSONResult> graceJSONResultResponseEntity =
                restTemplate.getForEntity(userServerUrlExecute, GraceJSONResult.class);
        //(2.4)从接口返回中,获取body;
        GraceJSONResult bodyResult = graceJSONResultResponseEntity.getBody();
        // (2.5)如果响应是200,则表示请求成功;
        if (bodyResult.getStatus() == 200) {
            /**
             * 从响应body中,获取数据(这个数据的类型是Object类型的);
             * 我们先把这个Object类型的对象,转成JSON;;;然后再把JSON字符串,转成List<AppUserVO>;
             */
            String userJson = JsonUtils.objectToJson(bodyResult.getData());
            appUserVOList = JsonUtils.jsonToList(userJson, AppUserVO.class);
        }
        //(3)根据业务需求,重新组装返回给前端的文章列表(主要目的是把"作者昵称"和"用户头像"设置进去)
        List<IndexArticleVO> indexArticleVOList = new ArrayList<>();

        //循环遍历List<Article>
        for (Article a : list) {
            IndexArticleVO indexArticleVO = new IndexArticleVO();
            BeanUtils.copyProperties(a, indexArticleVO);
            //从List<AppUserVO>中,获取属于该用户的基本信息;
            AppUserVO appUserVO = getUserIfPublisher(a.getPublishUserId(), appUserVOList);

            //然后,把用户基本信息拼凑到indexArticleVO上去;
            indexArticleVO.setPublisherVO(appUserVO);
            indexArticleVOList.add(indexArticleVO);
        }
        //(4)最后,我们需要重新指定pagedGridResult分页对象的rows;(具体,前端拿到List<IndexArticleVO>后,如何渲染展示,可以暂不必深究)
        pagedGridResult.setRows(indexArticleVOList);
        // END

        // 4.把"根据前端要求,包装好的pagedGridResult对象",返回给前端;
        return GraceJSONResult.ok(pagedGridResult);
    }

    /**
     * 工具方法:根据用户id,从List<AppUserVO>中找到该用户的那条AppUserVO
     * @param publisherId
     * @param list
     * @return
     */
    private AppUserVO getUserIfPublisher(String publisherId,List<AppUserVO> list) {
        for (AppUserVO appUserVO : list) {
            if (appUserVO.getId().equalsIgnoreCase(publisherId)) {
                return appUserVO;
            }
        }
        return null;
    }
说明:
(1)基本逻辑阐述如下:
(1.1)原先,我们返回给前端的是List<Article>;
● 自然,Article中,内容是用户id,即publishUserId;而不是用户昵称;而且,Article中也没有用户头像;;;所以,我们此时,返回给前端的值,就需要改变一下了;
(1.2)具体的用户昵称和用户头像,我们在【user】用户服务中,已经编写了一个【根据用户ids,查询用户的接口】,这个接口可以根据多个用户ids,获取一个List<AppUserVO>;
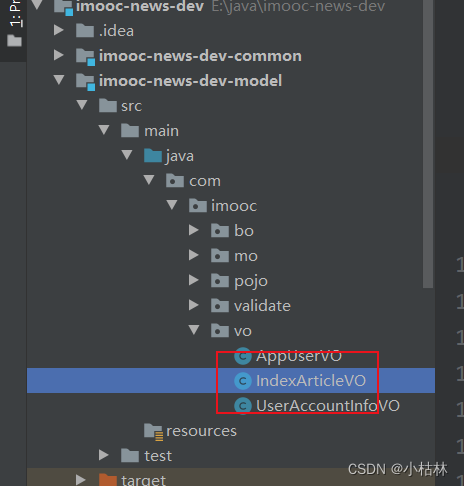
(1.3)然后,为了满足前端的需求,我们在【model】模型工程中,创建IndexArticleVO类;
package com.imooc.vo;

import javax.persistence.Column;
import javax.persistence.Id;
import java.util.Date;

public class IndexArticleVO {

    private String id;
    private String title;
    private Integer categoryId;
    private Integer articleType;
    private String articleCover;
    private Integer isAppoint;
    private Integer articleStatus;
    private String publishUserId;
    private Date publishTime;
    private Integer readCounts;
    private Integer commentCounts;
    private String mongoFileId;
    private Integer isDelete;
    private Date createTime;
    private Date updateTime;
    private String content;

    private AppUserVO publisherVO;

    public String getId() {
        return id;
    }

    public void setId(String id) {
        this.id = id;
    }

    public String getTitle() {
        return title;
    }

    public void setTitle(String title) {
        this.title = title;
    }

    public Integer getCategoryId() {
        return categoryId;
    }

    public void setCategoryId(Integer categoryId) {
        this.categoryId = categoryId;
    }

    public Integer getArticleType() {
        return articleType;
    }

    public void setArticleType(Integer articleType) {
        this.articleType = articleType;
    }

    public String getArticleCover() {
        return articleCover;
    }

    public void setArticleCover(String articleCover) {
        this.articleCover = articleCover;
    }

    public Integer getIsAppoint() {
        return isAppoint;
    }

    public void setIsAppoint(Integer isAppoint) {
        this.isAppoint = isAppoint;
    }

    public Integer getArticleStatus() {
        return articleStatus;
    }

    public void setArticleStatus(Integer articleStatus) {
        this.articleStatus = articleStatus;
    }

    public String getPublishUserId() {
        return publishUserId;
    }

    public void setPublishUserId(String publishUserId) {
        this.publishUserId = publishUserId;
    }

    public Date getPublishTime() {
        return publishTime;
    }

    public void setPublishTime(Date publishTime) {
        this.publishTime = publishTime;
    }

    public Integer getReadCounts() {
        return readCounts;
    }

    public void setReadCounts(Integer readCounts) {
        this.readCounts = readCounts;
    }

    public Integer getCommentCounts() {
        return commentCounts;
    }

    public void setCommentCounts(Integer commentCounts) {
        this.commentCounts = commentCounts;
    }

    public String getMongoFileId() {
        return mongoFileId;
    }

    public void setMongoFileId(String mongoFileId) {
        this.mongoFileId = mongoFileId;
    }

    public Integer getIsDelete() {
        return isDelete;
    }

    public void setIsDelete(Integer isDelete) {
        this.isDelete = isDelete;
    }

    public Date getCreateTime() {
        return createTime;
    }

    public void setCreateTime(Date createTime) {
        this.createTime = createTime;
    }

    public Date getUpdateTime() {
        return updateTime;
    }

    public void setUpdateTime(Date updateTime) {
        this.updateTime = updateTime;
    }

    public String getContent() {
        return content;
    }

    public void setContent(String content) {
        this.content = content;
    }

    public AppUserVO getPublisherVO() {
        return publisherVO;
    }

    public void setPublisherVO(AppUserVO publisherVO) {
        this.publisherVO = publisherVO;
    }
}
● 即,此时我们返回给前端的内容,需要是List<IndexArticleVO> ;
(1.4)所以根据【我们原先查出来的List<Article>】和【调用user服务的接口,得到的List<AppUserVO>】来组装List<IndexArticleVO>;是这儿的主要内容;
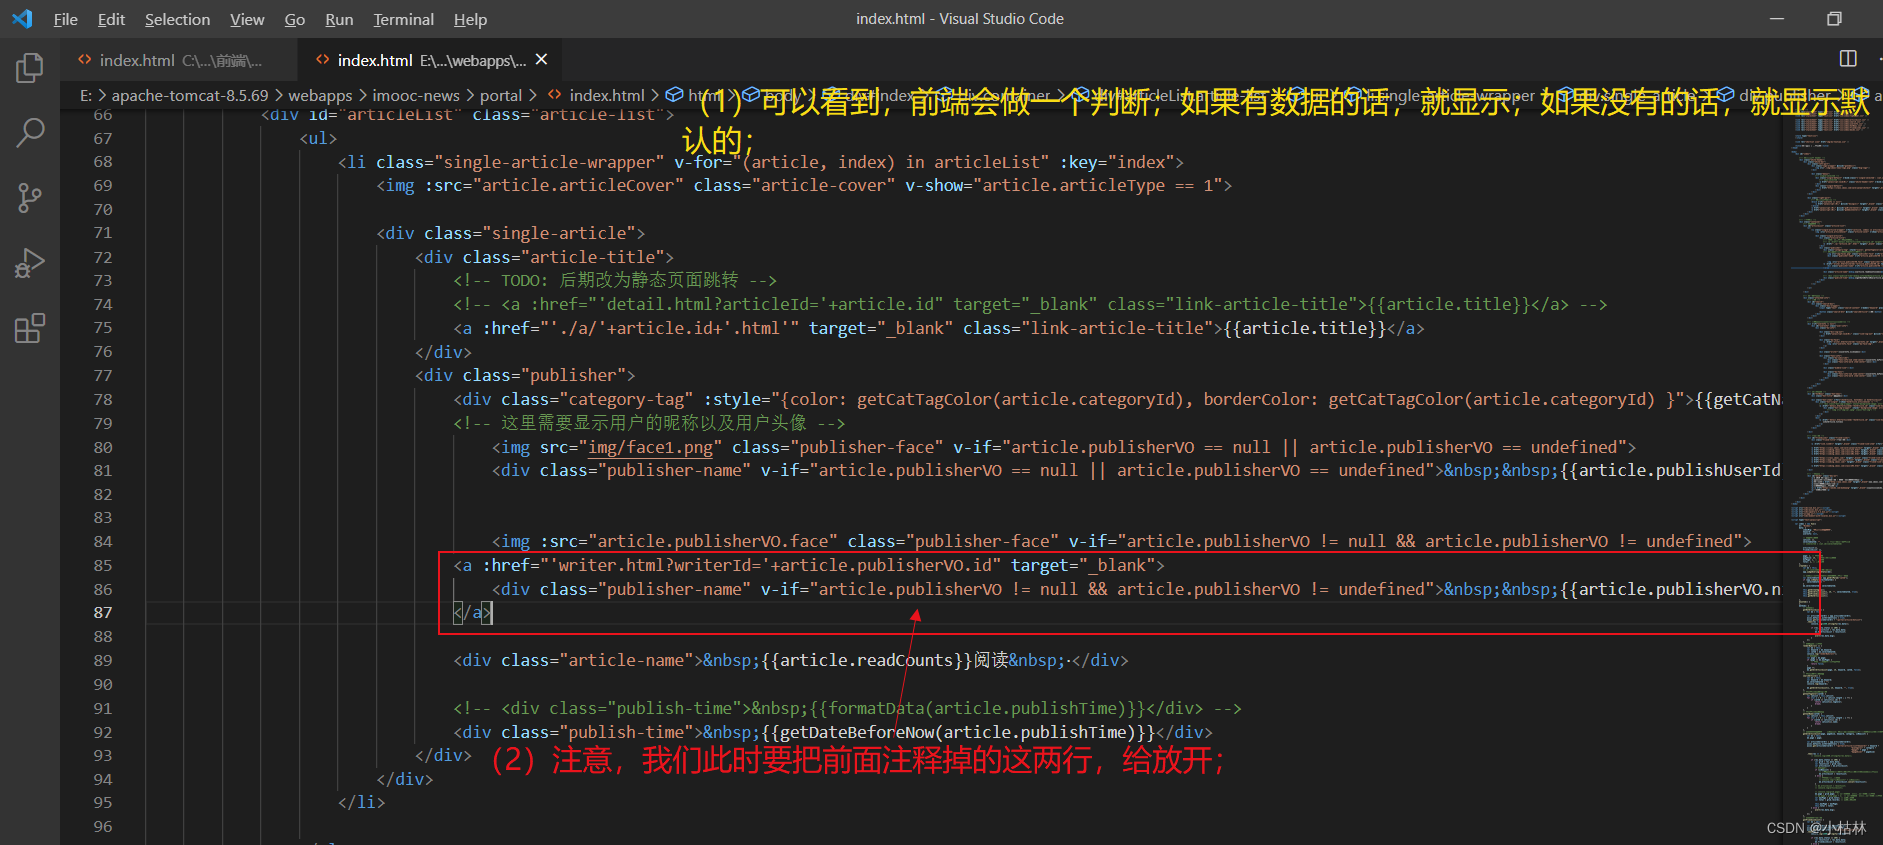
(2)我们在后端这么做,都是和前端约定好的;
(3)其实,在这儿也能够感到一个点:这两个接口间传递参数时候,把Set集合转成JSON,然后再传的;
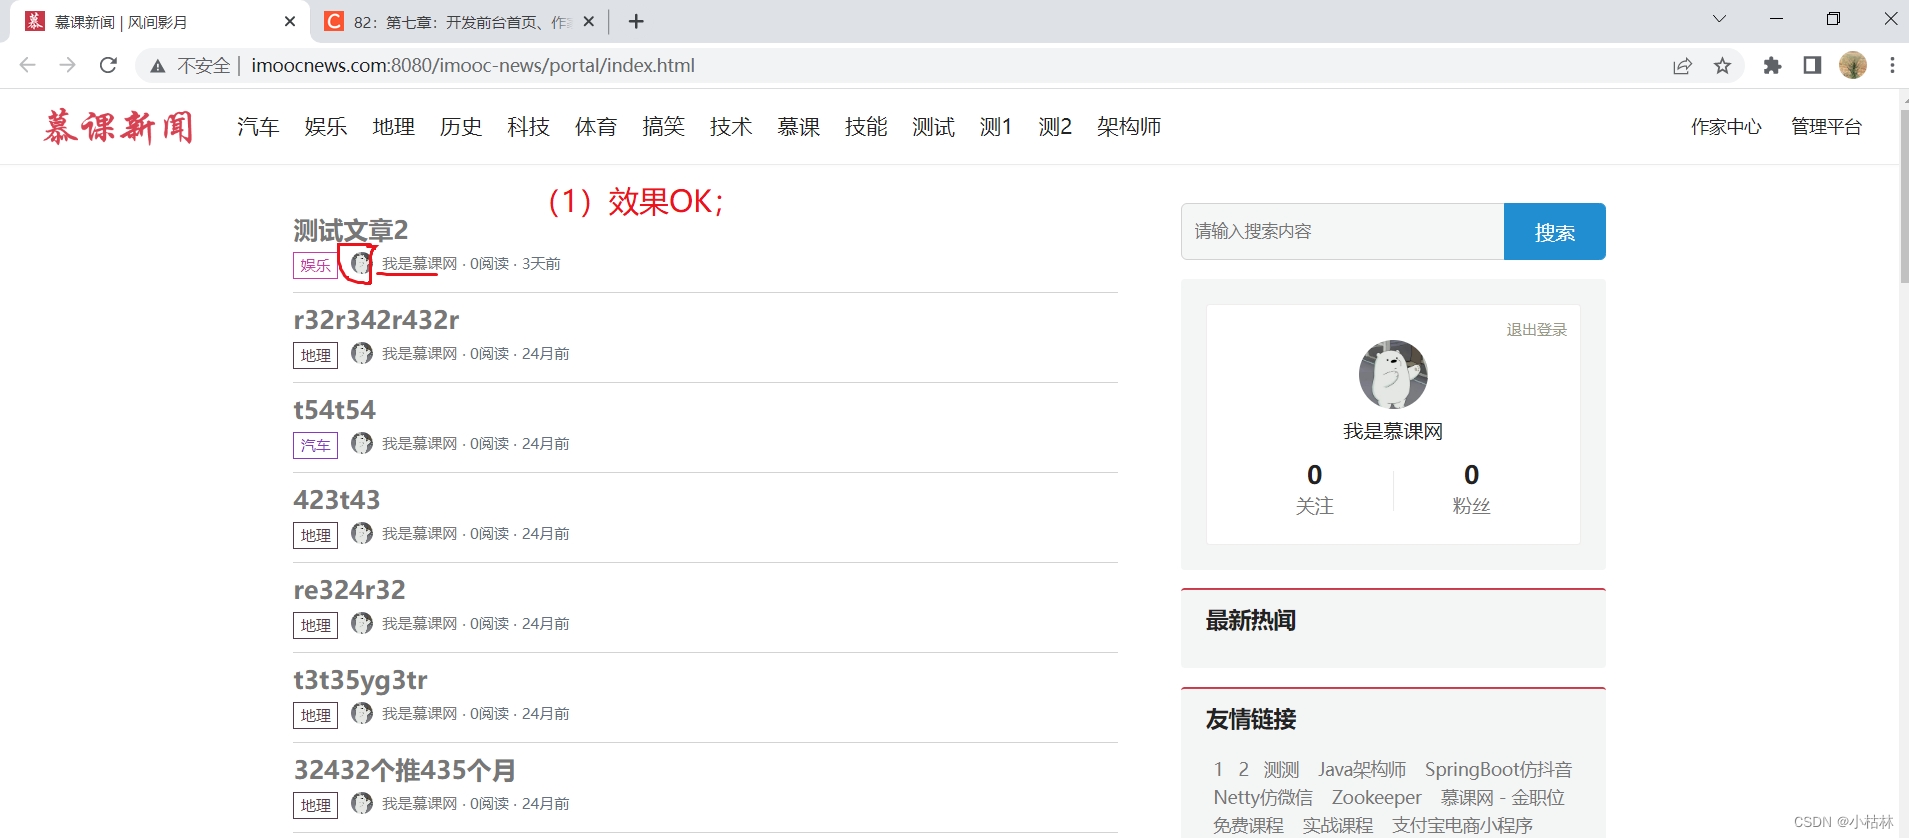
五:效果;
(1)先install一下整个项目;(2)记得使用SwitchHost开启虚拟域名映射;(3)使用Tomcat启动前端项目;(4)然后,启动后端项目;


 被折叠的 条评论
为什么被折叠?
被折叠的 条评论
为什么被折叠?
 到【灌水乐园】发言


