


 本文详细介绍了SpringMVC的配置步骤,包括配置ServletWebApplicationContext和RootWebApplicationContext的应用上下文、web.xml配置、spring-mvc.xml及applicationContext.xml的设置等。通过具体实例展示了如何创建并配置SpringMVC项目。
1、springmvc配置应用上下文有两种方式:
1)第一种是配置一个Servlet WebApplicationContext和Root WebApplicationContext
Servlet WebApplicationContext是springmvc使用
Root WebApplicationContext是全局配置,比如:事务管理、数据源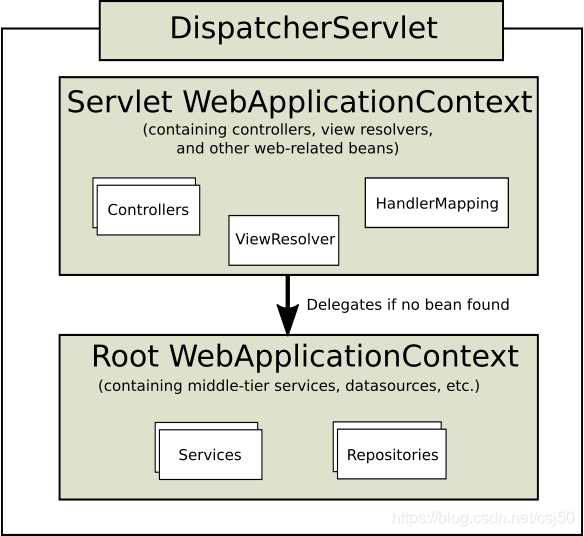
2)第二种是配置Root WebApplicationContext对单个DispatcherServlet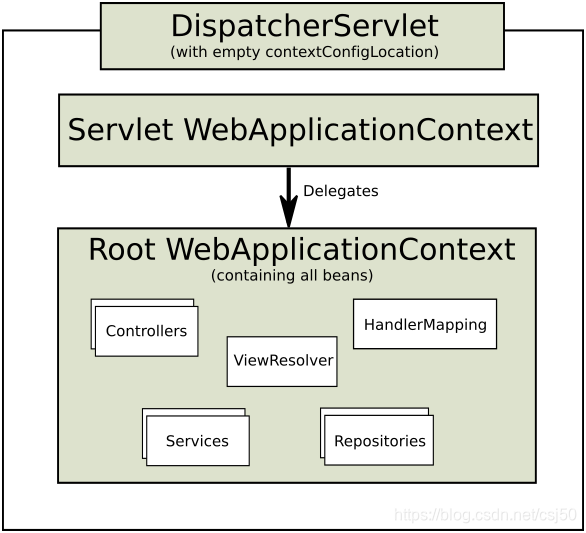
2、配置web.xml
这里使用第一种配置方法
<web-app xmlns="http://xmlns.jcp.org/xml/ns/javaee"
         xmlns:xsi="http://www.w3.org/2001/XMLSchema-instance"
	     xsi:schemaLocation="http://xmlns.jcp.org/xml/ns/javaee
		 http://xmlns.jcp.org/xml/ns/javaee/web-app_3_1.xsd"
	     version="3.1">
	<display-name>Archetype Created Web Application</display-name>

	<!--配置spring前端控制器 -->
	<servlet>
		<servlet-name>dispatcherServlet</servlet-name>
		<servlet-class>org.springframework.web.servlet.DispatcherServlet</servlet-class>
		<init-param>
			<param-name>contextConfigLocation</param-name>
			<param-value>classpath:spring-mvc.xml</param-value>
		</init-param>
		<load-on-startup>1</load-on-startup>
	</servlet>

	<servlet-mapping>
		<servlet-name>dispatcherServlet</servlet-name>
		<url-pattern>/</url-pattern>
	</servlet-mapping>

	<!-- 配置初始化root WebApplicationContext -->
	<context-param>
		<param-name>contextConfigLocation</param-name>
		<param-value>classpath:applicationContext.xml</param-value>
	</context-param>

	<listener>
		<listener-class>org.springframework.web.context.ContextLoaderListener</listener-class>
	</listener>

	<!-- 字符编码过滤器 统一编码UTF-8 -->
	<filter>
		<filter-name>encodingFilter</filter-name>
		<filter-class>org.springframework.web.filter.CharacterEncodingFilter</filter-class>
		<init-param>
			<param-name>encoding</param-name>
			<param-value>UTF-8</param-value>
		</init-param>
	</filter>

	<filter-mapping>
		<filter-name>encodingFilter</filter-name>
		<url-pattern>/*</url-pattern>
		<dispatcher>REQUEST</dispatcher>
		<dispatcher>FORWARD</dispatcher>
	</filter-mapping>

</web-app>
3、web.xml解析过程
1)web项目启动,容器(tomcat)创建ServletContext————由tomcat代码实现
2)容器开始读取web.xml文件
3)读取<context-param></context-param>作为键值对存到ServletContext中
4)触发ServletContextEvent事件
spring的ContextLoaderListener监听器继承ContextLoader类,实现ServletContextListener接口
ServletContextListener接口监听ServletContextEvent事件
public class ContextLoaderListener extends ContextLoader implements ServletContextListener {
...
}5)ContextLoaderListener执行初始化方法
创建root WebApplicationContext,并以键值对放入ServletContext中
6)web.xml的加载顺序是:context-param -> listener -> filter -> servlet ,而同个类型之间的实际程序启动的顺序是根据对应的mapping定义的顺序进行启动的
4、在resources下建立并配置spring-mvc.xml
<?xml version="1.0" encoding="UTF-8"?>
<beans xmlns="http://www.springframework.org/schema/beans"
	xmlns:xsi="http://www.w3.org/2001/XMLSchema-instance"
	xmlns:context="http://www.springframework.org/schema/context"
	xmlns:mvc="http://www.springframework.org/schema/mvc"
	xsi:schemaLocation="http://www.springframework.org/schema/beans
        http://www.springframework.org/schema/beans/spring-beans-4.3.xsd
        http://www.springframework.org/schema/context
        http://www.springframework.org/schema/context/spring-context-4.3.xsd
        http://www.springframework.org/schema/mvc
        http://www.springframework.org/schema/mvc/spring-mvc-4.3.xsd">

	<!-- 基于注解的自动装配 -->
	<context:annotation-config />

	<!-- 只扫描Controller -->
	<context:component-scan base-package="com.study.resources">
		<context:include-filter type="annotation"
			expression="org.springframework.stereotype.Controller" />
	</context:component-scan>

	<!-- 开启注解驱动 -->
	<mvc:annotation-driven />

	<!-- 使用默认的Servlet来响应静态文件 -->
	<mvc:default-servlet-handler />

	<!-- 配置视图解析器 -->
	<bean
		class="org.springframework.web.servlet.view.InternalResourceViewResolver"
		id="internalResourceViewResolver">
		<!-- 前缀 -->
		<property name="prefix" value="/WEB-INF/jsp/" />
		<!-- 后缀 -->
		<property name="suffix" value=".jsp" />
	</bean>

</beans>
5、spring-mvc.xml说明
1)<context:annotation-config />
打开自动装配
2)<context:component-scan></context:component-scan>
打开自动扫描,此处只扫描Controller注解
3)<mvc:annotation-driven />
开启mvc的注解驱动,自动注册默认处理请求,参数和返回值的类
4)<mvc:default-servlet-handler />
静态页面,如html、css、js、images可以访问
6、在resources下建立并配置applicationContext.xml
<?xml version="1.0" encoding="UTF-8"?>
<beans xmlns="http://www.springframework.org/schema/beans"
	xmlns:xsi="http://www.w3.org/2001/XMLSchema-instance"
	xmlns:context="http://www.springframework.org/schema/context"
	xsi:schemaLocation="http://www.springframework.org/schema/beans
        http://www.springframework.org/schema/beans/spring-beans-4.3.xsd
        http://www.springframework.org/schema/context
        http://www.springframework.org/schema/context/spring-context-4.3.xsd">

	<!-- 注解bean扫描,spring扫描排除Controller -->
	<context:annotation-config />
	<context:component-scan base-package="com.study">
		<context:exclude-filter type="annotation"
			expression="org.springframework.stereotype.Controller" />
	</context:component-scan>

	<!-- 下面可以导入其他spring配置文件 -->

</beans>
7、在src下建立测试controller
package com.study.resources;

import org.springframework.stereotype.Controller;
import org.springframework.web.bind.annotation.RequestMapping;

@Controller
@RequestMapping("mvc")
public class TestController {

	@RequestMapping("hello")
	private String hello() {
		return "hello";
	}
}
8、在WEB-INF下新建jsp文件夹,新建hello.jsp文件
<%@ page contentType="text/html;charset=UTF-8" language="java" %>
<html>
<head>
    <title>Title</title>
</head>
<body>
    Hello!
</body>
</html>9、启动tomcat,访问测试页面:http://127.0.0.1:8080/webapp/mvc/hello
10、其他注意事项
	<servlet-mapping>
		<servlet-name>dispatcherServlet</servlet-name>
		<url-pattern>/</url-pattern>
	</servlet-mapping>
这段url-pattern如果写成 /* 会拦截jsp页面,导致浏览器不能正确解析jsp页面,直接显示源代码
11、发现一件奇怪的事情,同样的代码,第一次启动访问不到controller,但是重启几次后就能访问到?
访问失败日志:
10:37:58.513 [http-nio-8080-exec-9] DEBUG org.springframework.web.servlet.DispatcherServlet - DispatcherServlet with name 'dispatcherServlet' processing GET request for [/webapp/mvc/hello]
10:37:58.513 [http-nio-8080-exec-9] DEBUG org.springframework.web.servlet.mvc.method.annotation.RequestMappingHandlerMapping - Looking up handler method for path /mvc/hello
10:37:58.513 [http-nio-8080-exec-9] DEBUG org.springframework.web.servlet.mvc.method.annotation.RequestMappingHandlerMapping - Did not find handler method for [/mvc/hello]
10:37:58.513 [http-nio-8080-exec-9] DEBUG org.springframework.web.servlet.handler.SimpleUrlHandlerMapping - Matching patterns for request [/mvc/hello] are [/**]
10:37:58.513 [http-nio-8080-exec-9] DEBUG org.springframework.web.servlet.handler.SimpleUrlHandlerMapping - URI Template variables for request [/mvc/hello] are {}
10:37:58.513 [http-nio-8080-exec-9] DEBUG org.springframework.web.servlet.handler.SimpleUrlHandlerMapping - Mapping [/mvc/hello] to HandlerExecutionChain with handler [org.springframework.web.servlet.resource.DefaultServletHttpRequestHandler@a25c8a6] and 1 interceptor
10:37:58.513 [http-nio-8080-exec-9] DEBUG org.springframework.web.servlet.DispatcherServlet - Last-Modified value for [/webapp/mvc/hello] is: -1
10:37:58.514 [http-nio-8080-exec-9] DEBUG org.springframework.web.servlet.DispatcherServlet - Null ModelAndView returned to DispatcherServlet with name 'dispatcherServlet': assuming HandlerAdapter completed request handling
10:37:58.514 [http-nio-8080-exec-9] DEBUG org.springframework.web.servlet.DispatcherServlet - Successfully completed request
访问成功日志:
10:54:14.629 [http-nio-8080-exec-3] DEBUG org.springframework.web.servlet.DispatcherServlet - DispatcherServlet with name 'dispatcherServlet' processing GET request for [/webapp/mvc/hello]
10:54:14.632 [http-nio-8080-exec-3] DEBUG org.springframework.web.servlet.mvc.method.annotation.RequestMappingHandlerMapping - Looking up handler method for path /mvc/hello
10:54:14.640 [http-nio-8080-exec-3] DEBUG org.springframework.web.servlet.mvc.method.annotation.RequestMappingHandlerMapping - Returning handler method [private java.lang.String com.study.resources.TestController.hello()]
10:54:14.640 [http-nio-8080-exec-3] DEBUG org.springframework.beans.factory.support.DefaultListableBeanFactory - Returning cached instance of singleton bean 'testController'
10:54:14.641 [http-nio-8080-exec-3] DEBUG org.springframework.web.servlet.DispatcherServlet - Last-Modified value for [/webapp/mvc/hello] is: -1
10:54:14.664 [http-nio-8080-exec-3] DEBUG org.springframework.beans.factory.support.DefaultListableBeanFactory - Invoking afterPropertiesSet() on bean with name 'hello'
10:54:14.664 [http-nio-8080-exec-3] DEBUG org.springframework.web.servlet.DispatcherServlet - Rendering view [org.springframework.web.servlet.view.InternalResourceView: name 'hello'; URL [/WEB-INF/jsp/hello.jsp]] in DispatcherServlet with name 'dispatcherServlet'
10:54:14.665 [http-nio-8080-exec-3] DEBUG org.springframework.web.servlet.view.InternalResourceView - Forwarding to resource [/WEB-INF/jsp/hello.jsp] in InternalResourceView 'hello'
10:54:15.177 [http-nio-8080-exec-3] DEBUG org.springframework.web.servlet.DispatcherServlet - Successfully completed request
12、关于xml头部配置解释
schemaLocation里的路径最好带版本号,否则可能会报错
Failed to read schema document 'http://www.springframework.org/schema/beans/参考资料:
1)总结下ServletContext和ApplicationContext
https://blog.youkuaiyun.com/bai_bug/article/details/80218202
2)web.xml 中的listener、 filter、servlet 加载顺序及其详解
https://www.cnblogs.com/Kevin-mao/p/5664056.html
3)Spring配置文件beans.xml头部配置解释
https://www.cnblogs.com/EasonJim/p/6880329.html
4)xsi:schemaLocation有何作用
https://blog.youkuaiyun.com/qq_38724991/article/details/76131614


 3834
3834

 被折叠的 条评论
为什么被折叠?
被折叠的 条评论
为什么被折叠?
 到【灌水乐园】发言


