


 本文深入探讨微服务架构中的服务治理概念,重点介绍Spring Cloud Eureka作为服务注册与发现组件的角色与实践,包括服务注册、服务发现、负载均衡及高可用部署。
服务治理 Spring Cloud Eureka
服务治理:是微服务架构中最为基础和重要的一个模块。主要用来实现各个模块实例的自动化注册和发现。
为什么需要使用服务治理的框架?
在最初构建微服务应用时可能服务并不多,我们可以通过简单的配置来完成服务的调用。例如,有两个服务 A,B
A需要调用B来实现一些业务的功能,为了实现服务B的高可用,可以通过集群的方式来实现,测试据需要维护服务B的大量的具体的实例。 但是随着业务的不断发展,服务的种类越来越多,需要维护的具体服务实例也越来越多,我们集群的位置,服务的名字 命名都可能发生变化,此时如果还是使用配置的方式就有可能发生问题。
服务注册:
在服务治理框架中我们通常需要有一个服务注册中心,每一个服务端向其注册,告知自己提供的服务名称,ip地址,端口号,版本信息,以及协议。而且服务注册中心也需要以心跳的方式去检测注册的服务是否可用,若不可用需要从清单中剔除。
服务发现:
在服务治理框架的运作下,服务之间不需要通过具体的服务位置来调用,可以通过服务的名称来调用。例如:服务C调用服务A,C向注册中心资讯A的信息,注册中心向C返回A的ip 端口 例如: 192.168.0.100:8000 192.168.0.101:8000 服务C通过轮询的方式从清单中选取一个调用。实际上框架为了性能的因素可能并不会每次都去请求ip port,可能会有缓存的方式来实现。
Netflix Eureka
既提供了服务端组件,也提供了客户端组件,而且使用java编写完成,主要是适用java开发的分布式系统,或是与JVM兼容的语言构建的系统。
Eureka服务端:也成为服务注册中心,与其他注册中心一样,支持高可用。依托于强一致性来提供良好的服务实例可用性。可以良好的应对多种故障场景。当以集群的方式注册时,当集群中有分片出现故障时,Eureka转为自我保护模式,允许继续注册和发现,当故障恢复时,集群中的其他数据会同步过来。使用的是强一致性,通过异步的方式互相复制自己的状态,这也意味着在一段时间内,集群内的Eureka关于所有服务的状态可能是存在差异的。
Eureka客户端:主要提供服务的注册和发现。通过注解和配置的方式集成到客户端的代码中,当客户端启动的时候,将自己注册到服务端并发送心跳信息周期性的更新自己的状态,并且以一定的时间向服务端获取到已经注册的服务并缓存到自己本地。
代码实例:
使用的SpringBoot版本: 2.0.8 SpringCloud版本: Finchley.SR2(注意 SpringCloud对于版本的要求很高 可能存在不兼容的问题)
①:pom.xml
<?xml version="1.0" encoding="UTF-8"?>
<project xmlns="http://maven.apache.org/POM/4.0.0" xmlns:xsi="http://www.w3.org/2001/XMLSchema-instance"
   xsi:schemaLocation="http://maven.apache.org/POM/4.0.0 http://maven.apache.org/xsd/maven-4.0.0.xsd">
   <modelVersion>4.0.0</modelVersion>
   <parent>
      <groupId>org.springframework.boot</groupId>
      <artifactId>spring-boot-starter-parent</artifactId>
      <version>2.0.8.RELEASE</version>
      <relativePath/> <!-- lookup parent from repository -->
   </parent>
   <groupId>com.wc.study.eureka</groupId>
   <artifactId>eureka_server01</artifactId>
   <version>0.0.1-SNAPSHOT</version>
   <name>eureka_server01</name>

   <properties>
      <java.version>1.8</java.version>
      <spring-cloud.version>Finchley.SR2</spring-cloud.version>
   </properties>

   <dependencies>
      <dependency>
         <groupId>org.springframework.cloud</groupId>
         <artifactId>spring-cloud-starter-netflix-eureka-server</artifactId>
      </dependency>

      <dependency>
         <groupId>org.springframework.boot</groupId>
         <artifactId>spring-boot-starter-web</artifactId>
      </dependency>

      <dependency>
         <groupId>org.springframework.boot</groupId>
         <artifactId>spring-boot-starter-test</artifactId>
         <scope>test</scope>
      </dependency>
   </dependencies>

   <dependencyManagement>
      <dependencies>
         <dependency>
            <groupId>org.springframework.cloud</groupId>
            <artifactId>spring-cloud-dependencies</artifactId>
            <version>${spring-cloud.version}</version>
            <type>pom</type>
            <scope>import</scope>
         </dependency>
      </dependencies>
   </dependencyManagement>

   <build>
      <plugins>
         <plugin>
            <groupId>org.springframework.boot</groupId>
            <artifactId>spring-boot-maven-plugin</artifactId>
         </plugin>
      </plugins>
   </build>

</project>
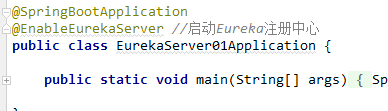
②:将当前的项目设置为Eureka-Server 需要在主类上增加注解: @EnableEurekaServer
③填写配置文件:
server:
  port: 8080
eureka:
  instance:
    hostname: localhost
  client:
    #关闭向注册中心注册自己
    register-with-eureka: false
    #由于自己就是注册中心  自己就维护着服务实例 不需要去检索服务
    fetch-registry: false
    serviceUrl:
      defaultZone: http://${eureka.instance.hostname}:${server.port}/eureka/
启动项目,在浏览器中输入 http://localhost:8080 可以看到已经正常启动:

当前没有任何客户端向服务端注册。
新增一个Eureka客户端: 实例:
①pom.xml
<?xml version="1.0" encoding="UTF-8"?>
<project xmlns="http://maven.apache.org/POM/4.0.0" xmlns:xsi="http://www.w3.org/2001/XMLSchema-instance"
   xsi:schemaLocation="http://maven.apache.org/POM/4.0.0 http://maven.apache.org/xsd/maven-4.0.0.xsd">
   <modelVersion>4.0.0</modelVersion>
   <parent>
      <groupId>org.springframework.boot</groupId>
      <artifactId>spring-boot-starter-parent</artifactId>
      <version>2.0.8.RELEASE</version>
      <relativePath/> <!-- lookup parent from repository -->
   </parent>
   <groupId>com.wc.study.eureka</groupId>
   <artifactId>eureka_client01</artifactId>
   <version>0.0.1-SNAPSHOT</version>
   <name>eureka_client01</name>

   <properties>
      <java.version>1.8</java.version>
      <spring-cloud.version>Finchley.SR2</spring-cloud.version>
   </properties>

   <dependencies>
      <dependency>
         <groupId>org.springframework.boot</groupId>
         <artifactId>spring-boot-starter-web</artifactId>
      </dependency>
      <dependency>
         <groupId>org.springframework.cloud</groupId>
         <artifactId>spring-cloud-starter-netflix-eureka-client</artifactId>
      </dependency>

      <dependency>
         <groupId>org.springframework.boot</groupId>
         <artifactId>spring-boot-starter-test</artifactId>
         <scope>test</scope>
      </dependency>
   </dependencies>

   <dependencyManagement>
      <dependencies>
         <dependency>
            <groupId>org.springframework.cloud</groupId>
            <artifactId>spring-cloud-dependencies</artifactId>
            <version>${spring-cloud.version}</version>
            <type>pom</type>
            <scope>import</scope>
         </dependency>
      </dependencies>
   </dependencyManagement>

   <build>
      <plugins>
         <plugin>
            <groupId>org.springframework.boot</groupId>
            <artifactId>spring-boot-maven-plugin</artifactId>
         </plugin>
      </plugins>
   </build>

</project>
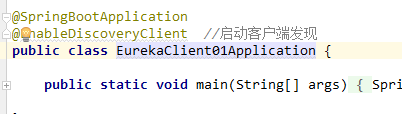
②在主类中增加 @EnableDiscoveryClient
③修改配置文件 (主要是指定端口 添加服务的名称 指定注册中心的地址)
server:
  port: 8081
#指定一个服务名字
spring:
  application:
    name: hello_service
#指定服务注册中心地址
eureka.client.serviceUrl.defaultZone: http://localhost:8080/eureka/
④新建一个Controller进行测试:
package com.wc.study.eureka.controller;

import org.slf4j.Logger;
import org.slf4j.LoggerFactory;
import org.springframework.beans.factory.annotation.Autowired;
import org.springframework.cloud.client.discovery.DiscoveryClient;
import org.springframework.web.bind.annotation.GetMapping;
import org.springframework.web.bind.annotation.RestController;

import java.util.List;

/**
 * Created by wangchen on 2019/1/21.
 */
@RestController
public class HelloController {

    private static final Logger LOGGER = LoggerFactory.getLogger(HelloController.class);

    @Autowired
    private DiscoveryClient discoveryClient;

    @GetMapping("/hello")
    public String hello(){
        List<String> services =  discoveryClient.getServices();
        // 测试一下 :[hello_service]   获取到的客户端从服务注册中心获取到的服务信息
        LOGGER.info("测试一下 :{}",services);
        return "hello";
    }
}
启动客户端:查看控制台的打印信息:

可以看到Eureka客户端会从服务端获取注册的实例信息。
⑤测试hello方法

可以看到的是可以获取到服务端已经注册的客户信息。
搭建一个高可用的注册中心:
在微服务架构这样的分布式环境中,需要考虑各种故障的情况,所以在生产环境中,需要对各个组件进行高可用的部署,微服务如此,服务注册中心也是如此。在前面我们配置服务注册中心时,指定了两个参数
eureka.client.register-with-eureka=false
eureka.client.fetch-registry=false
Eureka Server的高可用实际上就是向其他的注册注册中心注册自己,这样就可以形成一个互相注册的注册中心,以实现服务清单的互相同步。
搭建两个服务端,在配置文件中
增加 eureka.client.serviceUrl.defaultZone: http://另一个注册中心的:端口/eureka/
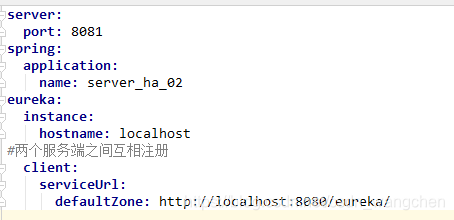
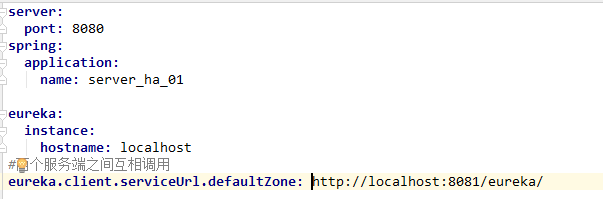
向客户端中增加此属性 为所有的注册中心服务器地址。

服务发现和消费:
服务消费的任务由Ribbon完成,Ribbon是一个基于HTTP和TCP的 客户端负载均衡器,可以再客户端配置的ribbonServerList服务列表去轮询访问以达到均衡负载的作用。当Ribbon和Eureka整合时,DiscoveryEnabledNIWSServerList重写,从Eureka服务中心获取列表。同时使用NEWSDiscoveryPing代替IPing。
实例:
新建一个consumer Eureka 客户端。配置与前面相同。
增加配置文件信息:
spring:
  application:
    name: consumer-01
server:
  port: 8091
eureka:
  instance:
    hostname: localhost
  client:
    serviceUrl:
      defaultZone: http://localhost:8080/eureka/,http://localhost:8081/eureka/
主类中配置为eureka客户端:
package com.wc.study.ribbon;

import org.springframework.boot.SpringApplication;
import org.springframework.boot.autoconfigure.SpringBootApplication;
import org.springframework.cloud.client.discovery.EnableDiscoveryClient;
import org.springframework.cloud.client.loadbalancer.LoadBalanced;
import org.springframework.context.annotation.Bean;
import org.springframework.web.client.RestTemplate;

@SpringBootApplication
@EnableDiscoveryClient
public class RibbonDemo1Application {

   @Bean
   @LoadBalanced
   RestTemplate restTemplate(){
      return new RestTemplate();
   }

   public static void main(String[] args) {
      SpringApplication.run(RibbonDemo1Application.class, args);
   }

}
测试实体类:
package com.wc.study.ribbon.controller;

import org.springframework.beans.factory.annotation.Autowired;
import org.springframework.web.bind.annotation.GetMapping;
import org.springframework.web.bind.annotation.RestController;
import org.springframework.web.client.RestTemplate;

/**
 * Created by wangchen on 2019/1/21.
 */
@RestController
public class ConsumerController {
    @Autowired
    private RestTemplate restTemplate;

    @GetMapping(value = "/ribbon_consumer")
    public String index(){
        return restTemplate.getForEntity("http://HELLO-SERVICE/hello",String.class).getBody();
    }
}
在调用其他服务时,直接指定服务名称即可。(再使用Ribbon时,指定的服务名称不可以使用下划线,可以使用中划线。下划线无法识别)。
此时在浏览器中调用consumer_01 http://localhost:8091/ribbon_consumer 可以观察到直接返回了HELLO-SERVICE中的结果。
基础架构:
服务注册中心
服务提供者
服务消费者
服务治理机制:
服务提供者:
服务提供者在启动之后,会发送REST请求方式将自己注册到服务注册信息,注册时会携带自身的一些元数据信息,Eureka Server在接收到这些元数据信息之后,将这些信息保存到一个双层的Map中,其中第一层key是服务名,第二层是服务的具体实例(同一个服务可以有多个实例)。
在服务注册的时候会注意一个参数:eureka.client.registry-with-eureka=true。 改参数默认为true,当设置为false时,不会进行注册。
服务同步:
两个服务注册者分别将服务注册到了两个不同的注册中心上,他们的信息分别被不同的注册中心服务。由于两个注册中心互相注册,当向其中的一个注册中心注册时,他会把请求转发到集群中的其他的注册中心,这样注册中心的数据就互相同步了。服务消费者不管请求那个注册中心都可以获取到需要的服务。
服务续约:
当提供者注册之后,会维持一个心跳机制来向注册中心宣布:我还活着,防止注册中心将其剔除。
eureka.instance.lease-renewal-interval-in-seconds=30 服务续约任务的调用间隔时间 30s
eureka.instance.lease-expiration-duration-in-seconds=90 定义服务失效的时间 90s
服务消费者:
获取服务:
到这里,在服务注册中心上已经有了注册的服务,当服务消费者启动时,会获取服务注册中心上的服务,为了性能,eureka Server会维护一份只读 的服务注册列表给调用者,这个清单30s更新一次。
eureka.client.fetch-registry=true 默认为true 获取注册的服务
eureka.client.registry-fetch-interval-seconds=30 缓存清单的更新时间默认为30s。
服务调用:
由于具备了已经注册的服务信息,消费者在进行调用的时候可以根据服务名获取到具体的服务元数据信息,并且可以更具需要决定调用哪一个具体实例。Ribbon采用轮询的方式来实现负载均衡。
服务下线:
当一个服务实例重启或者下线时,会触发一个事件给注册中心,告知注册中心我要下线了,注册中心将信息传递给集群中的其他Eureka server,将其状态更新为DOWN。
服务注册中心剔除机制:
有时服务可能出现了故障意外下线,此时注册中心接收不到客户端传递的信息,注册中心有一个定时任务,会每隔60s(默认60s) 将注册清单上的服务实例(默认超时90s)没有续约的服务剔除出去。
注册中心的自我保护:
我们可能会注意到有时会在注册中心的页面上有红色的警告信息:这实际上就是Eureka Server的自我保护。
服务提供者在启动时会向注册中心注册自己,并发送心跳信息告诉自己还活着,Server会统计心跳失败比例在15分钟内是否低于85%,如果出现此情况,注册中心会保护这些实例,让这些实例不会过期,此时当真出现问题时,就存在调用失败的情况,此时客户端必须要有容错机制,比如:请求重试,断路器等机制。
eureka.server.enable-self-preservation=false 关闭保护机制。
总结:
整的来说,整个注册中心分为三个组成部分, 服务注册中心 服务提供者 服务接受者。 总的通信机制是由提供者和消费者来发起的。例如,提供者在启动之后将自己的元数据信息传递给注册中心,向注册中心获取已经注册的服务,周期性的发送心跳信息给注册中心进行续约,甚至在下线的时候主动告知注册中心。注册中心更像是这个体系的响应。
我们在将客户端整合进体系中时,做的事情就是 在主类中增加注解:
- @EnableDiscoveryClient 还有就是在配置文件中添加配置
- eureka.client.serviceUrl.defaultZone: 指定服务端的位置。
配置详解:
客户端的配置:
服务注册相关的配置信息: 服务注册中心所在的位置 获取服务列表的间隔时间 可用区域
服务实例相关的配置信息:实例的名称 ip 端口 健康检查路径等
服务注册类常用的配置:
指定注册中心:
可以再配置文件中通过 eureka.client.serviceUrl 参数实现,配置保存在一个hashMap中,并且设置有默认值 key为defaultZone value为http://localhost:8761/eureka/ 我们也可以配置多个注册中心 中间使用逗号分隔。
有时可能需要安全校验 http://<username>:<password>@localhost:8761/eureka/
其他的配置参数 以 eureka.client 为开头:

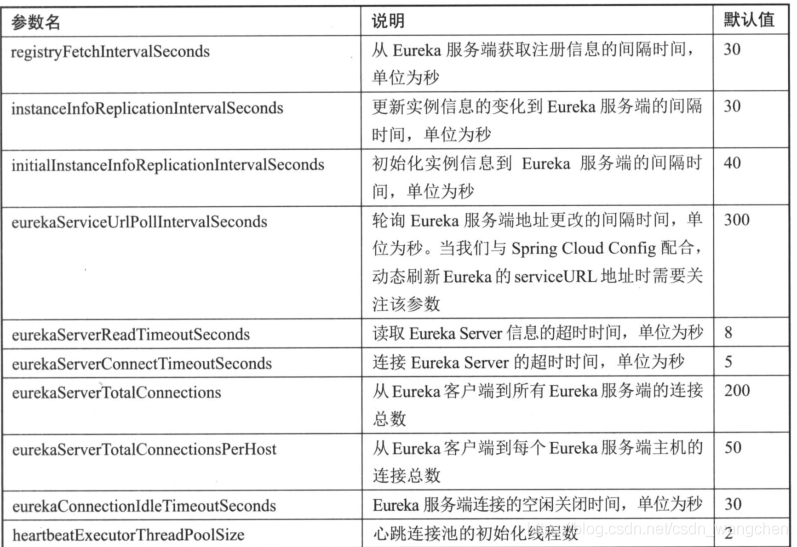
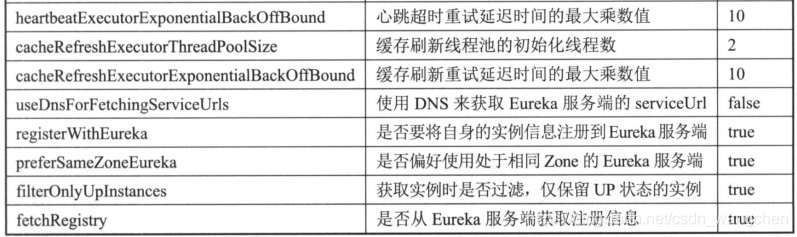
服务实例类配置:
元数据信息:
服务的名称、实例的名称、实例ip、实例端口等用于服务治理的重要信息
eureka.instance.<properties> = <value> 对标准化的元数据信息进行配置
eureka.instance.metadataMap.<key> = <value> 对自定义的元数据信息配置
例如: eureka.instance.metadataMap.zone=shanghai
实例名配置:
是区分同一服务之间不同实例的唯一标识。
${spring.cloud.client.hostname}:${spring.application.name}:${spring.application.instance_id:${server.port}}
可以通过设置不同的实例名来启动多个实例:
server.port=${random.int[10000,19999]} 可以让tomcat启动在不同的端口。
eureka.instance.instanceId=${spring.application.name:${random.int}}
端点配置:
homePageUrl statusPageUrl healthCheckUrl 首页url 状态页Url 健康检查url 其中后面的另个有默认的值 是actuator中的info 和 health。这些地址在我们配置了context-path 之后会发生改变。所以可能需要我们进行显示的配置。
management.context-path=/hello
eureka.instance.statusPageUrlPath=${management.context-path}/info
eureka.instance.healthCheckUrlPath=${management.context-path}/health
eureka.instance.homePageUrl=http://${eureka.instance.hostname}/
健康检查:
将eureka客户端的健康检查交给actuator
在pom.xml 中添加依赖 actuator
添加配置参数: eureka.client.healthcheck.enable=true
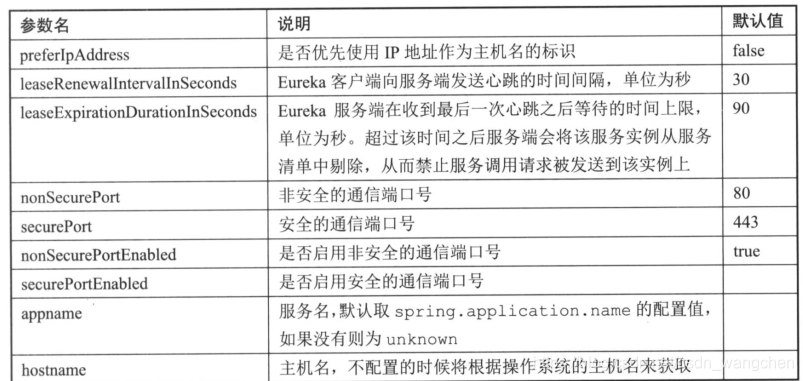
其他的一些配置:
以eureka.instance 开头:


 409
409

 被折叠的 条评论
为什么被折叠?
被折叠的 条评论
为什么被折叠?
 到【灌水乐园】发言


