


目录
摘要 :本文将深入剖析 Vue 的核心概念、语法特性、架构原理,结合丰富代码示例和多样化应用场景,辅以专业绘图工具生成的架构图、流程图,全方位展现 Vue 的魅力与强大功能,助力开发者全面掌握 Vue 开发技能,无论是初学者还是有一定经验的开发者,都能从中汲取知识养分,提升开发能力与项目实战水平,文章最后还会总结常见注意事项与技巧,为 Vue 开发之旅保驾护航。
、一Vue 概念讲解
Vue 是一套用于构建用户界面的渐进式 JavaScript 框架,其核心是采用响应式数据绑定和组合的视图组件,具有易上手、轻量级、高效等特性,使得开发者能够快速构建单页面应用以及复杂交互的前端界面。
(一)响应式数据绑定
这是 Vue 的核心特性之一。Vue 通过数据劫持(Object.defineProperty)和发布订阅者模式来实现响应式数据绑定。当数据发生变化时,视图会自动更新。
例如:
<div id="app">
  {{ message }}
</div>
<script>
  var app = new Vue({
    el: '#app',
    data: {
      message: 'Hello Vue!'
    }
  });
</script>
当修改 message 的值时,页面上显示的内容会实时更新。
(二)组件化
Vue 的组件系统允许开发者将界面拆分成独立、可复用的组件,每个组件都有自己的模板、逻辑和样式,便于开发和维护。
Vue.component('my-component', {
  template: '<div>A custom component!</div>'
});
然后在模板中使用 <my-component></my-component> 即可。
二、Vue 基础语法与代码示例
(一)模板语法
-
文本插值 :使用双花括号
{{ }}将数据插入到模板中,如{{ message }}。 -
指令 :以
v-开头,用于绑定 DOM 属性、事件等,如v-bind:href、v-on:click。
<div id="app">
  <a v-bind:href="url">链接</a>
  <button v-on:click="increment">点击次数:{{ count }}</button>
</div>
<script>
  var app = new Vue({
    el: '#app',
    data: {
      count: 0,
      url: 'https://vuejs.org/'
    },
    methods: {
      increment: function() {
        this.count++;
      }
    }
  });
</script>
(二)条件渲染与列表渲染
-
条件渲染 :使用
v-if、v-else、v-else-if指令根据条件渲染元素。-
v-if:当条件为 true 时渲染元素,否则不渲染。 -
v-else:与v-if配合使用,渲染当v-if条件为 false 时的元素。 -
v-else-if:提供额外的条件选项。
-
<div id="app">
  <div v-if="type === 'A'">A</div>
  <div v-else-if="type === 'B'">B</div>
  <div v-else>C</div>
</div>
<script>
  var app = new Vue({
    el: '#app',
    data: {
      type: 'A'
    }
  });
</script>-
列表渲染 :使用
v-for指令基于数组或对象渲染列表。
<div id="app">
  <ul>
    <li v-for="item in items" :key="item.id">
      {{ item.name }}
    </li>
  </ul>
</div>
<script>
  var app = new Vue({
    el: '#app',
    data: {
      items: [
        { id: 1, name: 'Item 1' },
        { id: 2, name: 'Item 2' },
        { id: 3, name: 'Item 3' }
      ]
    }
  });
</script>
三、Vue 组件通信
(一)父传子
通过 props 将数据从父组件传递给子组件。
// 父组件
<div id="app">
  <child-component :message="parentMessage"></child-component>
</div>
<script>
  Vue.component('child-component', {
    props: ['message'],
    template: '<div>{{ message }}</div>'
  });
  var app = new Vue({
    el: '#app',
    data: {
      parentMessage: 'Hello from parent!'
    }
  });
</script>
(二)子传父
子组件通过 $emit 触发事件,父组件监听该事件获取数据。
// 子组件
<div id="app">
  <child-component @update-count="updateCount"></child-component>
</div>
<script>
  Vue.component('child-component', {
    template: '<button @click="increment">点击</button>',
    data() {
      return {
        count: 0
      };
    },
    methods: {
      increment() {
        this.count++;
        this.$emit('update-count', this.count);
      }
    }
  });
  var app = new Vue({
    el: '#app',
    methods: {
      updateCount(count) {
        console.log('子组件传来的计数:', count);
      }
    }
  });
</script>
(三)非父子组件通信
可以使用中央事件总线或 Vuex(全局状态管理)来实现非父子组件之间的通信。
-
中央事件总线 :创建一个空的 Vue 实例作为事件总线,组件通过事件总线触发和监听事件。
// 创建事件总线
const bus = new Vue();
// 组件 A
Vue.component('component-a', {
  methods: {
    sendEvent() {
      bus.$emit('custom-event', '数据');
    }
  },
  template: '<button @click="sendEvent">发送事件</button>'
});
// 组件 B
Vue.component('component-b', {
  mounted() {
    bus.$on('custom-event', (data) => {
      console.log('收到事件:', data);
    });
  },
  template: '<div>组件 B</div>'
});-
Vuex :用于构建 Vue 应用的集中式状态管理仓库,适合管理复杂应用的状态。
四、Vue 生命周期
Vue 实例从创建到销毁会经历一系列生命周期阶段,每个阶段都有对应的生命周期钩子函数,开发者可以在这些钩子中执行相应的操作。
-
创建阶段 :
beforeCreate、created。在beforeCreate时,实例还未初始化,数据和 DOM 都不可用;created时,数据已经初始化,但 DOM 还未挂载。 -
挂载阶段 :
beforeMount、mounted。在beforeMount时,挂载过程即将开始,模板编译完成但还未挂载到 DOM;mounted时,实例挂载完成,可以访问 DOM 元素。 -
更新阶段 :
beforeUpdate、updated。当数据变化时,会触发更新阶段,在beforeUpdate时,数据已经更新,但 DOM 还未更新;updated时,DOM 已经更新完成。 -
销毁阶段 :
beforeDestroy、destroyed。在beforeDestroy时,实例即将被销毁,可以执行一些清理操作;destroyed时,实例已经被销毁,所有指令、事件监听等都被移除。
<div id="app"></div>
<script>
  var app = new Vue({
    el: '#app',
    data: {
      message: 'Hello'
    },
    beforeCreate() {
      console.log('beforeCreate', this.message); // 此时 data 还未初始化,message 为 undefined
    },
    created() {
      console.log('created', this.message); // 此时 data 已经初始化,message 为 'Hello'
    },
    beforeMount() {
      console.log('beforeMount');
    },
    mounted() {
      console.log('mounted');
    },
    beforeUpdate() {
      console.log('beforeUpdate');
    },
    updated() {
      console.log('updated');
    },
    beforeDestroy() {
      console.log('beforeDestroy');
    },
    destroyed() {
      console.log('destroyed');
    },
    methods: {
      changeMessage() {
        this.message = 'Updated';
      }
    }
  });
  // 调用方法触发更新
  setTimeout(() => {
    app.changeMessage();
  }, 2000);
  // 销毁实例
  setTimeout(() => {
    app.$destroy();
  }, 4000);
</script>
以下是 Vue 生命周期的流程图:

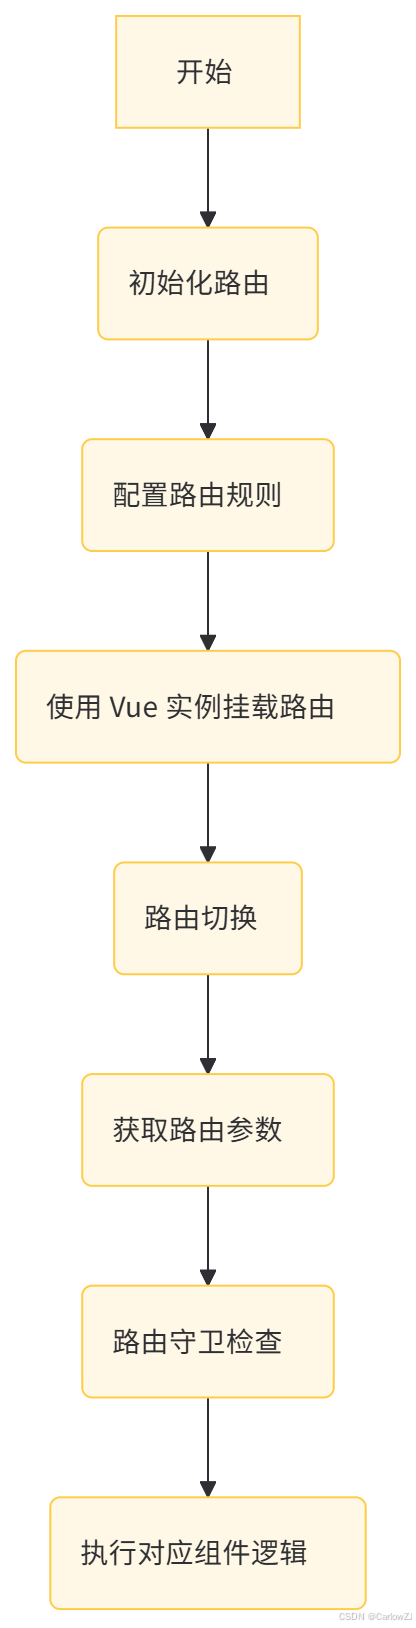
五、Vue 路由
Vue Router 是 Vue 官方的路由管理器,用于构建单页面应用的路由功能。
(一)安装与配置
-
首先安装 Vue Router:
npm install vue-router-
创建路由配置:
import Vue from 'vue';
import VueRouter from 'vue-router';
Vue.use(VueRouter);

const routes = [
  { path: '/', component: Home },
  { path: '/about', component: About },
  { path: '/user/:id', component: User }
];

const router = new VueRouter({
  routes
});-
在 Vue 实例中使用路由:
new Vue({
  router,
  render: h => h(App)
}).$mount('#app');
(二)路由切换与参数获取
-
使用
<router-link>标签进行路由切换,to属性指定目标路径。
<router-link to="/">首页</router>
-link<router-link to="/about">关于</router-link>
<router-link :to="{ path: '/user/' + userId }">用户</router-link>-
使用
$route对象获取路由参数,在组件中通过this.$route.params.id获取动态路由参数。
export default {
  computed: {
    userId() {
      return this.$route.params.id;
    }
  }
}
(三)路由守卫
路由守卫可以用来控制路由的访问权限,例如:
router.beforeEach((to, from, next) => {
  if (to.meta.requiresAuth && !isAuthenticated) {
    next('/login');
  } else {
    next();
  }
});
以上是 Vue 路由的架构图:
六、Vue 组件的应用场景
(一)表单组件
构建各种表单元素,如输入框、下拉框、复选框等,并结合 Vue 的双向数据绑定实现表单数据的实时更新。
 id<div="app">
  <form @submit.prevent="handleSubmit">
    <input type="text" v-model="formData.name" placeholder="姓名">
    <input type="email" v-model="formData.email" placeholder="邮箱">
    <select v-model="formData.selectOption">
      <option value="">请选择</option>
      <option value="option1">选项1</option>
      <option value="option2">选项2</option>
    </select>
    <input type="checkbox" v-model="formData.isChecked"> 是否同意
    <button type="submit">提交</button>
  </form>
</div>
<script>
  var app = new Vue({
    el: '#app',
    data: {
      formData: {
        name: '',
        email: '',
        selectOption: '',
        isChecked: false
      }
    },
    methods: {
      handleSubmit() {
        console.log('表单数据:', this.formData);
      }
    }
  });
</script>
(二)列表组件
展示数据列表,实现分页、排序、筛选等功能。
<div id="app">
  <div>
    <input type="text" v-model="searchQuery" placeholder="搜索">
    <button @click="handleSort('name')">按姓名排序</button>
    <button @click="handleSort('age')">按年龄排序</button>
  </div>
  <ul>
    <li v-for="item in filteredAndSortedItems" :key="item.id">
      {{ item.name }} - {{ item.age }}
    </li>
  </ul>
  <pagination :current-page="currentPage" :total-pages="totalPages" @page-change="handlePageChange"></pagination>
</div>
<script>
  Vue.component('pagination', {
    props: ['currentPage', 'totalPages'],
    template: `
      <div>
        <button :disabled="currentPage === 1" @click="$emit('page-change', currentPage - 1)">上一页</button>
        <span>第 {{ currentPage }} 页 / 共 {{ totalPages }} 页</span>
        <button :disabled="currentPage === totalPages" @click="$emit('page-change', currentPage + 1)">下一页</button>
      </div>
    `
  });
  var app = new Vue({
    el: '#app',
    data: {
      items: [
        { id: 1, name: '张三', age: 25 },
        { id: 2, name: '李四', age: 30 },
        { id: 3, name: '王五', age: 20 },
        { id: 4, name: '赵六', age: 28 }
      ],
      currentPage: 1,
      totalPages: 2,
      searchQuery: '',
      sortConfig: {
        key: '',
        order: ''
      }
    },
    computed: {
      filteredItems() {
        return this.items.filter(item =>          {
 return item.name.includes(this.searchQuery);
        });
      },
      sortedItems() {
        const { key, order } = this.sortConfig;
        return this.filteredItems.sort((a, b) => {
          if (!key) return 0;
          if (order === 'asc') {
            return a[key] - b[key];
          } else {
            return b[key] - a[key];
          }
        });
      },
      filteredAndSortedItems() {
        const pageSize = 2;
        const startIndex = (this.currentPage - 1) * pageSize;
        return this.sortedItems.slice(startIndex, startIndex + pageSize);
      }
    },
    methods: {
      handlePageChange(page) {
        this.currentPage = page;
      },
      handleSort(key) {
        if (this.sortConfig.key === key) {
          this.sortConfig.order = this.sortConfig.order === 'asc' ? 'desc' : 'asc';
        } else {
          this.sortConfig.key = key;
          this.sortConfig.order = 'asc';
        }
      }
    }
  });
</script>
(三)弹窗组件
创建可复用的弹窗组件,用于显示提示信息、用户确认等操作。
<template>
<div class="modal" v-if="isVisible">
<div class="modal-content">
<span class="close" @click="handleClose">×</span>
<h2>{{ title }}</h2>
<p>{{ message }}</p>
<div class="buttons">
<button @click="handleConfirm">{{ confirmText }}</button>
<button @click="handleCancel">{{ cancelText }}</button>
</div>
</div>
</div>
</template>
<script>
export default {
data() {
return {
isVisible: false
};
},
props: {
title: {
type: String,
default: '提示'
},
message: {
type: String,
required: true
},
confirmText: {
type: String,
default: '确认'
},
cancelText: {
type: String,
default: '取消'
}
},
methods: {
open() {
this.isVisible = true;
},
close() {
this.isVisible = false;
},
handleClose() {
this.close();
},
handleConfirm() {
this.$emit('confirm');
this.close();
},
handleCancel() {
this.$emit('cancel');
this.close();
}
}
};
</script>
<style>
.modal {
display: flex;
justify-content: center;
align-items: center;
position: fixed;
top: 0;
left: 0;
width: 100%;
height: 100%;
background-color: rgba(0, 0, 0, 0.5);
z-index: 1000;
}
.modal-content {
background-color: white;
padding: 20px;
border-radius: 5px;
width: 300px;
position: relative;
}
.close {
position: absolute;
top: 10px;
right: 10px;
font-size: 20px;
cursor: pointer;
}
.buttons {
display: flex;
justify-content: flex-end;
gap: 10px;
margin-top: 20px;
}
button {
padding: 8px 16px;
background-color: #4CAF50;
color: white;
border: none;
border-radius: 4px;
cursor: pointer;
}
button:last-child {
background-color: #f44336;
}
</style>使用弹窗组件:
<div id="app">
  <button @click="showModal">显示弹窗</button>
  <modal
    :title="'确认操作'"
    :message="'确定要执行此操作吗?'"
    :confirm-text="'确定'"
    :cancel-text="'取消'"
    @confirm="handleConfirm"
    @cancel="handleCancel"
    ref="modal"
  ></modal>
</div>
<script>
  Vue.component('modal', {
    template: '#modal-template', // 假设将上面的弹窗组件模板放在一个 script 标签中,type 为 text/x-template,id 为 modal-template
    data() {
      return {
        isVisible: false
      };
    },
    props: ['title', 'message', 'confirmText', 'cancelText'],
    methods: {
      open() {
        this.isVisible = true;
      },
      close() {
        this.isVisible = false;
      },
      handleClose() {
        this.close();
      },
      handleConfirm() {
        this.$emit('confirm');
        this.close();
      },
      handleCancel() {
        this.$emit('cancel');
        this.close();
      }
    }
  });
  var app = new Vue({
    el: '#app',
    methods: {
      showModal() {
        this.$refs.modal.open();
      },
      handleConfirm() {
        console.log('用户点击了确定');
      },
      handleCancel()        {
 console.log('用户点击了取消');
      }
    }
  });
</script>
七、Vue 性能优化
(一)组件懒加载
通过 Vue.lazy 实现组件的懒加载,按需加载组件,减少初始加载时间。
const Home = Vue.lazy(() => import('./Home.vue'));
const routes = [
  { path: '/', component: Home },
  // 其他路由
];
(二)缓存组件
对于频繁切换的组件,可以使用 <keep-alive> 进行缓存,避免组件频繁销毁和重新创建。
<keep-alive>
  <component :is="currentComponent"></component>
</keep-alive>
(三)避免频繁操作 DOM
尽量减少对 DOM 的直接操作,充分利用 Vue 的响应式系统和虚拟 DOM。
(四)优化列表渲染
当渲染大量数据时,使用 track-by 或 key 属性提高渲染性能;对于大型列表,可以考虑使用虚拟滚动等技术。
八、注意事项
(一)数据响应性
只有在 Vue 实例创建时已经存在的数据属性才是响应式的,如果在之后添加新的属性,需要使用 Vue.set 或实例的 $set 方法使其响应式。
this.$set(this.someObject, 'newKey', newValue);(二)异步更新
Vue 在数据变化时会异步更新 DOM,如果需要立即获取更新后的 DOM 状态,可以使用 nextTick。
this.someData = newValue;
this.$nextTick(() => {
  // 在这里可以访问更新后的 DOM
});
(三)组件复用时的 prop 数据
如果子组件的 prop 数据需要被修改,应该通过事件通知父组件修改数据,而不是直接修改 prop,避免出现错误。
// 子组件
// 错误的做法
props: ['value'],
methods: {
  updateValue() {
    this.value = newValue; // 会警告
  }
},
// 正确的做法
props: ['value'],
methods: {
  updateValue() {
    this.$emit('update:value', newValue);
  }
}
(四)路由的动态加载与预加载
在使用路由懒加载时,需要注意路由的预加载配置,以优化用户体验。
九、总结
Vue 作为一款优秀的前端框架,凭借其简洁易懂的语法、强大的响应式系统、高效的组件化构架以及丰富的生态系统,为前端开发者提供了便捷、高效的开发工具,无论是构建小型的交互界面还是大型的单页面应用,都能展现出强大的能力。掌握 Vue 的核心概念、语法特性、组件通信、生命周期、路由等知识,并了解性能优化技巧和注意事项,能够帮助开发者更好地利用 Vue 框架构建出高品质、高性能的前端应用,提升开发效率和项目质量,在前端开发的浪潮中乘风破浪,为用户提供更优质的用户体验。
在学习和使用 Vue 的过程中,还需要不断地实践和探索,参考官方文档和社区资源,不断积累经验,深入了解 Vue 的原理和最佳实践,这样才能真正驾驭 Vue,创造出令人惊艳的前端作品。
引用 :
[1] Vue 官方文档 Introduction | Vue.js


 1097
1097

 被折叠的 条评论
为什么被折叠?
被折叠的 条评论
为什么被折叠?
 到【灌水乐园】发言


