 Java SPI深入解析与实战


深入理解SPI机制
本文主要内容
SPI加载机制概述
JAVA SPI源码分析
什么是SPI
SPI ,全称为 Service Provider Interface,是一种服务发现机制,起初是提供给厂商做插件开发的,这一机制为很多框架扩展提供了可能,
Java SPI
JAVA SPI使用了策略模式,一个接口多种实现。我们只声明接口,具体的实现并不直在程序中直接确定,而是由程序之外的配置掌控,用于具体实现的装配。具体步凑如下:
(1) 定义一个接口及对应的方法。
(2)编写该接口的一个实现类。
(3)在META-INF/service/目录下,创建一个以接口全路径命名的文件,如com.test.spi.PrintSrvice
(4)文件内容为具体实现类的全路径名,如果有多个则分隔符分隔。
(5)在代码中通过java.util.ServiceLoader来加载具体的实现类
项目结构如下
项目结构
1.定义一个接口
package com.test.spi;

public interface PrintService {

    void printInfo();
}
2.接口实现1
package com.test.spi;

public class PrintServiceImpl implements PrintService {

    public void printInfo() {
        System.out.println("hello world");
    }
}
3.接口实现2
package com.test.spi;

public class Print2ServiceImpl implements PrintService {

    public void printInfo() {
        System.out.println("hello world2");
    }
}
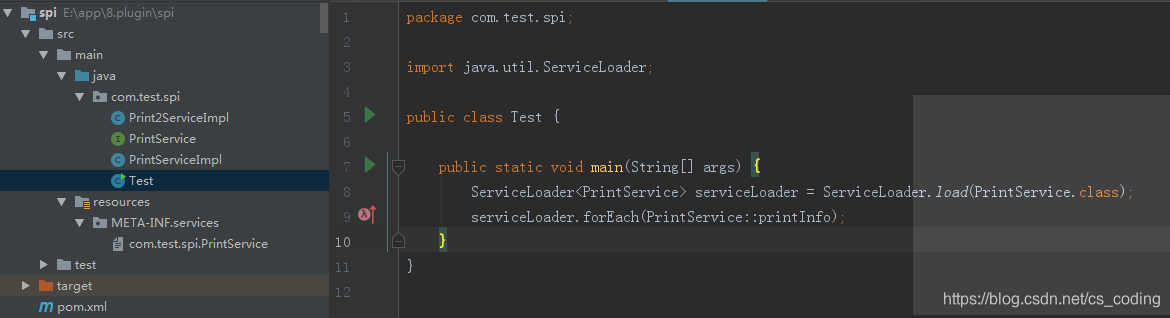
4.main函数入口
package com.test.spi;

import java.util.ServiceLoader;

public class Test {

    public static void main(String[] args) {
        ServiceLoader<PrintService> serviceLoader = ServiceLoader.load(PrintService.class);
        serviceLoader.forEach(PrintService::printInfo);
    }
}
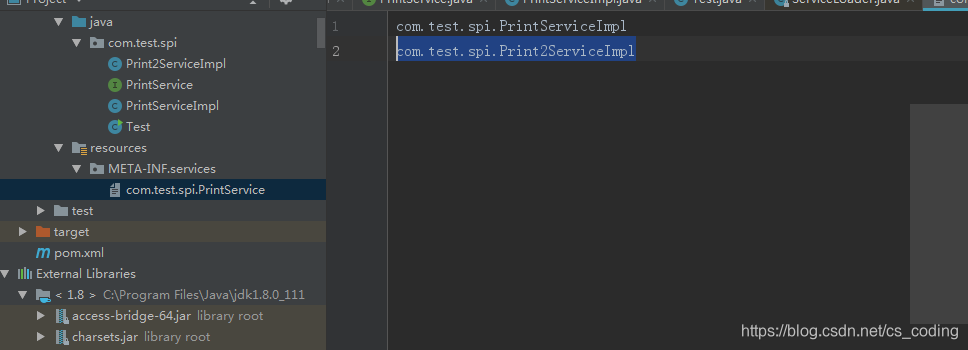
5.配置文件
com.test.spi.PrintServiceImpl
com.test.spi.Print2ServiceImpl
6.执行结果
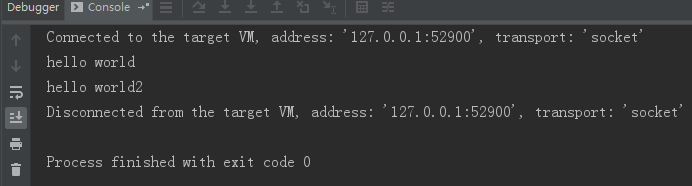
从上图看到,main函数通过ServiceLoader可以获取所有的接口实现,具体调用哪个实现可以由用户制定规则来决定。
源码分析
一、ServiceLoader类结构图
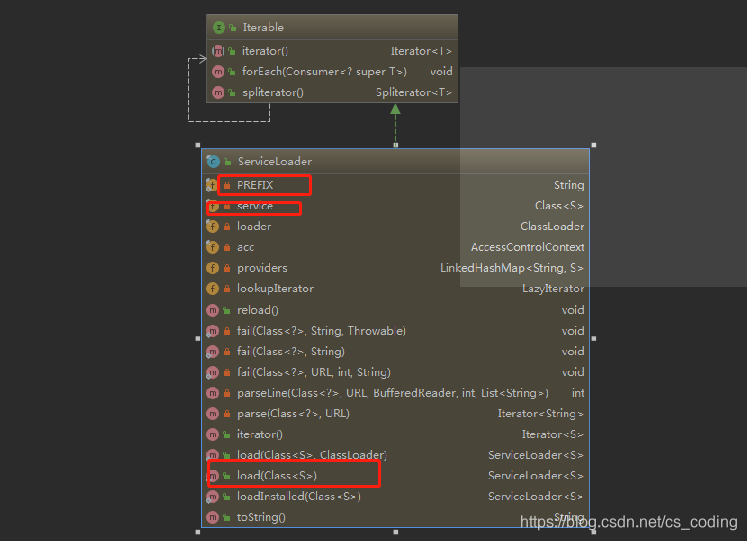
二、类定义属性
	//包名
    private static final String PREFIX = "META-INF/services/";

	//接口限定名
    // The class or interface representing the service being loaded
    private final Class<S> service;

	//类加载器
    // The class loader used to locate, load, and instantiate providers
    private final ClassLoader loader;

    // The access control context taken when the ServiceLoader is created
    private final AccessControlContext acc;

	//用来缓存加载的实现类
    // Cached providers, in instantiation order
    private LinkedHashMap<String,S> providers = new LinkedHashMap<>();

    // The current lazy-lookup iterator
    private LazyIterator lookupIterator;
三、执行加载的入口
    public static <S> ServiceLoader<S> load(Class<S> service) {
    	//获取类加载器
        ClassLoader cl = Thread.currentThread().getContextClassLoader();
        //执行加载流程
        return ServiceLoader.load(service, cl);
    }
四、初始化前置操作
    private ServiceLoader(Class<S> svc, ClassLoader cl) {
        //判断接口是否为空
        service = Objects.requireNonNull(svc, "Service interface cannot be null");
        //获取类加载器
        loader = (cl == null) ? ClassLoader.getSystemClassLoader() : cl;
        //上下文获取结果为null
        acc = (System.getSecurityManager() != null) ? AccessController.getContext() : null;
        //清除缓存实现
        providers.clear();
        //懒加载Iterator
        lookupIterator = new LazyIterator(service, loader);
    }
五、初始化前置操作
当执行for循环时执行下面代码(懒加载的方式)
        public boolean hasNext() {
       		//上文获取结果为null
            if (acc == null) {
            	//执行获取service处理
                return hasNextService();
            } else {
                PrivilegedAction<Boolean> action = new PrivilegedAction<Boolean>() {
                    public Boolean run() { return hasNextService(); }
                };
                return AccessController.doPrivileged(action, acc);
            }
        }
六、读取配置文件
    // Private inner class implementing fully-lazy provider lookup
    //
    private class LazyIterator
        implements Iterator<S>
    {

        Class<S> service;
        ClassLoader loader;
        Enumeration<URL> configs = null;
        Iterator<String> pending = null;
        String nextName = null;

        private LazyIterator(Class<S> service, ClassLoader loader) {
            this.service = service;
            this.loader = loader;
        }

        private boolean hasNextService() {
            if (nextName != null) {
                return true;
            }
            if (configs == null) {
                try {
                //获取文件的全路径名
                    String fullName = PREFIX + service.getName();
                    //读取配置文件
                    if (loader == null)
                        configs = ClassLoader.getSystemResources(fullName);
                    else
                        configs = loader.getResources(fullName);
                } catch (IOException x) {
                    fail(service, "Error locating configuration files", x);
                }
            }
            while ((pending == null) || !pending.hasNext()) {
                if (!configs.hasMoreElements()) {
                    return false;
                }
                //解析配置文件
                pending = parse(service, configs.nextElement());
            }
            nextName = pending.next();
            return true;
        }
七、解析配置文件并返回Iterator
循环读取配置文件中的接口,返回迭代器
    private Iterator<String> parse(Class<?> service, URL u)
        throws ServiceConfigurationError
    {
        InputStream in = null;
        BufferedReader r = null;
        ArrayList<String> names = new ArrayList<>();
        try {
            in = u.openStream();
            r = new BufferedReader(new InputStreamReader(in, "utf-8"));
            int lc = 1;
            while ((lc = parseLine(service, u, r, lc, names)) >= 0);
        } catch (IOException x) {
            fail(service, "Error reading configuration file", x);
        } finally {
            try {
                if (r != null) r.close();
                if (in != null) in.close();
            } catch (IOException y) {
                fail(service, "Error closing configuration file", y);
            }
        }
        return names.iterator();
    }
八、遍历Iterator
当配置文件内容不为空时执行next方法
        public S next() {
        	//上文中获取acc为空
            if (acc == null) {
                //执行下一步处理
                return nextService();
            } else {
                PrivilegedAction<S> action = new PrivilegedAction<S>() {
                    public S run() { return nextService(); }
                };
                return AccessController.doPrivileged(action, acc);
            }
        }
九、将得到的实现类通过反射加载并获取实例对象
private S nextService() {
            if (!hasNextService())
                throw new NoSuchElementException();
             //配置文件中的接口实现
            String cn = nextName;
            nextName = null;
            Class<?> c = null;
            try {
            	//通过反射加载实现类
                c = Class.forName(cn, false, loader);
            } catch (ClassNotFoundException x) {
                fail(service,
                     "Provider " + cn + " not found");
            }
            if (!service.isAssignableFrom(c)) {
                fail(service,
                     "Provider " + cn  + " not a subtype");
            }
            try {
            	//获取接口实现类的实例对象
                S p = service.cast(c.newInstance());
                //添加到缓存provider中
                providers.put(cn, p);
                return p;
            } catch (Throwable x) {
                fail(service,
                     "Provider " + cn + " could not be instantiated",
                     x);
            }
            throw new Error();          // This cannot happen
        }
当获取到所有对象实例,最终在执行foreach时调用指定的方法,并输出响应结果
十、通过Consumer执行接口中的目标方法
    default void forEach(Consumer<? super T> action) {
        Objects.requireNonNull(action);
        for (T t : this) {
            action.accept(t);
        }
    }
如需案例源码,请添加作者微信
欢迎各位技术大佬加微沟通,加微请注明来自 优快云,
如需转载请联系作者本人并注明原文章链接地址


 2219
2219

 被折叠的 条评论
为什么被折叠?
被折叠的 条评论
为什么被折叠?
 到【灌水乐园】发言


