


之前实现分页,都是写好后端就行,今天要自己全面实现一个分页,不知从何下手,也查了很多,但是基本都是说什么重构框架,自己写sql,计算前一页,前端 js 实现之类的,看的是云里雾里,后来也成功实现了分页,在此记录一下,希望能对大家有帮助。
一、maven pom文件中导入依赖(若没有使用相应的maven构建项目,导入相应的jar包即可)
<dependency>
    <groupId>com.github.pagehelper</groupId>
	<artifactId>pagehelper</artifactId>
	<version>3.4.2-fix</version>
</dependency>
二、在mybatis的配置文件里加入相应的插件配置(此处使用的mysql数据库)
<configuration>
	<plugins>
		<plugin interceptor="com.github.pagehelper.PageHelper">
			<property name="dialect" value="mysql"/>
			<property name="rowBoundsWithCount" value="true"/>
		</plugin>
	</plugins>
</configuration>
三、编写一个Page类辅助分页
package com.nine.util;
import java.util.List;

public class Page {

	private int start;	// 首页
	private int end;	// 尾页
	private int cur;	// 当前页
	private long total;	// 总记录数
	private List<?> rows;	// 记录的集合(查询出来的相应页的数据)

	public Page() {}

	public int getStart() {
		return start;
	}

	public void setStart(int start) {
		this.start = start;
	}

	public int getEnd() {
		return end;
	}

	public void setEnd(int end) {
		this.end = end;
	}

	public int getCur() {
		return cur;
	}

	public void setCur(int cur) {
		this.cur = cur;
	}

	public long getTotal() {
		return total;
	}

	public void setTotal(long total) {
		this.total = total;
	}

	public List<?> getRows() {
		return rows;
	}

	public void setRows(List<?> rows) {
		this.rows = rows;
	}

}
四、编写Service层查询接口
public interface ManaEmpService {
	// 分页展示所有培训人员
	public Page showAllTraner(int page, int rows);
}
五、实现查询接口
@Service
public class ManaEmpServiceImpl implements ManaEmpService {
	@Autowired
	private StudateMapper studateMapper;

	/**
	 *	 查询所有培训人员
	 *	page: 当前页
	 *	rows: 每一页有多少行
	 */
	@Override
	public Page showAllTraner(int page, int rows) {
		// 创建查询条件
		StudateExample example = new StudateExample();
		// 分页处理
		PageHelper.startPage(page, rows);
		//List<Studate> list = studateMapper.selectByExample(example);// 此方法查询stucont封装不上,mybatis对text类型特别进行了处理
		List<Studate> list = studateMapper.selectByExampleWithBLOBs(example);
		// 创建一个返回值对象,封装结果
		Page result = new Page();
		// 封装数据
		result.setRows(list);
		// 取记录总条数
		PageInfo<Studate> pageInfo = new PageInfo<>(list);
		result.setTotal(pageInfo.getTotal());
		// 取第一页
		result.setStart(pageInfo.getFirstPage());
		// 取最后一页
		result.setEnd(pageInfo.getLastPage());
		// 设置当前页
		result.setCur(page);

		return result;
	}

}
六、编写Controller层
@Controller
@RequestMapping("/manager")
public class ManaEmpController {
	// 注入管理员工Service
	@Autowired
	private ManaEmpService manaEmpService;

	@RequestMapping("/learningManager/{curpage}")
	public String getAllLeaner(Model model, @PathVariable Integer curpage) {
		Page result = manaEmpService.showAllTraner(curpage, 2);  // 由于数据有限,该处设置每页2行数据,大家可根据自己的需要设置相应的数字
		model.addAttribute("page", result);
		return "trainManager";
	}


}
七、前端 jsp 页面代码
1.前端使用bootstrap分页组件
<nav aria-label="Page navigation">
<ul class="pagination">
<li><a href="#" aria-label="Previous"> <span
aria-hidden="true">«</span>
</a></li>
<li><a>1</a></li>
<li><a>2</a></li>
<li><a>3</a></li>
<li><a>4</a></li>
<li><a>5</a></li>
<li><a>»</span>
</a></li>
</ul>
</nav>
效果图:

2.在jsp页面的顶部引入Page类,和要分页的数据的类(此处为Studate),和相应的 JSTL标签
<%@ page import="com.nine.pojo.Studate"%>
<%@ page import="com.nine.util.Page"%>
<%@ page contentType="text/html;charset=UTF-8" language="java"%>
<%@taglib prefix="c" uri="http://java.sun.com/jsp/jstl/core"%>
<%@ taglib prefix="fmt" uri="http://java.sun.com/jsp/jstl/fmt"%>
3.打印相应的数据
<div class="panel panel-default" style="width: 90%; margin-left: 5%">
		<div class="panel-heading" style="background-color: #fff">
			<h3 class="panel-title">全部人员</h3>
		</div>
		<div class="panel-body">
			<table class="table table-hover">
				<thead>
					<tr>
						<th>工号</th>
						<th>姓名</th>
						<th>培训项目</th>
						<th>是否培训</th>
						<th>是否完成</th>
						<th>培训日期</th>
						<th>详情</th>
						<th>编辑</th>
						<th>删除</th>
					</tr>
				</thead>
				<tbody>
					<c:forEach items="${page.rows}" var="studate">
						<tr>
							<td><c:out value="${studate.empId}"></c:out></td>
							<td><c:out value="${studate.empName}"></c:out></td>
							<td><c:out value="${studate.stucont}"></c:out></td>
							<c:if test="${studate.isJoin==1}">
								<td><c:out value="已培训"></c:out></td>
							</c:if>
							<c:if test="${studate.isJoin==0}">
								<td><c:out value="未培训"></c:out></td>
							</c:if>
							<c:if test="${studate.isFin==1}">
								<td><c:out value="已完成"></c:out></td>
							</c:if>
							<c:if test="${studate.isFin==0}">
								<td><c:out value="未完成"></c:out></td>
							</c:if>
							<td><fmt:formatDate value="${studate.studate}" type="date"
									pattern="yyyy-MM-dd" /></td>
							<td><a
								href="studate_detail.html/empId=<c:out value='${studate.empId}'></c:out>"><button
										type="button" class="btn btn-success btn-xs">详情</button></a></td>
							<td><a
								href="updatestudate.html/empId=<c:out value='${studate.empId}'></c:out>"><button
										type="button" class="btn btn-info btn-xs">编辑</button></a></td>
							<td><a
								href="deletestudate.html/empId=<c:out value=' ${studate.empId} '></c:out>"><button
										type="button" class="btn btn-danger btn-xs">删除</button></a></td>
						</tr>
					</c:forEach>
				</tbody>
			</table>
		</div>
	</div>
4.分页实现(!!!)
此处为页面显示5页(少于5页则显示实际的页数),自己可以根据自己的意愿编写相应的逻辑
<div class="curPage">
当前页:<c:out value='${page.cur}'></c:out> 共<c:out value=' ${page.end}'></c:out>页
</div>
<div class="pageStyle">
<ul class="pagination">
<li>
<a href="/manager/learningManager/1">
<span>«</span>
</a>
</li>
<li >
<a href="/manager/learningManager/${(page.cur-1) > 0 ? (page.cur-1) : 1}">
<span>‹</span>
</a>
</li>
<c:if test="${page.end < 5}">
<c:forEach begin="${page.start}" end="${page.end}"
varStatus="status">
<li><a href="/manager/learningManager/${status.index+page.start-1}"
class="current">${status.index}</a></li>
</c:forEach>
</c:if>
<c:if test="${page.end >= 5}">
<c:forEach begin="${(page.cur > 3) ? ((page.cur+5) <= page.end ? (page.cur-2) : (page.end-4)):1}"
end="${(page.cur >= 3) ? ((page.cur+2) <= page.end ? (page.cur+2):page.end):5}"
varStatus="status">
<li><a href="/manager/learningManager/${status.index+page.start-1}"
class="current">${status.index}</a></li>
</c:forEach>
</c:if>
<li >
<a href="/manager/learningManager/${(page.cur == page.end) ? page.end : (page.cur+1)}">
<span>›</span>
</a>
</li>
<li >
<a href="/manager/learningManager/${page.end}">
<span>»</span>
</a>
</li>
</ul>
</div>
5.分页结果
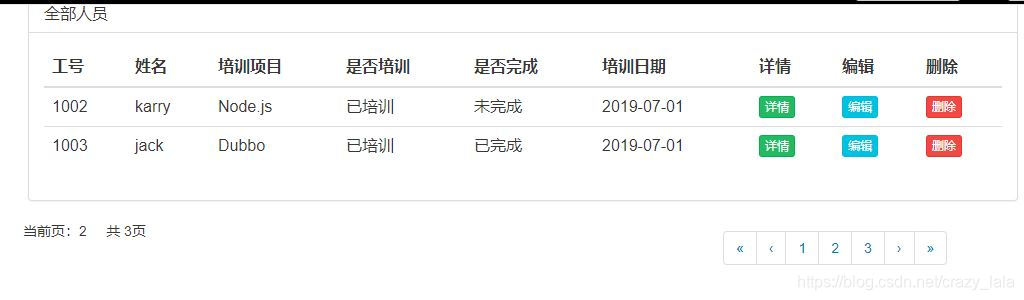


 2438
2438


 到【灌水乐园】发言


