


文章目录
简介
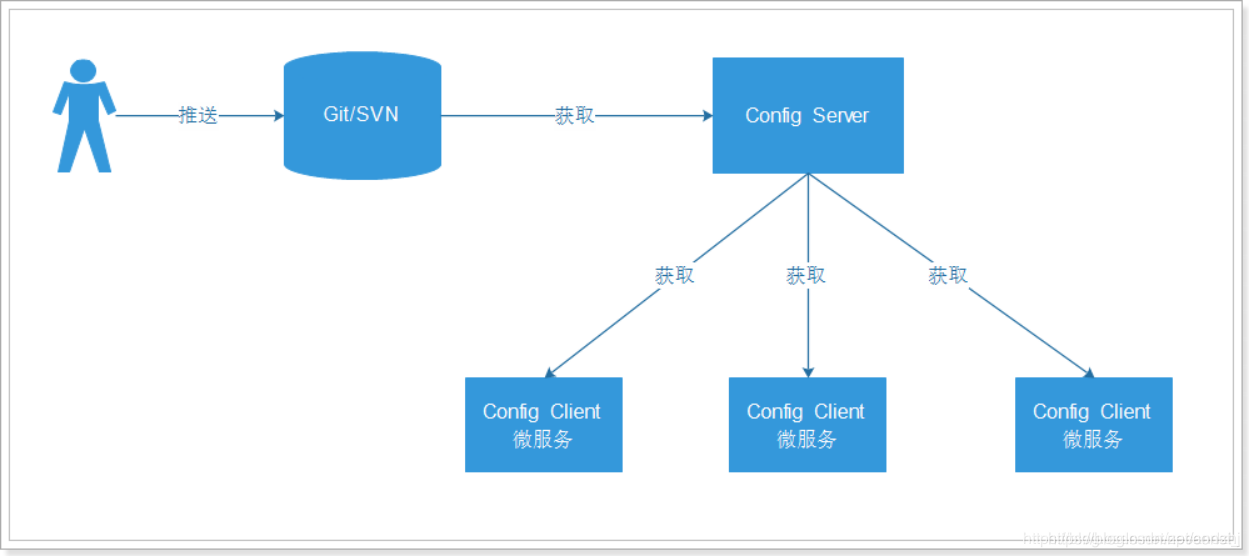
在分布式系统中,由于服务数量巨多,为了方便服务配置文件统一管理,实时更新,所以需要分布式配置中心组件。在Spring Cloud中,有分布式配置中心组件Spring Cloud Config,它支持配置服务放在配置服务的内存中(即本地),也支持放在远程Git仓库中。
在Spring Cloud Config组件中,分两个角色,一是Config Server,二是Config Client。
Config Server是一个可横向扩展、集中式的配置服务器,它用于集中管理应用程序各个环境下的配置,默认使用Git存储配置文件内容,也可以使用SVN存储,或者是本地文件存储。Config Client是Config Server的客户端,用于操作存储在Config Server中的配置内容。微服务在启动时会请求Config Server获取配置文件的内容,请求到后再启动容器。
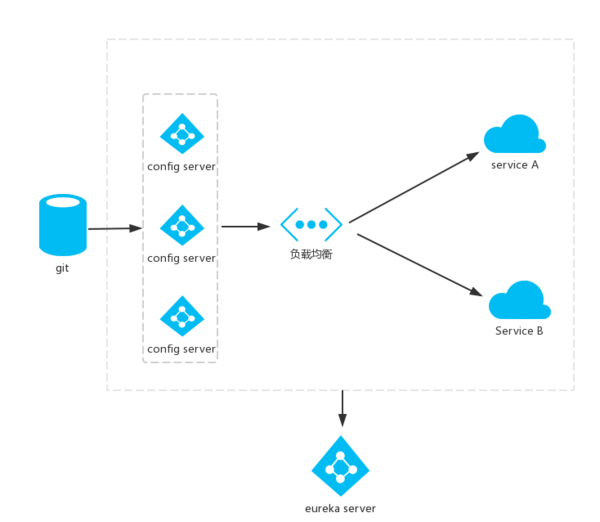
使用Spring Cloud Config的架构:
ContigServer从本地读取配置文件
搭建Config Server
创建一个model工程作为配置中心,即config-server。
导入依赖。
<dependency>
    <groupId>org.springframework.cloud</groupId>
    <artifactId>spring-cloud-config-server</artifactId>
</dependency>
在启动类中添加@EnableConfigServer注解开启配置服务器的功能。
import org.springframework.boot.SpringApplication;
import org.springframework.boot.autoconfigure.SpringBootApplication;
import org.springframework.cloud.config.server.EnableConfigServer;

@SpringBootApplication
// 开启配置服务
@EnableConfigServer
public class ConfigServerApplication {

	public static void main(String[] args) {
		SpringApplication.run(ConfigServerApplication.class, args);
	}

}
配置文件appication.yml
server:
  port: 8095

spring:
  profiles: native
  application:
      name: config-server
  cloud:
    config:
      server:
        native:
          search-locations: classpath:/shared
在工程的 Resources 目录下建一个 shared 文件夹,用于存放本地配置文件。在shared 目录下,新建一个 config-client-dev.yml 文件,用作 config-client 工程的 dev (开发环境〉的配置文件。在 config-client-dev.yml 配置文件中,指定程序的端口号为 9999 ,并定义一个变量 foo,内容如下:
server:
  port: 9999
foo: foo version 1
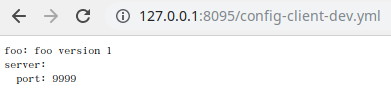
启动测试
访问:http://127.0.0.1:8095/config-client-dev.yml
搭建Config Client
创建一个model工程作为配置中心,即config-client。
导入依赖。
<dependency>
    <groupId>org.springframework.cloud</groupId>
    <artifactId>spring-cloud-starter-config</artifactId>
</dependency>
在启动类中添加@EnableConfigServer注解开启配置服务器的功能。
创建配置文件bootstrap.yml,注意这里用的是 bootstrap.yml ,bootstrap 相对于 application 具有优先的执行顺序。
配置文件 bootstrap.yml 的代码如下:
spring:
  application:
    name: config-client
  cloud:
    config:
      uri: http://127.0.0.1:8095/
      fail-fast: true
      profile: dev
      name: config-client
spring.cloud.config.uri:配置中心的地址spring.cloud.config.fail-fast:如果没有读取成功,则执行快速失败- 变量
{spring.cloud.config.name}和变量{spring.cloud.config.profile},两者以“-”相连,构成了向 Config Server 读取的配置文件名,本案例为:config-client-dev.yml文件。
ContigServer从远程Git仓库读取配置文件
搭建Config Server
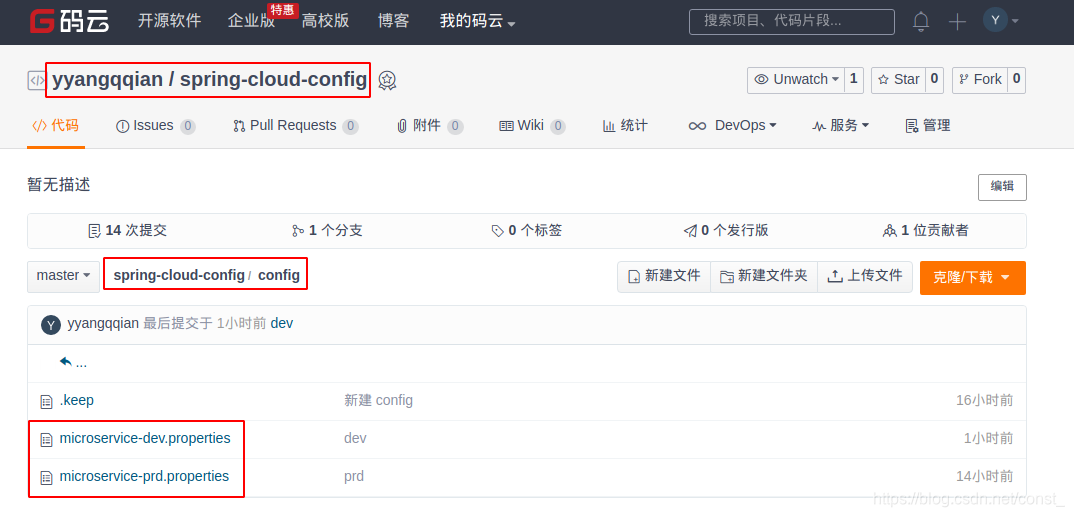
在Git服务器上准备配置文件。
配置文件的命名规则是:{application}-{profile}.properties/yml
jdbc.driverClassName=com.mysql.jdbc.Driver
jdbc.url=jdbc:mysql://127.0.0.1:3306/test?useUnicode=true&characterEncoding=utf8&autoReconnect=true&allowMultiQueries=true
jdbc.username=root
jdbc.password=123456
推送文件到git服务器,这里使用的是码云,当然也可以使用github或者使用svn。使用码云创建一个项目(私有项目需要账号密码)
创建一个model工程作为配置中心,即config-server。
导入依赖。
<dependency>
    <groupId>org.springframework.cloud</groupId>
    <artifactId>spring-cloud-config-server</artifactId>
</dependency>
在程序的入口Application类加上@EnableConfigServer注解开启配置服务器的功能。
import org.springframework.boot.SpringApplication;
import org.springframework.boot.autoconfigure.SpringBootApplication;
import org.springframework.cloud.config.server.EnableConfigServer;

@SpringBootApplication
// 开启配置服务
@EnableConfigServer
public class ConfigServerApplication {

	public static void main(String[] args) {
		SpringApplication.run(ConfigServerApplication.class, args);
	}

}
编写配置文件application.yml:
server:
  port: 8085

spring:
  application:
      name: config-server
  cloud:
      config:
        server:
          git: #配置git仓库地址
            uri: https://gitee.com/yyangqqian/spring-cloud-config.git
            search-paths:
            - config		#配置文件目录地址
            #码云账号(公有项目不需要设置)
            username:
            #码云密码(公有项目不需要设置)
            password:
        #分支名称
        label: master
配置说明:
- spring.cloud.config.server.git.uri:配置git仓库地址
- spring.cloud.config.server.git.searchPaths:配置仓库路径
- spring.cloud.config.label:配置仓库的分支
- spring.cloud.config.server.git.username:访问git仓库的用户名(公开仓库可以不填)
- spring.cloud.config.server.git.password:访问git仓库的用户密码(公开仓库可以不填)
启动测试
访问:http://127.0.0.1:8085/jdbc.url/dev
证明配置服务中心可以从远程程序获取配置信息。

请求配置文件的规则如下:
/{application}/{profile}/[label]
/{application}-{profile}.yml
/{label}/{application}-{profile}.yml
/{application}-{profile}.properties
/{label}/{application}-{profile}.properties
其中{label}是指分支,默认是master。
访问:http://127.0.0.1:8085/microservice-dev.yml

搭建Config Client
创建一个SpringBoot的model工程作为配置中心,即config-client。其pom文件:
<dependency>
    <groupId>org.springframework.cloud</groupId>
    <artifactId>spring-cloud-starter-config</artifactId>
</dependency>
新增配置文件bootstrap.yml:
spring:
  application:
    name: config-client
  cloud:
    config:
      # 配置中心的地址
      uri: http://127.0.0.1:8085/
      # 对应配置服务中的{profile}
      profile: dev
      # 对应的分支
      label: master
# 必须和Git上的配置文件名相匹配,例如配置文件为:testConfig-dev.properties,这个时候对应的name=testConfig
      # 对应配置服务中的{application},不写默认是本应用名,即spring.application.name
      name: microservice
server:
  port: 8086
变量{spring.cloud.config.name}和变量{spring.cloud.config.profile},两者以“-”相连,构成了向配置中心读取的配置文件名,本案例为:microservice-dev.yml文件。
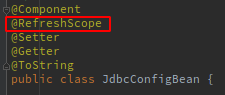
编写对象通过@Value注解读取Config Server中的值。
import lombok.Getter;
import lombok.Setter;
import lombok.ToString;
import org.springframework.beans.factory.annotation.Value;
import org.springframework.stereotype.Component;

@Component
@Setter
@Getter
@ToString
public class JdbcConfigBean {
    @Value("${jdbc.url}")
    private String url;
    @Value("${jdbc.username}")
    private String username;
    @Value("${jdbc.password}")
    private String password;
    @Value("${jdbc.driverClassName}")
    private String driverClassName;
}
编写控制器
import org.springframework.beans.factory.annotation.Autowired;
import org.springframework.web.bind.annotation.GetMapping;
import org.springframework.web.bind.annotation.RestController;

@RestController
public class DemoController {
    @Autowired
    JdbcConfigBean jdbcConfigBean;
    @GetMapping("/demo")
    public String demo() {
        return jdbcConfigBean.toString();
    }
}
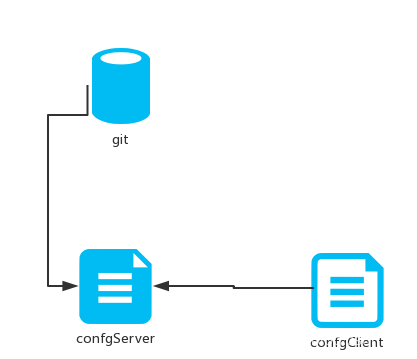
启动测试

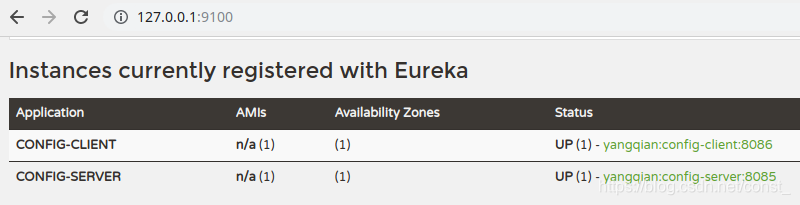
说明config-client从config-server获取了配置信息,而config-server是从git仓库读取的,如图:
将服务注册到eureka
将配置中心做成一个微服务注册到eureka,将其集群化,从而达到高可用。
改造config-server
导入EurekaClient的起步依赖。
<dependency>
    <groupId>org.springframework.cloud</groupId>
    <artifactId>spring-cloud-starter-netflix-eureka-client</artifactId>
</dependency>
在application.yml配置文件中增加注册到eureka的配置。
eureka:
  client:
    serviceUrl:
      defaultZone: http://localhost:8100/eureka/
最后在程序的启动类Application加上@EnableEurekaClient开启eureka客户端注解。
改造config-client
导入EurekaClient的起步依赖。
<dependency>
    <groupId>org.springframework.cloud</groupId>
    <artifactId>spring-cloud-starter-netflix-eureka-client</artifactId>
</dependency>
在bootstrap.yml配置文件中增加注册到eureka的配置。
eureka:
  client:
    serviceUrl:
      defaultZone: http://localhost:8100/eureka/
修改bootstrap.yml配置文件,将写死配置中心地址方式改成从eureka注册中心获取配置中心服务。
spring:
  application:
    name: config-client
  cloud:
    config:
      # 配置中心的地址
#      uri: http://127.0.0.1:8085/
      # 对应配置服务中的{profile}
      profile: dev
      # 对应的分支
      label: master
      # 必须和Git上的配置文件名相匹配,例如配置文件为:testConfig-dev.properties,这个时候对应的name=testConfig
      # 不写默认是本应用名,即spring.application.name
      name: microservice
      discovery:
        enabled: true #启用发现服务功能
        service-id: config-server #指定配置中心的服务名
最后在程序的启动类Application加上@EnableEurekaClient开启eureka客户端注解。
架构图
Client手动刷新配置
使用actuator监控中心完成刷新功能。
在config-client项目上做修改。
导入依赖:
<dependency>
    <groupId>org.springframework.boot</groupId>
    <artifactId>spring-boot-starter-actuator</artifactId>
</dependency>
为动态更新配置内容的bean添加@RefreshScope注解。
在application.yml文件中,添加配置如下:
#开启所有端点
management:
  endpoints:
    web:
     exposure:
       include: "*"
重启测试
使用refrehs端点
curl -X POST http://localhost:8086/actuator/refresh
刷新从Server中获取配置文件的属性值。

动态网关
传统方式将zuul路由规则配置在配置文件中,如果修改了路由规则,需要重启服务器。可以将配置文件存在配置中心,利用SpringCloud Config实现动态路由规则添加。
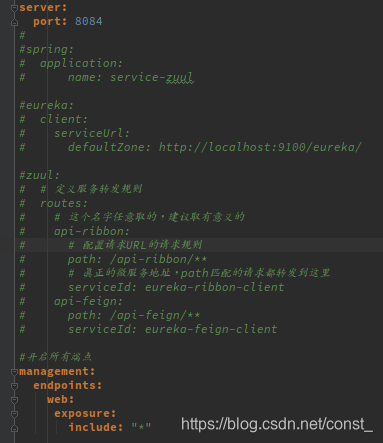
在git服务器上创建配置文件service-zuul-dev.yml,注释掉网关工程yml文件中的zuul配置,把配置拷到service-zuul-dev.yml中。
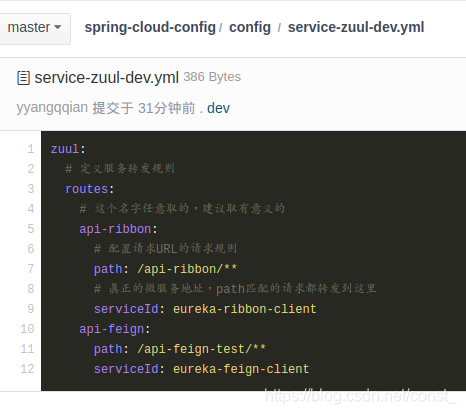
zuul:
  # 定义服务转发规则
  routes:
    # 这个名字任意取的,建议取有意义的
    api-ribbon:
      # 配置请求URL的请求规则
      path: /api-ribbon/**
      # 真正的微服务地址,path匹配的请求都转发到这里
      serviceId: eureka-ribbon-client
    api-feign:
      path: /api-feign/**
      serviceId: eureka-feign-client
导入依赖
<dependency>
    <groupId>org.springframework.boot</groupId>
    <artifactId>spring-boot-starter-actuator</artifactId>
</dependency>
<dependency>
    <groupId>org.springframework.cloud</groupId>
    <artifactId>spring-cloud-starter-config</artifactId>
</dependency>
注释掉网关工程中的配置,并开启actuator:
management:
  endpoints:
    web:
     exposure:
       include: "*"
在网关工程新建bootstrap.yml,启用Spring Cloud Config功能,将zuul注册到eureka:
spring:
  application:
    name: service-zuul
  cloud:
    config:
      # 对应配置服务中的{profile}
      profile: dev
      # 对应的分支
      label: master
      # 必须和Git上的配置文件名相匹配,例如配置文件为:testConfig-dev.properties,这个时候对应的name=testConfig
      # 不写默认是本应用名,即spring.application.name
      name: service-zuul
      discovery:
        enabled: true #启用发现服务功能
        service-id: config-server #指定配置中心的服务名

eureka:
  client:
    serviceUrl:
      defaultZone: http://localhost:9100/eureka/
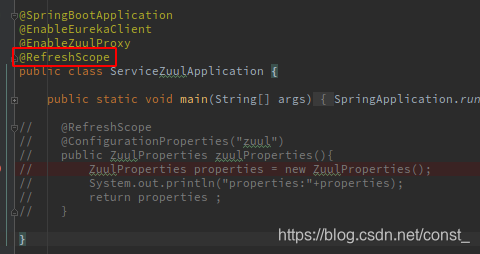
在启动类增加@RefreshScope注解,支持手动刷新。
ZuulProperties:zuul配置信息类。
启动服务测试
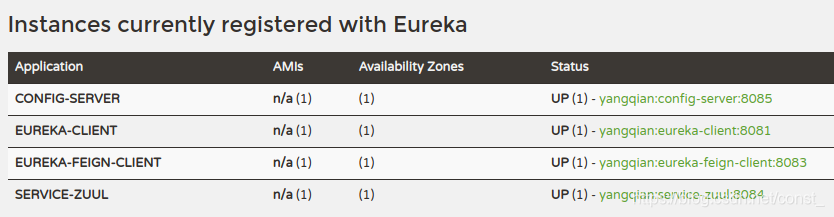
通过Zuul正常访问服务。


 6万+
6万+

 被折叠的 条评论
为什么被折叠?
被折叠的 条评论
为什么被折叠?
 到【灌水乐园】发言


