


😎 知识点概览
为了方便后续回顾该项目时能够清晰的知道本章节讲了哪些内容,并且能够从该章节的笔记中得到一些帮助,所以在完成本章节的学习后在此对本章节所涉及到的知识点进行总结概述。
本章节为【学成在线】项目的 day07 的内容
- 对课程管理的CRUD
- 级联菜单
- 使用
mongoDB储存数据字典
目录
内容会比较多,小伙伴们可以根据目录进行按需查阅。
一、课程查询
0x01 需求分析
课程添加完成后可通过我的课程进入课程修改页面,此页面显示我的课程列表,如下图所示,可分页查询。

上边的查询要实现分页、会存在多表关联查询,所以建议使用mybatis实现我的课程查询。
0x02 定义API接口
输入参数:页码、每页显示个数、查询条件
输出结果类型:QueryResponseResult<自定义类型>,在 api 工程创建 course 包,创建CourseControllerApi 接口。
@Api(value="课程管理API",description = "用于对课程的增删查改")
public interface CourseControllerApi {
	    @ApiOperation("分页查询课程列表1")
    public QueryResponseResult findCourseList(int page, int size, CourseListRequest courseListRequest);
}
0x03 课程管理服务
PageHelper
PageHelper 是 mybatis 的通用分页插件,通过 mybatis 的拦截器实现分页功能,拦截sql查询请求,添加分页语句,最终实现分页查询功能。
我的课程具有分页功能,本项目使用 Pagehelper 实现 Mybatis 分页功能开发,由于本项目使用 springboot 开发,在 springboot 上集成 pagehelper(https://github.com/pagehelper/pagehelper-spring-boot)PageHelper 的使用方法及原理如下:
- 在调用
dao的service方法中设置分页参数:PageHelper.startPage(page, size),分页参数会设置在ThreadLocal中 PageHelper在mybatis执行sql前进行拦截,从ThreadLocal取出分页参数,修改当前执行的sql语句,添加分页sql。- 最后执行添加了分页
sql的sql语句,实现分页查询。

1)添加依赖
<dependency>
    <groupId>com.github.pagehelper</groupId>
    <artifactId>pagehelper‐spring‐boot‐starter</artifactId>
    <version>1.2.4</version>
</dependency>
2)配置pageHelper
pagehelper:
  helper‐dialect: mysql
Dao
1)mapper 接口
import com.github.pagehelper.Page;
import com.xuecheng.framework.domain.course.CourseBase;
import com.xuecheng.framework.domain.course.ext.CourseInfo;
import com.xuecheng.framework.domain.course.request.CourseListRequest;
import org.apache.ibatis.annotations.Mapper;
@Mapper
public interface CourseMapper {
    CourseBase findCourseBaseById(String id);
    Page<CourseInfo> findCourseListPage(CourseListRequest courseListRequest);
}
2)mapper.xml映射文件
<select id="findCourseListPage" resultType="com.xuecheng.framework.domain.course.ext.CourseInfo"
        parameterType="com.xuecheng.framework.domain.course.request.CourseListRequest">
    SELECT
    course_base.*,
    (SELECT pic FROM course_pic WHERE courseid = course_base.id) pic
    FROM
    course_base
</select>
- 测试dao
//测试分页
@Test
public void testPageHelper(){
    PageHelper.startPage(2, 1);
    CourseListRequest courseListRequest = new CourseListRequest();
    Page<CourseInfo> courseListPage = courseMapper.findCourseListPage(courseListRequest);
    List<CourseInfo> result = courseListPage.getResult();
    System.out.println(courseListPage);
}
测试前修改日志级别为debug,并跟踪运行日志,发现sql语句中已经包括分页语句。
Service
定义CourseService.java类,用于课程管理的service定义:
 /**
     * 分页查询课程信息
     */
    public QueryResponseResult findCourseList(int pageNum, int size, CourseListRequest courseListRequest){
        if(pageNum<=0){
            pageNum = 0;
        }
        if(size<=0){
            size = 20;
        }
        PageHelper.startPage(pageNum,size);  //设置分页参数
        Page<CourseBase> courseList = courseMapper.findCourseList(courseListRequest);
        QueryResult queryResult = new QueryResult();
        queryResult.setList(courseList.getResult());
        queryResult.setTotal(courseList.getTotal());
        return new QueryResponseResult(CommonCode.SUCCESS,queryResult);
    }
Controller
@RestController
@RequestMapping("/course")
public class CourseController implements CourseControllerApi {
    @Autowired
    CourseService courseService;
    @Override
    @GetMapping("/coursebase/list/{page}/{size}")
    public QueryResponseResult<CourseInfo> findCourseList(
            @PathVariable("page") int page,
            @PathVariable("size") int size,
            CourseListRequest courseListRequest) {
        return courseService.findCourseList(page,size,courseListRequest);
    }
}
测试
使用 postman 或 swagger-ui 测试课程列表接口。
0x04 前端开发
页面编写
创建 ourse_list.vue
1)使用element 的card组件

页面布局代码如下:
<template>
  <section>
    <el‐row >
      <el‐col :span="8"  :offset=2 >
        <el‐card :body‐style="{ padding: '10px' }">
          <img src="/static/images/add.jpg" class="image" height="150px">
          <div style="padding: 10px;">
            <span>课程名称</span>
            <div class="bottom clearfix">
              <time class="time"></time>
              <router‐link class="mui‐tab‐item" :to="{path:'/course/add/base'}">
                  <el‐button type="text" class="button" >新增课程</el‐button>
              </router‐link>
            </div>
          </div>
        </el‐card>
      </el‐col>
      <el‐col :span="8" v‐for="(course, index) in courses" :key="course.id" :offset="index > 0 ?
2 : 2">
        <el‐card :body‐style="{ padding: '10px' }">
          <img :src="course.pic!=null?imgUrl+course.pic:'/static/images/nonepic.jpg'"
class="image" height="150px">
          <div style="padding: 10px;">
           <span>{{course.name}}</span>
            <div class="bottom clearfix">
              <time class="time"></time>
              <el‐button type="text" class="button" @click="handleManage(course.id)">管理课程
</el‐button>
            </div>
          </div>
        </el‐card>
      </el‐col>
      <!‐‐分页‐‐>
      <el‐col :span="24" class="toolbar">
        <el‐pagination background layout="prev, pager, next" @current‐
change="handleCurrentChange" :page‐size="size"
                       :total="total" :current‐page="page"
                       style="float:right;">
        </el‐pagination>
      </el‐col>
    </el‐row>
  </section>
</template>
<script>
  import * as courseApi from '../api/course';
  import utilApi from '../../../common/utils';
  let sysConfig = require('@/../config/sysConfig')
  export default {
    data() {
      return {
        page:1,
        size:7,
        total: 0,
        courses: [],
        sels: [],//列表选中列
        imgUrl:sysConfig.imgUrl
      }
    },
    methods: {
        //分页方法
      handleCurrentChange(val) {
        this.page = val;
      },
      //获取课程列表
      getCourse() {

      },
      handleManage: function (id) {
        console.log(id)
        this.$router.push({ path: '/course/manager/'+id})
      }
    },
    created(){
     },
    mounted() {
    }
  }
</script>
<style scoped>
  .el‐col‐8{
    width:20%
  }
  .el‐col‐offset‐2{
    margin‐left:2%
  }
  .time {
    font‐size: 13px;
    color: #999;
  }
  .bottom {
    margin‐top: 13px;
    line‐height: 12px;
  }
  .button {
    padding: 0;
    float: right;
  }
  .image {
    width: 100%;
    display: block;
  }
  .clearfix:before,
  .clearfix:after {
    display: table;
    content: "";
  }
  .clearfix:after {
    clear: both
  }
</style>
2)路由
import course_list from '@/module/course/page/course_list.vue';
import Home from '@/module/home/page/home.vue';
export default [
  {
     path: '/course',
    component: Home,
    name: '课程管理',
    hidden: false,
    iconCls: 'el‐icon‐document',
    children: [
      { path: '/course/list', name: '我的课程',component: course_list,hidden: false }
    ]
  }
]
Api调用
1、定义Api方法
//我的课程列表
export const findCourseList = (page,size,params) => {
     //对于查询条件,向服务端传入key/value串。
     //使用工具类将json对象转成key/value
     let queries = querystring.stringify(params)
    return http.requestQuickGet(apiUrl+"/course/coursebase/list/"+page+"/"+size+"?"+queries);
}
2、在页面调用 findCourseList 方法
//获取课程列表
getCourse() {
  courseApi.findCourseList(this.page,this.size,{}).then((res) => {
          console.log(res);
          if(res.success){
            this.total = res.queryResult.total;
            this.courses = res.queryResult.list;
          }
  });
}
在 mounted 钩子中调用 getCourse 方法
mounted() {
  //查询我的课程
  this.getCourse();
}
在分页方法中调用 getCourse 方法
 //分页方法
handleCurrentChange(val) {
  this.page = val;
  this.getCourse();
},
1测试
页面效果如下:
注意:由于课程图片服务器没有搭建,这里图片暂时无法显示。

二、新增课程
0x01 需求分析
用户操作流程如下:
1、用户进入“我的课程”页面,点击“新增课程”,进入新增课程页面
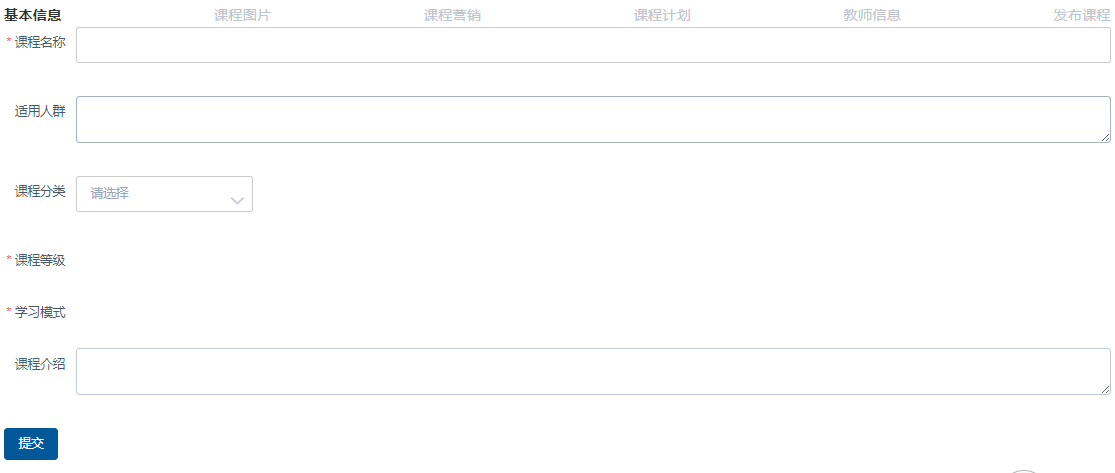
2、填写课程信息,选择课程分类、课程等级、学习模式等。
3、信息填写完毕,点击“提交”,课程添加成功或课程添加失败并提示失败原因。
需要解决的是在新增页面上输入的信息:
1、课程分类 多级分类,需要方便用户去选择。
2、课程等级、学习模式等这些选项建议是可以配置的。
0x02 课程分类查询
介绍
在新增课程界面需要选择课程所属分类, 分类信息是整个项目非常重要的信息,课程即商品,分类信息设置的好坏直接影响用户访问量。
分类信息在哪里应用?
1、首页分类导航

2 、课程的归属地
添加课程时要选择课程的所属分类。
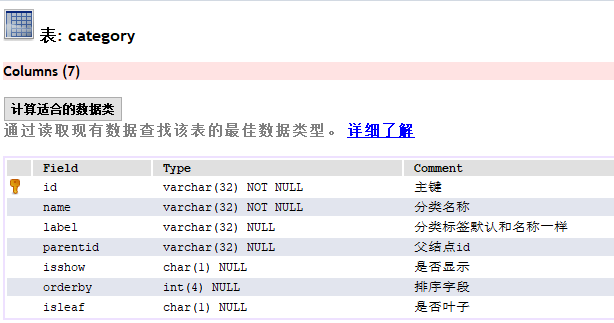
数据结构
分类表 category 的结构如下
分类查询
1)数据格式
在添加课程时需要选择课程所属的分类,这里需要定义课程分类查询接口。
接口格式要根据前端需要的数据格式来定义,前端展示课程分类使用 elemenet-ui 的cascader(级联选择器)组件。

数据格式例子如下:
[
  {
        value: 'zhinan',
        label: '指南',
        children: [{
          value: 'shejiyuanze',
          label: '设计原则',
          children: [{
            value: 'yizhi',
            label: '一致'
          }, {
            value: 'fankui',
            label: '反馈'
          }, {
            value: 'xiaolv',
            label: '效率'
          }, {
            value: 'kekong',
            label: '可控'
          }]
        }]
  }
]
2)数据模型
1)定义category的模型
category 模型对数据字段对应,如下:
@Data
@ToString
@Entity
@Table(name="category")
@GenericGenerator(name = "jpa‐assigned", strategy = "assigned")
public class Category implements Serializable {
    private static final long serialVersionUID = ‐906357110051689484L;
    @Id
    @GeneratedValue(generator = "jpa‐assigned")
    @Column(length = 32)
    private String id;
    private String name;
    private String label;
    private String parentid;
    private String isshow;
    private Integer orderby;
    private String isleaf;
}
2)定义数据返回格式
@Data
@ToString
public class CategoryNode extends Category {
    List<CategoryNode> children;
}
级联菜单属于三级菜单,所以每个菜单下面都会有一个 chaidren 的字段
3)API 接口
package com.xuecheng.api.web.controller.api.course;
import com.xuecheng.framework.domain.course.ext.CategoryNode;
import io.swagger.annotations.Api;
import io.swagger.annotations.ApiOperation;
import org.springframework.web.bind.annotation.GetMapping;
import org.springframework.web.bind.annotation.RequestMapping;
import org.springframework.web.bind.annotation.ResponseBody;
@Api(value = "课程分类管理",description = "课程分类管理",tags = {"课程分类管理"})

public interface CategoryControllerApi {
    @ApiOperation("查询分类")
    public CategoryNode findList();
}
4)DAO
1)定义mapper
@Mapper
public interface CategoryMapper {
    //查询分类
    public CategoryNode selectList();
}
2)定义mapper映射文件
采用表的自连接方式输出树型结果集。
<?xml version="1.0" encoding="UTF‐8" ?>
<!DOCTYPE mapper PUBLIC "‐//mybatis.org//DTD Mapper 3.0//EN" "http://mybatis.org/dtd/mybatis‐3‐
mapper.dtd" >
<mapper namespace="com.xuecheng.manage_course.dao.CategoryMapper" >
    <resultMap type="com.xuecheng.framework.domain.course.ext.CategoryNode" id="categoryMap" >
        <id property="id" column="one_id"/>
        <result property="name" column="one_name"/>
        <result property="label" column="one_label"/>
        <result property="isshow" column="one_isshow"/>
        <result property="isleaf" column="one_isleaf"/>
        <result property="orderby" column="one_orderby"/>
        <result property="parentid" column="one_parentid"/>
        <collection property="children"
ofType="com.xuecheng.framework.domain.course.ext.CategoryNode">
            <id property="id" column="two_id"/>
            <result property="name" column="two_name"/>
            <result property="label" column="two_label"/>
            <result property="isshow" column="two_isshow"/>
            <result property="isleaf" column="two_isleaf"/>
            <result property="orderby" column="two_orderby"/>
            <result property="parentid" column="two_parentid"/>
            <collection property="children"
ofType="com.xuecheng.framework.domain.course.ext.CategoryNode">
                <id property="id" column="three_id"/>
                <result property="name" column="three_name"/>
                <result property="label" column="three_label"/>
                <result property="isshow" column="three_isshow"/>
                <result property="isleaf" column="three_isleaf"/>
                <result property="orderby" column="three_orderby"/>
                <result property="parentid" column="three_parentid"/>
            </collection>
        </collection>
    </resultMap>
    <select id="selectList" resultMap="categoryMap" >
        SELECT
          a.id one_id,
          a.name one_name,
          a.label one_label,
          a.isshow one_isshow,
          a.isleaf one_isleaf,
          a.orderby one_orderby,
          a.parentid one_parentid,
          b.id two_id,
          b.name two_name,
          b.label two_label,
          b.isshow two_isshow,
          b.isleaf two_isleaf,
          b.orderby two_orderby,
          b.parentid two_parentid,
          c.id three_id,
          c.name three_name,
          c.label three_label,
          c.isshow three_isshow,
          c.isleaf three_isleaf,
          c.orderby three_orderby,
          c.parentid three_parentid
        FROM
          category a LEFT JOIN category b
            ON a.id = b.parentid
          LEFT JOIN category c
            ON b.id = c.parentid
        WHERE a.parentid = '0'

        ORDER BY a.orderby,
          b.orderby,
          c.orderby
   </select>
</mapper>
5)Service
@Service
public class CategoryService {
    @Autowired
    CategoryMapper categoryMapper;
    //查询分类
    public CategoryNode findList(){
        return categoryMapper.selectList();
    }
}
6)Controller
@RestController
@RequestMapping("/category")
public class CategoryController implements CategoryControllerApi {
    @Autowired
    CategoryService categoryService;

    @Override
    @GetMapping("/list")
    public CategoryNode list() {
        return categoryService.findList();
    }
}
7)接口测试
接口描述如下

使用swagger-ui或postman测试接口。

0x03 数据字典
介绍
在新增课程界面需要选择课程等级、课程状态等,这些信息统一采用数据字典管理的方式。
本项目对一些业务的分类配置信息,比如:课程等级、课程状态、用户类型、用户状态等进行统一管理,通过在数据库创建数据字典表来维护这些分类信息。
数据字典对系统的业务分类进行统一管理,并且也可以解决硬编码问题,比如添加课程时选择课程等级,下拉框中的课程等级信息如果在页面硬编码将造成不易修改维护的问题,所以从数据字典表中获取,如果要修改名称则在数据字典修改即可,提高系统的可维护性。
数据模型
在 mongodb 中创建数据字典表 sys_dictionary

一个字典信息如下
 {
"_id" : ObjectId("5a7e8d2dd019f15418fa2b71"),
"d_name" : "课程等级",
"d_type" : "200",
"d_value" : [
    {
        "sd_name" : "低级",
        "sd_id" : "200001",
        "sd_status" : "1"
    },
    {
        "sd_name" : "中级",
        "sd_id" : "200002",
        "sd_status" : "1"
    },
    {
        "sd_name" : "高级",
        "sd_id" : "200003",
        "sd_status" : "1"
    }
]
}
字段说明如下:
d_name:字典名称
d_type:字典分类
d_value:字典数据
sd_name:项目名称
sd_id:项目id
sd_status:项目状态(1:可用,0不可用)
数据模型类:
@Data
@ToString
@Document(collection = "sys_dictionary")
public class SysDictionary {
    @Id
    private String id;
    @Field("d_name")
    private String dName;
    @Field("d_type")
    private String dType;
    @Field("d_value")
    private List<SysDictionaryValue> dValue;
}
SysDictionaryValue 类型:
@Data
@ToString
public class SysDictionaryValue {
    @Field("sd_id")
    private String sdId;
    @Field("sd_name")
    private String sdName;
    @Field("sd_status")
    private String sdStatus;
}
字典查询接口
API接口
为了方便其它子系统使用,在cms模块下创建字典查询接口,根据字典的type查询字典信息,接口定义如下:
@Api(value = "数据字典接口",description = "提供数据字典接口的管理、查询功能")
public interface SysDicthinaryControllerApi {
    //数据字典
    @ApiOperation(value="数据字典查询接口")
    public SysDictionary getByType(String type);
}
Dao
在cms模块下创建数据库的dao、service等类。
@Repository
public interface SysDictionaryDao extends MongoRepository<SysDictionary,String> {
     //根据字典分类查询字典信息
     SysDictionary findBydType(String dType);
}
Service
@Service
public class SysdictionaryService {
    @Autowired
    SysDictionaryDao sysDictionaryDao;
//根据字典分类type查询字典信息
   public SysDictionary findDictionaryByType(String type){
       return sysDictionaryDao.findBydType(type);
   }
}
Controller
@RestController
@RequestMapping("/sys/dictionary")
public class SysDictionaryController implements SysDictionaryControllerApi {
    @Autowired
    SysdictionaryService sysdictionaryService;
    //根据字典分类id查询字典信息
    @Override
    @GetMapping("/get/{type}")
    public SysDictionary getByType(@PathVariable("type") String type) {
        return sysdictionaryService.findDictionaryByType(type);
    }
}
测试

0x04 新增课程页面完善
本节完成数据字典显示及课程分类显示。
新增课程页面
1)页面效果如下:

2)创建 course_add.vue 页面
在teach 前端工程的 course 模块下创建 course_add.vue 页面。
<template>
<div>
<el‐form :model="courseForm" label‐width="80px" :rules="courseRules" ref="courseForm">
<el‐form‐item label="课程名称" prop="name">
<el‐input v‐model="courseForm.name" auto‐complete="off" ></el‐input>
</el‐form‐item>
<el‐form‐item label="适用人群" prop="users">
<el‐input type="textarea" v‐model="courseForm.users" auto‐complete="off" ></el‐input>
</el‐form‐item>
<el‐form‐item label="课程分类" prop="categoryActive">
<el‐cascader
expand‐trigger="hover"
:options="categoryList"
v‐model="categoryActive"
:props="props">
</el‐cascader>
</el‐form‐item>
<el‐form‐item label="课程等级" prop="grade">
<b v‐for="grade in gradeList">
<el‐radio v‐model="courseForm.grade" :label="grade.sdId" >{{grade.sdName}}</el‐
radio>
</b>
</el‐form‐item>
<el‐form‐item label="学习模式" prop="studymodel">
<b v‐for="studymodel_v in studymodelList">
<el‐radio v‐model="courseForm.studymodel" :label="studymodel_v.sdId" >
{{studymodel_v.sdName}}</el‐radio>
</b>
</el‐form‐item>
<el‐form‐item label="课程介绍" prop="description">
<el‐input type="textarea" v‐model="courseForm.description" ></el‐input>
</el‐form‐item>
</el‐form>
<div slot="footer" class="dialog‐footer">
<el‐button type="primary" @click.native="save" >提交</el‐button>
</div>
</div>
</template>
<script>
import * as courseApi from '../api/course';
import utilApi from '../../../common/utils';
import * as systemApi from '../../../base/api/system';
export default {
data() {
return {
studymodelList:[],
gradeList:[],
props: {
value: 'id',
label:'label',
children:'children'
},
categoryList: [],
categoryActive:[],
courseForm: {
id:'',
name: '',
users: '',
grade:'',
studymodel:'',
mt:'',
st:'',
description: ''
},
courseRules: {
name: [
{required: true, message: '请输入课程名称', trigger: 'blur'}
],
category: [
{required: true, message: '请选择课程分类', trigger: 'blur'}
],
grade: [
{required: true, message: '请选择课程等级', trigger: 'blur'}
],
studymodel: [
{required: true, message: '请选择学习模式', trigger: 'blur'}
]
}
}
},
methods: {
save () {
}
},
created(){
},
mounted(){
}
}
</script>
<style scoped>
</style>
3)页面路由
 import course_add from '@/module/course/page/course_add.vue';
     { path: '/course/add/base', name: '添加课程',component: course_add,hidden: true },
4)课程添加链接
在我的课程页面添加“新增课程”链接
在 course_list.vue 中添加
<router‐link class="mui‐tab‐item" :to="{path:'/course/add/base'}">
    <el‐button type="text" class="button" >新增课程</el‐button>
</router‐link>
查询数据字典
课程添加页面中课程等级、学习模式需要从数据字典查询字典信息。
1)定义方法
数据字典查询 为公用方法,所以定义在 /base/api/system.js 中
let sysConfig = require('@/../config/sysConfig')
let apiUrl = sysConfig.xcApiUrlPre;
/*数据字典 */
export const sys_getDictionary= dType => {
  return http.requestQuickGet(apiUrl+'/sys/dictionary/get/'+dType)
}
2)在页面获取数据字典
在 mounted 钩子中定义方法如下:
// 查询数据字典字典
systemApi.sys_getDictionary('201').then((res) => {
this.studymodelList = res.dvalue;
});
systemApi.sys_getDictionary('200').then((res) => {
this.gradeList = res.dvalue;
});
3)效果

课程分类
课程添加页面中课程分类采用 Cascader 组件完成。
Cascader 级联选择器

1)页面
<el‐form‐item label=" 课程分类" prop="categoryActive">
  <el‐cascader
    expand‐trigger="hover"
    :options="categoryList"
    v‐model="categoryActive"
    :props="props">
  </el‐cascader>
</el‐form‐item>
2)定义方法
在本模块的course.js中定义
/* 查询课程分类 */
export const category_findlist= () => {
  return http.requestQuickGet(apiUrl+'/category/list')
}
3)在页面获取课程分类
在 mounted 钩子中定义
// 取课程分类
courseApi.category_findlist({}).then((res) => {
  this.categoryList = res.children;
});
4)效果

5) 如何获取选择的分类
用户选择课程分类后,所选分类 ID 绑定到 categoryActive(数组)中,选择了一级、二级分类,分别存储在 categoryActive 数组的第一个、第二个元素中。
0x05 新增课程服务端
API接口
创建课程添加提交接口:
@Api(value = " 课程管理",description = "课程管理",tags = {"课程管理"})
public interface CourseControllerApi {

    @ApiOperation("添加课程基础信息")
    public AddCourseResult addCourseBase(CourseBase courseBase);
}
Dao
public interface CourseBaseRepository extends JpaRepository<CourseBase, String> {

}
Service
  // 添加课程提交
    @Transactional
    public AddCourseResult addCourseBase(CourseBase courseBase) {
        //课程状态默认为未发布
        courseBase.setStatus("202001");
        courseBaseRepository.save(courseBase);
       return new AddCourseResult(CommonCode.SUCCESS,courseBase.getId());
    }
Controller
@Override
    @PostMapping("/coursebase/add")
    public AddCourseResult addCourseBase(@RequestBody CourseBase courseBase) {
        return courseService.addCourseBase(courseBase);
    }
0x06 新增课程前端
Api方法定义
在前端定义请求服务端添加课程的api的方法,在course模块中定义方法如下:
/* 添加课程基础信息*/
export const addCourseBase = params => {
  return http.requestPost(apiUrl+'/course/coursebase/add',params)
}
Api方法调用
在course_add.vue 调用api提交课程信息
methods: {
      save () {
          this.$refs.courseForm.validate((valid) => {
            if (valid) {
              this.$confirm('确认提交吗?', '提示', {}).then(() => {
                //当前选择的分类
                let mt = this.categoryActive[0];
                let st = this.categoryActive[1];
                this.courseForm.mt = mt;
                this.courseForm.st = st;
                //请求服务接口
                courseApi.addCourseBase(this.courseForm).then((res) => {
                  if(res.success){
                    this.$message.success('提交成功');
                    //跳转到课程图片
                    //this.$router.push({ path: '/course/add/picture/1/'+this.courseid})
                  }else{
                    if(res.message){
                      this.$message.error(res.message);
                    }else{
                      this.$message.error('提交失败');
                    }
                   }
                });
              });
            }
          });
      }
    },
测试
注意:将 course_base 表中的 company_id 改为非必填,待认证功能开发完成再修改为必填
测试流程:
1、进入我的课程,点击“新增课程”打开新增课程页面
2、输入课程信息,点击提交
三、课程信息修改
0x01 需求分析
课程添加成功进入课程管理页面,通过课程管理页面修改课程的基本信息、编辑课程图片、编辑课程营销信息等。
本小节实现修改课程。
0x02 课程管理页面说明
页面结构
课程管理页面的结构如下:

课程管理导航页面
1、定义course_manage.vue为课程管理导航页面。
导航效果使用 Element-UI 的 NavMenu 组件实现。
<template>
  <div>
    <el‐menu
      :default‐active="activeIndex"
      class="el‐menu‐demo"
      mode="horizontal"
      background‐color="#eee"
      text‐color="#000"
      active‐text‐color="#000">
      <router‐link class="mui‐tab‐item" :to="{path:'/course/manage/summary/'+this.courseid}">
      <el‐menu‐item index="1">课程首页</el‐menu‐item>
      </router‐link>
      <router‐link class="mui‐tab‐item" :to="{path:'/course/manage/baseinfo/'+this.courseid}">
      <el‐menu‐item index="2">基本信息</el‐menu‐item>
      </router‐link>
      <router‐link class="mui‐tab‐item" :to="{path:'/course/manage/picture/'+this.courseid}">
        <el‐menu‐item index="3">课程图片</el‐menu‐item>
      </router‐link>
      <router‐link class="mui‐tab‐item" :to="{path:'/course/manage/marketinfo/'+this.courseid}">
      <el‐menu‐item index="4">课程营销</el‐menu‐item>
      </router‐link>
      <router‐link class="mui‐tab‐item" :to="{path:'/course/manage/plan/'+this.courseid}">
      <el‐menu‐item index="5">课程计划</el‐menu‐item>
      </router‐link>
      <router‐link class="mui‐tab‐item" :to="{path:'/course/manage/teacher/'+this.courseid}">
        <el‐menu‐item index="6">教师信息</el‐menu‐item>
      </router‐link>
      <router‐link class="mui‐tab‐item" :to="{path:'/course/manage/pub/'+this.courseid}">
              <el‐menu‐item index="7"> 发布课程</el‐menu‐item>
      </router‐link>
    </el‐menu>
    <router‐view class="main"></router‐view>
  </div>
</template>
<script>
  import * as courseApi from '../api/course';
  import utilApi from '../../../common/utils';
  export default {
    data() {
      return {
        activeIndex:'2',
        courseid:''
      }
    },
    methods: {
    },
    mounted(){
      //课程id
      this.courseid = this.$route.params.courseid
      console.log("courseid=" + this.courseid)
      //跳转到页面列表
      this.$router.push({ path: '/course/manage/baseinfo/'+this.courseid})
    }
  }
</script>
<style scoped>

</style>
2、创建各各信息管理页面
通过管理页面的导航可以进入各各信息管理页面,这里先创建各各信息管理页面,页面内容暂
时为空,待开发时再完善,在本模块的 page 目录下创建 course_manage 目录,此目录存放
各个信息管理页面,页面明细如下:
课程管理首页:course_summary.vue
基本信息修改页面:course_baseinfo.vue
图片管理页面:course_picture.vue
营销信息页面:course_marketinfo.vue
老师信息页面:course_teacher.vue
课程计划页面:course_plan.vue
课程发布页面:course_pub.vue
3 、创建路由
import course_manage from '@/module/course/page/course_manage.vue';
import course_summary from '@/module/course/page/course_manage/course_summary.vue';
import course_picture from '@/module/course/page/course_manage/course_picture.vue';
import course_baseinfo from '@/module/course/page/course_manage/course_baseinfo.vue';
import course_marketinfo from '@/module/course/page/course_manage/course_marketinfo.vue';
import course_teacher from '@/module/course/page/course_manage/course_teacher.vue';
import course_plan from '@/module/course/page/course_manage/course_plan.vue';
import course_pub from '@/module/course/page/course_manage/course_pub.vue';
{ path: '/course/manager/:courseid', name: '管理课程',component: course_manage,hidden: true ,
        children: [
          { path: '/course/manage/plan/:courseid', name: '课程计划',component: course_plan,hidden:
false },
          { path: '/course/manage/baseinfo/:courseid', name: '基本信息',component:
course_baseinfo,hidden: false },
          { path: '/course/manage/picture/:courseid', name: '课程图片',component:
course_picture,hidden: false },
          { path: '/course/manage/marketinfo/:courseid', name: '营销信息',component:
course_marketinfo,hidden: false },
          { path: '/course/manage/teacher/:courseid', name: '教师信息',component:
course_teacher,hidden: false},
          { path: '/course/manage/pub/:courseid', name: '发布课程',component: course_pub,hidden:
false},
          { path: '/course/manage/summary/:courseid', name: '课程首页',component:
course_summary,hidden: false }
        ]}
0x03 Api 接口
修改课程需要如下接口:
1、根据id查询课程信息
2、修改课程提交
接口定义如下:
- 根据课程ID查询课程信息
@ApiOperation(" 获取课程基础信息")
public CourseBase getCourseBaseById(String courseId) throws RuntimeException;
2)修改课程信息
@ApiOperation("更新课程基础信息")
public ResponseResult updateCourseBase(String id,CourseBase courseBase);
0x04 服务端
Dao
略
Service
public CourseBase getCoursebaseById(String courseid) {
    Optional<CourseBase> optional = courseBaseRepository.findById(courseId);
    if(optional.isPresent()){
      return optional.get();
    }
    return null;
}
@Transactional
    public ResponseResult updateCoursebase(String id, CourseBase courseBase) {
        CourseBase one = this.getCoursebaseById(id);
        if(one == null){
          //抛出异常..
        }
        //修改课程信息
        one.setName(courseBase.getName());
        one.setMt(courseBase.getMt());
        one.setSt(courseBase.getSt());
        one.setGrade(courseBase.getGrade());
        one.setStudymodel(courseBase.getStudymodel());
        one.setUsers(courseBase.getUsers());
        one.setDescription(courseBase.getDescription());
        CourseBase save = courseBaseRepository.save(one);
        return new ResponseResult(CommonCode.SUCCESS);
    }
Controller
@Override
    @GetMapping("/coursebase/get/{courseId}")
    public CourseBase getCourseBaseById(@PathVariable("courseId") String courseId) throws
RuntimeException {
        return courseService.getCoursebaseById(courseId);
    }
    @Override
    @PutMapping("/coursebase/update/{id}")
    public ResponseResult updateCourseBase(@PathVariable("id") String id, @RequestBody CourseBase
courseBase) {
        return courseService.updateCoursebase(id,courseBase);
    }
0x05 前端
修改页面
在 course 模块下的 course_manage 目录下创建 course_baseinfo.vue 页面,本页面实现课程修改
<template>
<div>
<el‐form :model="courseForm" label‐width="80px" :rules="courseRules" ref="courseForm">
<el‐form‐item label="课程名称" prop="name">
<el‐input v‐model="courseForm.name" auto‐complete="off" ></el‐input>
</el‐form‐item>
<el‐form‐item label="适用人群" prop="users">
<el‐input type="textarea" v‐model="courseForm.users" auto‐complete="off" ></el‐input>
</el‐form‐item>
<el‐form‐item label="课程分类" prop="categoryActive">
<el‐cascader
expand‐trigger="hover"
:options="categoryList"
v‐model="categoryActive"
:props="props">
</el‐cascader>
</el‐form‐item>
<el‐form‐item label="课程等级" prop="grade">
<b v‐for="grade in gradeList">
<el‐radio v‐model="courseForm.grade" :label="grade.sdId" >{{grade.sdName}}</el‐
radio>
</b>
</el‐form‐item>
<el‐form‐item label="学习模式" prop="studymodel">
<b v‐for="studymodel_v in studymodelList">
<el‐radio v‐model="courseForm.studymodel" :label="studymodel_v.sdId" >
{{studymodel_v.sdName}}</el‐radio>
</b>
</el‐form‐item>
<el‐form‐item label="课程介绍" prop="description">
<el‐input type="textarea" v‐model="courseForm.description" ></el‐input>
</el‐form‐item>
</el‐form>
<div slot="footer" class="dialog‐footer">
<el‐button type="primary" @click.native="save" :loading="editLoading">提交</el‐button>
</div>
</div>
</template>
<script>
import * as courseApi from '../../api/course';
import utilApi from '../../../../common/utils';
import * as systemApi from '../../../../base/api/system';
export default {
data() {
return {
courseid:'',
studymodelList:[],
gradeList:[],
editLoading: false,
props: {
value: 'id',
label:'label',
children:'children'
},
categoryList: [],
categoryActive:[],
courseForm: {
id:'',
name: '',
users: '',
grade:'',
studymodel:'',
mt:'',
st:'',
description: ''
},
courseRules: {
name: [
{required: true, message: '请输入课程名称', trigger: 'blur'}
],
category: [
{required: true, message: '请选择课程分类', trigger: 'blur'}
],
grade: [
{required: true, message: '请选择课程等级', trigger: 'blur'}
],
studymodel: [
{required: true, message: '请选择学习模式', trigger: 'blur'}
]
}
}
},
methods: {
save () {
}
},
created(){
},
mounted(){
}
}
</script>
<style scoped>
</style>
API方法
// 获取课程基本信息
export const getCoursebaseById = id => {
  return http.requestQuickGet(apiUrl+'/course/coursebase/get/'+id)
}
//更新课程基本信息
export const updateCoursebase= (id,course) => {
  return http.requestPut(apiUrl+'/course/coursebase/update/'+id,course)
}
课程信息显示
在 mounted 钩子方法中查询课程信息及数据字典:
mounted(){
      //查询数据字典字典
      systemApi.sys_getDictionary('201').then((res) => {
//        console.log(res);
        this.studymodelList = res.dvalue;
      });
      systemApi.sys_getDictionary('200').then((res) => {
        this.gradeList = res.dvalue;
      });
      //取课程分类
      courseApi.category_findlist({}).then((res) => {
           this.categoryList = res.children;
      });
      //查询课程信息
        //课程id
        this.courseid = this.$route.params.courseid;
        courseApi.getCoursebaseById(this.courseid).then((res) => {
          this.courseForm = res;
          //课程分类显示,需要两级分类
          this.categoryActive.push(this.courseForm.mt);
          this.categoryActive.push(this.courseForm.st);
        });
    }
课程修改提交
编辑课程提交方法
methods: {
  save () {
      //修改课程
      this.$refs.courseForm.validate((valid) => {
        if (valid) {
          this.$confirm('确认提交吗?', '提示', {}).then(() => {
            let mt = this.categoryActive[0];
            let st = this.categoryActive[1];
            this.courseForm.mt = mt;
            this.courseForm.st = st;
            let id = this.courseForm.id
            courseApi.updateCoursebase(id,this.courseForm).then((res) => {
              if(res.success){
                this.$message({
                  message: '提交成功',
                  type: 'success'
                });
              }else{
                if(res.message){
                  this.$message.error(res.message);
                }else{
                  this.$message.error('提交失败');
                }
              }
            });
          });
        }
      });
  }
},
四、课程营销
该部分内容略过,内容与课程信息修改相同
😁 认识作者
作者:👦 LCyee ,全干型代码🐕
记录学习以及项目开发过程中的笔记与心得,记录认知迭代的过程,分享想法与观点。
优快云 博客:https://blog.youkuaiyun.com/codeyee
记录和分享一些开发过程中遇到的问题以及解决的思路。
欢迎加入微服务练习生的队伍,一起交流项目学习过程中的一些问题、分享学习心得等,不定期组织一起刷题、刷项目,共同见证成长。


 263


 扫一扫


 被折叠的 条评论
为什么被折叠?
 到【灌水乐园】发言


