


目录
一、网络安全技术分类
1、入侵检测系统IDS
特点是不阻断任何网络访问,而是依照一定的安全策略,通过软,硬件,对网络,系统的运行状况进行监控,尽可能发现各种攻击企图,攻击行为或攻击结果,以保证网络系统资源的机密性,完整性和可用性。
本质上,IDS (Intrusion Detection Systems)是监听设备(系统),不用直接接入网络链路,网络流量也不用经过IDS。所以IDS一般以旁路部署的形式接入系统,然后在网络上收集它所关心的报文即可。对于收集到的报文数据,IDS会进行清洗统计,并与内置的规则进行比对和分析,从而得出哪些网络数据是入侵和攻击。
根据模型和部署方式不同为以下三类:
①基于主机的IDS
在每个要保护的主机上运行一个代理程序,一般只能检测该主机上发生的入侵。主要部署在重要的系统服务器,工作站上。IDS代理程序监控操作系统或系统事件级别的可疑活动(如尝试登录等)。在使用时需要清楚的定义哪些是不合法的活动,然后根据这些定义的规则来做检测。
②基于网络的IDS
该类系统一般被动地在网络上监听整个网段上的信息流,通过捕获网络数据包,进行分析,能够检测该网络段上发生的网络入侵。
③分布式IDS
一般由多个部件组成,分布在网络的各个部分,每个部件完成相应功能,分别进行数据采集、数据分析等。通过中心的控制部件,进行数据汇总、分析、产生入侵警报等。在这种 "分布式IDS(入侵检测系统)” 的结构下,不仅可以检测到针对单独主机的入侵,同时也可以检测到针对该网段上的主机的入侵。
2、入侵防御系统IPS
IPS (Intrusion Prevention System)以串行的方式接入系统,IPS系统可以深度感知并检测经流的数据报文,可以根据预先设定的安全策略,对流经的每个报文进行深度检测(包括协议分析跟踪、特征匹配、流量统计分析、事件关联分析等),如果发现藏匿于其中的网络攻击,可以根据该攻击的威胁级别立即采取措施,这些措施包括中断连接,丢弃报文,隔离文件,向管理员告警等。
①主机IPS
主机IPS部署在终端主机节点上,主要用来保护单台主机,主机IPS与网络IPS结合使用效果更佳,对于能够规避网络IPS的威胁,主机IPS可以看是防御系统的最后一道防线。
②网络IPS
网络IPS一般部署在系统的战略位置上,所有进出的流量和报文,都要经由网络IPS,其作用在整个网络上。
③无线IPS
此类的入侵防御系统可以扫描无线网络,进行寻找未经授权的访问,并可以将未授权的设备移出网络。
3、防火墙FW
防火墙(Firewall)系统是在内部网络和外部网络之间,专用网络与公共网络之间,可信网络和不可信网络之间建立屏障。它是一种隔离技术,是在两个网络通讯时执行的一种访问控制尺度,它能允许经你 “同意”的个人和数据进入你的网络,同时将你 “不同意” 的个人和数据拒之门外,最大限度的阻止非法的流量和数据进入系统或网络。同时防火墙也可以根据规则禁止本地网络向外发送数据报文,以及根据规则转发网络流量等。
防火墙以串行的方式接入系统,所有流入流出的网络报文都要经由防火墙。根据工作模式不同,防火墙可以分为网络层防火墙,应用层防火墙等。
4、防水墙WW
与防火墙相对,防水墙(Waterwall)是一种防止内部信息泄漏的安全产品。它利用透明加解密,身份认证,访问控制和审计跟踪等技术手段,对涉密信息,重要业务数据和技术专利等敏感信息的存储,传播和处理过程,实施安全保护;最大限度地防止敏感信息泄漏、被破坏和违规外传,并完整记录涉及敏感信息的操作日志,以便日后审计。
二、防火墙分类
1、保护范围划分
①主机防火墙
主机防火墙对单个主机进行防护,运行在终端主机上,主机防火墙可以阻止未授权的程序和数据出入计算机,Windows和Linux 系统都有自带的主机防火墙。
②网络防火墙
网络防火墙部署在整个系统的主线网路上,对整个系统的出入数据进行过滤。
2、实现方式划分
①硬件防火墙
硬件防火墙以独立硬件设备的形式提供服务,独立供电,独立部署,其软件是单独运行在硬件里面的,所有硬件资源都只给防火墙这一个程序使用,因此性能和功能更好更强。
②软件防火墙
没有独立硬件,一般以应用程序的形式提供,运行于通用硬件平台,寄生于操作系统中,是通过纯软件的方式提供服务。
3、网络协议划分
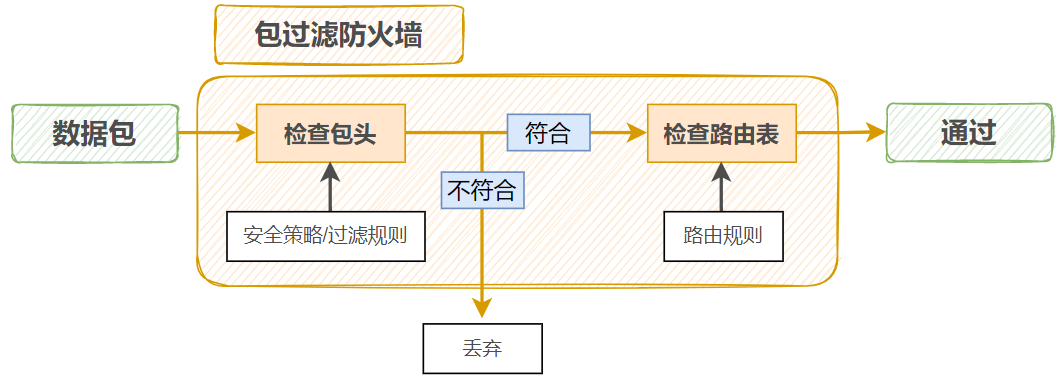
①网络层防火墙(包过滤防火墙)
网络层防火墙对流经的数据包中的源地址,目标地址,端口号及协议等内容做出分析,依据事先设定好的过滤规则,对数据包作出不同的处理(包括拒绝,丢弃,放行,转发等)。这些过滤规则,被称为访问控制列表(ACL)。网络层防火墙只能根据数据包头部的协议端口号等进行过滤,无法过滤应用层的具体数据。
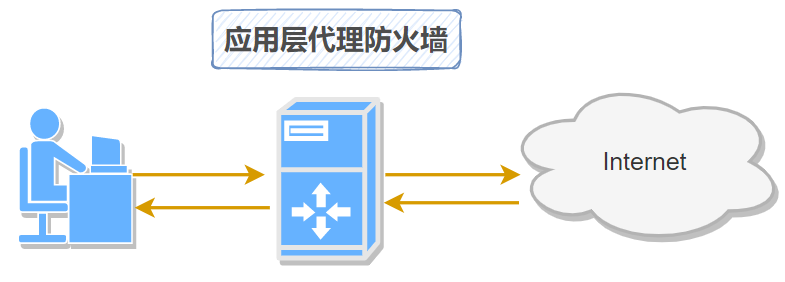
②应用层防火墙
应用层网只针对特别的网络应用服务协议来确定数据过滤逻辑。应用层网关防火墙是内部网和外部网的隔离点,它部署在主链路上,将系统分为两部份,起到内外部网络通讯时的中间转接作用。
三、Linux防火墙基础知识
1、netfilter
Netfilter 是 Linux 内核中的一个核心框架,用于实现网络数据包的过滤、修改和转发功能。它是 Linux 防火墙(如 iptables、nftables)和高级网络功能(如 NAT、QoS)的基础,通过钩子(Hooks)机制在内核网络协议栈的不同阶段拦截和处理数据包。
从 Linux 2.4.x 版本的内核开始,netfilter 就正式成为了新一代的 Linux 防火墙机制,是Linux内核的一个子系统。Netfilter采用模块化设计,具有良好的可扩充性,提供扩展网络服务的结构化底层框架。Linux防火墙的功能主要是通过netfilter框架实现的。Netfilter与IP协议栈是无缝契合,并允许对数据包进行过滤、地址转换、处理等操作。
netfilter/iptables三部分组成:netfilter 框架、iptables(内核空间)、iptables 命令行工具(用户空间)。
防火墙原理:用户在用户空间使用 iptables 命令行工具来配置防火墙规则。iptables 工具会将用户设定的规则进行解析和转换,然后通过特定的系统调用将这些规则写入到内核空间,再由内核中的 netfilter 框架来进行数据包过滤。(命令行工具有多种)
#查看内核中netfilter相关的模块
[root@ubuntu-157 ~]# uname -r
6.14.0-33-generic

[root@ubuntu-157 ~]# grep -i netfilter /boot/config-6.14.0-33-generic
2、防火墙工具
①iptables
由软件包iptables提供的命令行工具,工作在用户空间,用来设置防火墙规则,写好的规则被送往netfilter,告诉内核如何去处理信息包。
#rocky中己默认安装
[root@rocky8-153 ~]#rpm -q iptables
iptables-1.8.5-11.el8.x86_64

#ubuntu中己默认安装
[root@ubuntu-158 ~]# dpkg -l iptables
Desired=Unknown/Install/Remove/Purge/Hold
| Status=Not/Inst/Conf-files/Unpacked/halF-conf/Half-inst/trig-aWait/Trig-pend
|/ Err?=(none)/Reinst-required (Status,Err: uppercase=bad)
||/ Name           Version         Architecture Description
+++-==============-===============-============-=================================================
ii  iptables       1.8.11-2ubuntu1 amd64        administration tools for packet filtering and NAT
②firewalld
#rocky中已默认安装
[root@rocky8-153 ~]#rpm -q firewalld
firewalld-0.9.11-10.el8_10.noarch

#ubuntu中没有安装
[root@ubuntu-158 ~]# dpkg -l firewalld
Desired=Unknown/Install/Remove/Purge/Hold
| Status=Not/Inst/Conf-files/Unpacked/halF-conf/Half-inst/trig-aWait/Trig-pend
|/ Err?=(none)/Reinst-required (Status,Err: uppercase=bad)
||/ Name           Version      Architecture Description
+++-==============-============-============-=================================
un  firewalld      <none>       <none>       (no description available)
③nftables
它重用了 netfilter框架的许多部份,例如连接跟踪和NAT功能。它还保留了命名法和基本iptables设计的几个部份,例如表,链和规则。就像iptables一样,充当链的容器,并且链包含单独的规则,这些规则可以执行操作,例如丢弃数据包,移至下一个规则或跳至新链。
从用户角度来看,nftables添加了名为 nft 的新工具,该工具是iptables及其衍生指令 (ip6tables,arptables,ebtables)的超集(包含),替代了iptables 及其衍生指令的中的所有工具。从体系结构的角度来看,它还替换了内核中处理数据包过滤规则集运行时评估的那些部分。
[root@rocky8-153 ~]#rpm -q nftables
nftables-1.0.4-7.el8_10.x86_64

[root@ubuntu-158 ~]# dpkg -l nftables
Desired=Unknown/Install/Remove/Purge/Hold
| Status=Not/Inst/Conf-files/Unpacked/halF-conf/Half-inst/trig-aWait/Trig-pend
|/ Err?=(none)/Reinst-required (Status,Err: uppercase=bad)
||/ Name           Version       Architecture Description
+++-==============-=============-============-==============================================================
ii  nftables       1.1.1-1build1 amd64        Program to control packet filtering rules by Netfilter project
[root@rocky8-153 ~]#rpm -ql iptables | grep sbin
/usr/sbin/ip6tables
/usr/sbin/ip6tables-apply
/usr/sbin/ip6tables-restore
/usr/sbin/ip6tables-restore-translate
/usr/sbin/ip6tables-save
/usr/sbin/ip6tables-translate
/usr/sbin/iptables
/usr/sbin/iptables-apply
/usr/sbin/iptables-restore
/usr/sbin/iptables-restore-translate
/usr/sbin/iptables-save
/usr/sbin/iptables-translate
/usr/sbin/xtables-monitor
/usr/sbin/xtables-nft-multi

[root@rocky8-153 ~]#rpm -ql nftables | grep bin
/usr/sbin/nft
3、netfilter工作原理
netfilter 在内核中网络协议栈放置了五个勾子函数(hook function),分别是 INPUT,OUTPUT,FORWARD,PREOUTING,POSTROUTING,管理员可以通过配置工具配置规则,让这五个函数按照自定义的规则进行工作对数据包进行匹配和操作,达到防火墙的功能。
说明:从 Linux kernel 4.2 版以后,netfilter在 PREOUTING 前加了一个 INGRESS 勾子函数。可以使用这个新的入口挂钩来过滤来自第2层(数据链路层)的流量,这个新挂钩比预路由要早,基本上是 tc 命令(流量控制工具)的替代品。
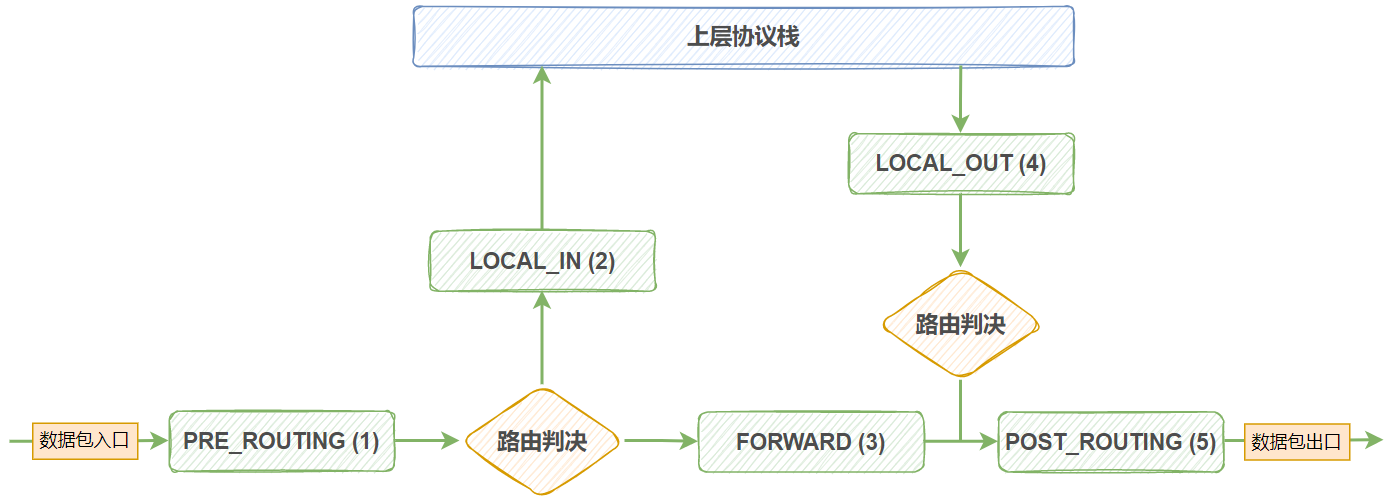
三种报文流向
| 数据走向 | 具体过程 |
| 流入本机 | PREROUTING --> INPUT --> 用户空间进程 |
| 流出本机 | 用户空间进程 --> OUTPUT --> POSTROUTING |
| 从本机转发 | PREROUTING --> FORWARD --> POSTROUTING |
4、iptables组成
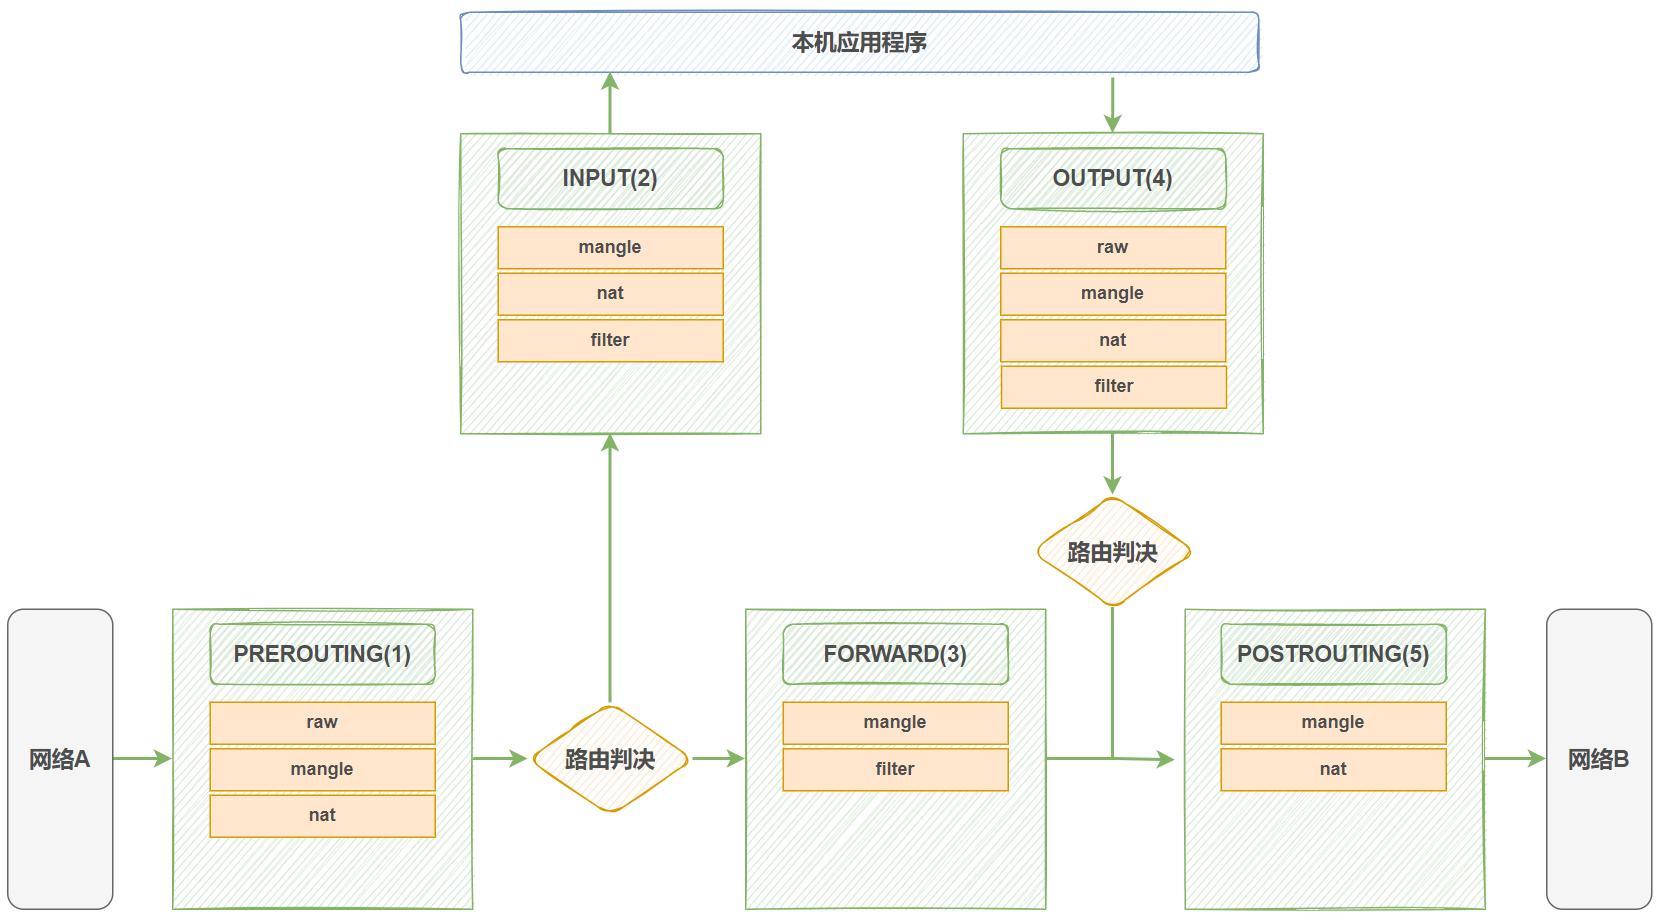
netfilter 在内核中设置了五个勾子函数,管理员在用户空间,通过程序设置过滤规则,内核中的勾子函数根据预设的规则进行工作,达到对流经的数据包进行过滤,拒绝,转发等功能。iptables中有五个链(chain)对应内核中的五个勾子函数。除此之外,iptables中还有五个表(table),一起来配合工作。
iptables中的链
| 类型 | 备注 |
| 内置链 | 对应内核中的每一个勾子函数 (INPUT,OUTPUT,FORWARD,PREROUTING, POSTROUTING) |
| 自定义链 | 用于对内置链进行扩展或补充,可实现更灵活的规则组织管理机制; 只有Hook钩子调用自定义链时,才会生效 |
iptables中的表
| 表名 | 备注 |
| filter | 过滤规则表,根据预定义的规则过滤符合条件的数据包,默认表 |
| nat | 地址转换规则表 |
| mangle | 修改数据标记位规则表 |
| raw | 关闭启用的连接跟踪机制,加快封包穿越防火墙速度 |
| security | 用于强制访问控制(MAC)网络规则,由Linux安全模块(如SELinux)实现,很少使用 |
表的优先级(高-低)
security --> raw --> mangle --> nat --> filter
链和表对应关系(不是每个表都能支持五个表)
| 表 | 可支持的链 |
| raw | PREROUTING,OUTPUT |
| mangle | PREROUTING,POSTOUTING,INPUT,OUTPUT,FORWARD |
| nat | PREROUTING,POSTOUTING,INPUT,OUTPUT |
| filter | INPUT,FORWARD,OUTPUT |
数据包过滤匹配流程
1、当一个数据包进入网卡时,数据包首先进入PREROUTING链,内核根据数据包目的IP判断是否需要传送出去。
2、如果数据包是进入本机的,则会进入INPUT链,然后交由本机的应用程序处理。
3、如果数据包是要转发的,且内核允许转发,则数据包在PREROUTING链之后到FORWARD链,再经由POSTROUTING链输出。
4、本机的应用程序往外发送数据包,会先进入OUTPUT链,然后到达POSTROUTING链输出。
数据流入:PREROUTING --> INPUT
数据流出:OUTPUT --> POSTROUTING
数据转发:PREROUTING --> FORWARD --> POSTROUTING
四、iptables用法
1、前置工作
在 ubuntu 中,在用iptables命令设置防火墙之前,先关闭自带的 ufw 服务,因为 ufw 服务中也有一套自定义的规则,如果在开启 ufw 服务的情况下再用 iptables 设置或删除规则,容易发生冲突,因为不同防火墙工具设置的规则都是要提交给我们的内核netfilter框架去处理,因此在使用防火墙时,只保留一个规则入口。
[root@ubuntu-157 ~]# systemctl is-active ufw
active

[root@ubuntu-157 ~]# systemctl disable --now  ufw
Synchronizing state of ufw.service with SysV service script with /usr/lib/systemd/systemd-sysv-install.
Executing: /usr/lib/systemd/systemd-sysv-install disable ufw
在 redhat 系中要先停用 firewalld 服务
[root@rocky8-153 ~]#systemctl is-active firewalld
active

[root@rocky8-153 ~]#systemctl disable --now firewalld
注意:如果不是最小化安装,在禁用 frewalld 之后,再次重启还是能看到防火墙规则,这是由KVM启动的。(virbr0)
[root@rocky-154 ~]#yum remove qemu-kvm
2、iptables命令组成
iptables Table Chain Rule

#通过iptables命令,在某个链上某个表设置一个过滤规则

#例:
iptables -t filter -A INPUT -s 192.168.0.1 -j DROP
#在INPUT链上的filer表上添加一条规则:所有来自该源ip地址的数据包丢弃| 字段 | 说明 |
| iptables | 命令 |
| Table | 具体要操作的表,用 -t 指定,raw | mangle | nat | filter,默认 filter |
| Chain | 具体要操作的链,PREROUTING | INPUT | FORWARD | OUTPUT | POSTROUTING |
| Rule | 具体规则,由匹配条件和目标组成,如果满足条件,就执行目标中的规则,目标用 -j 指定 |
iptables [-t table] {-A|-C|-D} chain rule-specification
iptables [-t table] -I chain [rulenum] rule-specification
iptables [-t table] -R chain rulenum rule-specification
iptables [-t table] -D chain rulenum
iptables [-t table] -S [chain [rulenum]]
iptables [-t table] {-F|-L|-Z} [chain [rulenum]] [options...]
iptables [-t table] -N chain
iptables [-t table] -X [chain]
iptables [-t table] -P chain target
iptables [-t table] -E old-chain-name new-chain-name

rule-specification = [matches...] [target]
match = -m matchname [per-match-options]
target = -j targetname [per-target-options]

#指定表
-t|--table table              #指定表raw|mangle|nat|filter,如果不显式指定,默认是filter

#操作链
-N|--new-chain chain          #添加自定义新链
-X|--delete-chain [chain]     #删除自定义链(要求链中没有规则)
-P|--policy chain target      #设置默认策略,对filter表中的链而言,其默认策略有ACCEPT|DROP
-L|--list [chain]             #列出链上的所有规则
-S|--list-rules [chain]       #列出链上的的有规则
-F|--flush [chain]            #清空链上的所有规则,默认是所有链
-Z|--zero [chain [rulenum]]   #置0,清空计数器,默认操作所有链上的所有规则
-E|--rename-chain old-chain new-chain   #重命名自定义链,引用计数不为0的自定义链不能被重命名

#操作具体规则
-A|--append chain rule-specification    #往链上追加规则
-C|--check chain rule-specification     #检查链上的规则是否正确
-D|--delete chain rule-specification    #删除链上的规则
-D|--delete chain rulenum               #根据编号删除链上的规则
-R|--replace chain rulenum rule-specification   #根据链上的规则编号,使用新的规则替换原有规则
-I|--insert chain [rulenum] rule-specification  #往链上插入规则,可以指定编号,默认插入到最前面(第一条)

#其它选项
-h|--help         #显示帮助
-V|--version      #显示版本
-v|--verbose      #显示详细信息
-n|--numeric      #以数字形式显示IP和端口,默认显示主机名和协议名
--line-numbers    #显示每条规则编号
查看规则
#在使用 -L 选项查看规则时,如果规则不为空,单独 -L 选项显示时有可能会很慢,这是因为需要对主机
名和服务名进行反解导致的,可以加 -n 选项来规避

#默认filter,规则为空
[root@ubuntu-157 ~]# iptables -L
Chain INPUT (policy ACCEPT)
target     prot opt source               destination

Chain FORWARD (policy ACCEPT)
target     prot opt source               destination

Chain OUTPUT (policy ACCEPT)
target     prot opt source               destination

[root@ubuntu-157 ~]# iptables -vnL
Chain INPUT (policy ACCEPT 0 packets, 0 bytes)
 pkts bytes target     prot opt in     out     source               destination

Chain FORWARD (policy ACCEPT 0 packets, 0 bytes)
 pkts bytes target     prot opt in     out     source               destination

Chain OUTPUT (policy ACCEPT 0 packets, 0 bytes)
 pkts bytes target     prot opt in     out     source               destination

#指定filter表
[root@ubuntu-157 ~]# iptables -t filter -vnL
Chain INPUT (policy ACCEPT 0 packets, 0 bytes)
 pkts bytes target     prot opt in     out     source               destination

Chain FORWARD (policy ACCEPT 0 packets, 0 bytes)
 pkts bytes target     prot opt in     out     source               destination

Chain OUTPUT (policy ACCEPT 0 packets, 0 bytes)
 pkts bytes target     prot opt in     out     source               destination

#指定INPUT链
[root@rocky8-153 ~]#iptables -vnL INPUT
Chain INPUT (policy ACCEPT 0 packets, 0 bytes)
 pkts bytes target     prot opt in     out     source               destination

#指定filter表INPUT链
[root@ubuntu-157 ~]# iptables -t filter -vnL INPUT
Chain INPUT (policy ACCEPT 0 packets, 0 bytes)
 pkts bytes target     prot opt in     out     source               destination
查看规则
#默认filter表
[root@ubuntu-157 ~]# iptables -S
-P INPUT ACCEPT
-P FORWARD ACCEPT
-P OUTPUT ACCEPT

[root@ubuntu-157 ~]# iptables -vnS
iptables v1.8.11 (nf_tables): Illegal option `--numeric' with this command
Try `iptables -h' or 'iptables --help' for more information.

[root@ubuntu-157 ~]# iptables -vS
-P INPUT ACCEPT -c 0 0
-P FORWARD ACCEPT -c 0 0
-P OUTPUT ACCEPT -c 0 0

#指定filter表
[root@ubuntu-157 ~]# iptables -t filter -vS
-P INPUT ACCEPT -c 0 0
-P FORWARD ACCEPT -c 0 0
-P OUTPUT ACCEPT -c 0 0

#指定INPUT链
[root@ubuntu-157 ~]# iptables -vS INPUT
-P INPUT ACCEPT -c 0 0

#指定filter表INPUT链
[root@ubuntu-157 ~]# iptables -t filter -vS INPUT
-P INPUT ACCEPT -c 0 0
新增规则
#在INPUT链的filter表上设置过滤规则,将来自10.0.0.154的数据包拒绝
[root@ubuntu-157 ~]# iptables -t filter -A INPUT -s 10.0.0.154 -j REJECT

#查看规则
[root@ubuntu-157 ~]# iptables -vnL
Chain INPUT (policy ACCEPT 1073 packets, 79928 bytes)
 pkts bytes target     prot opt in     out     source               destination
    0     0 REJECT     all  --  *      *       10.0.0.154           0.0.0.0/0            reject-with icmp-port-unreachable

Chain FORWARD (policy ACCEPT 0 packets, 0 bytes)
 pkts bytes target     prot opt in     out     source               destination

Chain OUTPUT (policy ACCEPT 0 packets, 0 bytes)
 pkts bytes target     prot opt in     out     source               destination

#指定表和链
[root@ubuntu-157 ~]# iptables -t filter -vnL INPUT
Chain INPUT (policy ACCEPT 1206 packets, 88044 bytes)        #当前链上己通过的数据
 pkts bytes target     prot opt in     out     source               destination
    0     0 REJECT     all  --  *      *       10.0.0.154           0.0.0.0/0            reject-with icmp-port-unreachable
| 字段 | 说明 |
| pkts | 在当前规则中,被命中的数据包数量 |
| bytes | 在当前规则中,被命中的总流量大小 |
| target | 动作,目标,DROP 表示丢弃 |
| prot | 具体协议 |
| opt | 选项 |
| in | 数据从哪个网络设备进来 |
| out | 数据从哪个网络设备上出去 |
| source | 源,可以是主机IP,网段,anywhere 表示不受限 |
| destination | 目标,可以是主机IP,网段,anywherer 表示不受限 |
测试
#主机154 PING 157
[root@rocky-154 ~]#ping 10.0.0.157
PING 10.0.0.157 (10.0.0.157) 56(84) bytes of data.
From 10.0.0.157 icmp_seq=1 Destination Port Unreachable
From 10.0.0.157 icmp_seq=2 Destination Port Unreachable
...
^C
--- 10.0.0.157 ping statistics ---
8 packets transmitted, 0 received, +8 errors, 100% packet loss, time 7154ms    #发送了8个数据包

#再次查看防火墙,刚好拒绝了8个数据包
[root@ubuntu-157 ~]# iptables -t filter -vnL INPUT
Chain INPUT (policy ACCEPT 1227 packets, 89372 bytes)
 pkts bytes target     prot opt in     out     source               destination
    8   672 REJECT     all  --  *      *       10.0.0.154           0.0.0.0/0            reject-with icmp-port-unreachable

#用其他主机PING 157
[root@ubuntu2204-150 ~]# ping 10.0.0.157
PING 10.0.0.157 (10.0.0.157) 56(84) bytes of data.
64 bytes from 10.0.0.157: icmp_seq=1 ttl=64 time=2.04 ms
64 bytes from 10.0.0.157: icmp_seq=2 ttl=64 time=0.558 ms
64 bytes from 10.0.0.157: icmp_seq=3 ttl=64 time=0.475 ms
^C
--- 10.0.0.157 ping statistics ---
3 packets transmitted, 4 received, 0% packet loss, time 3005ms
rtt min/avg/max/mdev = 0.475/0.913/2.038/0.650 ms
#[root@ubuntu-157 ~]# iptables -D INPUT 1
[root@ubuntu-157 ~]# iptables -vnL
Chain INPUT (policy ACCEPT 1372 packets, 98968 bytes)
pkts bytes target prot opt in out source destination
Chain FORWARD (policy ACCEPT 0 packets, 0 bytes)
pkts bytes target prot opt in out source destination
Chain OUTPUT (policy ACCEPT 0 packets, 0 bytes)
pkts bytes target prot opt in out source destination
[root@rocky-154 ~]#ping 10.0.0.157
PING 10.0.0.157 (10.0.0.157) 56(84) bytes of data.
64 bytes from 10.0.0.157: icmp_seq=1 ttl=64 time=0.388 ms
64 bytes from 10.0.0.157: icmp_seq=2 ttl=64 time=0.398 ms
64 bytes from 10.0.0.157: icmp_seq=3 ttl=64 time=0.440 ms
...
#在INPUT链的filter表上设置过滤规则,将来自10.0.0.154的数据包丢弃
[root@ubuntu-157 ~]# iptables -t filter -A INPUT -s 10.0.0.154 -j DROP
[root@rocky-154 ~]#ping 10.0.0.157
PING 10.0.0.157 (10.0.0.157) 56(84) bytes of data.
64 bytes from 10.0.0.157: icmp_seq=1 ttl=64 time=0.388 ms
64 bytes from 10.0.0.157: icmp_seq=2 ttl=64 time=0.398 ms
64 bytes from 10.0.0.157: icmp_seq=3 ttl=64 time=0.440 ms
...
64 bytes from 10.0.0.157: icmp_seq=11 ttl=64 time=0.538 ms
64 bytes from 10.0.0.157: icmp_seq=12 ttl=64 time=0.461 ms
64 bytes from 10.0.0.157: icmp_seq=13 ttl=64 time=0.459 ms
64 bytes from 10.0.0.157: icmp_seq=14 ttl=64 time=0.543 ms (无响应)
#抓包工具分析
#154来的ping包,都没有回应,因为被iptables drop
[root@ubuntu-157 ~]# tcpdump icmp
tcpdump: verbose output suppressed, use -v[v]... for full protocol decode
listening on ens33, link-type EN10MB (Ethernet), snapshot length 262144 bytes
15:45:33.247122 IP 10.0.0.154 > 10.0.0.157: ICMP echo request, id 7, seq 29, length 64
15:45:34.271432 IP 10.0.0.154 > 10.0.0.157: ICMP echo request, id 7, seq 30, length 64
15:45:35.295461 IP 10.0.0.154 > 10.0.0.157: ICMP echo request, id 7, seq 31, length 64
...
[root@ubuntu-157 ~]# iptables -vnL
Chain INPUT (policy ACCEPT 2388 packets, 1904K bytes)
pkts bytes target prot opt in out source destination
497 41604 DROP all -- * * 10.0.0.154 0.0.0.0/0
Chain FORWARD (policy ACCEPT 0 packets, 0 bytes)
pkts bytes target prot opt in out source destination
Chain OUTPUT (policy ACCEPT 0 packets, 0 bytes)
pkts bytes target prot opt in out source destination
#来自154 ssh流量 拒绝
[root@rocky-154 ~]#ssh 10.0.0.157
^C
[root@ubuntu-157 ~]# iptables -S
-P INPUT ACCEPT
-P FORWARD ACCEPT
-P OUTPUT ACCEPT
-A INPUT -s 10.0.0.154/32 -j DROP
#其他主机
[root@rocky8-153 ~]#ssh root@10.0.0.157
Welcome to Ubuntu 25.04 (GNU/Linux 6.14.0-33-generic x86_64)
...
Last login: Sun Oct 26 15:46:34 2025 from 10.0.0.1
[root@ubuntu-157 ~]# iptables中的规则顺序
#清除所有规则
[root@ubuntu-157 ~]# iptables -F

[root@ubuntu-157 ~]# iptables -vnL
Chain INPUT (policy ACCEPT 2539 packets, 1918K bytes)
 pkts bytes target     prot opt in     out     source               destination

Chain FORWARD (policy ACCEPT 0 packets, 0 bytes)
 pkts bytes target     prot opt in     out     source               destination

Chain OUTPUT (policy ACCEPT 0 packets, 0 bytes)
 pkts bytes target     prot opt in     out     source               destination

#添加规则:拒绝10.0.0.0整个网段
[root@ubuntu-157 ~]# iptables -t filter -A INPUT -s 10.0.0.0/24 -j REJECT

#本地物理机立即断开,也无法远程连接
[root@ubuntu-157 ~]#
Socket error Event: 32 Error: 10053.
Connection closing...Socket close.

Connection closed by foreign host.

Disconnected from remote host(ubuntu2504-157) at 16:11:03.

Type `help' to learn how to use Xshell prompt.

[C:\~]$ ssh root@10.0.0.157


Connecting to 10.0.0.157:22...
Could not connect to '10.0.0.157' (port 22): Connection failed.

Type `help' to learn how to use Xshell prompt.
[C:\~]$
#ssh客户端向服务器22端口发源ip 157的数据包,被防火墙规则匹配拒绝,服务器收到后回应不可达直接断开

[root@ubuntu-157 ~]# iptables -vnL
Chain INPUT (policy ACCEPT 2858 packets, 1941K bytes)
  pkts bytes target     prot opt in     out     source               destination
   29  2660  REJECT     all  --  *      *       10.0.0.0/24          0.0.0.0/0            reject-with icmp-port-unreachable

Chain FORWARD (policy ACCEPT 0 packets, 0 bytes)
 pkts bytes target     prot opt in     out     source               destination

Chain OUTPUT (policy ACCEPT 0 packets, 0 bytes)
 pkts bytes target     prot opt in     out     source               destination

#添加一条特点IP的放行规则(错误示范)
[root@ubuntu-157 ~]# iptables -t filter -A  INPUT -s 10.0.0.1 -j ACCEPT

[C:\~]$ ping 10.0.0.157

正在 Ping 10.0.0.157 具有 32 字节的数据:
来自 10.0.0.157 的回复: 无法连到端口。
来自 10.0.0.157 的回复: 无法连到端口。
来自 10.0.0.157 的回复: 无法连到端口。
来自 10.0.0.157 的回复: 无法连到端口。

10.0.0.157 的 Ping 统计信息:
    数据包: 已发送 = 4,已接收 = 4,丢失 = 0 (0% 丢失),

#查看
[root@ubuntu-157 ~]# iptables -t filter -vnL INPUT --line-numbers
Chain INPUT (policy ACCEPT 0 packets, 0 bytes)
num   pkts bytes target     prot opt in     out     source               destination
  1    33  2660  REJECT     all  --  *      *       10.0.0.0/24          0.0.0.0/0            reject-with icmp-port-unreachable
  2     0    0   ACCEPT     all  --  *      *       10.0.0.1             0.0.0.0/0
⚪iptables 防火墙中的规则,在生效时会按照顺序,从上往下生效,当前一条规则命中后,不再继续往下匹配。
⚪如果多条规则里面,匹配条件中有交集,或者有包含关系,则这些规则,要注意前后顺序,范围小的,需要精确匹配的,要往前放,范围大的,往后放,负责兜底的,放在最后。
⚪如果多条规则里面,匹配条件没有交集,彼此不会互相影响,则无所谓前后顺序,但是从效率上来讲,更容易命中的要放在前面。例如:主机150、154分别访问请求157 1w、2w次 ,在规则中第一条REJECT 150、第二条REJECT 154情况下,①150:1w+154:2w+2w 请求总次数5w次,相反规则顺序调换,②150:1w+1w+154:2w 请求总次数4w次,后者效率更高。
#在最前面插入一条放行物理机IP的规则
[root@ubuntu-157 ~]#  iptables -t filter -I INPUT -s 10.0.0.1 -j ACCEPT

[C:\~]$ ping 10.0.0.157

正在 Ping 10.0.0.157 具有 32 字节的数据:
来自 10.0.0.157 的回复: 字节=32 时间<1ms TTL=64
来自 10.0.0.157 的回复: 字节=32 时间<1ms TTL=64
来自 10.0.0.157 的回复: 字节=32 时间<1ms TTL=64
来自 10.0.0.157 的回复: 字节=32 时间<1ms TTL=64

10.0.0.157 的 Ping 统计信息:
    数据包: 已发送 = 4,已接收 = 4,丢失 = 0 (0% 丢失),
往返行程的估计时间(以毫秒为单位):
    最短 = 0ms,最长 = 0ms,平均 = 0ms

[C:\~]$ ssh root@10.0.0.157


Connecting to 10.0.0.157:22...
Connection established.
To escape to local shell, press 'Ctrl+Alt+]'.

[root@ubuntu-157 ~]# iptables -t filter -vnL INPUT --line-numbers
Chain INPUT (policy ACCEPT 0 packets, 0 bytes)
num   pkts bytes target     prot opt in     out     source               destination
  1     4   240  ACCEPT     all  --  *      *       10.0.0.1             0.0.0.0/0
  2    33  2660  REJECT     all  --  *      *       10.0.0.0/24          0.0.0.0/0            reject-with icmp-port-unreachable
  3     0    0   ACCEPT     all  --  *      *       10.0.0.1             0.0.0.0/0

[root@ubuntu-157 ~]# ipatbles -D INPUT 3

[root@ubuntu-157 ~]# iptables -t filter -vnL INPUT
Chain INPUT (policy ACCEPT 2897 packets, 1974K bytes)
 pkts bytes target     prot opt in     out     source               destination
   73  6842 ACCEPT     all  --  *      *       10.0.0.1             0.0.0.0/0
   33  2660 REJECT     all  --  *      *       10.0.0.0/24          0.0.0.0/0            reject-with icmp-port-unreachable
删除iptables规则
[root@ubuntu-157 ~]# iptables -t filter -vnL INPUT --line-numbers
Chain INPUT (policy ACCEPT 2902 packets, 1975K bytes)
num   pkts bytes target     prot opt in     out     source               destination
1      719 46538 ACCEPT     all  --  *      *       10.0.0.1             0.0.0.0/0
2        0     0 REJECT     all  --  *      *       10.0.0.160           0.0.0.0/0            reject-with icmp-port-unreachable
3        0     0 REJECT     all  --  *      *       10.0.0.150           0.0.0.0/0            reject-with icmp-port-unreachable

#删除第2条规则,根据规则编号删除
[root@ubuntu-157 ~]# iptables -D INPUT 2

#查看
[root@ubuntu-157 ~]# iptables -t filter -vnL INPUT --line-numbers
Chain INPUT (policy ACCEPT 2902 packets, 1975K bytes)
num   pkts bytes target     prot opt in     out     source               destination
1      750 48422 ACCEPT     all  --  *      *       10.0.0.1             0.0.0.0/0
2        0     0 REJECT     all  --  *      *       10.0.0.150           0.0.0.0/0            reject-with icmp-port-unreachable
黑名单和白名单
#只允许 10.0.0.1 连接
[root@ubuntu-157 ~]# iptables -t filter -A INPUT -s 10.0.0.1 -j ACCEPT

#其它机器数据全部拒绝,不指定匹配条件,则全部拒绝
[root@ubuntu-157 ~]# iptables -t filter -A INPUT -j REJECT

#注意规则顺序
[root@ubuntu-157 ~]# iptables -t filter -nL INPUT
Chain INPUT (policy ACCEPT)
target     prot opt source               destination
ACCEPT     all  --  10.0.0.1             0.0.0.0/0
REJECT     all  --  0.0.0.0/0            0.0.0.0/0            reject-with icmp-port-unreachable          reject-with icmp-port-unreachable

#其他主机测试
[root@rocky-154 ~]#ping 10.0.0.157
PING 10.0.0.157 (10.0.0.157) 56(84) bytes of data.
From 10.0.0.157 icmp_seq=1 Destination Port Unreachable
From 10.0.0.157 icmp_seq=2 Destination Port Unreachable
From 10.0.0.157 icmp_seq=3 Destination Port Unreachable
^C
--- 10.0.0.157 ping statistics ---
3 packets transmitted, 0 received, +3 errors, 100% packet loss, time 2086ms

#本机也无法使用
[root@ubuntu-157 ~]# ping 127.1
PING 127.1 (127.0.0.1) 56(84) bytes of data.
^C
--- 127.1 ping statistics ---
5 packets transmitted, 0 received, 100% packet loss, time 4099ms

#插入本机127.0.0.1 ACCEPT 规则
[root@ubuntu-157 ~]# iptables -t filter -I INPUT -s 127.0.0.1 -j ACCEPT

[root@ubuntu-157 ~]# ping 127.1
PING 127.1 (127.0.0.1) 56(84) bytes of data.
64 bytes from 127.0.0.1: icmp_seq=1 ttl=64 time=0.022 ms
64 bytes from 127.0.0.1: icmp_seq=2 ttl=64 time=0.038 ms
64 bytes from 127.0.0.1: icmp_seq=3 ttl=64 time=0.035 ms
^C
--- 127.1 ping statistics ---
3 packets transmitted, 3 received, 0% packet loss, time 2064ms
rtt min/avg/max/mdev = 0.022/0.031/0.038/0.007 ms
指定数据流入设备
[root@ubuntu-157 ~]# iptables -t filter -vnL INPUT
Chain INPUT (policy ACCEPT 3146 packets, 1989K bytes)
 pkts bytes target     prot opt in     out     source               destination
    6   504 ACCEPT     all  --  *      *       127.0.0.1            0.0.0.0/0
  872 53148 ACCEPT     all  --  *      *       10.0.0.1             0.0.0.0/0
  142 14464 REJECT     all  --  *      *       0.0.0.0/0            0.0.0.0/0            reject-with icmp-port-unreachable

#删除
[root@ubuntu-157 ~]# iptables -D INPUT 1

[root@ubuntu-157 ~]# ping 127.1
PING 127.1 (127.0.0.1) 56(84) bytes of data.
^C
--- 127.1 ping statistics ---
3 packets transmitted, 0 received, 100% packet loss, time 2088ms

#再次添加,指定入口设备是本地回环网卡
#-i(或者 --in-interface)选项用于指定数据包进入本机时所经过的网络接口
[root@ubuntu-157 ~]# iptables -t filter -I INPUT -i lo -j ACCEPT

#查看
[root@ubuntu-157 ~]# iptables -t filter -vnL INPUT
Chain INPUT (policy ACCEPT 3146 packets, 1989K bytes)
 pkts bytes target     prot opt in     out     source               destination
    6   504 ACCEPT     all  --  lo     *       0.0.0.0/0            0.0.0.0/0
 1309 79648 ACCEPT     all  --  *      *       10.0.0.1             0.0.0.0/0
  210 21872 REJECT     all  --  *      *       0.0.0.0/0            0.0.0.0/0            reject-with icmp-port-unreachable

#测试
[root@ubuntu-157 ~]# ping 127.1
PING 127.1 (127.0.0.1) 56(84) bytes of data.
64 bytes from 127.0.0.1: icmp_seq=1 ttl=64 time=0.022 ms
64 bytes from 127.0.0.1: icmp_seq=2 ttl=64 time=0.039 ms
64 bytes from 127.0.0.1: icmp_seq=3 ttl=64 time=0.036 ms
^C
--- 127.1 ping statistics ---
3 packets transmitted, 3 received, 0% packet loss, time 2045ms
rtt min/avg/max/mdev = 0.022/0.032/0.039/0.007 ms
规则替换
[root@ubuntu-157 ~]# iptables -t filter -vnL INPUT
Chain INPUT (policy ACCEPT 3146 packets, 1989K bytes)
 pkts bytes target     prot opt in     out     source               destination
   12  1008 ACCEPT     all  --  lo     *       0.0.0.0/0            0.0.0.0/0
 1427 86888 ACCEPT     all  --  *      *       10.0.0.1             0.0.0.0/0
  215 23632 REJECT     all  --  *      *       0.0.0.0/0            0.0.0.0/0            reject-with icmp-port-unreachable

#替换第一条
[root@ubuntu-157 ~]# iptables -t filter -R INPUT 1 -s 127.0.0.1 -j ACCEPT

[root@ubuntu-157 ~]# iptables -t filter -vnL INPUT
Chain INPUT (policy ACCEPT 3146 packets, 1989K bytes)
 pkts bytes target     prot opt in     out     source               destination
    0     0 ACCEPT     all  --  *      *       127.0.0.1            0.0.0.0/0
 1561 94676 ACCEPT     all  --  *      *       10.0.0.1             0.0.0.0/0
  215 23632 REJECT     all  --  *      *       0.0.0.0/0            0.0.0.0/0            reject-with icmp-port-unreachable

[root@ubuntu-157 ~]# ping 127.0.0.1
PING 127.0.0.1 (127.0.0.1) 56(84) bytes of data.
64 bytes from 127.0.0.1: icmp_seq=1 ttl=64 time=0.019 ms
64 bytes from 127.0.0.1: icmp_seq=2 ttl=64 time=0.041 ms
64 bytes from 127.0.0.1: icmp_seq=3 ttl=64 time=0.040 ms
^C
--- 127.0.0.1 ping statistics ---
3 packets transmitted, 3 received, 0% packet loss, time 2036ms
rtt min/avg/max/mdev = 0.019/0.033/0.041/0.010 ms
清空统计数据
[root@ubuntu-157 ~]# iptables -t filter -vnL INPUT
Chain INPUT (policy ACCEPT 3146 packets, 1989K bytes)
 pkts bytes target     prot opt in     out     source               destination
    6   504 ACCEPT     all  --  *      *       127.0.0.1            0.0.0.0/0
 1634 99060 ACCEPT     all  --  *      *       10.0.0.1             0.0.0.0/0
  216 24052 REJECT     all  --  *      *       0.0.0.0/0            0.0.0.0/0            reject-with icmp-port-unreachable

#清空INPUT链上的第一条规则统计数据
[root@ubuntu-157 ~]# iptables -t filter -Z INPUT 2

#查看
[root@ubuntu-157 ~]# iptables -t filter -vnL INPUT
Chain INPUT (policy ACCEPT 3146 packets, 1989K bytes)
 pkts bytes target     prot opt in     out     source               destination
    6   504 ACCEPT     all  --  *      *       127.0.0.1            0.0.0.0/0
    6   364 ACCEPT     all  --  *      *       10.0.0.1             0.0.0.0/0
  216 24052 REJECT     all  --  *      *       0.0.0.0/0            0.0.0.0/0            reject-with icmp-port-unreachable

#清空表上的所有统计数据(链上所有filter表)
[root@ubuntu-157 ~]# iptables -t filter -Z

[root@ubuntu-157 ~]# iptables -t filter -vnL INPUT
Chain INPUT (policy ACCEPT 0 packets, 0 bytes)
 pkts bytes target     prot opt in     out     source               destination
    0     0 ACCEPT     all  --  *      *       127.0.0.1            0.0.0.0/0
    6   364 ACCEPT     all  --  *      *       10.0.0.1             0.0.0.0/0
    0     0 REJECT     all  --  *      *       0.0.0.0/0            0.0.0.0/0            reject-with icmp-port-unreachable
默认规则
[root@ubuntu-157 ~]# iptables -F

#显示的filter表上各链路默认规则
[root@ubuntu-157 ~]# iptables -L
Chain INPUT (policy ACCEPT)
target     prot opt source               destination

Chain FORWARD (policy ACCEPT)
target     prot opt source               destination

Chain OUTPUT (policy ACCEPT)
target     prot opt source               destination

#修改默认规则
[root@ubuntu-157 ~]# iptables -P FORWARD DROP

#查看
[root@ubuntu-157 ~]# iptables -L
Chain INPUT (policy ACCEPT)
target     prot opt source               destination

Chain FORWARD (policy DROP)
target     prot opt source               destination

Chain OUTPUT (policy ACCEPT)
target     prot opt source               destination
iptables 规则只有 root 才能操作
[hu@rocky8-153 ~]$iptables -vnL
iptables v1.8.5 (nf_tables): Could not fetch rule set generation id: Permission denied (you must be root)

[hu@rocky8-153 ~]$
3、iptables匹配条件
iptables 中的匹配条件分为基本匹配和扩展匹配两种,当一条 iptables 规则中有多个匹配条件时,默认是 “与” ,即要同时满足。
①基本匹配
[!] -s|--source address[/mask][,...]       #匹配源IP地址或网段
[!] -d|--destination address[/mask][,...]  #匹配目标IP地址或网段
[!] -p|--protocol protocol                 #匹配具体协议,可以使用协议号或协议名,具体见 /etc/protocols
[!] -i|--in-interface name                 #匹配报文流入接口,只用于数据流入
[!] -o|--out-interface name                #匹配报文流出接口,只用于数据流出
规则取反
[root@ubuntu-157 ~]# iptables -t filter -A INPUT -s 10.0.0.1 -j ACCEPT
[root@ubuntu-157 ~]# iptables -t filter -A INPUT -s 10.0.0.154 -j REJECT

#查看
[root@ubuntu-157 ~]# iptables -vnL
Chain INPUT (policy ACCEPT 494 packets, 36568 bytes)
 pkts bytes target     prot opt in     out     source               destination
  376 22592 ACCEPT     all  --  *      *       10.0.0.1             0.0.0.0/0
    0     0 REJECT     all  --  *      *       10.0.0.154           0.0.0.0/0            reject-with icmp-port-unreachable

Chain FORWARD (policy ACCEPT 0 packets, 0 bytes)
 pkts bytes target     prot opt in     out     source               destination

Chain OUTPUT (policy ACCEPT 0 packets, 0 bytes)
 pkts bytes target     prot opt in     out     source               destination

#154数据包被拒绝
[root@rocky-154 ~]#ping 10.0.0.157
PING 10.0.0.157 (10.0.0.157) 56(84) bytes of data.
From 10.0.0.157 icmp_seq=1 Destination Port Unreachable
From 10.0.0.157 icmp_seq=2 Destination Port Unreachable
From 10.0.0.157 icmp_seq=3 Destination Port Unreachable
^C
--- 10.0.0.157 ping statistics ---
3 packets transmitted, 0 received, +3 errors, 100% packet loss, time 2020ms

#设置取反规则替换,除了154来的数据,其他都拒绝
[root@ubuntu-157 ~]# iptables -t filter -R INPUT 2 ! -s 10.0.0.154 -j REJECT

[root@ubuntu-157 ~]# iptables -t filter -nL INPUT
Chain INPUT (policy ACCEPT)
target     prot opt source               destination
ACCEPT     all  --  10.0.0.1             0.0.0.0/0
REJECT     all  -- !10.0.0.154           0.0.0.0/0            reject-with icmp-port-unreachable

#测试
[root@rocky-154 ~]#ping 10.0.0.157
PING 10.0.0.157 (10.0.0.157) 56(84) bytes of data.
64 bytes from 10.0.0.157: icmp_seq=1 ttl=64 time=0.503 ms
64 bytes from 10.0.0.157: icmp_seq=2 ttl=64 time=0.543 ms
64 bytes from 10.0.0.157: icmp_seq=3 ttl=64 time=0.584 ms
^C
--- 10.0.0.157 ping statistics ---
3 packets transmitted, 3 received, 0% packet loss, time 2060ms
rtt min/avg/max/mdev = 0.503/0.543/0.584/0.038 ms

#其他主机
[root@ubuntu2204-150 ~]# ping 10.0.0.157
PING 10.0.0.157 (10.0.0.157) 56(84) bytes of data.
From 10.0.0.157 icmp_seq=1 Destination Port Unreachable
From 10.0.0.157 icmp_seq=2 Destination Port Unreachable
From 10.0.0.157 icmp_seq=3 Destination Port Unreachable
^C
--- 10.0.0.157 ping statistics ---
3 packets transmitted, 0 received, +3 errors, 100% packet loss, time 2031ms
根据目标地址匹配
#添加IP地址
[root@ubuntu-157 ~]# ip addr a 10.0.0.110/24 dev ens33
[root@ubuntu-157 ~]# ip a
...
2: ens33: <BROADCAST,MULTICAST,UP,LOWER_UP> mtu 1500 qdisc fq_codel state UP group default qlen 1000
    link/ether 00:0c:29:88:bd:f8 brd ff:ff:ff:ff:ff:ff
    altname enp2s1
    altname enx000c2988bdf8
    inet 10.0.0.157/24 brd 10.0.0.255 scope global ens33
       valid_lft forever preferred_lft forever
    inet 10.0.0.110/24 scope global secondary ens33
       valid_lft forever preferred_lft forever
    inet6 fe80::20c:29ff:fe88:bdf8/64 scope link proto kernel_ll
       valid_lft forever preferred_lft forever
...

#清空规则
[root@ubuntu-157 ~]# iptables -F

[root@ubuntu-157 ~]# iptables -t filter -nL INPUT
Chain INPUT (policy ACCEPT)
target     prot opt source               destination

#两个IP地址都可访问
[root@rocky-154 ~]#ping 10.0.0.157
PING 10.0.0.157 (10.0.0.157) 56(84) bytes of data.
64 bytes from 10.0.0.157: icmp_seq=1 ttl=64 time=0.578 ms
^C
--- 10.0.0.157 ping statistics ---
1 packets transmitted, 1 received, 0% packet loss, time 0ms
rtt min/avg/max/mdev = 0.578/0.578/0.578/0.000 ms

[root@rocky-154 ~]#ping 10.0.0.110
PING 10.0.0.110 (10.0.0.110) 56(84) bytes of data.
64 bytes from 10.0.0.110: icmp_seq=1 ttl=64 time=2.06 ms
^C
--- 10.0.0.110 ping statistics ---
1 packets transmitted, 1 received, 0% packet loss, time 0ms
rtt min/avg/max/mdev = 2.057/2.057/2.057/0.000 ms

#设置规则:发送至110IP地址的数据包都拒绝
[root@ubuntu-157 ~]# iptables -t filter -A INPUT -d 10.0.0.110 -j REJECT

#查看
[root@ubuntu-157 ~]# iptables -t filter -nL INPUT
Chain INPUT (policy ACCEPT)
target     prot opt source               destination
REJECT     all  --  0.0.0.0/0            10.0.0.110           reject-with icmp-port-unreachable

#110PING不通
[root@rocky-154 ~]#ping 10.0.0.110
PING 10.0.0.110 (10.0.0.110) 56(84) bytes of data.
From 10.0.0.110 icmp_seq=1 Destination Port Unreachable
^C
--- 10.0.0.110 ping statistics ---
1 packets transmitted, 0 received, +1 errors, 100% packet loss, time 0ms

#但154能PING
[root@rocky-154 ~]#ping 10.0.0.157
PING 10.0.0.157 (10.0.0.157) 56(84) bytes of data.
64 bytes from 10.0.0.157: icmp_seq=1 ttl=64 time=0.439 ms
^C
--- 10.0.0.157 ping statistics ---
1 packets transmitted, 1 received, 0% packet loss, time 0ms
rtt min/avg/max/mdev = 0.439/0.439/0.439/0.000 ms

#设置规则取反
[root@ubuntu-157 ~]# iptables -t filter -R INPUT 1 ! -d 10.0.0.110 -j REJECT

[root@ubuntu-157 ~]#
Socket error Event: 32 Error: 10053.
Connection closing...Socket close.

Connection closed by foreign host.

Disconnected from remote host(10.0.0.157:22) at 20:37:02.

Type `help' to learn how to use Xshell prompt.
[C:\~]$

#到vmware中查看
[root@ubuntu-157 ~]# iptables -t filter -nL INPUT
Chain INPUT (policy ACCEPT)
target     prot opt source               destination
REJECT     all  --  0.0.0.0/0            !10.0.0.110           reject-with icmp-port-unreachable

#110PING的通
[root@rocky-154 ~]#ping 10.0.0.110
PING 10.0.0.110 (10.0.0.110) 56(84) bytes of data.
64 bytes from 10.0.0.110: icmp_seq=1 ttl=64 time=0.607 ms
^C
--- 10.0.0.110 ping statistics ---
1 packets transmitted, 1 received, 0% packet loss, time 0ms
rtt min/avg/max/mdev = 0.607/0.607/0.607/0.000 ms

#但157PING不通
[root@rocky-154 ~]#ping 10.0.0.157
PING 10.0.0.157 (10.0.0.157) 56(84) bytes of data.
From 10.0.0.157 icmp_seq=1 Destination Port Unreachable
^C
--- 10.0.0.157 ping statistics ---
1 packets transmitted, 0 received, +1 errors, 100% packet loss, time 0ms

#连接不上 请求数据发送到的不是110IP
[C:\~]$ ssh root@10.0.0.157


Connecting to 10.0.0.157:22...
Canceled.

Type `help' to learn how to use Xshell prompt.

#成功连接
[C:\~]$ ssh root@10.0.0.110


Connecting to 10.0.0.110:22...
Connection established.
To escape to local shell, press 'Ctrl+Alt+]'.
根据协议过滤
#设置规则:将到110IP的ICMP数据包都拒绝
[root@ubuntu-157 ~]# iptables -t filter -A INPUT -d 10.0.0.110 -p icmp -j REJECT

[root@ubuntu-157 ~]# iptables -t filter -nL INPUT
Chain INPUT (policy ACCEPT)
target     prot opt source               destination
REJECT     icmp --  0.0.0.0/0            10.0.0.110           reject-with icmp-port-unreachable

#测试
#110 ICMP被拒绝
[root@rocky-154 ~]#ping 10.0.0.110
PING 10.0.0.110 (10.0.0.110) 56(84) bytes of data.
From 10.0.0.110 icmp_seq=1 Destination Port Unreachable
^C
--- 10.0.0.110 ping statistics ---
1 packets transmitted, 0 received, +1 errors, 100% packet loss, time 0ms

[root@rocky-154 ~]#ping 10.0.0.157
PING 10.0.0.157 (10.0.0.157) 56(84) bytes of data.
64 bytes from 10.0.0.157: icmp_seq=1 ttl=64 time=0.529 ms
^C
--- 10.0.0.157 ping statistics ---
1 packets transmitted, 1 received, 0% packet loss, time 0ms
rtt min/avg/max/mdev = 0.529/0.529/0.529/0.000 ms

[root@ubuntu2204-150 ~]# ssh 10.0.0.110
The authenticity of host '10.0.0.110 (10.0.0.110)' can't be established.
ED25519 key fingerprint is SHA256:NMjZpMYkMVJ2F+4SEexMgqnsJUEqj5uLmSeXYJfg3zA.
This key is not known by any other names
Are you sure you want to continue connecting (yes/no/[fingerprint])?

#HTTP服务正常使用
[root@rocky-154 ~]#curl 10.0.0.110
<!DOCTYPE html>
<html>
<head>
<title>Welcome to nginx!</title>
...

#在Windows下测试
C:\Users\35069>ping 10.0.0.110

正在 Ping 10.0.0.110 具有 32 字节的数据:
来自 10.0.0.110 的回复: 无法连到端口。

10.0.0.110 的 Ping 统计信息:
    数据包: 已发送 = 1,已接收 = 1,丢失 = 0 (0% 丢失),
Control-C
^C
C:\Users\35069>ssh 10.0.0.110
The authenticity of host '10.0.0.110 (10.0.0.110)' can't be established.
ED25519 key fingerprint is SHA256:NMjZpMYkMVJ2F+4SEexMgqnsJUEqj5uLmSeXYJfg3zA.
This key is not known by any other names.
Are you sure you want to continue connecting (yes/no/[fingerprint])?
②扩展匹配
扩展匹配条件需要加载扩展模块才能使用,扩展匹配条件分为隐式扩展和显示扩展两种。
#查看扩展模块
[root@ubuntu ~]# dpkg -L iptables | grep libxt_.*.so

[root@ubuntu ~]# ls -l /usr/lib/x86_64-linux-gnu/xtables/*so | head
隐式扩展
iptables 在使用 -p 选项指明了特定的协议时,无需再用 -m 选项指明扩展模块的扩展机制,不需要手动加载扩展模块,不需要用 -m 显示指定的扩展,即隐式扩展。
tcp,upd,icmp 这三个协议是可以用 -m 指定的模块,但同时,也可以在基本匹配里面用 -p 来指定这几个协议。
[root@ubuntu ~]# dpkg -L iptables | grep tcp.so
/usr/lib/x86_64-linux-gnu/xtables/libxt_tcp.so

[root@ubuntu ~]# dpkg -L iptables | grep udp.so
/usr/lib/x86_64-linux-gnu/xtables/libxt_udp.so

[root@ubuntu ~]# dpkg -L iptables | grep icmp.so
/usr/lib/x86_64-linux-gnu/xtables/libipt_icmp.so
tcp协议扩展选项
[!] --source-port|--sport port[:port]       #匹配报文源端口,可为端口连续范围
[!] --destination-port|--dport port[:port]  #匹配报文目标端口,可为连续范围
[!] --tcp-flags mask comp                   #mask 需检查的标志位列表,用逗号分隔,例如 SYN,ACK,FIN,RST

#comp 在mask列表中必须为1的标志位列表,无指定则必须为0,用逗号分隔tcp协议的扩展选项

#空格 前0后1
--tcp-flags SYN,ACK,FIN,RST SYN             #检查SYN,ACK,FIN,RST四个标志位,其中SYN值为1,其它值为0,表示第一次握手
--tcp-flags SYN,ACK,FIN,RST SYN,ACK         #第二次握手

[!] --syn                                   #第一次握手的简单写法
用tcp协议和目标端口拒绝ssh服务
#拒绝来自154 目标110,目标端口21到23的数据包
[root@ubuntu-157 ~]# iptables -t filter -A INPUT -s 10.0.0.154 -d 10.0.0.110 -p tcp --dport 21:23 -j REJECT

[root@ubuntu-157 ~]# iptables -t filter -nL INPUT
Chain INPUT (policy ACCEPT)
target     prot opt source               destination
REJECT     tcp  --  10.0.0.154           10.0.0.110           tcp dpts:21:23 reject-with icmp-port-unreachable

#测试
[root@rocky-154 ~]#ping 10.0.0.110
PING 10.0.0.110 (10.0.0.110) 56(84) bytes of data.
64 bytes from 10.0.0.110: icmp_seq=1 ttl=64 time=0.520 ms
^C
--- 10.0.0.110 ping statistics ---
1 packets transmitted, 1 received, 0% packet loss, time 0ms
rtt min/avg/max/mdev = 0.520/0.520/0.520/0.000 ms

[root@rocky-154 ~]#curl 10.0.0.110
<!DOCTYPE html>
<html>
<head>
<title>Welcome to nginx!</title>
...

#ssh服务监听22端口
[root@rocky-154 ~]#ssh 10.0.0.110
ssh: connect to host 10.0.0.110 port 22: Connection refused

[root@rocky-154 ~]#ssh 10.0.0.157
[root@ubuntu-157 ~]# exit
logout
Connection to 10.0.0.157 closed.
根据tcp标志位过滤
#拒绝第一次握手
[root@ubuntu ~]# iptables -t filter -A INPUT -s 10.0.0.150 -d 10.0.0.110 -p tcp --tcp-flags SYN,ACK,FIN,RST SYN -j REJECT

[root@ubuntu ~]# iptables -t filter -L INPUT
Chain INPUT (policy ACCEPT)
target     prot opt source               destination
REJECT     tcp  --  10.0.0.150           10.0.0.110           tcp
flags:FIN,SYN,RST,ACK/SYN reject-with icmp-port-unreachable
udp协议扩展选项
[!] --source-port, --sport port[:port]     #匹配报文的源端口或端口范围
[!] --destination-port,--dport port[:port] #匹配报文的目标端口或端口范围
icmp协议扩展选项
[!] --icmp-type {type[/code]|typename}

0/0|echo-reply         #icmp应答
8/0|echo-request       #icmp请求
拒绝ICMP的请求包
[root@ubuntu2204-150 ~]# ping 10.0.0.157
PING 10.0.0.157 (10.0.0.157) 56(84) bytes of data.
64 bytes from 10.0.0.157: icmp_seq=1 ttl=64 time=0.539 ms
...

[root@ubuntu-157 ~]# tcpdump icmp
tcpdump: verbose output suppressed, use -v[v]... for full protocol decode
listening on ens33, link-type EN10MB (Ethernet), snapshot length 262144 bytes
14:20:36.200906 IP 10.0.0.150 > 10.0.0.157: ICMP echo request, id 1, seq 7, length 64
14:20:36.200937 IP 10.0.0.157 > 10.0.0.150: ICMP echo reply, id 1, seq 7, length 64
...

[root@ubuntu-157 ~]# iptables -t filter -A INPUT -s 10.0.0.150 -p icmp --icmp-type 8 -j REJECT

[root@ubuntu-157 ~]# iptables -t filter -nL INPUT
Chain INPUT (policy ACCEPT)
target     prot opt source               destination
REJECT     icmp --  10.0.0.150           0.0.0.0/0            icmptype 8 reject-with icmp-port-unreachable

#测试
[root@ubuntu2204-150 ~]# ping 10.0.0.157
PING 10.0.0.157 (10.0.0.157) 56(84) bytes of data.
From 10.0.0.157 icmp_seq=1 Destination Port Unreachable
From 10.0.0.157 icmp_seq=2 Destination Port Unreachable
From 10.0.0.157 icmp_seq=3 Destination Port Unreachable
^C
--- 10.0.0.157 ping statistics ---
3 packets transmitted, 0 received, +3 errors, 100% packet loss, time 2007ms
显示扩展及其相关模块
显示扩展即必须使用 -m 选项指明要调用的扩展模块名称,需要手动加载扩展模块。
#格式
-m matchname [per-match-options]
multiport扩展
#以离散方式定义多端口匹配,最多指定15个端口

[!] --source-ports|--sports port[,port|,port:port]...      #指定多个源端口
[!] --destination-ports|--dports port[,port|,port:port]... #指定多个目标端口
[!] --ports port[,port|,port:port]...                      #多个源或目标端口

port1,port2     #port1和port2端口(离散)
port1:port2     #port1到port2之间的所有端口
[root@ubuntu-157 ~]# iptables -t filter -A INPUT -s 10.0.0.150 -d 10.0.0.157 -p tcp -m multiport --dports 22,80 -j REJECT
[root@ubuntu-157 ~]# iptables -t filter -nL INPUT
Chain INPUT (policy ACCEPT)
target prot opt source destination
REJECT tcp -- 10.0.0.150 10.0.0.157 multiport dports 22,80 reject-with icmp-port-unreachable
[root@ubuntu2204-150 ~]# ping 10.0.0.157
PING 10.0.0.157 (10.0.0.157) 56(84) bytes of data.
64 bytes from 10.0.0.157: icmp_seq=1 ttl=64 time=1.03 ms
64 bytes from 10.0.0.157: icmp_seq=2 ttl=64 time=0.530 ms
64 bytes from 10.0.0.157: icmp_seq=3 ttl=64 time=0.568 ms
^C
--- 10.0.0.157 ping statistics ---
3 packets transmitted, 3 received, 0% packet loss, time 2027ms
rtt min/avg/max/mdev = 0.530/0.710/1.032/0.228 ms
[root@ubuntu2204-150 ~]# ssh 10.0.0.157
ssh: connect to host 10.0.0.157 port 22: Connection refused
[root@ubuntu2204-150 ~]# curl 10.0.0.157
curl: (7) Failed to connect to 10.0.0.157 port 80 after 0 ms: Connection refused
#其他主机
[root@ubuntu-157 ~]# exit
logout
Connection to 10.0.0.157 closed.
[root@rocky-154 ~]#curl 10.0.0.157
<!DOCTYPE html>
<html>
<head>
<title>Welcome to nginx!</title>
...
iprange扩展
指明连续的(但一般不是整个网络)ip地址范围。
[!] --src-range from[-to]     #源IP地址范围
[!] --dst-range from[-to]     #目标IP地址范围
#拒绝150-155这6个IP地址
[root@ubuntu-157 ~]# iptables -t filter -A INPUT -m iprange --src-range 10.0.0.150-10.0.0.155 -j DROP
[root@ubuntu-157 ~]# iptables -t filter -nL INPUT
Chain INPUT (policy ACCEPT)
target prot opt source destination
DROP all -- 0.0.0.0/0 0.0.0.0/0 source IP range 10.0.0.150-10.0.0.155
#测试-数据包被丢弃
[root@ubuntu2204-150 ~]# ping 10.0.0.157
PING 10.0.0.157 (10.0.0.157) 56(84) bytes of data.
^C
--- 10.0.0.157 ping statistics ---
31 packets transmitted, 0 received, 100% packet loss, time 30715ms
[root@ubuntu2204-150 ~]# ssh 10.0.0.157
^C
[root@ubuntu2204-150 ~]# curl 10.0.0.157
^C
[root@ubuntu2204-150 ~]# ping 10.0.0.110
PING 10.0.0.110 (10.0.0.110) 56(84) bytes of data.
^C
--- 10.0.0.110 ping statistics ---
10 packets transmitted, 0 received, 100% packet loss, time 9205ms
[root@ubuntu2204-150 ~]# ssh 10.0.0.110
^C
#除6个IP地址以外其他IP地址测试
root@ubuntu-158:~# ping 10.0.0.157
PING 10.0.0.157 (10.0.0.157) 56(84) bytes of data.
64 bytes from 10.0.0.157: icmp_seq=1 ttl=64 time=11.1 ms
64 bytes from 10.0.0.157: icmp_seq=2 ttl=64 time=0.500 ms
^C
--- 10.0.0.157 ping statistics ---
2 packets transmitted, 2 received, 0% packet loss, time 1002ms
rtt min/avg/max/mdev = 0.500/5.815/11.131/5.315 ms
[root@ubuntu-157 ~]# exit
logout
Connection to 10.0.0.157 closed.
root@ubuntu-158:~#
mac扩展
mac 模块可以指明源MAC地址,适用于:PREROUTING, FORWARD,INPUT chains。
[!] --mac-source XX:XX:XX:XX:XX:XX[root@ubuntu-157 ~]# iptables -t filter -A INPUT -s 10.0.0.1 -j ACCEPT
#仅mac地址00:0c:29:b4:f4:b7的主机才能访问157
[root@ubuntu-157 ~]# iptables -t filter -A INPUT -d 10.0.0.157 -m mac --mac-source 00:0c:29:b4:f4:b7 -j ACCEPT
#其他主机都拒绝
[root@ubuntu-157 ~]# iptables -t filter -A INPUT -d 10.0.0.157 -j REJECT
[root@ubuntu-157 ~]# iptables -nL
Chain INPUT (policy ACCEPT)
target prot opt source destination
ACCEPT all -- 10.0.0.1 0.0.0.0/0
ACCEPT all -- 0.0.0.0/0 10.0.0.157 MAC 00:0c:29:b4:f4:b7
REJECT all -- 0.0.0.0/0 10.0.0.157 reject-with icmp-port-unreachable
Chain FORWARD (policy ACCEPT)
target prot opt source destination
Chain OUTPUT (policy ACCEPT)
target prot opt source destination
[root@ubuntu2204-150 ~]# ping 10.0.0.157
PING 10.0.0.157 (10.0.0.157) 56(84) bytes of data.
From 10.0.0.157 icmp_seq=1 Destination Port Unreachable
^C
--- 10.0.0.157 ping statistics ---
1 packets transmitted, 0 received, +1 errors, 100% packet loss, time 0ms
[root@rocky8-153 ~]#ip a s
...
2: eth0: <BROADCAST,MULTICAST,UP,LOWER_UP> mtu 1500 qdisc mq state UP group default qlen 1000
link/ether 00:0c:29:b4:f4:99 brd ff:ff:ff:ff:ff:ff
altname enp3s0
altname ens160
3: eth1: <BROADCAST,MULTICAST,UP,LOWER_UP> mtu 1500 qdisc mq state UP group default qlen 1000
link/ether 00:0c:29:b4:f4:b7 brd ff:ff:ff:ff:ff:ff
altname enp4s0
altname ens161
inet 10.0.0.163/24 brd 10.0.0.255 scope global noprefixroute eth1
valid_lft forever preferred_lft forever
inet6 fe80::20c:29ff:feb4:f4b7/64 scope link
valid_lft forever preferred_lft forever
...
[root@rocky8-153 ~]#ping 10.0.0.157
PING 10.0.0.157 (10.0.0.157) 56(84) bytes of data.
64 bytes from 10.0.0.157: icmp_seq=1 ttl=64 time=0.525 ms
64 bytes from 10.0.0.157: icmp_seq=2 ttl=64 time=0.429 ms
64 bytes from 10.0.0.157: icmp_seq=3 ttl=64 time=0.422 ms
^C
--- 10.0.0.157 ping statistics ---
3 packets transmitted, 3 received, 0% packet loss, time 2053ms
#添加mac地址
[root@rocky8-153 ~]#vim /etc/sysconfig/network-scripts/ifcfg-eth1
[root@rocky8-153 ~]#cat /etc/sysconfig/network-scripts/ifcfg-eth1
TYPE=Ethernet
NAME=eth1
IPADDR=10.0.0.163
PREFIX=24
DEVICE=eth1
GATEWAY=10.0.0.2
DNS1=10.0.0.2
DNS2=114.114.114.114
MACADDR=00:0c:29:66:66:66
[root@rocky8-153 ~]#nmcli con reload ; nmcli con up eth1
Connection successfully activated (D-Bus active path: /org/freedesktop/NetworkManager/ActiveConnection/4)
#查看
[root@rocky8-153 ~]#ip a s
...
3: eth1: <BROADCAST,MULTICAST,UP,LOWER_UP> mtu 1500 qdisc mq state UP group default qlen 1000
link/ether 00:0c:29:66:66:66 brd ff:ff:ff:ff:ff:ff permaddr 00:0c:29:b4:f4:b7
altname enp4s0
altname ens161
inet 10.0.0.163/24 brd 10.0.0.255 scope global noprefixroute eth1
valid_lft forever preferred_lft forever
inet6 fe80::20c:29ff:fe66:6666/64 scope link
valid_lft forever preferred_lft forever
...
[root@rocky8-153 ~]#ping 10.0.0.157
PING 10.0.0.157 (10.0.0.157) 56(84) bytes of data.
From 10.0.0.157 icmp_seq=1 Destination Port Unreachable
From 10.0.0.157 icmp_seq=2 Destination Port Unreachable
^C
--- 10.0.0.157 ping statistics ---
2 packets transmitted, 0 received, +2 errors, 100% packet loss, time 1002msstring扩展
对报文中的应用层数据做字符串模式匹配检测。
--algo {bm|kmp}           #过滤算法 Boyer-Moore|Knuth-Pratt-Morris,在Rocky8.6中bm算法配合nginx有问题
--from offset             #开始偏移量,一般用来跳过包头,只检查具体内容,这样能提高效率
--to offset               #结束偏移量
[!] --string pattern      #具体要匹配的字符串
[!] --hex-string pattern  #具体要匹配的字符串,16进制格式
[root@ubuntu-157 ~]# cd /var/www/html
[root@ubuntu-157 html]# echo "baidu.com" > bd.html
[root@ubuntu-157 html]# echo "google.com" > gg.html
[root@ubuntu2204-150 ~]# curl 10.0.0.157/bd.html
baidu.com
[root@ubuntu2204-150 ~]# curl 10.0.0.157/gg.html
google.com
#设置出口规则,在返回的数据包中,跳过前62字节的报文头,如果内容中出现 google,则拒绝返回
[root@ubuntu-157 html]# iptables -t filter -A OUTPUT -m string --algo kmp --from 62 --string "google" -j REJECT
[root@ubuntu-157 html]# iptables -nL OUTPUT
Chain OUTPUT (policy ACCEPT)
target prot opt source destination
REJECT all -- 0.0.0.0/0 0.0.0.0/0 STRING match "google" ALGO name kmp FROM 62 reject-with icmp-port-unreachable
#测试
[root@ubuntu2204-150 ~]# curl 10.0.0.157/bd.html
baidu.com
#google无法返回
[root@ubuntu2204-150 ~]# curl 10.0.0.157/gg.html
^C
#区分大小写,大写不会命中
[root@ubuntu-157 html]# echo "Google" > Gg.html
[root@ubuntu2204-150 ~]# curl 10.0.0.157/Gg.html
Googletime扩展
根据将报文到达的时间与指定的时间范围进行匹配,此扩展中默认使用UTC时间,所以使用时,要根据当前时区进行计算(北京时间+8)。此扩展在CentOS8中有问题。
--datestart YYYY[-MM[-DD[Thh[:mm[:ss]]]]] #开始生效时间
--datestop YYYY[-MM[-DD[Thh[:mm[:ss]]]]]  #结束生效时间
--timestart hh:mm[:ss]                    #开始生效时间
--timestop hh:mm[:ss]                     #结束生效时间
[!] --monthdays day[,day...]              #指定几号,1-31
[!] --weekdays day[,day...]               #指定星期几,可以写Mon|Tue|Wed|Thu|Fri|Sat|Sun,也可以写1|2|3|4|5|6|7
--contiguous
--kerneltz                                #内核时区,此选项不建议使用,CentOS7版本以上系统默认UTC
#rocky8中设置报错
[root@rocky-154 ~]#iptables -t filter -A INPUT -m time --timestart 01:00 --timestop 07:50 -s 10.0.0.150 -j REJECT
Warning: Extension time revision 0 not supported, missing kernel module?
iptables v1.8.5 (nf_tables): RULE_APPEND failed (No such file or directory): rule in chain INPUT
#ubuntu中设置
[root@ubuntu-157 ~]# iptables -t filter -A INPUT -m time --timestart 01:00 --timestop 07:50 -s 10.0.0.150 -j REJECT
[root@ubuntu-157 ~]# iptables -nL INPUT
Chain INPUT (policy ACCEPT)
target prot opt source destination
REJECT all -- 10.0.0.150 0.0.0.0/0 TIME from 01:00:00 to 07:50:00 UTC reject-with icmp-port-unreachable
[root@ubuntu-157 ~]# date +"%F %T"
2025-10-27 15:49:30
#在设置规则好后一直150ping157
#到规定的结束生效时间150又能ping通157
[root@ubuntu2204-150 ~]# ping 10.0.0.157
PING 10.0.0.157 (10.0.0.157) 56(84) bytes of data.
From 10.0.0.157 icmp_seq=1 Destination Port Unreachable
...
From 10.0.0.157 icmp_seq=45 Destination Port Unreachable
64 bytes from 10.0.0.157: icmp_seq=46 ttl=64 time=0.506 ms
64 bytes from 10.0.0.157: icmp_seq=47 ttl=64 time=0.591 ms
64 bytes from 10.0.0.157: icmp_seq=48 ttl=64 time=0.671 ms
^C
--- 10.0.0.157 ping statistics ---
60 packets transmitted, 15 received, +45 errors, 75% packet loss, time 60196ms
rtt min/avg/max/mdev = 0.417/0.561/0.921/0.119 ms
#另一台主机上安装压力测试工具
[root@rocky-154 ~]#yum install -y httpd-tools

[root@ubuntu2204-150 ~]# apt-get install apache2-utils

#压测
[root@ubuntu2204-150 ~]# ab -n 100000 -c 1000 http://10.0.0.157/

#-n N   总共发起多少个请求,默认一个
#-c N   每次请求并发数,默认一个

#157主机上查看
[root@ubuntu-157 ~]# ss -nt
State                    Recv-Q               Send-Q                             Local Address:Port                               Peer Address:Port
ESTAB                    78                   0                                     10.0.0.157:80                                   10.0.0.150:54844
ESTAB                    78                   0                                     10.0.0.157:80                                   10.0.0.150:54912
ESTAB                    78                   0                                     10.0.0.157:80                                   10.0.0.150:54112
...

#限制并发连接
[root@ubuntu-157 ~]# iptables -t filter -A INPUT -m connlimit --connlimit-above 10 -j REJECT

[root@ubuntu-157 ~]# iptables -t filter -nL INPUT
Chain INPUT (policy ACCEPT)
target     prot opt source               destination
REJECT     all  --  0.0.0.0/0            0.0.0.0/0            #conn src/32 > 10 reject-with icmp-port-unreachable

#无法发起连接
[root@ubuntu2204-150 ~]# ab -n 100000 -c 1000 http://10.0.0.157/
This is ApacheBench, Version 2.3 <$Revision: 1879490 $>
Copyright 1996 Adam Twiss, Zeus Technology Ltd, http://www.zeustech.net/
Licensed to The Apache Software Foundation, http://www.apache.org/

Benchmarking 10.0.0.157 (be patient)
apr_socket_recv: Connection refused (111)
Total of 1 requests completed
limit扩展
基于收发报文的速率做匹配 , 令牌桶过滤器。
connlimit 扩展是限制单个客户端对服务器的并发连接数,limit 扩展是限制服务器上所有的连接数。
--limit-burst number                   #前多少个包不限制
--limit #[/second|/minute|/hour|/day]  #在一个时间区间内能接收的连接数
#添加 icmp 放行规则,前10个不处理,后面每分钟放行20个
[root@ubuntu-157 ~]# iptables -t filter -A INPUT -p icmp --icmp-type 8 -m limit --limit 20/minute --limit-burst 10 -j ACCEPT
#兜底规则
[root@ubuntu-157 ~]# iptables -t filter -A INPUT -p icmp -j REJECT
[root@ubuntu-157 ~]# iptables -nL INPUT
Chain INPUT (policy ACCEPT)
target prot opt source destination
ACCEPT icmp -- 0.0.0.0/0 0.0.0.0/0 icmptype 8 limit: avg 20/min burst 10
REJECT icmp -- 0.0.0.0/0 0.0.0.0/0 reject-with icmp-port-unreachable
[root@ubuntu2204-150 ~]# ping 10.0.0.157
PING 10.0.0.157 (10.0.0.157) 56(84) bytes of data.
64 bytes from 10.0.0.157: icmp_seq=1 ttl=64 time=0.352 ms
...
64 bytes from 10.0.0.157: icmp_seq=12 ttl=64 time=0.638 ms
64 bytes from 10.0.0.157: icmp_seq=13 ttl=64 time=1.11 ms
64 bytes from 10.0.0.157: icmp_seq=14 ttl=64 time=0.540 ms
From 10.0.0.157 icmp_seq=15 Destination Port Unreachable
64 bytes from 10.0.0.157: icmp_seq=16 ttl=64 time=0.586 ms
From 10.0.0.157 icmp_seq=17 Destination Port Unreachable
From 10.0.0.157 icmp_seq=18 Destination Port Unreachable
64 bytes from 10.0.0.157: icmp_seq=19 ttl=64 time=0.563 ms
From 10.0.0.157 icmp_seq=20 Destination Port Unreachable
From 10.0.0.157 icmp_seq=21 Destination Port Unreachable
64 bytes from 10.0.0.157: icmp_seq=22 ttl=64 time=0.572 ms
From 10.0.0.157 icmp_seq=23 Destination Port Unreachable
From 10.0.0.157 icmp_seq=24 Destination Port Unreachable
^C
--- 10.0.0.157 ping statistics ---
32 packets transmitted, 20 received, +12 errors, 37.5% packet loss, time 31728ms
rtt min/avg/max/mdev = 0.352/0.650/1.113/0.150 ms
state扩展
state 扩展,可以根据 "连接追踪机制" 去检查连接的状态,比较耗费资源。
[!] --state statestate扩展的状态
| 状态类型 | 说明 |
| NEW | 新发出请求;连接追踪信息库中不存在此连接的相关信息条目,因此,将其识别为第一次发出的请求 |
| ESTABLISHED | NEW状态之后,连接追踪信息库中为其建立的条目失效之前期间内所进行的通信状态 |
| RELATED | 新发起的但与已有连接相关联的连接,如:ftp协议中的数据连接与命令连接之间的关系 |
| INVALID | 无效的连接,如flag标记不正确 |
| UNTRACKED | 未进行追踪的连接,如:raw表中关闭追踪 |
连接追踪机制需要内核选项支持,rocky中开启了此功能,所以此处我们在 rocky 中进行测试。只要系统中某处要使用到连接追踪机制,连接追踪机制相关模块会自动加载。
[root@rocky-154 ~]#cat /usr/lib/modules/4.18.0-553.el8_10.x86_64/config | grep CONFIG_NF_CONNTRACK_PROCFS
CONFIG_NF_CONNTRACK_PROCFS=y

[root@ubuntu2204-150 ~]# cat /boot/config-5.15.0-160-generic | grep CONFIG_NF_CONNTRACK_PROCFS
# CONFIG_NF_CONNTRACK_PROCFS is not set

#查看是否启用连接追踪机制

#当前还未启用
[root@rocky-154 ~]#lsmod | grep nf_conntrack

#启用连接跟踪机制后,会自动生成此文件
[root@rocky-154 ~]#cat /proc/net/nf_conntrack
cat: /proc/net/nf_conntrack: No such file or directory
#157PING154,先建立连接,再设置防火墙
[root@ubuntu-157 ~]# ping 10.0.0.154
PING 10.0.0.154 (10.0.0.154) 56(84) bytes of data.
64 bytes from 10.0.0.154: icmp_seq=1 ttl=64 time=0.670 ms
64 bytes from 10.0.0.154: icmp_seq=2 ttl=64 time=0.394 ms
64 bytes from 10.0.0.154: icmp_seq=3 ttl=64 time=0.586 ms
...

#己连接的客户端可以继续通信
[root@rocky-154 ~]#iptables -t filter -A INPUT -m state --state ESTABLISHED -j ACCEPT

#新的客户端拒绝连接
[root@rocky-154 ~]#iptables -t filter -A INPUT -m state --state NEW -j REJECT

#查看
[root@rocky-154 ~]#iptables -t filter -nL INPUT
Chain INPUT (policy ACCEPT)
target     prot opt source               destination
ACCEPT     all  --  0.0.0.0/0            0.0.0.0/0            state ESTABLISHED
REJECT     all  --  0.0.0.0/0            0.0.0.0/0            state NEW reject-with icmp-port-unreachable

#其他主机150PING154
[root@ubuntu2204-150 ~]# ping 10.0.0.154
PING 10.0.0.154 (10.0.0.154) 56(84) bytes of data.
From 10.0.0.154 icmp_seq=1 Destination Port Unreachable
From 10.0.0.154 icmp_seq=2 Destination Port Unreachable
From 10.0.0.154 icmp_seq=3 Destination Port Unreachable
...

#同时尝试建立ssh连接
[C:\~]$ ssh root@10.0.0.154


Connecting to 10.0.0.154:22...
Could not connect to '10.0.0.154' (port 22): Connection failed.

#查看模块加载和追踪文件
[root@rocky-154 ~]#lsmod | grep nf_conntrack
nf_conntrack          176128  1 xt_conntrack
nf_defrag_ipv6         20480  1 nf_conntrack
nf_defrag_ipv4         16384  1 nf_conntrack
libcrc32c              16384  3 nf_conntrack,nf_tables,xfs

#启用连接跟踪机制之后,连接状态是记录在文件中的
[root@rocky-154 ~]#cat /proc/net/nf_conntrack
ipv4     2 udp      17 24 src=10.0.0.154 dst=10.0.0.254 sport=68 dport=67 src=10.0.0.254 dst=10.0.0.154 sport=67 dport=68 mark=0 secctx=system_u:object_r:unlabeled_t:s0 zone=0 use=2
ipv4     2 tcp      6 299 ESTABLISHED src=10.0.0.154 dst=10.0.0.1 sport=22 dport=58103 src=10.0.0.1 dst=10.0.0.154 sport=58103 dport=22 [ASSURED] mark=0 secctx=system_u:object_r:unlabeled_t:s0 zone=0 use=2

#nf_conntrack 文件内容说明
ipv4         #第一列 网络层协议名称
2            #第二列 网络层协议号
tcp          #第三列 传输层协议名称
6            #第四列 传输层协议号
299          #第五列 无后续包进入时无效的秒数,即老化时间
ESTABLISHED  #第六列 该连接的连接状态,不是所有协议都有此列值
             #后续都是k=v 格式的连接参数和选项
#nf_conntrack文件中能记录多少内容,取决于配置
[root@rocky-154 ~]#cat /proc/sys/net/netfilter/nf_conntrack_max
65536

#将此参数改小,表示记录连接状态的文件,只能保存一条记录
[root@rocky-154 ~]#echo 1 > /pcat /proc/sys/net/netfilter/nf_conntrack_max
1
[root@rocky-154 ~]#cat /proc/sys/net/netfilter/nf_conntrack_max
1

#查看系统日志,连接数超过了可跟踪记录的最大值,报文被抛弃
[root@rocky-154 ~]#journalctl -f
-- Logs begin at Mon 2025-10-27 13:13:25 CST. --
Oct 27 18:10:45 rocky-154 kernel: nf_conntrack: nf_conntrack: table full, dropping packet
Oct 27 18:10:45 rocky-154 kernel: nf_conntrack: nf_conntrack: table full, dropping packet
Oct 27 18:10:46 rocky-154 kernel: nf_conntrack: nf_conntrack: table full, dropping packet
...

#恢复
[root@rocky-154 ~]#echo 65535 > /proc/sys/net/netfilter/nf_conntrack_max
[root@rocky-154 ~]#cat  /proc/sys/net/netfilter/nf_conntrack_max
65535
不同协议的连接追踪时长
[root@rocky-154 ~]#ll /proc/sys/net/netfilter/*timeout*

#此处表示,一个己经被追踪记录的ICMP协议连接的客户端,30S没有响应,则认为超时,从记录表中剔除
[root@rocky-154 ~]#cat /proc/sys/net/netfilter/nf_conntrack_icmp_timeout
30
| 参数 | 说明 |
| /proc/sys/net/netfilter/nf_conntrack_max | 连接追踪功能所能够容纳的最大连接数量,修改此处,下一项也会改变 |
| /proc/sys/net/nf_conntrack_max | 连接追踪功能所能够容纳的最大连接数量,修改此处,上一项也会改变 |
| /proc/sys/net/netfilter/nf_conntrack_count | 己追踪的连接数量 |
| /proc/sys/net/netfilter/*_timeout_* | 不同协议超时时长,单位为秒,超时后会踢出己监控的队列 |
面试题:有一台服务器无法建立新的连接,查看系统日志有如下提示,请问是什么问题,应该如何解决?
[root@rocky-154 ~]#journalctl -f
-- Logs begin at Mon 2025-10-27 13:13:25 CST. --
Oct 27 18:10:45 rocky-154 kernel: nf_conntrack: nf_conntrack: table full, dropping packet
Oct 27 18:10:45 rocky-154 kernel: nf_conntrack: nf_conntrack: table full, dropping packet
1、加大连接限制
vi /etc/sysctl.conf
net.nf_conntrack_max = 393216
net.netfilter.nf_conntrack_max = 393216
2、降低 nf_conntrack timeout时间
vi /etc/sysctl.conf
net.netfilter.nf_conntrack_tcp_timeout_established = 300
net.netfilter.nf_conntrack_tcp_timeout_time_wait = 120
net.netfilter.nf_conntrack_tcp_timeout_close_wait = 60
net.netfilter.nf_conntrack_tcp_timeout_fin_wait = 120
......
4、target
-j targetname [per-target-options]| target | 说明 |
| ACCEPT | 允许通过,命中此规则后,不再对比当前链的其它规则,进入下一个链 |
| DROP | 丢弃,命中此规则后,该连接直接中断,发送方收不到任何回应 |
| REJECT | 拒绝,命中此规则后,该连接直接中断,发送方能收到拒绝回应 |
| RETURN | 返回,在当前链中不再继续匹配,返回到主链,一般用于自定义规则链中 |
| LOG | 记录日志,将被命中的数据记录在日志中 |
| SNAT | 源IP地址转换 |
| DNAT | 目标IP地址转换 |
| REDIRECT | 本机端口转换 |
| MASQUERADE | 源IP地址动态转换10 |
| 自定义 |
--log-level level     #日志级别debug|info|notice|warning|error|crit|alert|emerg
--log-prefix prefix   #日志前缀,用于区别不同的日志,最多29个字符
DROP和REJECT
#DROP
[root@ubuntu-157 ~]# iptables -t filter -A INPUT -s 10.0.0.154 -j DROP

#测试
[root@rocky-154 ~]#ping 10.0.0.157
PING 10.0.0.157 (10.0.0.157) 56(84) bytes of data.
^C
--- 10.0.0.157 ping statistics ---
58 packets transmitted, 0 received, 100% packet loss, time 58393ms

#清空规则
[root@ubuntu-157 ~]# iptables -F

#REJECT
[root@ubuntu-157 ~]# iptables -t filter -A INPUT -s 10.0.0.154 -j REJECT

#再次测试
[root@rocky-154 ~]#ping 10.0.0.157
PING 10.0.0.157 (10.0.0.157) 56(84) bytes of data.
From 10.0.0.157 icmp_seq=1 Destination Port Unreachable
From 10.0.0.157 icmp_seq=2 Destination Port Unreachable
From 10.0.0.157 icmp_seq=3 Destination Port Unreachable
^C
--- 10.0.0.157 ping statistics ---
3 packets transmitted, 0 received, +3 errors, 100% packet loss, time 2049ms
记录日志
[root@ubuntu-157 ~]# iptables -t filter -A INPUT -s 10.0.0.150 -j LOG --log-prefix "hhaosocool"

[root@ubuntu-157 ~]# iptables -t filter -nL INPUT
Chain INPUT (policy ACCEPT)
target     prot opt source               destination
LOG        all  --  10.0.0.150           0.0.0.0/0            LOG flags 0 level 4 prefix "hhaosocool"

#测试
[root@ubuntu2204-150 ~]# ping 10.0.0.157
PING 10.0.0.157 (10.0.0.157) 56(84) bytes of data.
64 bytes from 10.0.0.157: icmp_seq=1 ttl=64 time=0.747 ms
64 bytes from 10.0.0.157: icmp_seq=2 ttl=64 time=0.820 ms
64 bytes from 10.0.0.157: icmp_seq=3 ttl=64 time=0.715 ms
....

#查看157日志
[root@ubuntu-157 ~]# tail -f /var/log/syslog
2025-10-27T19:36:25.507597+08:00 ubuntu-157 kernel: hhaosocoolIN=ens33 OUT= MAC=00:0c:29:88:bd:f8:00:0c:29:b2:c0:32:08:00 SRC=10.0.0.150 DST=10.0.0.157 LEN=84 TOS=0x00 PREC=0x00 TTL=64 ID=37124 DF PROTO=ICMP TYPE=8 CODE=0 ID=14 SEQ=2
2025-10-27T19:36:26.520093+08:00 ubuntu-157 kernel: hhaosocoolIN=ens33 OUT= MAC=00:0c:29:88:bd:f8:00:0c:29:b2:c0:32:08:00 SRC=10.0.0.150 DST=10.0.0.157 LEN=84 TOS=0x00 PREC=0x00 TTL=64 ID=37294 DF PROTO=ICMP TYPE=8 CODE=0 ID=14 SEQ=3
2025-10-27T19:36:27.544318+08:00 ubuntu-157 kernel: hhaosocoolIN=ens33 OUT= MAC=00:0c:29:88:bd:f8:00:0c:29:b2:c0:32:08:00 SRC=10.0.0.150 DST=10.0.0.157 LEN=84 TOS=0x00 PREC=0x00 TTL=64 ID=37297 DF PROTO=ICMP TYPE=8 CODE=0 ID=14 SEQ=4
...
5、规则设置优化
⚪安全放行所有入站和出站的状态为ESTABLISHED状态连接,建议放在第一条,效率更高谨慎放行入站的新请求。
⚪有特殊目的限制访问功能,要在放行规则之前加以拒绝。
⚪同类规则(访问同一应用,比如:http ),匹配范围小的放在前面,用于特殊处理。
⚪不同类的规则(访问不同应用,一个是http,另一个是mysql ),匹配范围大的放在前面,效率更高。
⚪应该将那些可由一条规则能够描述的多个规则合并为一条,减少规则数量,提高检查效率。
⚪设置默认策略,建议白名单(只放行特定连接)。
⚪默认规则(iptables -P)是 ACCEPT,不建议修改,容易出现 “自杀” 现象。
⚪规则的最后定义规则做为默认策略,推荐使用,放在最后一条。
6、iptables规则保存
使用iptables 命令定义的规则,手动删除之前,其生效期限为 kernel 存活期限,当系统重启之后,定义的规则会消失。
持久化保存规则
#添加规则
[root@ubuntu-157 ~]# iptables -t filter -A INPUT -s 10.0.0.1 -j ACCEPT

[root@ubuntu-157 ~]# iptables -L
Chain INPUT (policy ACCEPT)
target     prot opt source               destination
ACCEPT     all  --  10.0.0.1             anywhere

Chain FORWARD (policy ACCEPT)
target     prot opt source               destination

Chain OUTPUT (policy ACCEPT)
target     prot opt source               destination

#在标准输出中显示
[root@ubuntu-157 ~]# iptables-save
# Generated by iptables-save v1.8.11 (nf_tables) on Mon Oct 27 20:04:48 2025
*filter
:INPUT ACCEPT [517352:37826796]
:FORWARD ACCEPT [0:0]
:OUTPUT ACCEPT [405397:107272380]
-A INPUT -s 10.0.0.1/32 -j ACCEPT
COMMIT
# Completed on Mon Oct 27 20:04:48 2025

[root@ubuntu-157 ~]# iptables -S
-P INPUT ACCEPT
-P FORWARD ACCEPT
-P OUTPUT ACCEPT
-A INPUT -s 10.0.0.1/32 -j ACCEPT

#导出规则至文件
[root@ubuntu-157 ~]# iptables-save > iptables.rule

[root@ubuntu-157 ~]# cat iptables.rule
# Generated by iptables-save v1.8.11 (nf_tables) on Mon Oct 27 20:05:46 2025
*filter
:INPUT ACCEPT [517352:37826796]
:FORWARD ACCEPT [0:0]
:OUTPUT ACCEPT [405505:107281428]
-A INPUT -s 10.0.0.1/32 -j ACCEPT
COMMIT
# Completed on Mon Oct 27 20:05:46 2025

#注意:iptables-save 适用于 centOS7,centOS8中

#CentOS6使用此命令将规则保存至 /etc/sysconfig/iptables 文件中
service iptables save
加载保存的规则
#清空规则
[root@ubuntu-157 ~]# iptables -F

[root@ubuntu-157 ~]# iptables -L
Chain INPUT (policy ACCEPT)
target     prot opt source               destination

Chain FORWARD (policy ACCEPT)
target     prot opt source               destination

Chain OUTPUT (policy ACCEPT)
target     prot opt source               destination

#导入规则
[root@ubuntu-157 ~]# iptables-restore < ./iptables.rule

[root@ubuntu-157 ~]# iptables -L
Chain INPUT (policy ACCEPT)
target     prot opt source               destination
ACCEPT     all  --  10.0.0.1             anywhere

Chain FORWARD (policy ACCEPT)
target     prot opt source               destination

Chain OUTPUT (policy ACCEPT)
target     prot opt source               destination

#iptables-restore 命令适用于 CnetOS7,Centos8中

#CentOS6中使用此命令会从 /etc/sysconfig/iptables 文件中导入规则
service iptables restart
#iptables-restore命令是将保存在文件中的防火墙规则导入到系统中
iptables-restore [option] [file]
#常用选项
-h #显示帮助
-t #测试
-n #保留原有规则(追加)
#例
[root@ubuntu-157 ~]# iptables-restore -n < ./iptables.rule
[root@ubuntu-157 ~]# iptables-restore -n < ./iptables.rule
[root@ubuntu-157 ~]# iptables -t filter -nL INPUT
Chain INPUT (policy ACCEPT)
target prot opt source destination
ACCEPT all -- 10.0.0.1 0.0.0.0/0
ACCEPT all -- 10.0.0.1 0.0.0.0/0
ACCEPT all -- 10.0.0.1 0.0.0.0/0 开机自动加载规则
#rocky
[root@rocky-154 ~]#iptables -t filter -A INPUT -s 10.0.0.1 -j ACCEPT

#这里规则文件保存在/root下可能未能加载
[root@rocky-154 ~]#iptables-save > /tmp/rules.txt

[root@rocky-154 ~]#iptables -L
Chain INPUT (policy ACCEPT)
target     prot opt source               destination
ACCEPT     all  --  10.0.0.1             anywhere

Chain FORWARD (policy ACCEPT)
target     prot opt source               destination

Chain OUTPUT (policy ACCEPT)
target     prot opt source               destination
[root@rocky-154 ~]#iptables -F

#添加
[root@rocky-154 ~]#vim /etc/rc.d/rc.local
iptables-restore < /tmp/rules.txt

#保存后给文件增加执行权限,CentOS8中默认没有可执行权限
[root@rocky-154 ~]#chmod a+x /etc/rc.d/rc.local

[root@rocky-154 ~]#reboot

[root@rocky-154 ~]#iptables -L
Chain INPUT (policy ACCEPT)
target     prot opt source               destination
ACCEPT     all  --  10.0.0.1             anywhere

Chain FORWARD (policy ACCEPT)
target     prot opt source               destination

Chain OUTPUT (policy ACCEPT)
target     prot opt source               destination
#ubuntu
[root@ubuntu-157 ~]# iptables -t filter -I INPUT -s 10.0.0.1 -j ACCEPT
[root@ubuntu-157 ~]# iptables-save > rules.txt
[root@ubuntu-157 ~]# iptables -L
Chain INPUT (policy ACCEPT)
target prot opt source destination
ACCEPT all -- 10.0.0.1 anywhere
Chain FORWARD (policy ACCEPT)
target prot opt source destination
Chain OUTPUT (policy ACCEPT)
target prot opt source destination
[root@ubuntu-157 ~]# iptables -F
#ubuntu中没有该文件,自行创建
[root@ubuntu-157 ~]# ll /etc/rc.d/rc.local
ls: cannot access '/etc/rc.d/rc.local': No such file or directory
[root@ubuntu-157 ~]# ll /etc/rc.d
ls: cannot access '/etc/rc.d': No such file or directory
[root@ubuntu-157 ~]# mkdir /etc/rc.d
#添加
[root@ubuntu-157 ~]# vim /etc/rc.d/rc.local
#!/bin/bash
iptables-restore < /root/rules.txt
[root@ubuntu-157 ~]# chmod a+x /etc/rc.d/rc.local
#起作用的是/etc/rc.local,进行软连接处理
#这里直接写在/etc/rc.local也是可以的
[root@ubuntu-157 ~]# ln -sv /etc/rc.d/rc.local /etc/rc.local
'/etc/rc.local' -> '/etc/rc.d/rc.local'
[root@ubuntu-157 ~]# ll /etc/rc.local
lrwxrwxrwx 1 root root 18 Oct 27 21:47 /etc/rc.local -> /etc/rc.d/rc.local*
[root@ubuntu-157 ~]# reboot
[root@ubuntu-157 ~]# iptables -L
Chain INPUT (policy ACCEPT)
target prot opt source destination
ACCEPT all -- 10.0.0.1 anywhere
Chain FORWARD (policy ACCEPT)
target prot opt source destination
Chain OUTPUT (policy ACCEPT)
target prot opt source destination 在redhat系列中使用iptables-services实现(ubuntu中没有)
[root@rocky8-153 ~]#yum install -y iptables-services

[root@rocky8-153 ~]#systemctl status iptables
● iptables.service - IPv4 firewall with iptables
   Loaded: loaded (/usr/lib/systemd/system/iptables.service; disabled; vendor >
   Active: inactive (dead)

#开启服务
[root@rocky8-153 ~]#systemctl start iptables

#这些规则是启动iptables 服务后加载的规则,其保存文件为 /etc/sysconfig/iptables
[root@rocky8-153 ~]#systemctl siptables -L
Chain INPUT (policy ACCEPT)
target     prot opt source               destination
ACCEPT     all  --  anywhere             anywhere             state RELATED,ESTABLISHED
ACCEPT     icmp --  anywhere             anywhere
ACCEPT     all  --  anywhere             anywhere
ACCEPT     tcp  --  anywhere             anywhere             state NEW tcp dpt:ssh
REJECT     all  --  anywhere             anywhere             reject-with icmp-host-prohibited

Chain FORWARD (policy ACCEPT)
target     prot opt source               destination
REJECT     all  --  anywhere             anywhere             reject-with icmp-host-prohibited

Chain OUTPUT (policy ACCEPT)
target     prot opt source               destination

[root@rocky8-153 ~]#cat /etc/sysconfig/iptables
# sample configuration for iptables service
# you can edit this manually or use system-config-firewall
# please do not ask us to add additional ports/services to this default configuration
*filter
:INPUT ACCEPT [0:0]
:FORWARD ACCEPT [0:0]
:OUTPUT ACCEPT [0:0]
-A INPUT -m state --state RELATED,ESTABLISHED -j ACCEPT
-A INPUT -p icmp -j ACCEPT
-A INPUT -i lo -j ACCEPT
-A INPUT -p tcp -m state --state NEW -m tcp --dport 22 -j ACCEPT
-A INPUT -j REJECT --reject-with icmp-host-prohibited
-A FORWARD -j REJECT --reject-with icmp-host-prohibited
COMMIT

#将自定义的规则保存到 /etc/sysconfig/iptables,再将 iptables 服务设置成开机启动即可
iptables 服务 和 firewalld 服务不要同时启用,因为这两个服务都是设置防火墙规则的,彼此之间的规则会造成混乱。还是那句话,规则编辑入口,最好只保留一个,各种防火墙工具可能自带默认规则,送往内核执行,可能产生冲突。
[root@rocky8-153 ~]#systemctl cat firewalld
# /usr/lib/systemd/system/firewalld.service
[Unit]
Description=firewalld - dynamic firewall daemon
Before=network-pre.target
Wants=network-pre.target
After=dbus.service
After=polkit.service
Conflicts=iptables.service ip6tables.service ebtables.service ipset.service nftables.service
Documentation=man:firewalld(1)
...
7、iptables中的自定义链
iptables 中除了系统自带的五个链之外,还可以自定义链,来实现将规则进行分组,重复调用的目的。自定义链添加规则之后,要作为系统链的 target 与之关联,才能起到作用。
[root@rock10123~]#iptables -L
Chain INPUT (policy ACCEPT)
target     prot opt source               destination

Chain FORWARD (policy ACCEPT)
target     prot opt source               destination

Chain OUTPUT (policy ACCEPT)
target     prot opt source               destination

#添加自定义链
[root@rock10123~]#iptables -t filter -N web_chain

#查看
[root@rock10123~]#iptables -L
Chain INPUT (policy ACCEPT)
target     prot opt source               destination

Chain FORWARD (policy ACCEPT)
target     prot opt source               destination

Chain OUTPUT (policy ACCEPT)
target     prot opt source               destination

Chain web_chain (0 references)
target     prot opt source               destination

#重命名自定义链
[root@rock10123~]#iptables -t filter -E web_chain WEB_CHAIN

[root@rock10123~]#iptables -L
Chain INPUT (policy ACCEPT)
target     prot opt source               destination

Chain FORWARD (policy ACCEPT)
target     prot opt source               destination

Chain OUTPUT (policy ACCEPT)
target     prot opt source               destination

Chain WEB_CHAIN (0 references)
target     prot opt source               destination

#向自定义链中添加规则
[root@rock10123~]#iptables -t filter -A WEB_CHAIN -p tcp -m multiport --dports 80,443 -j ACCEPT

#继续添加
[root@rock10123~]#iptables -t filter -N SSH_CHAIN

[root@rock10123~]#iptables -t filter -A SSH_CHAIN -p tcp --dport 22 -j ACCEPT

#查看
[root@rock10123~]#iptables -t filter -vnL
Chain INPUT (policy ACCEPT 0 packets, 0 bytes)
 pkts bytes target     prot opt in     out     source               destination

Chain FORWARD (policy ACCEPT 0 packets, 0 bytes)
 pkts bytes target     prot opt in     out     source               destination

Chain OUTPUT (policy ACCEPT 0 packets, 0 bytes)
 pkts bytes target     prot opt in     out     source               destination

Chain WEB_CHAIN (0 references)
 pkts bytes target     prot opt in     out     source               destination
    0     0 ACCEPT     tcp  --  *      *       0.0.0.0/0            0.0.0.0/0            multiport dports 80,443

Chain SSH_CHAIN (0 references)
 pkts bytes target     prot opt in     out     source               destination
    0     0 ACCEPT     tcp  --  *      *       0.0.0.0/0            0.0.0.0/0            tcp dpt:22

#自定义链必须关联到系统链上才能使用
[root@rock10123~]#iptables -t filter -A INPUT -s 10.0.0.1 -j WEB_CHAIN
[root@rock10123~]#iptables -t filter -A INPUT -s 10.0.0.1 -j SSH_CHAIN

#添加兜底规则
[root@rock10123~]#iptables -t filter -A INPUT -j DROP

#再次查看
[root@rock10123~]#iptables -nL
Chain INPUT (policy ACCEPT)
target     prot opt source               destination
WEB_CHAIN  all  --  10.0.0.1             0.0.0.0/0
SSH_CHAIN  all  --  10.0.0.1             0.0.0.0/0
DROP       all  --  0.0.0.0/0            0.0.0.0/0

Chain FORWARD (policy ACCEPT)
target     prot opt source               destination

Chain OUTPUT (policy ACCEPT)
target     prot opt source               destination

Chain WEB_CHAIN (1 references)
target     prot opt source               destination
ACCEPT     tcp  --  0.0.0.0/0            0.0.0.0/0            multiport dports 80,443

Chain SSH_CHAIN (1 references)
target     prot opt source               destination
ACCEPT     tcp  --  0.0.0.0/0            0.0.0.0/0            tcp dpt:22
#10.0.0.150测试
[root@ubuntu2204-150 ~]# ping 10.0.0.123
PING 10.0.0.123 (10.0.0.123) 56(84) bytes of data.
^C
--- 10.0.0.123 ping statistics ---
3 packets transmitted, 0 received, 100% packet loss, time 2054ms

#在10.0.0.1上测试
#Ping不通
C:\Users\35069>ping 10.0.0.123

正在 Ping 10.0.0.123 具有 32 字节的数据:
请求超时。
请求超时。
请求超时。
请求超时。

10.0.0.123 的 Ping 统计信息:
    数据包: 已发送 = 4,已接收 = 0,丢失 = 4 (100% 丢失),

#ssh服务22端口放行
C:\Users\35069>ssh 10.0.0.123
The authenticity of host '10.0.0.123 (10.0.0.123)' can't be established.
ED25519 key fingerprint is SHA256:MWItps0K3a6Ci0RAC/5t7i8OId+XSVn0uB4hdICH8O8.
This key is not known by any other names.
Are you sure you want to continue connecting (yes/no/[fingerprint])?

#WEB可用
C:\Users\35069>curl 10.0.0.123
test-test-10.0.0.123
在使用单独的自定义链的情况下,如果需要修改,则只需要修改链上的具体规则,而不用修改自定义链与系统链的关联关系。
[root@rocky-154 ~]#iptables -t filter -nL INPUT
Chain INPUT (policy ACCEPT)
target     prot opt source               destination
WEB_CHAIN  all  --  10.0.0.1             0.0.0.0/0
SSH_CHAIN  all  --  10.0.0.1             0.0.0.0/0
DROP       all  --  0.0.0.0/0            0.0.0.0/0

[root@rocky-154 ~]#iptables -t filter -nL WEB_CHAIN
Chain WEB_CHAIN (1 references)
target     prot opt source               destination
ACCEPT     tcp  --  0.0.0.0/0            0.0.0.0/0            multiport dports 80,443

#替换WEB_CHAIN自定义链上的规则
[root@rocky-154 ~]#iptables -t filter -R WEB_CHAIN 1 -p tcp -m multiport --dports 80,8080,443 -j ACCEPT

[root@rocky-154 ~]#iptables -t filter -nL WEB_CHAIN
Chain WEB_CHAIN (1 references)
target     prot opt source               destination
ACCEPT     tcp  --  0.0.0.0/0            0.0.0.0/0            multiport dports 80,8080,443
自定义链中的规则进行复用
[root@rock10123~]#iptables -t filter -I INPUT 2 -s 10.0.0.150 -j WEB_CHAIN

[root@ubuntu2204-150 ~]# ping 10.0.0.123
PING 10.0.0.123 (10.0.0.123) 56(84) bytes of data.
^C
--- 10.0.0.123 ping statistics ---
3 packets transmitted, 0 received, 100% packet loss, time 2046ms

[root@ubuntu2204-150 ~]# curl 10.0.0.123
test-test-10.0.0.123
情况规则,并不会删除自定义链
#查看
[root@rocky-154 ~]#iptables -nL
Chain INPUT (policy ACCEPT)
target     prot opt source               destination
WEB_CHAIN  all  --  10.0.0.1             0.0.0.0/0
WEB_CHAIN  all  --  10.0.0.150           0.0.0.0/0
SSH_CHAIN  all  --  10.0.0.1             0.0.0.0/0
DROP       all  --  0.0.0.0/0            0.0.0.0/0

Chain FORWARD (policy ACCEPT)
target     prot opt source               destination

Chain OUTPUT (policy ACCEPT)
target     prot opt source               destination

Chain WEB_CHAIN (2 references)
target     prot opt source               destination
ACCEPT     tcp  --  0.0.0.0/0            0.0.0.0/0            multiport dports 80,8080,443

Chain SSH_CHAIN (1 references)
target     prot opt source               destination
ACCEPT     tcp  --  0.0.0.0/0            0.0.0.0/0            tcp dpt:22

#清空规则,自定义链还在
[root@rocky-154 ~]#iptables -F

[root@rocky-154 ~]#iptables -nL
Chain INPUT (policy ACCEPT)
target     prot opt source               destination

Chain FORWARD (policy ACCEPT)
target     prot opt source               destination

Chain OUTPUT (policy ACCEPT)
target     prot opt source               destination

Chain WEB_CHAIN (0 references)
target     prot opt source               destination

Chain SSH_CHAIN (0 references)
target     prot opt source               destination

#-X 删除自定义链
[root@rocky-154 ~]#iptables -X SSH_CHAIN

[root@rocky-154 ~]#iptables -nL
Chain INPUT (policy ACCEPT)
target     prot opt source               destination

Chain FORWARD (policy ACCEPT)
target     prot opt source               destination

Chain OUTPUT (policy ACCEPT)
target     prot opt source               destination

Chain WEB_CHAIN (0 references)
target     prot opt source               destination

#添加规则,如果自定义链中还有规则,则无法删除
[root@rocky-154 ~]#iptables -t filter -A WEB_CHAIN -p tcp --dport 80 -j ACCEPT

[root@rocky-154 ~]#iptables -t filter -nL WEB_CHAIN
Chain WEB_CHAIN (0 references)
target     prot opt source               destination
ACCEPT     tcp  --  0.0.0.0/0            0.0.0.0/0            tcp dpt:80

[root@rocky-154 ~]#iptables -X WEB_CHAIN
iptables v1.8.5 (nf_tables):  CHAIN_USER_DEL failed (Device or resource busy): chain WEB_CHAIN

#清空链上规则
[root@rocky-154 ~]#iptables -t filter -F WEB_CHAIN

[root@rocky-154 ~]#iptables -X WEB_CHAIN

#删除成功
[root@rocky-154 ~]#iptables -nL
Chain INPUT (policy ACCEPT)
target     prot opt source               destination

Chain FORWARD (policy ACCEPT)
target     prot opt source               destination

Chain OUTPUT (policy ACCEPT)
target     prot opt source               destination
五、网络防火墙
1、NAT网络转换原理
当我们从运营商接入宽带之后,经过路由器,防火墙,交换机等各种设备,后面再接入终端机,包括打印机,手机,电脑等,在大多数情况下,我们在接入运营商的宽带后,会在使用(公司,学校,工厂,家庭)范围内组建一个局域网。
例如:当前物理机IP地址192.168.0.101,在物理机上运行着两台虚拟机,它们的IP分别是10.0.0.150,10.0.0.151。但是这三台主机,在访问互联网时,互联网上得到的这三台主机IP都是219.143.130.7。
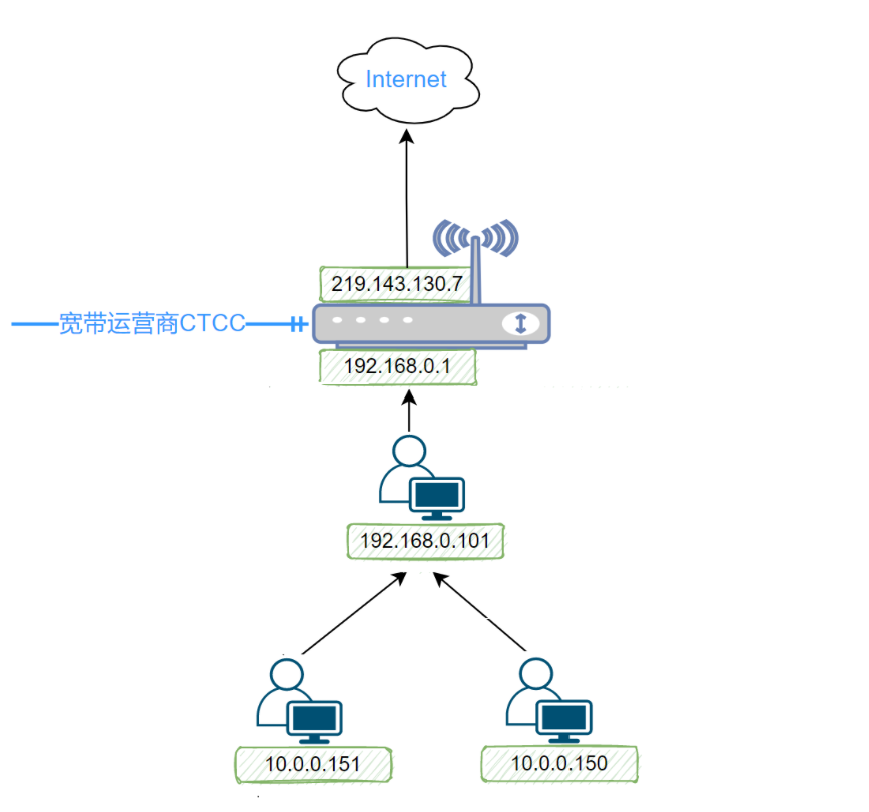
#windows物理机在互联网上的IP地址
C:\Users\35069>curl ifconfig.me

#Linux虚拟机在互联网上的IP地址
[root@ubuntu2204-150 ~]# curl ip.sb
两台主机之间通讯,是需要经过路由表的,路由表中保存了去到下一个IP地址的路由记录,但是 192.168.0.101 和 10.0.0.150 这两个IP地址都是私有地址,在网路上是不可达的,也就是说,在互联网上,是没有一个去到 192.168.0.101 这个网段的路由记录的(10.0.0.150 同理),那么,物理机和虚拟机,是怎么访问互联网的,互联网上的主机,又是怎么回传数据给我的物理机和虚拟机的呢?
两台主机之间通讯,是客户端主机启一个随机端口,去连接服务器的IP地址和固定端口,连接成功后,客户端发送数据,服务端根据客户端发送的数据,做出响应,再返回给客户端。
NAT
NAT(Network Address Translation) 网络地址转换。
局域网中的主机都是分配的私有IP地址,这些IP地址在互联网上是不可达的,局域网中的主机,在与互联网通讯时,要经过网络地址转换,去到互联网时,变成公网IP地址对外发送数据。服务器返回数据时,也是返回到这个公网地址,再经由网络地址转换返回给局域网中的主机。
一个局域网中的主机,想要访问互联网,在出口处,应该有一个公网可达的IP地址,应该能将局域网中的IP地址通过NAT转换成公网IP。
| NAT | 说明 | 备注 |
| SNAT | Source NAT | 源地址转换,修改请求报文中的源IP地址 |
| DNAT | Destination NAT | 目标地址转换,修改响应报文中的目标IP地址 |
| PNAT | Port NAT | 端口转换,IP地址和端口都进行转换 |
例:以访问百度为例。
具体过程:
1、client->server,源:192.168.0.101:12345,目标:220.181.111.232:80
2、client->server,源:219.143.130.7:23456,目标:220.181.111.232:80
3、server->client,源:220.181.111.232:80 ,目标:219.143.130.7:23456
4、server->client,源:219.143.130.7:23456 ,目标:192.168.0.101:12345
[root@ubuntu2204-150 ~]# host www.baidu.com
www.baidu.com is an alias for www.a.shifen.com.
www.a.shifen.com has address 220.181.111.232
www.a.shifen.com has address 220.181.111.1
Vmware虚拟机NAT网络配置DNAT转发
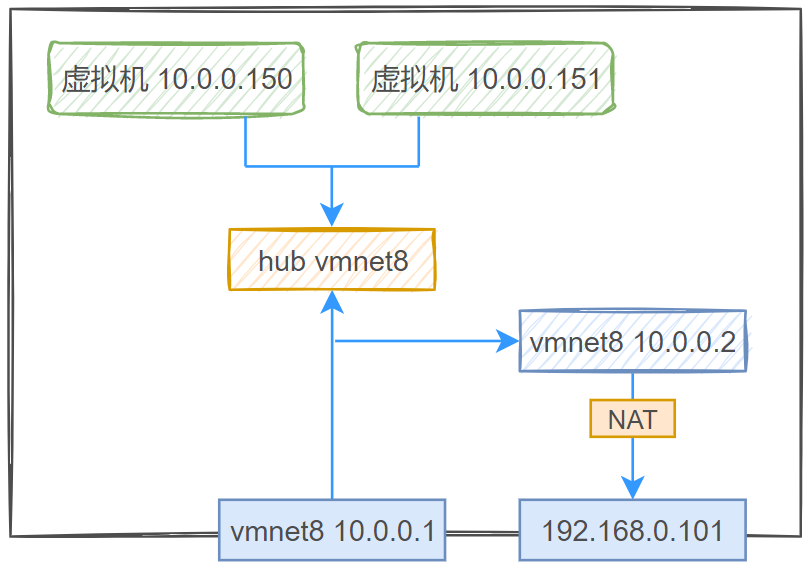
重点:虚拟机10.0.0.150、10.0.0.151处在同一虚拟网络vmnet8(子网IP10.0.0.0/24)中,通过hub集线器连接到vmnet8网络,使得虚拟机之间可以互相通讯。10.0.0.2作为网关IP(Vmware虚拟网络编辑器自动配置)充当"路由器"角色,提供默认路由并为虚拟机动态分配IP地址和域名解析的DHCP、DNS服务,当虚拟机访问互联网时需要借助物理机上的网卡,通过NAT网络地址转换转到192.168.0.101物理机IP上(虚拟机发出的数据包首先到达10.0.0.2接着网关将数据包的源IP地址转换为物理机IP192.168.0.101),在物理机上再通过一次网络地址转换,比如之前的例子转到219.143.130.7公网IP地址上(物理机上NAT服务进一步将数据包源IP地址转换为公网IP219.143.130.7),才能实现访问互联网。
另外,物理机同一网段的其他主机,如果在10.0.0.150虚拟机上配置服务,则其他主机是不能访问10.0.0.150,因为该IP地址在当前网络是不可见的。如果要让其他主机访问配置在10.0.0.150上的服务,则需要在物理机上配置DNAT进行转发。
NAT不仅转换源IP地址,还负责转换目的IP地址(DNAT),将外部网络对NAT设备公网IP地址的访问请求,映射到内部虚拟网络中的特定虚拟机。当外部主机向NAT设备的公网IP地址发送请求时,NAT设备会根据预先配置的DNAT规则,将请求的目的IP地址从公网IP地址转换为内部虚拟机的IP地址。
注:虚拟网卡vmnet8 IP地址10.0.0.1,安装vmware后自动生成,与物理机交互必须要有一个同网段IP。NAT设备接入到vmnet8网络。
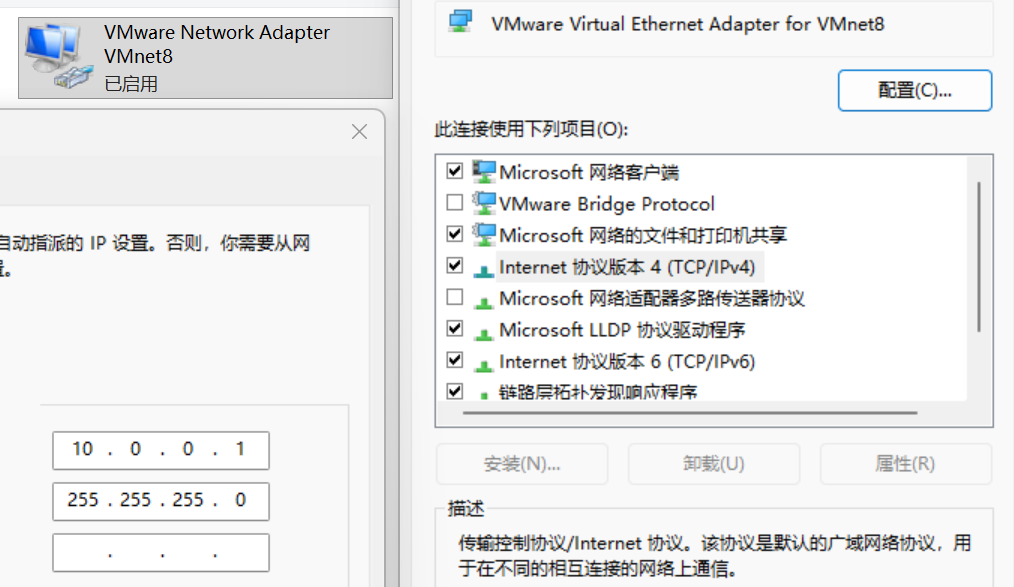
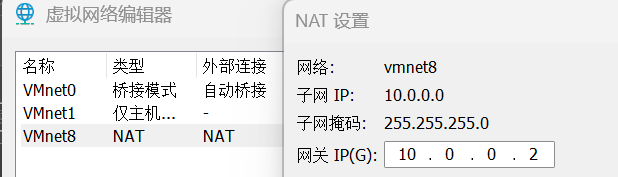
例:将物理机的80端口转发到虚拟机中
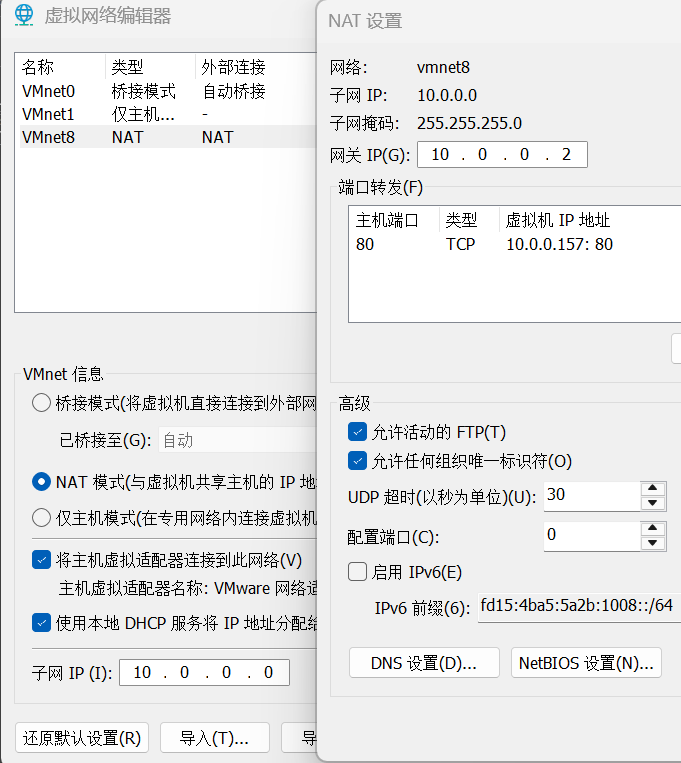
#关闭防火墙
[root@ubuntu-157 html]# iptables -F

#开启web服务
[root@ubuntu-157 html]# systemctl enable --now  nginx
Synchronizing state of nginx.service with SysV service script with /usr/lib/systemd/systemd-sysv-install.
Executing: /usr/lib/systemd/systemd-sysv-install enable nginx

#如果有虚拟网桥,关闭,因为转发建立之后,虚拟机对外发送的数据包,默认走virbr0设备而不是nat网卡
nmcli con
nmcli con down virbr0

#物理机上访问虚拟机
C:\Users\35069>curl 10.0.0.157/index.nginx-debian.html
this is 10.0.0.157

#物理机上访问物理机本机,转发到其下虚拟机
C:\Users\35069>curl 172.16.181.244/index.nginx-debian.html
this is 10.0.0.157

查看本机访问互联网时所使用的IP地址
#可以省略 http:// 头,可以写成 curl ip.sb
curl http://ip.sb

curl ipinfo.io/ip/

curl http://ip.sb

curl http://ipinfo.io/ip/

curl http://ifconfig.me

curl -L http://tool.lu/ip

curl http://cip.cc
2、iptables主中的NAT
①前置准备工作
左边 10.0.0.0/24 网段的主机用来模拟内网环境,需要配置路由指向;192.168.10.0/24 网段不需要配置路由,右边用来模拟互联网环境,让其与防火墙主机之间没有路由表。

#修改10.0.0.150主机的网关,指向10.0.0.123
#route add default gw 10.0.0.123 dev ens33

[root@ubuntu2204-150 netplan]# vim 50-cloud-init.yaml
[root@ubuntu2204-150 netplan]# cat 50-cloud-init.yaml
network:
    ethernets:
        ens33:
           #dhcp4: true
           addresses: [10.0.0.150/24]
           gateway4: 10.0.0.123        #修改
           nameservers:
             addresses: [127.0.0.1]
    version: 2

[root@ubuntu2204-150 netplan]# netplan apply

[root@ubuntu2204-150 netplan]# route -n
Kernel IP routing table
Destination     Gateway         Genmask         Flags Metric Ref    Use Iface
0.0.0.0         10.0.0.123      0.0.0.0         UG    0      0        0 ens33
10.0.0.0        0.0.0.0         255.255.255.0   U     0      0        0 ens33
#修改10.0.0.123主机 添加一块仅主机网卡192.168.10.123
[root@rocky10123 ~]#cd /etc/sysconfig/network-scripts/
[root@rocky10123 network-scripts]#ls
ifcfg-ens160 ifcfg-ens192
[root@rocky10123 network-scripts]#cat ifcfg-ens160
TYPE=Ethernet
NAME=ens160
DEVICE=ens160
IPADDR=10.0.0.123
PREFIX=8
[root@rocky10123 network-scripts]#cat ifcfg-ens192
TYPE=Ethernet
NAME=ens192
DEVICE=ens192
IPADDR=192.168.10.123
PREFIX=24
#防火墙主机只保留同网段的网关
[root@rocky10123 ~]#route -n
Kernel IP routing table
Destination Gateway Genmask Flags Metric Ref Use Iface
10.0.0.0 0.0.0.0 255.0.0.0 U 100 0 0 ens160
192.168.10.0 0.0.0.0 255.255.255.0 U 101 0 0 ens192
#确认ip_forward 功能打开
root@rocky10123 ~]#sysctl -a | grep ip_forward
net.ipv4.ip_forward = 0
net.ipv4.ip_forward_update_priority = 1
net.ipv4.ip_forward_use_pmtu = 0
#如果没有开启,在配置文件添加,开启功能
[root@rocky10123 ~]#vim /etc/sysctl.conf
net.ipv4.ip_forward=1
[root@rocky10123 ~]#sysctl -p
net.ipv4.ip_forward = 1
[root@rocky10123 ~]#sysctl -a | grep ip_forward
net.ipv4.ip_forward = 1
net.ipv4.ip_forward_update_priority = 1
net.ipv4.ip_forward_use_pmtu = 0#仅主机192.168.10.150
network:
ethernets:
ens33:
#dhcp4: true
addresses: [192.168.10.150/24]
version: 2
#192.168.10.150主机
#检查防火墙,关闭
[root@ubuntu2204-150 ~]# systemctl status ufw
● ufw.service - Uncomplicated firewall
     Loaded: loaded (/lib/systemd/system/ufw.service; enabled; vendor preset: enabled)
     Active: active (exited) since Tue 2025-10-28 09:19:21 UTC; 17min ago
       Docs: man:ufw(8)
   Main PID: 694 (code=exited, status=0/SUCCESS)
        CPU: 2ms

Oct 28 09:19:21 ubuntu2204-152 systemd[1]: Starting Uncomplicated firewall...
Oct 28 09:19:21 ubuntu2204-152 systemd[1]: Finished Uncomplicated firewall.

[root@ubuntu2204-150 ~]# systemctl disable --now  ufw
Synchronizing state of ufw.service with SysV service script with /lib/systemd/systemd-sysv-install.
Executing: /lib/systemd/systemd-sysv-install disable ufw
Removed /etc/systemd/system/multi-user.target.wants/ufw.service.

#开启nginx服务
[root@ubuntu2204-150 ~]# systemctl start nginx

[root@ubuntu2204-150 ~]# cd /var/www/html

[root@ubuntu2204-150 html]# ls
index.nginx-debian.html

[root@ubuntu2204-150 html]# echo "test-test" > index.nginx-debian.html

#测试
#192.168.10.123测试
[root@rocky10123 ~]#curl 192.168.10.150
test-test

#本机测试
[root@ubuntu2204-150 ~]# curl 192.168.10.150
test-test

#10.0.0.150测试
[root@ubuntu2204-150 ~]# curl 192.168.10.150
^C

[root@ubuntu2204-150 ~]# ping 192.168.10.150
PING 192.168.10.150 (192.168.10.150) 56(84) bytes of data.
^C
--- 192.168.10.150 ping statistics ---
5 packets transmitted, 0 received, 100% packet loss, time 4074ms

#在192.168.10.150本机上抓包
[root@ubuntu2204-150 ~]# tcpdump icmp
tcpdump: verbose output suppressed, use -v[v]... for full protocol decode
listening on ens33, link-type EN10MB (Ethernet), snapshot length 262144 bytes
09:42:05.585159 IP 10.0.0.150 > ubuntu2204-150: ICMP echo request, id 2, seq 1, length 64
09:42:06.589720 IP 10.0.0.150 > ubuntu2204-150: ICMP echo request, id 2, seq 2, length 64
09:42:07.611494 IP 10.0.0.150 > ubuntu2204-150: ICMP echo request, id 2, seq 3, length 64
09:42:08.635435 IP 10.0.0.150 > ubuntu2204-150: ICMP echo request, id 2, seq 4, length 64
09:42:09.659332 IP 10.0.0.150 > ubuntu2204-150: ICMP echo request, id 2, seq 5, length 64
^C
5 packets captured
5 packets received by filter
0 packets dropped by kernel

#192.168.10.150没有路由到10.0.0.150
[root@ubuntu2204-150 ~]# route -n
Kernel IP routing table
Destination     Gateway         Genmask         Flags Metric Ref    Use Iface
192.168.10.0    0.0.0.0         255.255.255.0   U     0      0        0 ens33
②SNAT实现源IP地址转换
SNAT:Source NAT,源地址转换,基于nat表,工作在 POSTROUTING 链上。具体是指将经过当前主机转发的请求报文的源IP地址转换成根据防火墙规则指定的IP地址。
iptables -t nat -A POSTROUTING -s LocalNet ! -d LocalNet -j SNAT --to-source ExtIP [--random]
--to-source [ipaddr[-ipaddr]][:port[-port]] #转换成指定IP,或指定范围内的IP,端口可选
--random                                    #端口映射基于hash算法随机化
#在10.0.0.123防火墙主机添加规则,如果源IP是10.0.0.24网段的IP,则出去的时候替换成192.168.10.123
[root@rocky10123 ~]#iptables -t nat -A POSTROUTING -s 10.0.0.0/24 ! -d 10.0.0.0/24 -j SNAT --to-source 192.168.10.123
[root@rocky10123 ~]#iptables -t nat -nL POSTROUTING
Chain POSTROUTING (policy ACCEPT)
target prot opt source destination
SNAT all -- 10.0.0.0/24 !10.0.0.0/24 to:192.168.10.123
#10.0.0.150主机测试
[root@ubuntu2204-150 ~]# ping 192.168.10.150
PING 192.168.10.150 (192.168.10.150) 56(84) bytes of data.
64 bytes from 192.168.10.150: icmp_seq=1 ttl=63 time=1.00 ms
64 bytes from 192.168.10.150: icmp_seq=2 ttl=63 time=10.1 ms
64 bytes from 192.168.10.150: icmp_seq=3 ttl=63 time=10.5 ms
64 bytes from 192.168.10.150: icmp_seq=4 ttl=63 time=0.921 ms
64 bytes from 192.168.10.150: icmp_seq=5 ttl=63 time=1.08 ms
^C
--- 192.168.10.150 ping statistics ---
5 packets transmitted, 5 received, 0% packet loss, time 4007ms
rtt min/avg/max/mdev = 0.921/4.710/10.465/4.546 ms
#192.168.10.150主机上抓包
#所有PING包来自于192.168.10.123,而非10.0.0.150
#转换关系会有映射
#[root@ubuntu2204-150 ~]# tcpdump icmp
tcpdump: verbose output suppressed, use -v[v]... for full protocol decode
listening on ens33, link-type EN10MB (Ethernet), snapshot length 262144 bytes
09:59:46.989949 IP 192.168.10.123 > ubuntu2204-150: ICMP echo request, id 4, seq 1, length 64
09:59:46.989987 IP ubuntu2204-150 > 192.168.10.123: ICMP echo reply, id 4, seq 1, length 64
09:59:47.991766 IP 192.168.10.123 > ubuntu2204-150: ICMP echo request, id 4, seq 2, length 64
09:59:47.991794 IP ubuntu2204-150 > 192.168.10.123: ICMP echo reply, id 4, seq 2, length 64
09:59:48.993578 IP 192.168.10.123 > ubuntu2204-150: ICMP echo request, id 4, seq 3, length 64
09:59:48.993609 IP ubuntu2204-150 > 192.168.10.123: ICMP echo reply, id 4, seq 3, length 64
09:59:49.995761 IP 192.168.10.123 > ubuntu2204-150: ICMP echo request, id 4, seq 4, length 64
09:59:49.995814 IP ubuntu2204-150 > 192.168.10.123: ICMP echo reply, id 4, seq 4, length 64
09:59:50.997031 IP 192.168.10.123 > ubuntu2204-150: ICMP echo request, id 4, seq 5, length 64
09:59:50.997059 IP ubuntu2204-150 > 192.168.10.123: ICMP echo reply, id 4, seq 5, length 64
^C
10 packets captured
10 packets received by filter
0 packets dropped by kernel
#10.0.0.150web测试
[root@ubuntu2204-150 ~]# curl 192.168.10.150
test-test
#192.158.10.150主机查看access.log日志
#最后一条来自于10.0.0.150的请求,源地址被转换成192.168.10.123
[root@ubuntu2204-150 ~]# tail -f /var/log/nginx/access.log
...
192.168.10.123 - - [28/Oct/2025:10:07:31 +0000] "GET / HTTP/1.1" 200 10 "-" "curl/7.81.0"
#在防火墙主机关闭ip_forward功能
[root@rocky10123 ~]#echo 0 > /proc/sys/net/ipv4/ip_forward
[root@rocky10123 ~]#cat /proc/sys/net/ipv4/ip_forward
0

#在10.0.0.150主机PING不通
[root@ubuntu2204-150 ~]# ping 192.168.10.150
PING 192.168.10.150 (192.168.10.150) 56(84) bytes of data.
^C
--- 192.168.10.150 ping statistics ---
4 packets transmitted, 0 received, 100% packet loss, time 3076ms
指定多个IP,指定出口设备
#snat的IP设置成多个IP,且指定出口网络设备
[root@rocky10123 ~]#iptables -t nat -nL POSTROUTING
Chain POSTROUTING (policy ACCEPT)
target     prot opt source               destination

[root@rocky10123 ~]#iptables -t nat -A POSTROUTING -s 10.0.0.0/24 ! -d 10.0.0.0/24 -o ens192 -j SNAT --to-source 192.168.10.160-192.168.10.163

#测试
[root@ubuntu2204-150 ~]# ping 192.168.10.150
PING 192.168.10.150 (192.168.10.150) 56(84) bytes of data.
^C
--- 192.168.10.150 ping statistics ---
13 packets transmitted, 0 received, 100% packet loss, time 12287ms

[root@ubuntu2204-150 ~]# tcpdump icmp
tcpdump: verbose output suppressed, use -v[v]... for full protocol decode
listening on ens33, link-type EN10MB (Ethernet), snapshot length 262144 bytes
11:36:01.431173 IP 192.168.10.162 > ubuntu2204-150: ICMP echo request, id 11, seq 8, length 64
11:36:02.455581 IP 192.168.10.162 > ubuntu2204-150: ICMP echo request, id 11, seq 9, length 64
11:36:03.479425 IP 192.168.10.162 > ubuntu2204-150: ICMP echo request, id 11, seq 10, length 64
11:36:04.503476 IP 192.168.10.162 > ubuntu2204-150: ICMP echo request, id 11, seq 11, length 64
11:36:05.527566 IP 192.168.10.162 > ubuntu2204-150: ICMP echo request, id 11, seq 12, length 64
^C
5 packets captured
5 packets received by filter
0 packets dropped by kernel

[root@rocky10123 ~]#ip addr a 192.168.10.162/24 dev ens192
[root@rocky10123 ~]#ip a s
...
3: ens192: <BROADCAST,MULTICAST,UP,LOWER_UP> mtu 1500 qdisc mq state UP group default qlen 1000
    link/ether 00:0c:29:2d:41:1d brd ff:ff:ff:ff:ff:ff
    altname enp11s0
    inet 192.168.10.123/24 brd 192.168.10.255 scope global noprefixroute ens192
       valid_lft forever preferred_lft forever
    inet 192.168.10.162/24 scope global secondary ens192
       valid_lft forever preferred_lft forever
    inet6 fe80::20c:29ff:fe2d:411d/64 scope link
       valid_lft forever preferred_lft forever

#再次测试
[root@ubuntu2204-150 ~]# ping 192.168.10.150
PING 192.168.10.150 (192.168.10.150) 56(84) bytes of data.
64 bytes from 192.168.10.150: icmp_seq=1 ttl=63 time=1.40 ms
64 bytes from 192.168.10.150: icmp_seq=2 ttl=63 time=0.865 ms
64 bytes from 192.168.10.150: icmp_seq=3 ttl=63 time=1.15 ms
64 bytes from 192.168.10.150: icmp_seq=4 ttl=63 time=0.802 ms
64 bytes from 192.168.10.150: icmp_seq=5 ttl=63 time=1.21 ms
^C
--- 192.168.10.150 ping statistics ---
5 packets transmitted, 5 received, 0% packet loss, time 4042ms
rtt min/avg/max/mdev = 0.802/1.085/1.398/0.222 ms

[root@ubuntu2204-150 ~]# tcpdump icmp
tcpdump: verbose output suppressed, use -v[v]... for full protocol decode
listening on ens33, link-type EN10MB (Ethernet), snapshot length 262144 bytes
11:36:01.431173 IP 192.168.10.162 > ubuntu2204-150: ICMP echo request, id 11, seq 8, length 64
11:36:02.455581 IP 192.168.10.162 > ubuntu2204-150: ICMP echo request, id 11, seq 9, length 64
11:36:03.479425 IP 192.168.10.162 > ubuntu2204-150: ICMP echo request, id 11, seq 10, length 64
11:36:04.503476 IP 192.168.10.162 > ubuntu2204-150: ICMP echo request, id 11, seq 11, length 64
11:36:05.527566 IP 192.168.10.162 > ubuntu2204-150: ICMP echo request, id 11, seq 12, length 64
^C
5 packets captured
5 packets received by filter
0 packets dropped by kernel
指定转发端口
[root@rocky10123 ~]#iptables -t nat -F POSTROUTING

[root@rocky10123 ~]#iptables -t nat -nL POSTROUTING
Chain POSTROUTING (policy ACCEPT)

#只转换tcp协议 目标端口为80的报文,且通过12345 端口向外访问
[root@rocky10123 ~]#iptables -t nat -A POSTROUTING -s 10.0.0.0/24 ! -d 10.0.0.0/24 -o ens192 -p tcp --dport 80 -j SNAT --to-source 192.168.10.123:12345

[root@rocky10123 ~]#iptables -t nat -nL POSTROUTING
Chain POSTROUTING (policy ACCEPT)
target     prot opt source               destination
SNAT       tcp  --  10.0.0.0/24         !10.0.0.0/24          tcp dpt:80 to:192.168.10.123:12345

#10.0.0.150测试
[root@ubuntu2204-150 ~]# ssh 192.168.10.150
^C

#PING不通
[root@ubuntu2204-150 ~]# ping 192.168.10.150
PING 192.168.10.150 (192.168.10.150) 56(84) bytes of data.
^C
--- 192.168.10.150 ping statistics ---
5 packets transmitted, 0 received, 100% packet loss, time 4074ms

#tcp 8端口的web服务可用
[root@ubuntu2204-150 ~]# curl 192.168.10.150
test-test

#在 192.168.10.150 主机上抓包,可以明显看到 访问请求来自 192.168.10.123.12345
[root@ubuntu2204-150 ~]# tcpdump -nn 'tcp port 80'
tcpdump: verbose output suppressed, use -v[v]... for full protocol decode
listening on ens33, link-type EN10MB (Ethernet), snapshot length 262144 bytes
11:53:25.109859 IP 192.168.10.123.12345 > 192.168.10.150.80: Flags [S], seq 1221832954, win 64240, options [mss 1460,sackOK,TS val 4198444021 ecr 0,nop,wscale 7], length 0
11:53:25.109897 IP 192.168.10.150.80 > 192.168.10.123.12345: Flags [S.], seq 1594759706, ack 1221832955, win 65160, options [mss 1460,sackOK,TS val 1653829838 ecr 4198444021,nop,wscale 7], length 0
...

[root@rocky10123 ~]#iptables -t nat -F POSTROUTING

[root@rocky10123 ~]#iptables -t nat -nL POSTROUTING
Chain POSTROUTING (policy ACCEPT)
target     prot opt source               destination

#指定转发ICMP协议
[root@rocky10123 ~]#iptables -t nat -A POSTROUTING -s 10.0.0.0/24 ! -d 10.0.0.0/24 -o ens192 -p icmp -j SNAT --to-source 192.168.10.123:24680

[root@rocky10123 ~]#iptables -t nat -nL POSTROUTING
Chain POSTROUTING (policy ACCEPT)
target     prot opt source               destination
SNAT       icmp --  10.0.0.0/24         !10.0.0.0/24          to:192.168.10.123:24680

#10.0.0.150测试
[root@ubuntu2204-150 ~]# ssh 192.168.10.150
^C

[root@ubuntu2204-150 ~]# curl 192.168.10.150
^C

[root@ubuntu2204-150 ~]# ping 192.168.10.150
PING 192.168.10.150 (192.168.10.150) 56(84) bytes of data.
64 bytes from 192.168.10.150: icmp_seq=1 ttl=63 time=0.846 ms
64 bytes from 192.168.10.150: icmp_seq=2 ttl=63 time=1.04 ms
64 bytes from 192.168.10.150: icmp_seq=3 ttl=63 time=0.722 ms
^C
--- 192.168.10.150 ping statistics ---
3 packets transmitted, 3 received, 0% packet loss, time 2003ms
rtt min/avg/max/mdev = 0.722/0.870/1.042/0.131 ms

#抓包
[root@ubuntu2204-150 ~]# tcpdump -nn 'icmp'
tcpdump: verbose output suppressed, use -v[v]... for full protocol decode
listening on ens33, link-type EN10MB (Ethernet), snapshot length 262144 bytes
11:58:34.961216 IP 192.168.10.123 > 192.168.10.150: ICMP echo request, id 24680, seq 1, length 64
11:58:34.961297 IP 192.168.10.150 > 192.168.10.123: ICMP echo reply, id 24680, seq 1, length 64
11:58:35.963211 IP 192.168.10.123 > 192.168.10.150: ICMP echo request, id 24680, seq 2, length 64
11:58:35.963245 IP 192.168.10.150 > 192.168.10.123: ICMP echo reply, id 24680, seq 2, length 64
11:58:36.964568 IP 192.168.10.123 > 192.168.10.150: ICMP echo request, id 24680, seq 3, length 64
11:58:36.964594 IP 192.168.10.150 > 192.168.10.123: ICMP echo reply, id 24680, seq 3, length 64
^C
6 packets captured
6 packets received by filter
0 packets dropped by kernel
③MASQUERADE实现IP地址转换
如果我们内网的出口设备上有固定IP,则直接指定 --to-source IP 没有任何问题,但是如果是使用拨号上网,出口网络设备上的IP地址会发生变化,这种情况下,我们的出口IP不能写成固定的。
这种场景下,我们需要使用 MASQUERADE 进行地址转换,MASOUERADE 可以从主机网卡上自动获取IP地址当作出口IP地址。
iptables -t nat -A POSTROUTING -s LocalNET ! -d LocalNet -j MASQUERADE [--toports port[-port]] [--random]
--to-ports port[-port]     #指定端口
--random                   #端口映射基于hash算法随机化
[root@rocky10123 ~]#iptables -t nat -F POSTROUTING
[root@rocky10123 network-scripts]#iptables -t nat -A POSTROUTING -s 10.0.0.0/24 ! -d 10.0.0.0/24 -j SNAT --to-source 192.168.10.123
[root@rocky10123 network-scripts]#iptables -t ntables -t nat -nL POSTROUTING
Chain POSTROUTING (policy ACCEPT)
target prot opt source destination
SNAT all -- 10.0.0.0/24 !10.0.0.0/24 to:192.168.10.123
[root@ubuntu2204-150 ~]# ping 192.168.10.150
PING 192.168.10.150 (192.168.10.150) 56(84) bytes of data.
^C
--- 192.168.10.150 ping statistics ---
12 packets transmitted, 0 received, 100% packet loss, time 11256ms
#将防火墙主机的IP改成192.168.10.125,但防火墙规则可以不用修改
125,192.168.10.150回应的是123,192.168.10.123已经不在,现在是125
[root@ubuntu2204-150 ~]# tcpdump -nn 'icmp'
tcpdump: verbose output suppressed, use -v[v]... for full protocol decode
listening on ens33, link-type EN10MB (Ethernet), snapshot length 262144 bytes
12:46:34.206663 IP 192.168.10.123 > 192.168.10.150: ICMP echo request, id 23, seq 6, length 64
12:46:35.230685 IP 192.168.10.123 > 192.168.10.150: ICMP echo request, id 23, seq 7, length 64
12:46:36.254782 IP 192.168.10.123 > 192.168.10.150: ICMP echo request, id 23, seq 8, length 64
12:46:37.278584 IP 192.168.10.123 > 192.168.10.150: ICMP echo request, id 23, seq 9, length 64
12:46:38.303225 IP 192.168.10.123 > 192.168.10.150: ICMP echo request, id 23, seq 10, length 64
^C
5 packets captured
5 packets received by filter
0 packets dropped by kernel
————————————————————————————————————————————————————————————————————————————————————————
#清空防火墙主机规则
[root@rocky10123 ~]#iptables -t nat -F POSTROUTING
[root@rocky10123 ~]#iptables -t nat -nL POSTROUTING
Chain POSTROUTING (policy ACCEPT)
target prot opt source destination
#用 MASQUERADE 设置SNAT转发
[root@rocky10123 ~]#iptables -t nat -A POSTROUTING -s 10.0.0.0/24 ! -d 10.0.0.0/24 -j MASQUERADE
[root@rocky10123 ~]#iptables -t nat -A POSTROUTInL POSTROUTING
Chain POSTROUTING (policy ACCEPT)
target prot opt source destination
MASQUERADE all -- 10.0.0.0/24 !10.0.0.0/24
#测试
[root@ubuntu2204-150 ~]# ping 192.168.10.150
PING 192.168.10.150 (192.168.10.150) 56(84) bytes of data.
64 bytes from 192.168.10.150: icmp_seq=1 ttl=63 time=1.15 ms
64 bytes from 192.168.10.150: icmp_seq=2 ttl=63 time=0.742 ms
64 bytes from 192.168.10.150: icmp_seq=3 ttl=63 time=0.790 ms
^C
--- 192.168.10.150 ping statistics ---
3 packets transmitted, 3 received, 0% packet loss, time 2004ms
rtt min/avg/max/mdev = 0.742/0.892/1.145/0.179 ms
#在192.168.10.150主机上抓包,可以看到请求IP 是 192.168.10.123
[root@ubuntu2204-150 ~]# tcpdump -nn 'icmp'
tcpdump: verbose output suppressed, use -v[v]... for full protocol decode
listening on ens33, link-type EN10MB (Ethernet), snapshot length 262144 bytes
12:33:22.890320 IP 192.168.10.123 > 192.168.10.150: ICMP echo request, id 19, seq 1, length 64
12:33:22.890368 IP 192.168.10.150 > 192.168.10.123: ICMP echo reply, id 19, seq 1, length 64
12:33:23.892170 IP 192.168.10.123 > 192.168.10.150: ICMP echo request, id 19, seq 2, length 64
12:33:23.892201 IP 192.168.10.150 > 192.168.10.123: ICMP echo reply, id 19, seq 2, length 64
12:33:24.907376 IP 192.168.10.123 > 192.168.10.150: ICMP echo request, id 19, seq 3, length 64
12:33:24.907401 IP 192.168.10.150 > 192.168.10.123: ICMP echo reply, id 19, seq 3, length 64
^C
6 packets captured
6 packets received by filter
0 packets dropped by kernel
#将防火墙主机的IP改成192.168.10.125,但防火墙规则可以不用修改
[root@rocky10123 network-scripts]#vim ifcfg-ens192
IPADDR=192.168.10.125
[root@rocky10123 network-scripts]#ip a s
...
2: ens160: <BROADCAST,MULTICAST,UP,LOWER_UP> mtu 1500 qdisc mq state UP group default qlen 1000
link/ether 00:0c:29:2d:41:13 brd ff:ff:ff:ff:ff:ff
altname enp3s0
inet 10.0.0.123/8 brd 10.255.255.255 scope global noprefixroute ens160
valid_lft forever preferred_lft forever
inet6 fe80::20c:29ff:fe2d:4113/64 scope link
valid_lft forever preferred_lft forever
3: ens192: <BROADCAST,MULTICAST,UP,LOWER_UP> mtu 1500 qdisc mq state UP group default qlen 1000
link/ether 00:0c:29:2d:41:1d brd ff:ff:ff:ff:ff:ff
altname enp11s0
inet 192.168.10.125/24 brd 192.168.10.255 scope global noprefixroute ens192
valid_lft forever preferred_lft forever
inet6 fe80::20c:29ff:fe2d:411d/64 scope link
valid_lft forever preferred_lft forever
#再次测试
[root@ubuntu2204-150 ~]# ping 192.168.10.150
PING 192.168.10.150 (192.168.10.150) 56(84) bytes of data.
64 bytes from 192.168.10.150: icmp_seq=1 ttl=63 time=10.0 ms
64 bytes from 192.168.10.150: icmp_seq=2 ttl=63 time=0.920 ms
64 bytes from 192.168.10.150: icmp_seq=3 ttl=63 time=1.00 ms
^C
--- 192.168.10.150 ping statistics ---
3 packets transmitted, 3 received, 0% packet loss, time 2004ms
rtt min/avg/max/mdev = 0.920/3.980/10.019/4.270 ms
#请求IP己经变成 192.168.10.125
[root@ubuntu2204-150 ~]# tcpdump -nn 'icmp'
tcpdump: verbose output suppressed, use -v[v]... for full protocol decode
listening on ens33, link-type EN10MB (Ethernet), snapshot length 262144 bytes
12:35:34.770386 IP 192.168.10.125 > 192.168.10.150: ICMP echo request, id 20, seq 1, length 64
12:35:34.778891 IP 192.168.10.150 > 192.168.10.125: ICMP echo reply, id 20, seq 1, length 64
12:35:35.771564 IP 192.168.10.125 > 192.168.10.150: ICMP echo request, id 20, seq 2, length 64
12:35:35.771617 IP 192.168.10.150 > 192.168.10.125: ICMP echo reply, id 20, seq 2, length 64
12:35:36.773463 IP 192.168.10.125 > 192.168.10.150: ICMP echo request, id 20, seq 3, length 64
12:35:36.773494 IP 192.168.10.150 > 192.168.10.125: ICMP echo reply, id 20, seq 3, length 64
^C
6 packets captured
6 packets received by filter
0 packets dropped by kernel
[root@ubuntu2204-150 ~]# ④DNAT实现目标IP地址转换
DNAT:Destination NAT,目标地址转换,基于nat表,工作在 PREROUTING 链上。
在内网环境中,使用私有IP地址的设备要与互联网进行通讯时,需要借助出口设备将源内网IP地址转换成公网可达的IP地址再进行通讯。
在内网环境中,只有在出口设备上才有一个(或数个)公网可达的IP,所以在互联网上,是不能路由至内网主机的。如果要让内网主机上的服务在公网上可见,我们需要使用 DNAT 实现目标IP地址转换。(与SNAT相反)分布式。DNAT 只能将一条请求规则重定向到一台后端主机,无法实现负载均衡功能。
iptables -t nat -A PREROUTING -d ExtIP -p tcp|udp|icmp --dport PORT -j DNAT --todestination InterSeverIP[:PORT]

-d ExtIP                                         #指公网可达的IP地址,必须是固定IP
--to-destination [ipaddr[-ipaddr]][:port[-port]] #转换成指定IP,或指定范围内的IP,端口可选
#设置转发规则,使 192.168.10.150 访问 192.168.10.123 WEB 服务时将请求转发到10.0.0.150上
#在 192.168.10.150上查看
[root@ubuntu2204-150 ~]# route -n
Kernel IP routing table
Destination Gateway Genmask Flags Metric Ref Use Iface
192.168.10.0 0.0.0.0 255.255.255.0 U 0 0 0 ens33
#防火墙主机上没有WEB服务,也没有开启DNAT转发
[root@rocky10123 ~]#curl 192.168.10.123
curl: (7) Failed to connect to 192.168.10.123 port 80: Connection refused
#在防火墙主机上设置DNAT转发规则,在访问 192.168.10.123 的 web 服务时,转发到 10.0.0.150上
[root@rocky10123 ~]#iptables -t nat -A PREROUTING -d 192.168.10.123 -p tcp --dport 80 -j DNAT --to-destination 10.0.0.150:80
[root@rocky10123 ~]#iptables -t nat -nL PREROUTING
Chain PREROUTING (policy ACCEPT)
target prot opt source destination
DNAT tcp -- 0.0.0.0/0 192.168.10.123 tcp dpt:80 to:10.0.0.150:80
#测试
[root@ubuntu2204-150 ~]# curl 192.168.10.123
this is 10.0.0.150
[root@ubuntu2204-150 ~]# curl 192.168.10.123:80
this is 10.0.0.150
#再添加一条规则
[root@rocky10123 ~]#iptables -t nat -A PREROUTING -d 192.168.10.123 -p tcp --dport 8080 -j DNAT --to-destination 10.0.0.150:80
[root@rocky10123 ~]#iptables -t nat -nL PREROUTING
Chain PREROUTING (policy ACCEPT)
target prot opt source destination
DNAT tcp -- 0.0.0.0/0 192.168.10.123 tcp dpt:80 to:10.0.0.150:80
DNAT tcp -- 0.0.0.0/0 192.168.10.123 tcp dpt:8080 to:10.0.0.150:80
#再次测试
[root@ubuntu2204-150 ~]# curl 192.168.10.123:8080
this is 10.0.0.150
防火墙主机上看不到80和8080的端口监听,因为这里看到的是应用程序在监听的端口,而防火墙是在内核中实现的。
[root@rocky10123 ~]#ss -tnlp | grep 80
[root@rocky10123 ~]#ss -tnlp | grep 8080
⑤REDIRECT实现本机端口转换
REDIRECT:重定向,通过定义规则,将收到的数据包转发至同一主机的不同端口。
REDIRECT 功能无需开启内核 ip_forward 转发。
iptables -t nat -A PREROUTING -d ExtIP -p tcp|udp --dport PORT -j REDIRECT --to-ports PORT
--to-ports         #新的端口
#将nginx服务监听端口修改为81
[root@ubuntu2204-150 ~]# cd /etc/nginx
[root@ubuntu2204-150 nginx]# ls
conf.d fastcgi_params koi-win modules-available nginx.conf scgi_params sites-enabled uwsgi_params
fastcgi.conf koi-utf mime.types modules-enabled proxy_params sites-available snippets win-utf
[root@ubuntu2204-150 nginx]# cd sites-available/
[root@ubuntu2204-150 sites-available]# ls
default
[root@ubuntu2204-150 sites-available]# vim default
[root@ubuntu2204-150 sites-available]# systemctl restart nginx
#查看
[root@ubuntu2204-150 sites-available]# ss -tnlp | grep nginx
LISTEN 0 511 0.0.0.0:81 0.0.0.0:* users:(("nginx",pid=2648,fd=6),("nginx",pid=2647,fd=6),("nginx",pid=2646,fd=6))
LISTEN 0 511 [::]:81 [::]:* users:(("nginx",pid=2648,fd=7),("nginx",pid=2647,fd=7),("nginx",pid=2646,fd=7))
#192.168.10.150测试
[root@ubuntu2204-150 ~]# curl 192.168.10.123:80
curl: (7) Failed to connect to 192.168.10.123 port 80 after 1 ms: Connection refused
[root@ubuntu2204-150 ~]# curl 192.168.10.123:8080
curl: (7) Failed to connect to 192.168.10.123 port 8080 after 1 ms: Connection refused
#法1-将防火墙规则DNAT-端口改为81
#修改原有第二条规则
[root@rocky10123 ~]#iptables -t nat -R PREROUTING 2 -d 192.168.10.123 -p tcp --dport 8080 -j DNAT --to-destination 10.0.0.150:81
[root@rocky10123 ~]#iptables -t nat -nL PREROUTING
Chain PREROUTING (policy ACCEPT)
target prot opt source destination
DNAT tcp -- 0.0.0.0/0 192.168.10.123 tcp dpt:80 to:10.0.0.150:80
DNAT tcp -- 0.0.0.0/0 192.168.10.123 tcp dpt:8080 to:10.0.0.150:81
#测试
[root@ubuntu2204-150 ~]# curl 192.168.10.123:80
curl: (7) Failed to connect to 192.168.10.123 port 80 after 1 ms: Connection refused
[root@ubuntu2204-150 ~]# curl 192.168.10.123:8080
this is 10.0.0.150
[root@rocky10123 ~]#iptables -t nat -R PREROUTING 2 -d 192.168.10.123 -p tcp --dport 8080 -j DNAT --to-destination 10.0.0.150:80
#法2-主机防火墙规则不用修改,将10.0.0.150:80端口实现本机端口转换10.0.0.150:81
#在150上添加REDIRECT规则,将80端口的请求转发到81端口
[root@ubuntu2204-150 sites-available]# iptables -t nat -A PREROUTING -d 10.0.0.150 -p tcp --dport 80 -j REDIRECT --to-port 81
[root@ubuntu2204-150 sites-available]# iptables -t nat -nL PREROUTING
Chain PREROUTING (policy ACCEPT)
target prot opt source destination
REDIRECT tcp -- 0.0.0.0/0 10.0.0.150 tcp dpt:80 redir ports 81
#测试
[root@ubuntu2204-150 ~]# curl 192.168.10.123:80
this is 10.0.0.150
[root@ubuntu2204-150 ~]# curl 192.168.10.123:8080
this is 10.0.0.150


 205
205

 被折叠的 条评论
为什么被折叠?
被折叠的 条评论
为什么被折叠?
 到【灌水乐园】发言


