


SDK下载参考前面的“Zephyr下ESP32S3开发环境搭建(Linux篇)”
1.关于UART0
在下面路径下对应UART0的配置
./drivers/serial/CMakeLists.txt:34:zephyr_library_sources_ifdef(CONFIG_UART_EFINIX_SAPPIHIRE uart_efinix_sapphire.c)

./drivers/serial/uart_efinix_sapphire.c
调出配置界面命令:
west build -b esp32s3_devkitm/esp32s3/procpu samples/subsys/shell/shell_module -d build_111 -t menuconfig
UART0的功能可以参见“samples/subsys/shell/shell_module”,里面可以进行部分命令交互。
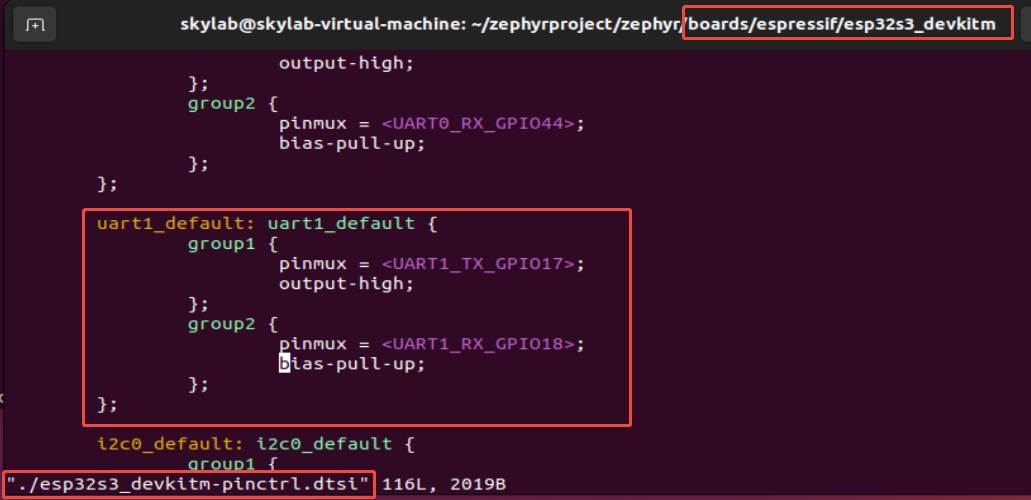
2.关于UART1
对应PIN脚定义如下:
下面介绍下Zephyr下ESP32S3的UART1功能对应源码实现:
工程结构:

文件CMakeLists.txt内容如下:
cmake_minimum_required(VERSION 3.20.0)

find_package(Zephyr REQUIRED HINTS $ENV{ZEPHYR_BASE})
project(uart1)

target_sources(app PRIVATE src/main.c)
文件prj.conf文件内容如下:
CONFIG_SERIAL=y
CONFIG_UART_INTERRUPT_DRIVEN=y
CONFIG_UART_ASYNC_API=y
CONFIG_UART_USE_RUNTIME_CONFIGURE=y
CONFIG_TEST_USERSPACE=y
文件boards/esp32s3_devkitm_procpu.overlay的内容如下:
&uart1 {
	status = "okay";
	current-speed = <115200>;
	pinctrl-0 = <&uart1_default>;
	pinctrl-names = "default";
};
文件src/main.c的内容如下:
#include <zephyr/kernel.h>
#include <zephyr/device.h>
#include <zephyr/drivers/uart.h>
#include <string.h>
/* change this to any other UART peripheral if desired */
#define UART_DEVICE_NODE DT_NODELABEL(uart1)
#define MSG_SIZE 32
/* queue to store up to 10 messages (aligned to 4-byte boundary) */
K_MSGQ_DEFINE(uart_msgq, MSG_SIZE, 10, 4);
static const struct device *const uart_dev = DEVICE_DT_GET(UART_DEVICE_NODE);
/* receive buffer used in UART ISR callback */
static char rx_buf[MSG_SIZE];
static int rx_buf_pos;
/*
* Read characters from UART until line end is detected. Afterwards push the
* data to the message queue.
*/
void serial_cb(const struct device *dev, void *user_data)
{
uint8_t c;
if (!uart_irq_update(uart_dev)) {
return;
}
if (!uart_irq_rx_ready(uart_dev)) {
return;
}
/* read until FIFO empty */
while (uart_fifo_read(uart_dev, &c, 1) == 1) {
if ((c == '\n' || c == '\r') && rx_buf_pos > 0) {
/* terminate string */
rx_buf[rx_buf_pos] = '\0';
/* if queue is full, message is silently dropped */
k_msgq_put(&uart_msgq, &rx_buf, K_NO_WAIT);
/* reset the buffer (it was copied to the msgq) */
rx_buf_pos = 0;
} else if (rx_buf_pos < (sizeof(rx_buf) - 1)) {
rx_buf[rx_buf_pos++] = c;
}
/* else: characters beyond buffer size are dropped */
}
}
/*
* Print a null-terminated string character by character to the UART interface
*/
void print_uart(char *buf)
{
int msg_len = strlen(buf);
for (int i = 0; i < msg_len; i++) {
uart_poll_out(uart_dev, buf[i]);
}
}
int main(void)
{
char tx_buf[MSG_SIZE];
if (!device_is_ready(uart_dev)) {
printk("UART device not found!");
return 0;
}
/* configure interrupt and callback to receive data */
int ret = uart_irq_callback_user_data_set(uart_dev, serial_cb, NULL);
if (ret < 0) {
if (ret == -ENOTSUP) {
printk("Interrupt-driven UART API support not enabled\n");
} else if (ret == -ENOSYS) {
printk("UART device does not support interrupt-driven API\n");
} else {
printk("Error setting UART callback: %d\n", ret);
}
return 0;
}
uart_irq_rx_enable(uart_dev);
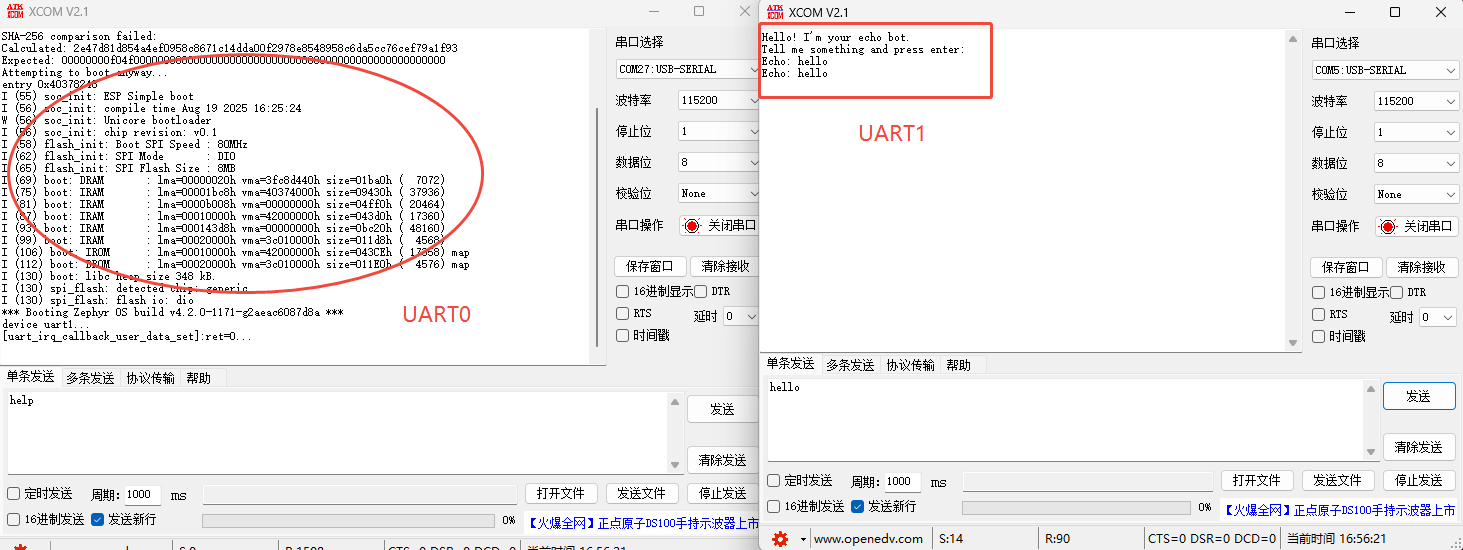
print_uart("Hello! I'm your echo bot.\r\n");
print_uart("Tell me something and press enter:\r\n");
/* indefinitely wait for input from the user */
while (k_msgq_get(&uart_msgq, &tx_buf, K_FOREVER) == 0) {
print_uart("Echo: ");
print_uart(tx_buf);
print_uart("\r\n");
}
return 0;
}
运行结果如下:


 847
847

 被折叠的 条评论
为什么被折叠?
被折叠的 条评论
为什么被折叠?
 到【灌水乐园】发言


