


 本文介绍了如何在SpringBoot项目中集成JDBC和Druid数据源,包括JdbcTemplate的使用和Druid的配置与监控,最后展示了MyBatis的整合步骤,覆盖了数据库操作的全链路管理。
文章目录
一、SpringData简介
对于数据库访问层,无论是SQL还是NoSQL,SpringBoot底层都是采用SpringData的方式统一处理
Sping Data 官网:https://spring.io/projects/spring-data
数据库相关的启动器 ,可以参考官方文档:
https://docs.spring.io/spring-boot/docs/2.2.5.RELEASE/reference/htmlsingle/#using-boot-starter
二、集成JDBC
2.1、搭建数据库
CREATE DATABASE /*!32312 IF NOT EXISTS*/`springboot` /*!40100 DEFAULT
CHARACTER SET utf8 */;
USE `springboot`;
/*Table structure for table `department` */
DROP TABLE IF EXISTS `department`;
CREATE TABLE `department` (
	`id` int(3) NOT NULL AUTO_INCREMENT COMMENT '部门id',
	`department_name` varchar(20) NOT NULL COMMENT '部门名字',
	PRIMARY KEY (`id`)
) ENGINE=InnoDB AUTO_INCREMENT=106 DEFAULT CHARSET=utf8;
/*Data for the table `department` */
insert into `department`(`id`,`department_name`) values (101,'技术部'),
(102,'销售部'),(103,'售后部'),(104,'后勤部'),(105,'运营部');
/*Table structure for table `employee` */
DROP TABLE IF EXISTS `employee`;
CREATE TABLE `employee` (
	`id` int(5) NOT NULL AUTO_INCREMENT COMMENT '雇员id',
	`last_name` varchar(100) NOT NULL COMMENT '名字',
	`email` varchar(100) NOT NULL COMMENT '邮箱',
	`gender` int(2) NOT NULL COMMENT '性别1 男, 0 女',
	`department` int(3) NOT NULL COMMENT '部门id',
	`birth` datetime NOT NULL COMMENT '生日',
	PRIMARY KEY (`id`)
) ENGINE=InnoDB AUTO_INCREMENT=1006 DEFAULT CHARSET=utf8;
/*Data for the table `employee` */
insert into
`employee`(`id`,`last_name`,`email`,`gender`,`department`,`birth`) values
(1001,'张三','24736743@qq.com',1,101,'2020-03-06 15:04:33'),(1002,'李
四','24736743@qq.com',1,102,'2020-03-06 15:04:36'),(1003,'王
五','24736743@qq.com',0,103,'2020-03-06 15:04:37'),(1004,'赵
六','24736743@qq.com',1,104,'2020-03-06 15:04:39'),(1005,'孙
七','24736743@qq.com',0,105,'2020-03-06 15:04:45');
2.2、搭建项目
-
新建项目时引入基础模块:springboot-data-jdbc
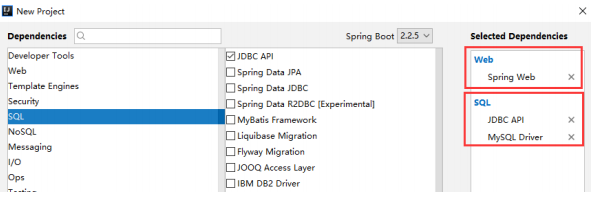
-
项目建好之后,发现自动帮我们导入了如下的启动器
<dependency> <groupId>org.springframework.boot</groupId> <artifactId>spring-boot-starter-jdbc</artifactId> </dependency> <dependency> <groupId>mysql</groupId> <artifactId>mysql-connector-java</artifactId> <scope>runtime</scope> </dependency> -
yml配置文件连接数据库
spring: datasource: username: root password: 123456 #?serverTimezone=UTC解决时区的报错 url: jdbc:mysql://localhost:3306/springboot?serverTimezone=UTC&useUnicode=true&characterEncoding=utf-8 driver-class-name: com.mysql.cj.jdbc.Driver -
配置完成以后就可以直接使用了,因为SpringBoot已经默认帮我们进行了自动配置
@SpringBootTest
class SpringbootDataJdbcApplicationTests {
	//DI注入数据源
	@Autowired
	DataSource dataSource;
	@Test
	public void contextLoads() throws SQLException {
		//看一下默认数据源
		System.out.println(dataSource.getClass());
		//获得连接
		Connection connection = dataSource.getConnection();
		System.out.println(connection);
		//关闭连接
		connection.close();
	}
}
结果:我们可以看到默认配置的数据源为 : class com.zaxxer.hikari.HikariDataSource , 我们并没有手动配置。
可以使用 spring.datasource.type 指定自定义的数据源类型,值为 要使用的连接池实现的完全限定名。
2.3、JdbcTemplate
- 有了数据源,就可以拿到数据库连接,有了连接就可以使用原生的JDBC来操作数据库
- Spring 本身也对原生的JDBC 做了轻量级的封装,即 JdbcTemplate
- 数据库操作的所有 CRUD 方法都在 JdbcTemplate 中
- Spring Boot 不仅提供了默认的数据源,同时默认已经配置好了 JdbcTemplate 放在了容器中,只注入即可使用
- JdbcTemplate 的自动配置是依赖 org.springframework.boot.autoconfigure.jdbc 包下的JdbcTemplateConfiguration 类
JdbcTemplate主要提供以下几类方法
- execute方法:可以用于执行任何SQL语句,一般用于执行DDL语句;
- update方法及batchUpdate方法:update方法用于执行新增、修改、删除等语句;batchUpdate方法用于执行批处理相关语句;
- query方法及queryForXXX方法:用于执行查询相关语句;
- call方法:用于执行存储过程、函数相关语句
2.4、测试
@RestController
@RequestMapping("/jdbc")
public class JdbcController {
	/**
	* Spring Boot 默认提供了数据源,默认提供了
	org.springframework.jdbc.core.JdbcTemplate
	* JdbcTemplate 中会自己注入数据源,用于简化 JDBC操作
	* 还能避免一些常见的错误,使用起来也不用再自己来关闭数据库连接
	*/
	@Autowired
	JdbcTemplate jdbcTemplate;
	//查询employee表中所有数据
	//List 中的1个 Map 对应数据库的 1行数据
	//Map 中的 key 对应数据库的字段名,value 对应数据库的字段值
	@GetMapping("/list")
	public List<Map<String, Object>> userList(){
		String sql = "select * from employee";
		List<Map<String, Object>> maps = jdbcTemplate.queryForList(sql);
		return maps;
	}
	//新增一个用户
	@GetMapping("/add")
	public String addUser(){
		//插入语句,注意时间问题
		String sql = "insert into employee(last_name,
		email,gender,department,birth)" +
		" values ('狂神说','24736743@qq.com',1,101,'"+ new
		Date().toLocaleString() +"')";
		jdbcTemplate.update(sql);
		//查询
		return "addOk";
	}
	//修改用户信息
	@GetMapping("/update/{id}")
	public String updateUser(@PathVariable("id") int id){
		//插入语句
		String sql = "update employee set last_name=?,email=? where id="+id;
		//数据
		Object[] objects = new Object[2];
		objects[0] = "秦疆";
		objects[1] = "24736743@sina.com";
		jdbcTemplate.update(sql,objects);
		//查询
		return "updateOk";
	}
	//删除用户
	@GetMapping("/delete/{id}")
	public String delUser(@PathVariable("id") int id){
		//插入语句
		String sql = "delete from employee where id=?";
		jdbcTemplate.update(sql,id);
		//查询
		return "deleteOk";
	}
}
三、集成Druid
3.1、简介
Druid 是阿里巴巴开源平台上一个数据库连接池实现,结合了 C3P0、DBCP 等连接池的优点,同时加入了日志监控。
Druid 可以很好的监控 DB 池连接和 SQL 的执行情况。
Spring Boot 2.0 以上默认的Hikari 与 Driud 都是当前 Java Web 上最优秀的数据源。
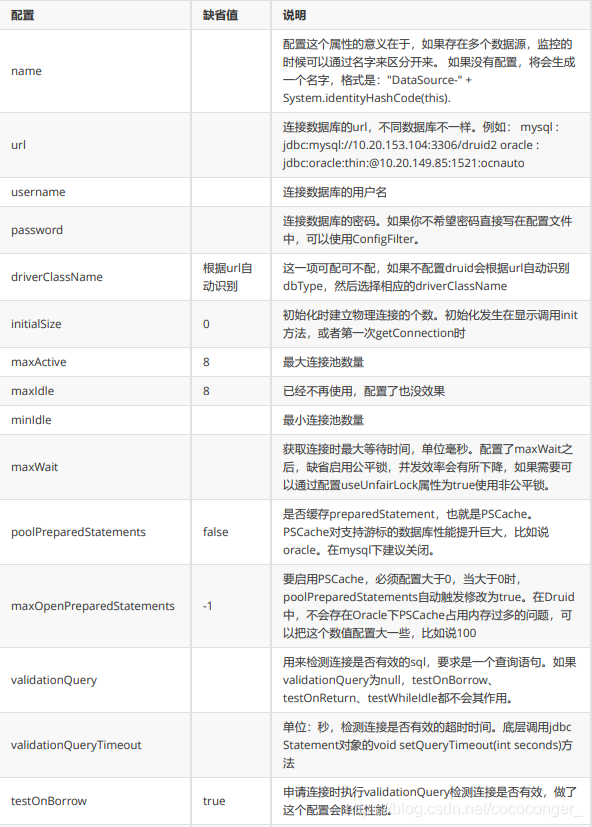
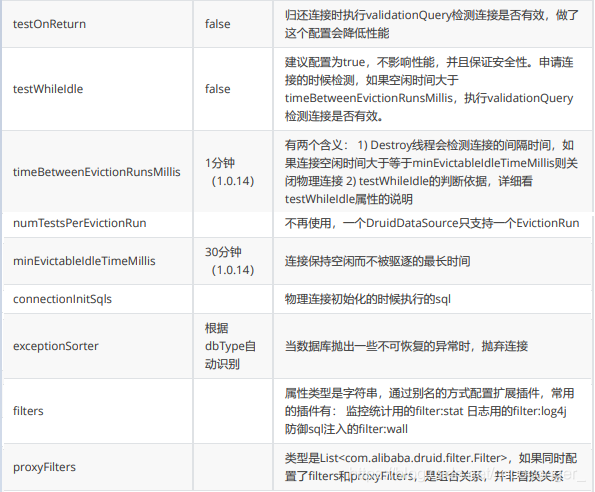
DruidDataSource 基本配置参数如下:
3.2、配置数据源
-
添加上 Druid 数据源依赖
<!-- https://mvnrepository.com/artifact/com.alibaba/druid --> <dependency> <groupId>com.alibaba</groupId> <artifactId>druid</artifactId> <version>1.1.21</version> </dependency> -
切换数据源
spring: datasource: username: root password: 123456 url: jdbc:mysql://localhost:3306/springboot?serverTimezone=UTC&useUnicode=true&characterEncoding=utf-8 driver-class-name: com.mysql.cj.jdbc.Driver type: com.alibaba.druid.pool.DruidDataSource # 自定义数据源 -
数据源切换之后,在测试类中注入 DataSource,获取到之后查看输出结果是否切换
-
设置数据源连接初始化大小、最大连接数、等待时间、最小连接数等设置项
spring: datasource: username: root password: 123456 #?serverTimezone=UTC解决时区的报错 url: jdbc:mysql://localhost:3306/springboot?serverTimezone=UTC&useUnicode=true&characterEncoding=utf-8 driver-class-name: com.mysql.cj.jdbc.Driver type: com.alibaba.druid.pool.DruidDataSource #Spring Boot 默认是不注入这些属性值的,需要自己绑定 #druid 数据源专有配置 druid: initialSize: 5 minIdle: 5 maxActive: 20 maxWait: 60000 timeBetweenEvictionRunsMillis: 60000 minEvictableIdleTimeMillis: 300000 validationQuery: SELECT 1 FROM DUAL testWhileIdle: true testOnBorrow: false testOnReturn: false poolPreparedStatements: true #配置监控统计拦截的filters,stat:监控统计、log4j:日志记录、wall:防御sql注入 #如果允许时报错 java.lang.ClassNotFoundException: org.apache.log4j.Priority #则导入 log4j 依赖即可,Maven 地址: https://mvnrepository.com/artifact/log4j/log4j filters: stat,wall,log4j maxPoolPreparedStatementPerConnectionSize: 20 useGlobalDataSourceStat: true connectionProperties: druid.stat.mergeSql=true;druid.stat.slowSqlMillis=500 -
导入Log4j依赖
<!-- https://mvnrepository.com/artifact/log4j/log4j --> <dependency> <groupId>log4j</groupId> <artifactId>log4j</artifactId> <version>1.2.17</version> </dependency> -
为 DruidDataSource 绑定全局配置文件中的参数,再添加到容器中不再使用 Spring Boot 的自动生成了
@Configuration
public class DruidConfig {
	/*
	将自定义的 Druid数据源添加到容器中,不再让 Spring Boot 自动创建
	绑定全局配置文件中的 druid 数据源属性到com.alibaba.druid.pool.DruidDataSource从而让它们生效
	@ConfigurationProperties(prefix = "spring.datasource"):作用就是将全局配置文件中前缀为 spring.datasource的属性值注入到
	com.alibaba.druid.pool.DruidDataSource 的同名参数中
	*/
	@ConfigurationProperties(prefix = "spring.datasource.druid")
	@Bean
	public DataSource druidDataSource() {
		return new DruidDataSource();
	}
}
3.3、配置Druid数据源监控
Druid 数据源具有监控的功能,并提供了一个 web 界面方便用户查看
-
配置 Druid 的后台管理页面,比如 登录账号、密码 等
//配置 Druid 监控管理后台的Servlet; //内置 Servlet 容器时没有web.xml文件,所以使用 Spring Boot 的注册 Servlet 方式 @Bean public ServletRegistrationBean statViewServlet() { ServletRegistrationBean bean = new ServletRegistrationBean(new StatViewServlet(), "/druid/*"); // 这些参数可以在 com.alibaba.druid.support.http.StatViewServlet的父类 com.alibaba.druid.support.http.ResourceServlet 中找到 Map<String, String> initParams = new HashMap<>(); initParams.put("loginUsername", "admin"); // 后台管理界面的登录账号 initParams.put("loginPassword", "123456"); // 后台管理界面的登录密码 // 后台允许谁可以访问 // initParams.put("allow", "localhost"):表示只有本机可以访问 // initParams.put("allow", ""):为空或者为null时,表示允许所有访问 initParams.put("allow", ""); // deny:Druid 后台拒绝谁访问 // initParams.put("kuangshen", "192.168.1.20");表示禁止此ip访问 // 设置初始化参数 bean.setInitParameters(initParams); return bean; } -
访问 : http://localhost:8080/druid/login.html
-
配置 Druid web 监控 filter 过滤器
//配置 Druid 监控 之 web 监控的 filter
//WebStatFilter:用于配置Web和Druid数据源之间的管理关联监控统计
@Bean
public FilterRegistrationBean webStatFilter() {
	FilterRegistrationBean bean = new FilterRegistrationBean();
	bean.setFilter(new WebStatFilter());
	//exclusions:设置哪些请求进行过滤排除掉,从而不进行统计
	Map<String, String> initParams = new HashMap<>();
	initParams.put("exclusions", "*.js,*.css,/druid/*,/jdbc/*");
	bean.setInitParameters(initParams);
	//"/*" 表示过滤所有请求
	bean.setUrlPatterns(Arrays.asList("/*"));
	return bean;
}
四、整合Mybatis
-
导入 MyBatis 所需要的依赖
<dependency> <groupId>org.mybatis.spring.boot</groupId> <artifactId>mybatis-spring-boot-starter</artifactId> <version>2.1.1</version> </dependency> -
配置数据库连接信息
spring: datasource: username: root password: 123456 #?serverTimezone=UTC解决时区的报错 url: jdbc:mysql://localhost:3306/springboot?serverTimezone=UTC&useUnicode=true&characterEncoding=utf-8 driver-class-name: com.mysql.cj.jdbc.Driver type: com.alibaba.druid.pool.DruidDataSource #Spring Boot 默认是不注入这些属性值的,需要自己绑定 #druid 数据源专有配置 initialSize: 5 minIdle: 5 maxActive: 20 maxWait: 60000 timeBetweenEvictionRunsMillis: 60000 minEvictableIdleTimeMillis: 300000 validationQuery: SELECT 1 FROM DUAL testWhileIdle: true testOnBorrow: false testOnReturn: false poolPreparedStatements: true #配置监控统计拦截的filters,stat:监控统计、log4j:日志记录、wall:防御sql注入 #如果允许时报错 java.lang.ClassNotFoundException: org.apache.log4j.Priority #则导入 log4j 依赖即可,Maven 地址: https://mvnrepository.com/artifact/log4j/log4j filters: stat,wall,log4j maxPoolPreparedStatementPerConnectionSize: 20 useGlobalDataSourceStat: true connectionProperties: druid.stat.mergeSql=true;druid.stat.slowSqlMillis=500 -
创建实体类,导入 Lombok
@Data @NoArgsConstructor @AllArgsConstructor public class Department { private Integer id; private String departmentName; } -
Mapper 接口
//@Mapper : 表示本类是一个 MyBatis 的 Mapper @Mapper @Repository public interface DepartmentMapper { // 获取所有部门信息 List<Department> getDepartments(); // 通过id获得部门 Department getDepartment(Integer id); } -
Mapper.xml
<?xml version="1.0" encoding="UTF-8" ?> <!DOCTYPE mapper PUBLIC "-//mybatis.org//DTD Mapper 3.0//EN" "http://mybatis.org/dtd/mybatis-3-mapper.dtd"> <mapper namespace="com.kuang.mapper.DepartmentMapper"> <select id="getDepartments" resultType="Department"> select * from department; </select> <select id="getDepartment" resultType="Department" parameterType="int"> select * from department where id = #{id}; </select> </mapper> -
maven配置资源过滤问题
<resources> <resource> <directory>src/main/java</directory> <includes> <include>**/*.xml</include> </includes> <filtering>true</filtering> </resource> </resources> -
既然已经提供了 myBatis 的映射配置文件,自然要告诉 spring boot 这些文件的位置
#指定myBatis的核心配置文件与Mapper映射文件 mybatis.mapper-locations=classpath:mybatis/mapper/*.xml # 注意:对应实体类的路径 mybatis.type-aliases-package=com.kuang.mybatis.pojo -
编写部门的 DepartmentController 进行测试
@RestController
public class DepartmentController {
	@Autowired
	DepartmentMapper departmentMapper;
	// 查询全部部门
	@GetMapping("/getDepartments")
	public List<Department> getDepartments(){
		return departmentMapper.getDepartments();
	}
	// 查询全部部门
	@GetMapping("/getDepartment/{id}")
	public Department getDepartment(@PathVariable("id") Integer id){
		return departmentMapper.getDepartment(id);
	}
}


 1839
1839

 被折叠的 条评论
为什么被折叠?
被折叠的 条评论
为什么被折叠?
 到【灌水乐园】发言


