


 本文介绍了如何在Spring与Jersey集成的环境中搭建认证系统,涵盖了HTTP基本认证、摘要认证和表单认证的实现步骤。包括环境配置、 Realm设置、服务器配置、认证验证以及相关代码和配置文件的展示。通过Postman和浏览器验证了认证过程。
一、准备工作
Spring5.1.7 + Jersey2.27 + Tomcat环境搭建
- 创建spring+jersey的maven项目依赖如下:
<dependencies>
    <dependency>
      <groupId>org.glassfish.jersey.core</groupId>
      <artifactId>jersey-server</artifactId>
      <version>2.27</version>
    </dependency>
    <dependency>
      <groupId>org.glassfish.jersey.containers</groupId>
      <artifactId>jersey-container-servlet-core</artifactId>
      <version>2.27</version>
    </dependency>
    <dependency>
      <groupId>org.glassfish.jersey.containers</groupId>
      <artifactId>jersey-container-servlet</artifactId>
      <version>2.27</version>
    </dependency>
    <dependency>
      <groupId>org.glassfish.jersey.inject</groupId>
      <artifactId>jersey-hk2</artifactId>
      <version>2.27</version>
    </dependency>
    <dependency>
      <groupId>org.glassfish.jersey.ext</groupId>
      <artifactId>jersey-spring4</artifactId>
      <version>2.27</version>
    </dependency>
    <dependency>
      <groupId>org.glassfish.jersey.media</groupId>
      <artifactId>jersey-media-json-jackson</artifactId>
      <version>2.27</version>
    </dependency>
    <dependency>
      <groupId>org.springframework</groupId>
      <artifactId>spring-context</artifactId>
      <version>5.1.7.RELEASE</version>
    </dependency>
 </dependencies>
- 配置applicationContext.xml文件
<?xml version="1.0" encoding="UTF-8"?>
<beans xmlns="http://www.springframework.org/schema/beans"
       xmlns:context="http://www.springframework.org/schema/context"
       xmlns:xsi="http://www.w3.org/2001/XMLSchema-instance"
       xsi:schemaLocation="http://www.springframework.org/schema/beans http://www.springframework.org/schema/beans/spring-beans.xsd">

    <context:component-scan base-package="com.jersey"></context:component-scan>
</beans>
- 编写一个Rest示例类
@Component
@Path("hello")
public class HelloResource {

    @Path("index")
    @GET
    public Response index() {
        return Response.ok("hello world!").build();
    }

    @Path("pH")
    @POST
    public Response postH() {
        return Response.ok("hello world!").build();
    }
}
- 准备并创建Realm所需的数据库表及数据
SET FOREIGN_KEY_CHECKS=0;
-- ----------------------------
-- Table structure for users
-- ----------------------------
DROP TABLE IF EXISTS `users`;
CREATE TABLE `users` (
  `user_name` varchar(255) DEFAULT NULL,
  `user_password` varchar(255) DEFAULT NULL
) ENGINE=InnoDB DEFAULT CHARSET=utf8;

-- ----------------------------
-- Records of users
-- ----------------------------
INSERT INTO `users` VALUES ('caroline', 'zhang');
INSERT INTO `users` VALUES ('eric', 'han');
DROP TABLE IF EXISTS `user_roles`;
CREATE TABLE `user_roles` (
  `user_name` varchar(255) DEFAULT NULL,
  `role_name` varchar(255) DEFAULT NULL
) ENGINE=InnoDB DEFAULT CHARSET=utf8;

-- ----------------------------
-- Records of user_roles
-- ----------------------------
INSERT INTO `user_roles` VALUES ('caroline', 'user');
INSERT INTO `user_roles` VALUES ('eric', 'admin');
- 配置JDBCRealm
修改服务器配置文件$CATALINA_BASE/conf/server.xml,配置内容如下:
<Realm className="org.apache.catalina.realm.JDBCRealm"
		driverName="com.mysql.jdbc.Driver"
		connectionURL="jdbc:mysql://localhost:3306/test"
		connectionName="root"
		connectionPassword="seeyon123456"
		userTable="users"
		userNameCol="user_name"
		userCredCol="user_password"
		userRoleTable="user_roles"
		roleNameCol="role_name" />
代码修改位置层级结构图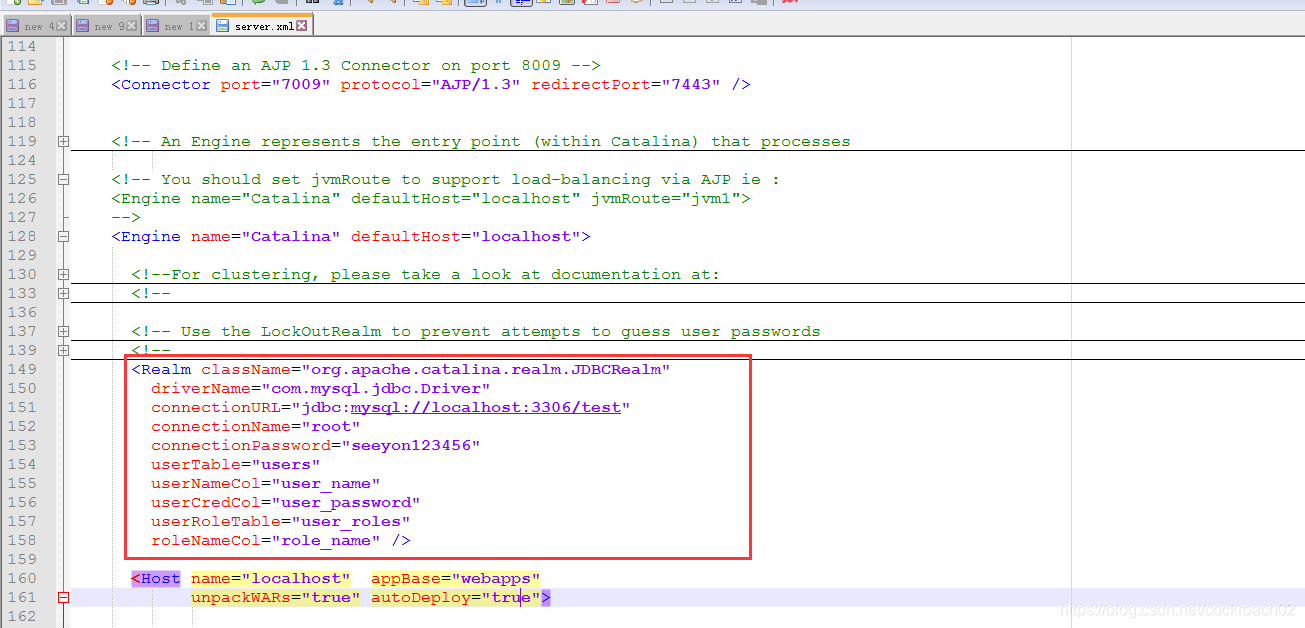
二、基本认证
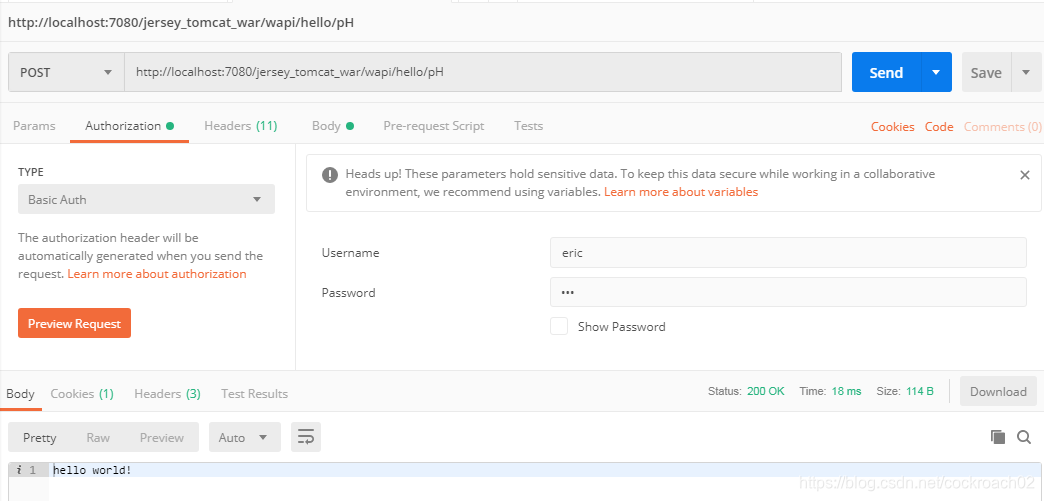
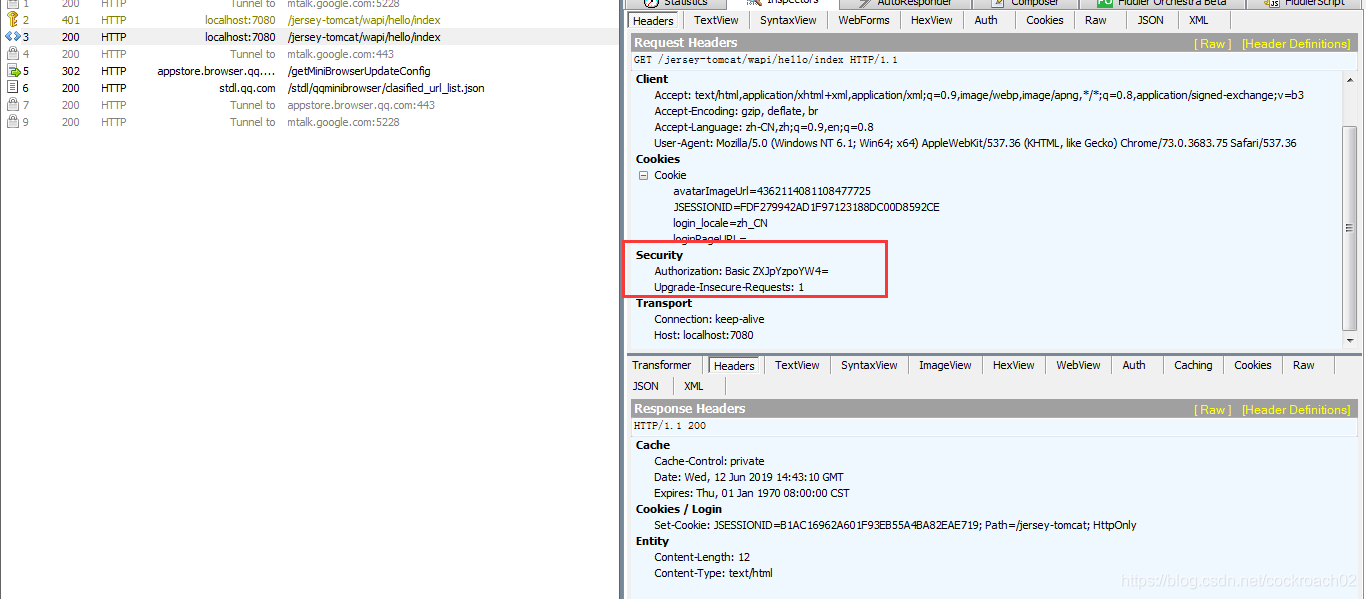
HTTP基本认证是指通过WEB浏览器或者其他客户端在发送请求的时,提供用户名和密码作为身份凭证的一种登录验证方式。在请求发送之前,用户名和密码字符串通过一个冒号合并,形式如:Username:Password,合并后的字符串经过BASE64算法进行编码。
	<security-constraint>
        <web-resource-collection>
            <web-resource-name>BASIC Auth</web-resource-name>
            <url-pattern>/wapi/*</url-pattern>
            <http-method>GET</http-method>
            <http-method>POST</http-method>
            <http-method>PUT</http-method>
            <http-method>DELETE</http-method>
        </web-resource-collection>
        <auth-constraint>
            <role-name>admin</role-name>
        </auth-constraint>
    </security-constraint>
    <security-constraint>
        <web-resource-collection>
            <web-resource-name>BASIC Auth</web-resource-name>
            <url-pattern>/wapi/*</url-pattern>
            <http-method>GET</http-method>
        </web-resource-collection>
        <auth-constraint>
            <role-name>user</role-name>
        </auth-constraint>
    </security-constraint>
    <login-config>
        <auth-method>BASIC</auth-method>
    </login-config>
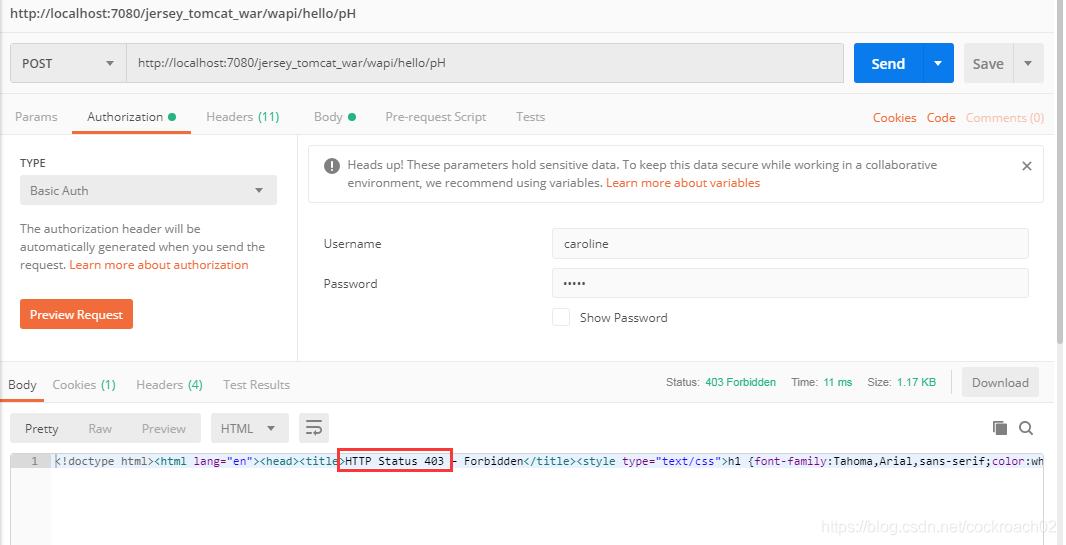
- 使用Postman验证
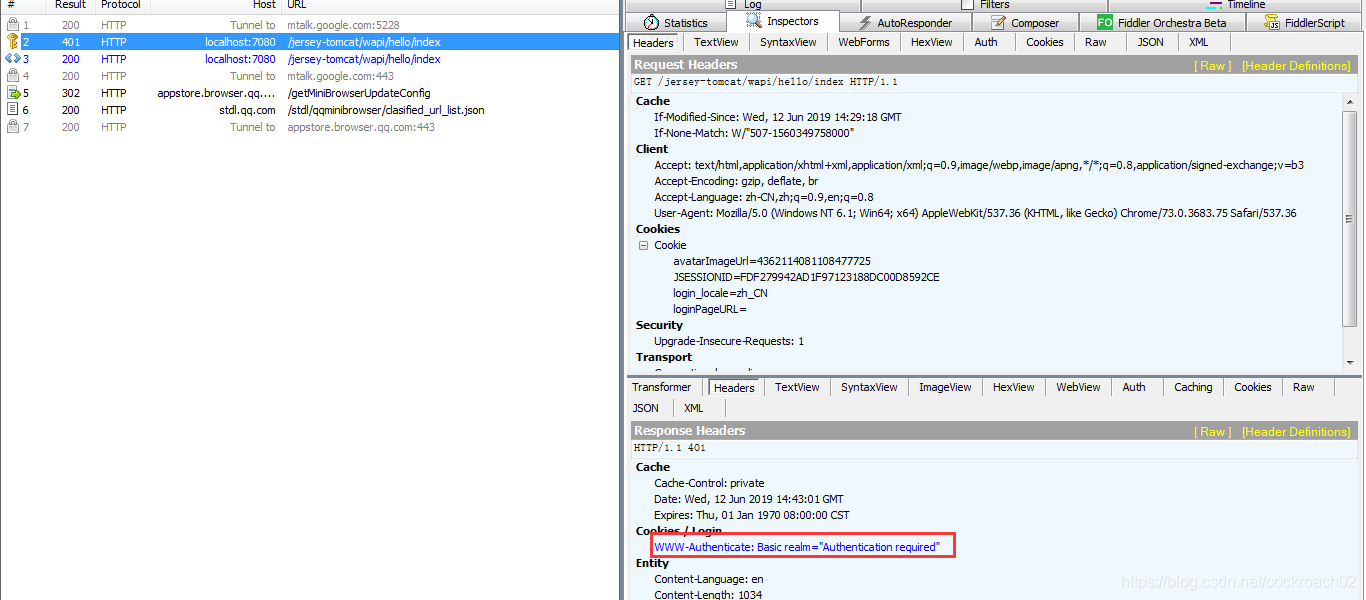
- 查看Header信息
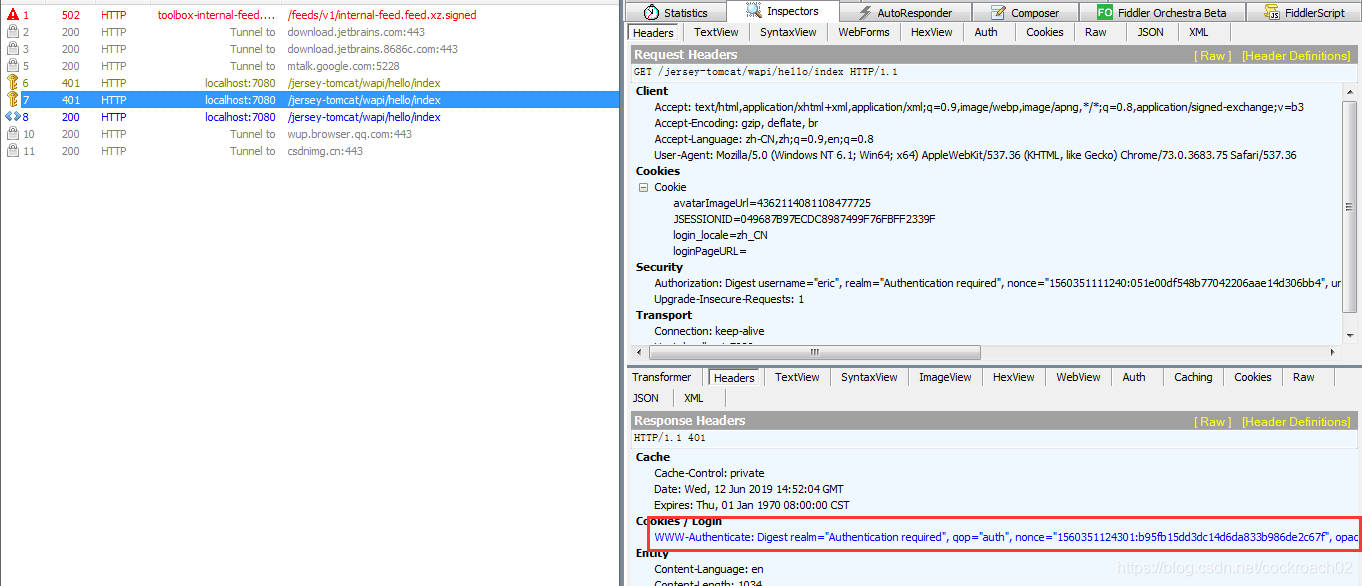
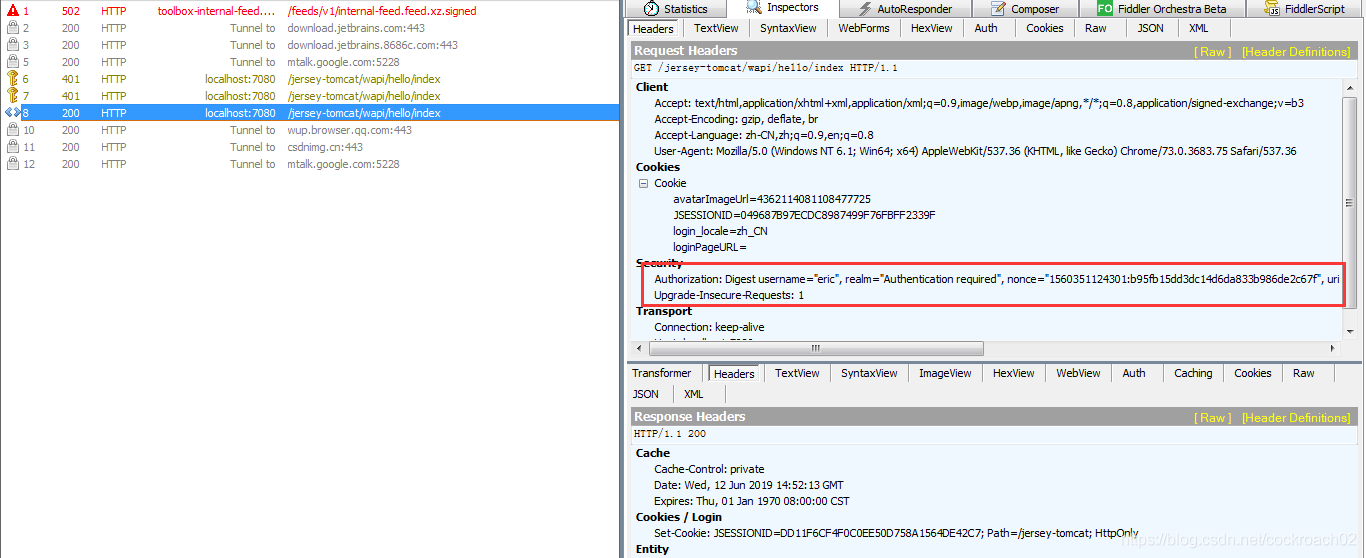
三、摘要认证
	<security-constraint>
        <web-resource-collection>
            <web-resource-name>BASIC Auth</web-resource-name>
            <url-pattern>/wapi/*</url-pattern>
            <http-method>GET</http-method>
            <http-method>POST</http-method>
            <http-method>PUT</http-method>
            <http-method>DELETE</http-method>
        </web-resource-collection>
        <auth-constraint>
            <role-name>admin</role-name>
        </auth-constraint>
    </security-constraint>
    <security-constraint>
        <web-resource-collection>
            <web-resource-name>BASIC Auth</web-resource-name>
            <url-pattern>/wapi/*</url-pattern>
            <http-method>GET</http-method>
        </web-resource-collection>
        <auth-constraint>
            <role-name>user</role-name>
        </auth-constraint>
    </security-constraint>
    <login-config>
        <auth-method>DIGEST</auth-method>
    </login-config>
- Postman验证
与BASIC验证一样,不再截图;
- 查看Header信息
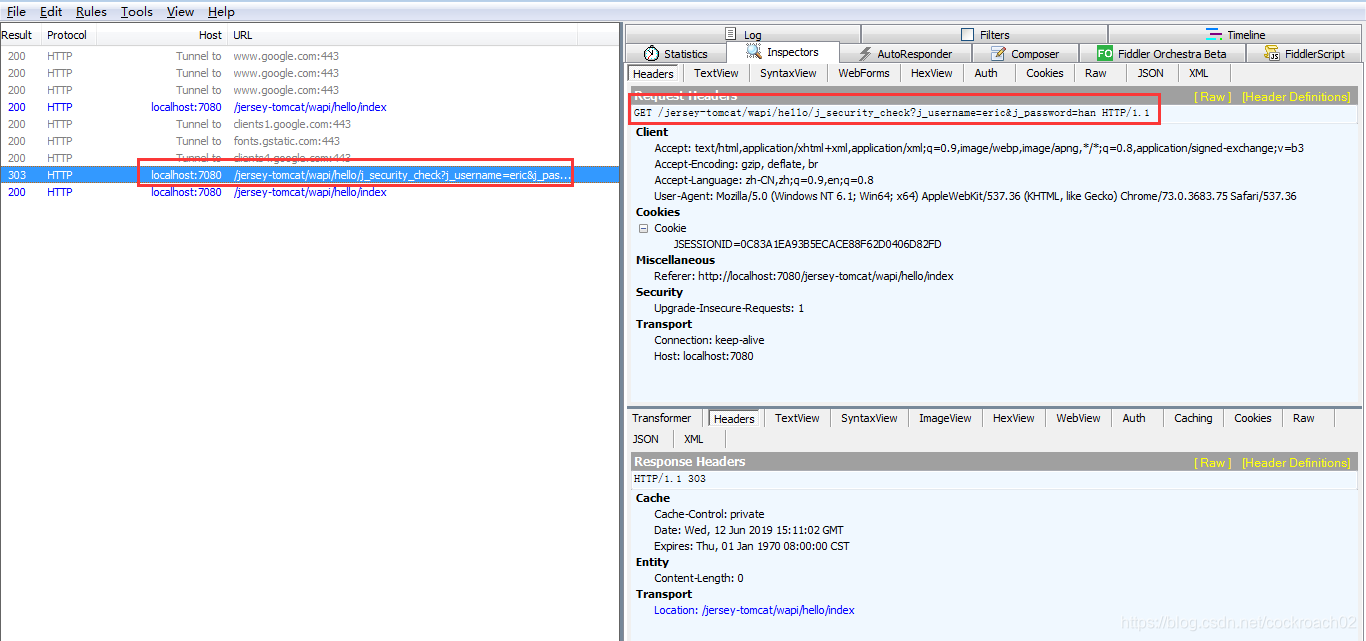
四、表单认证
表单认证是基于HTTP,使用HTML的Form标签提交表单的认证形式。用户登录页面定义在web.xml文件的form-login-page字段中,在没有被认证前,访问者对资源地址的访问会被引导到该页面。访问者提交身份信息后,服务器接收并处理请求,如果认证通过,将重定向到welcom-file字段定义的页面,如果失败,将重定向到form-error-page字段定义的页面。
	<security-constraint>
        <web-resource-collection>
            <web-resource-name>BASIC Auth</web-resource-name>
            <url-pattern>/wapi/*</url-pattern>
            <http-method>GET</http-method>
            <http-method>POST</http-method>
            <http-method>PUT</http-method>
            <http-method>DELETE</http-method>
        </web-resource-collection>
        <auth-constraint>
            <role-name>admin</role-name>
        </auth-constraint>
    </security-constraint>
    <security-constraint>
        <web-resource-collection>
            <web-resource-name>BASIC Auth</web-resource-name>
            <url-pattern>/wapi/*</url-pattern>
            <http-method>GET</http-method>
        </web-resource-collection>
        <auth-constraint>
            <role-name>user</role-name>
        </auth-constraint>
    </security-constraint>
    <login-config>
        <auth-method>FORM</auth-method>
        <form-login-config>
            <form-login-page>/login.html</form-login-page>
            <form-error-page>/error.html</form-error-page>
        </form-login-config>
    </login-config>
login.html
<!DOCTYPE html>
<html lang="en">
<head>
    <meta charset="UTF-8">
    <title>登录页面</title>
</head>
<body>
    <form action="j_security_check">
        <div>
            <span>user name</span>
            <input id="j_username" name="j_username" type="text">
        </div>
        <div>
            <span>password</span>
            <input id="j_password" name="j_password" type="password">
        </div>
        <input type="submit" value="login in">
    </form>
</body>
</html>
- 使用chrome浏览器验证
码云地址
五、参考链接
- 在tomcat中使用Realm
- Spring集成Jersey开发(附demo)
- 用idea创建一个maven web项目
创建maven项目的时候注意加archetypeCatalog=internal属性,否则创建不出来 - 在Tomcat中采用基于表单的安全验证


 1240
1240

 被折叠的 条评论
为什么被折叠?
被折叠的 条评论
为什么被折叠?
 到【灌水乐园】发言


