


 本文详细介绍了一个Spring MVC项目的创建过程,包括项目结构配置、Controller编写、视图解析器设置及运行测试。
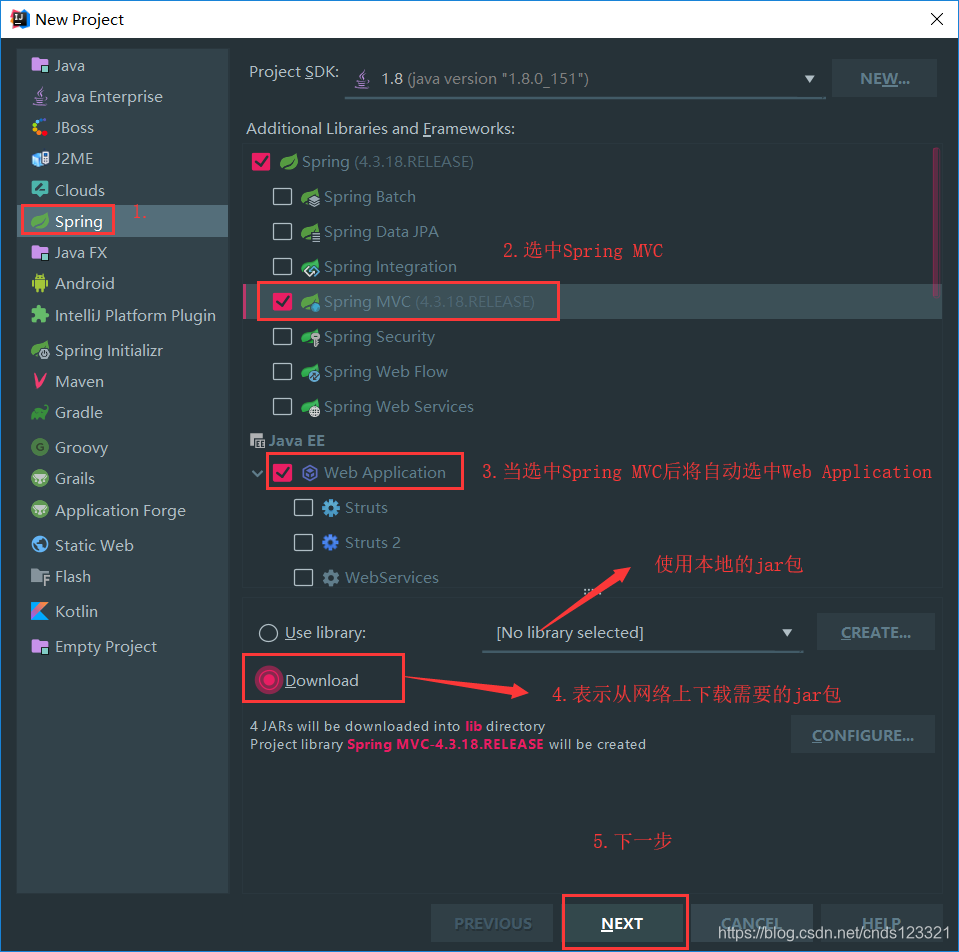
创建项目
第一步:创建项目
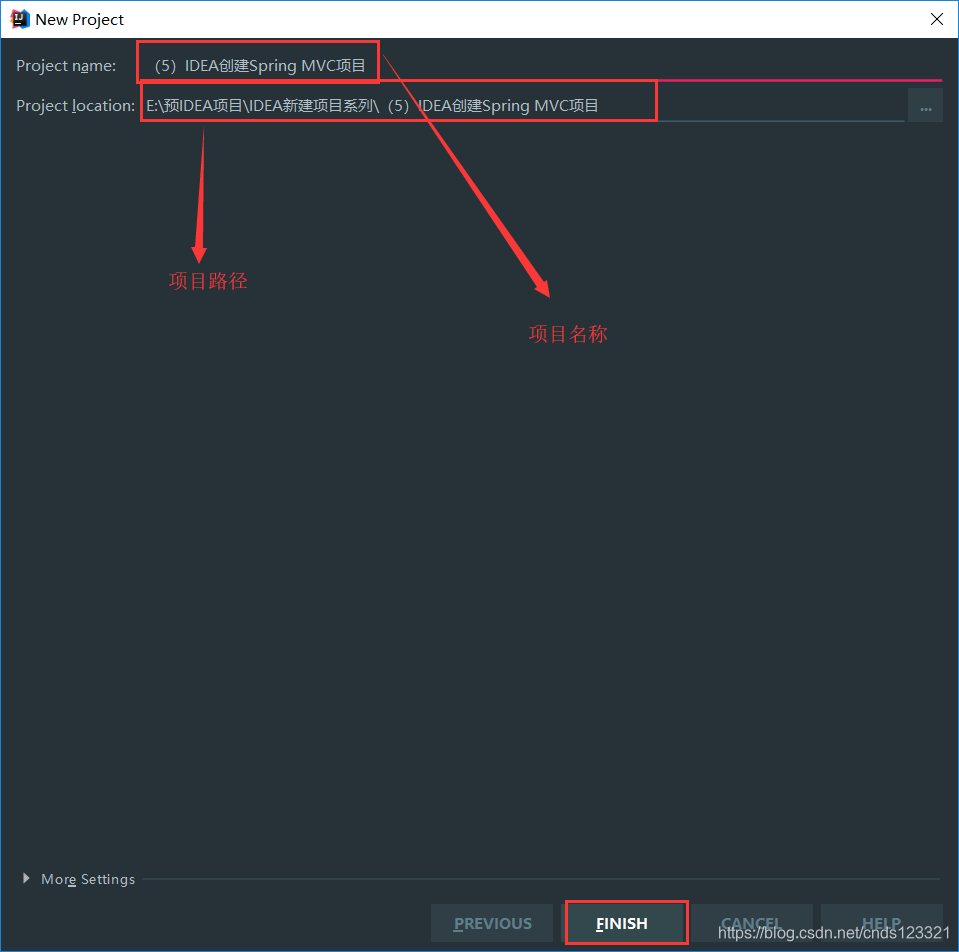
第二步:设置项目名称及路径
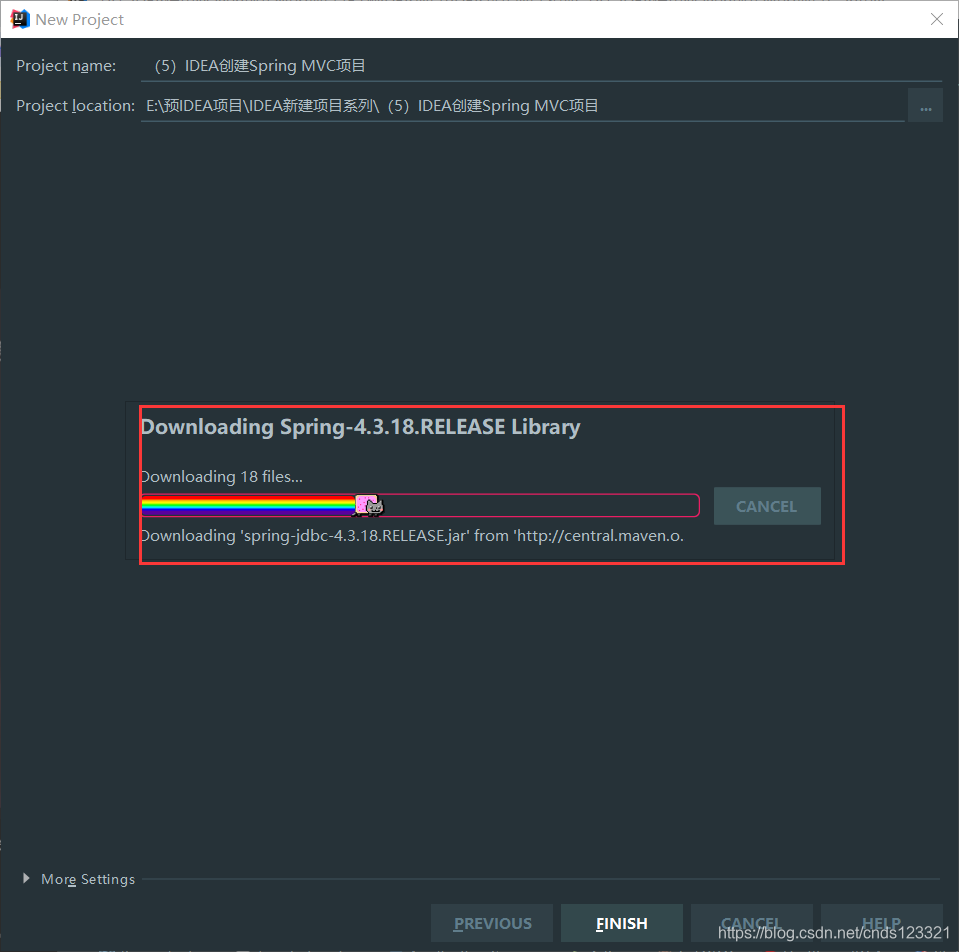
第三步:正在下载jar包
表示正在下载项目需要的jar包。
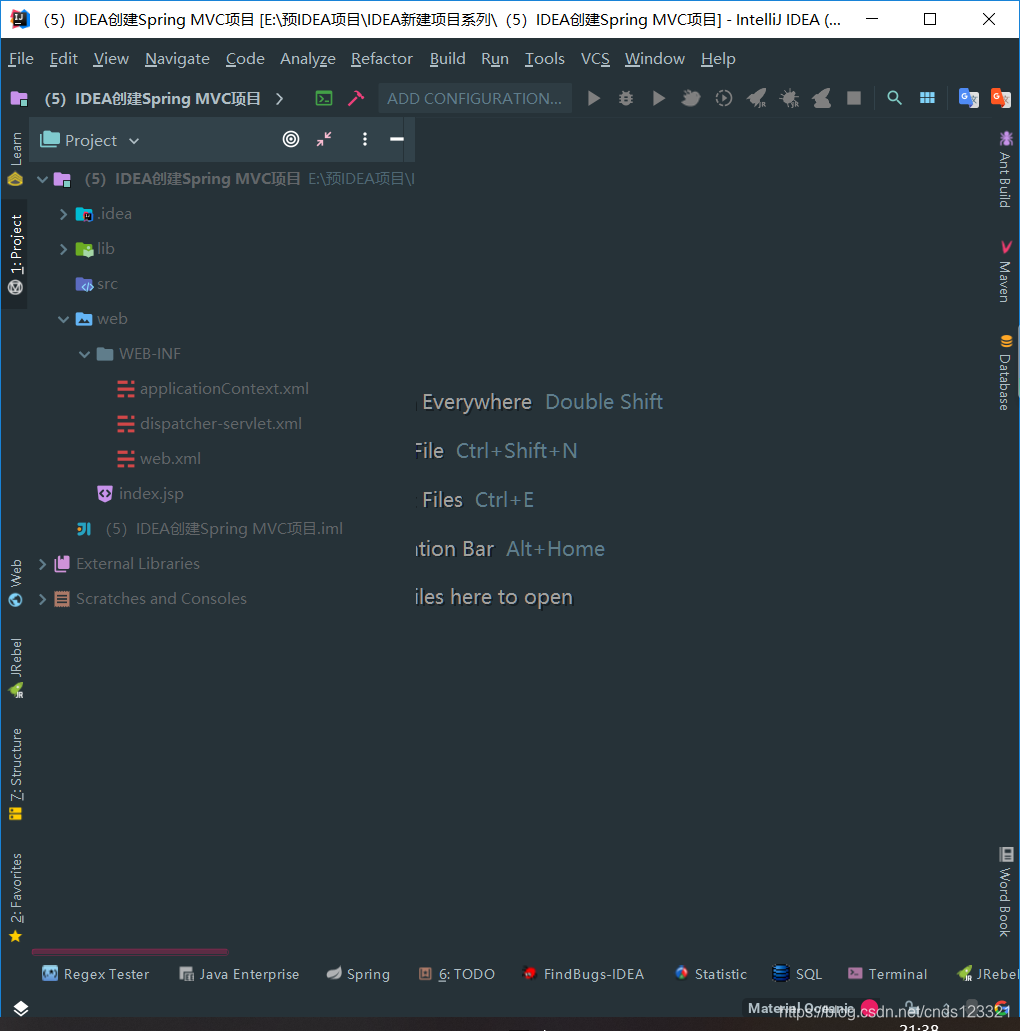
第四步:项目创建成功
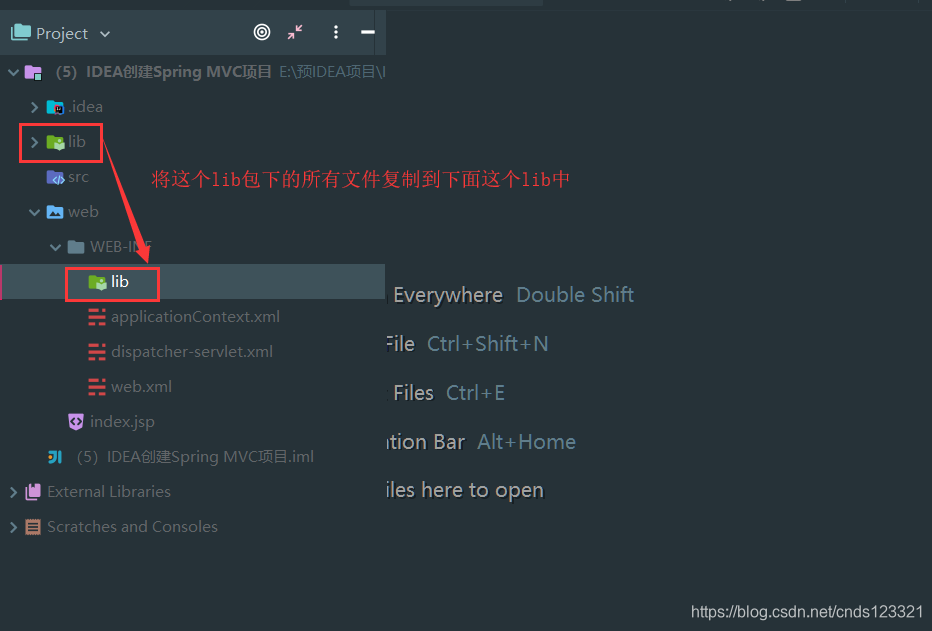
第五步:导入相关jar包
在web/WEB-INF目录下创建一个lib文件夹,然后将根目录下的所有jar包复制到web/WEB-INF/lib下
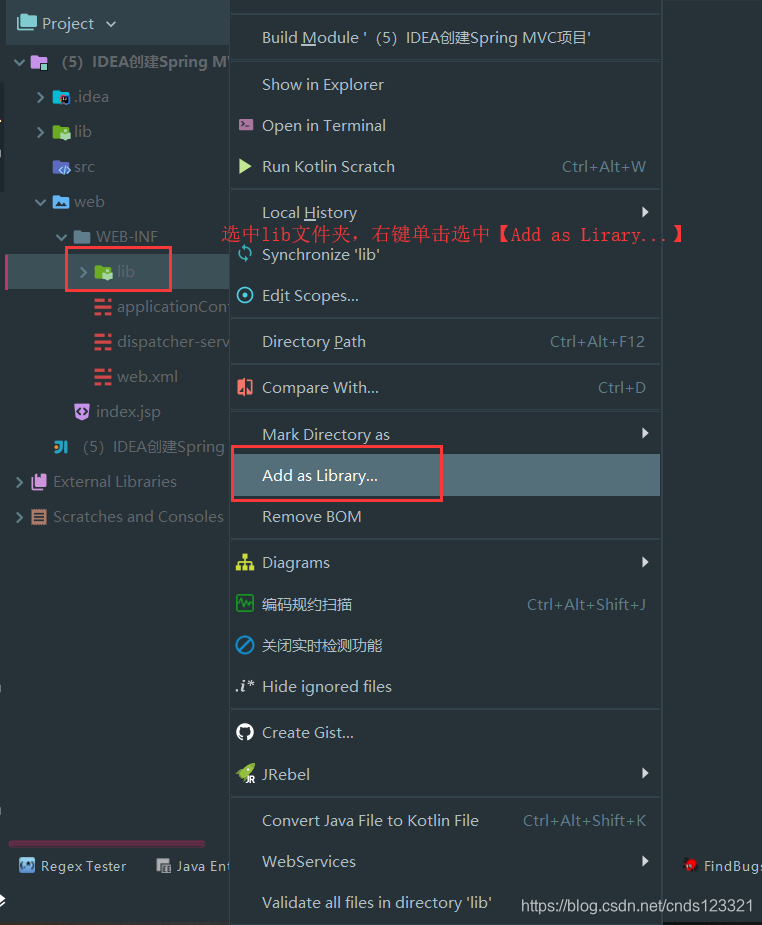
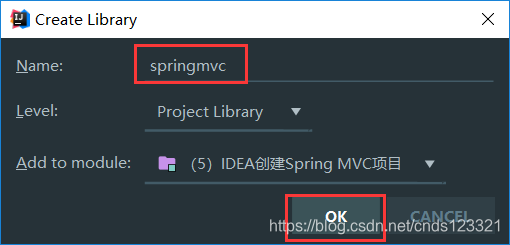
第六步:配置为Library
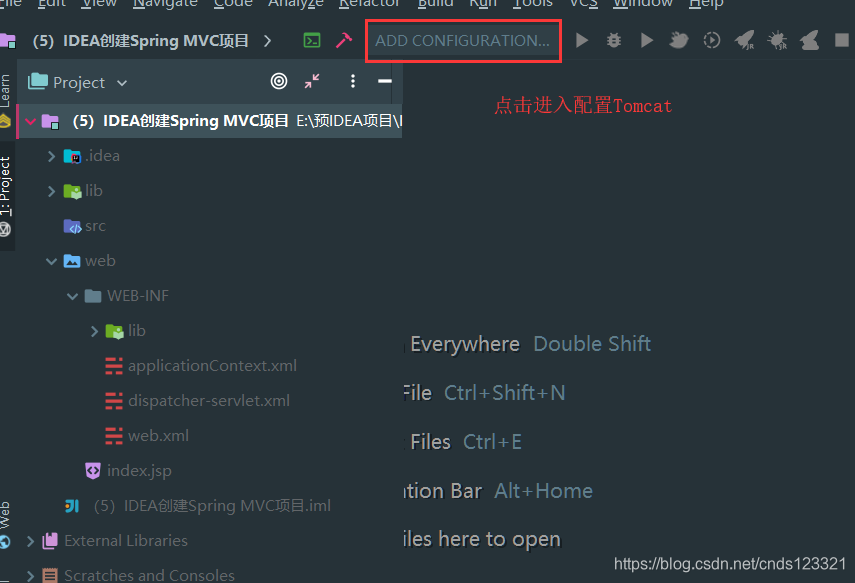
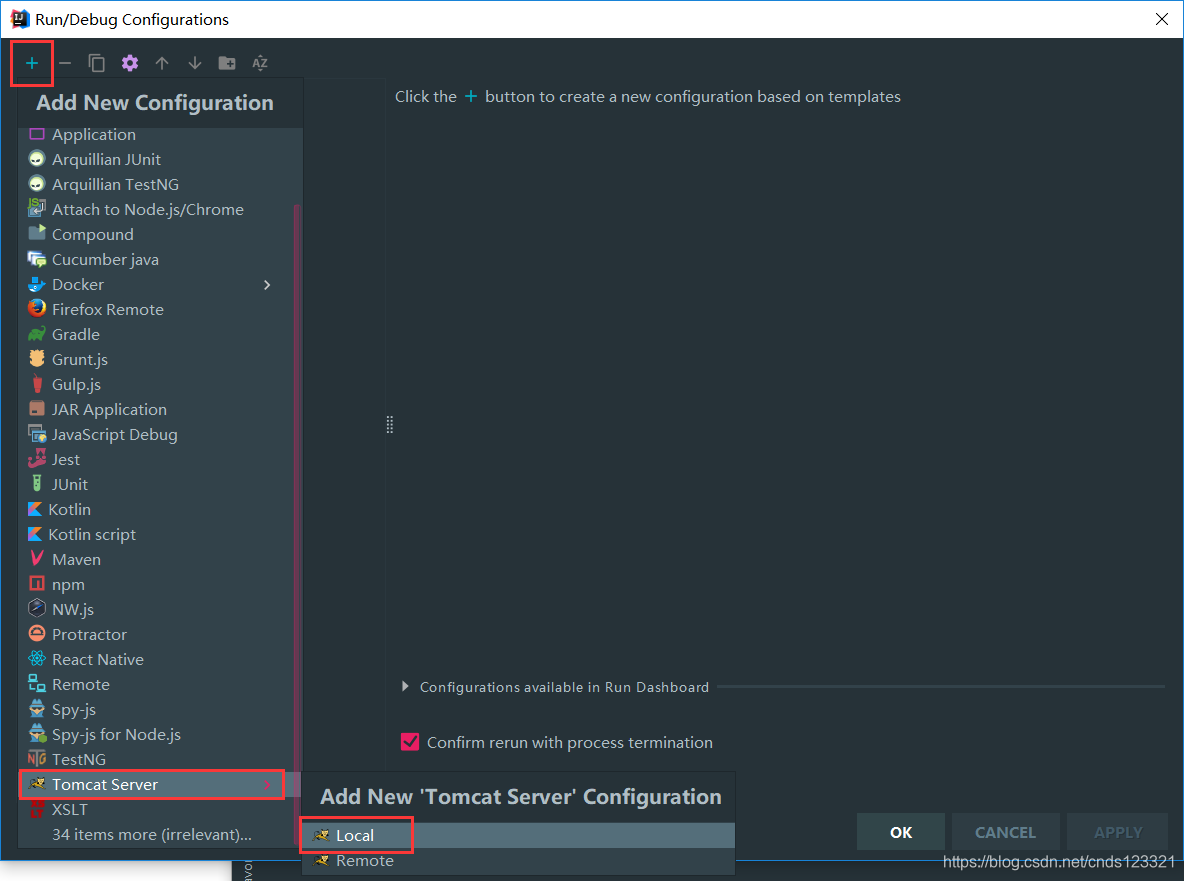
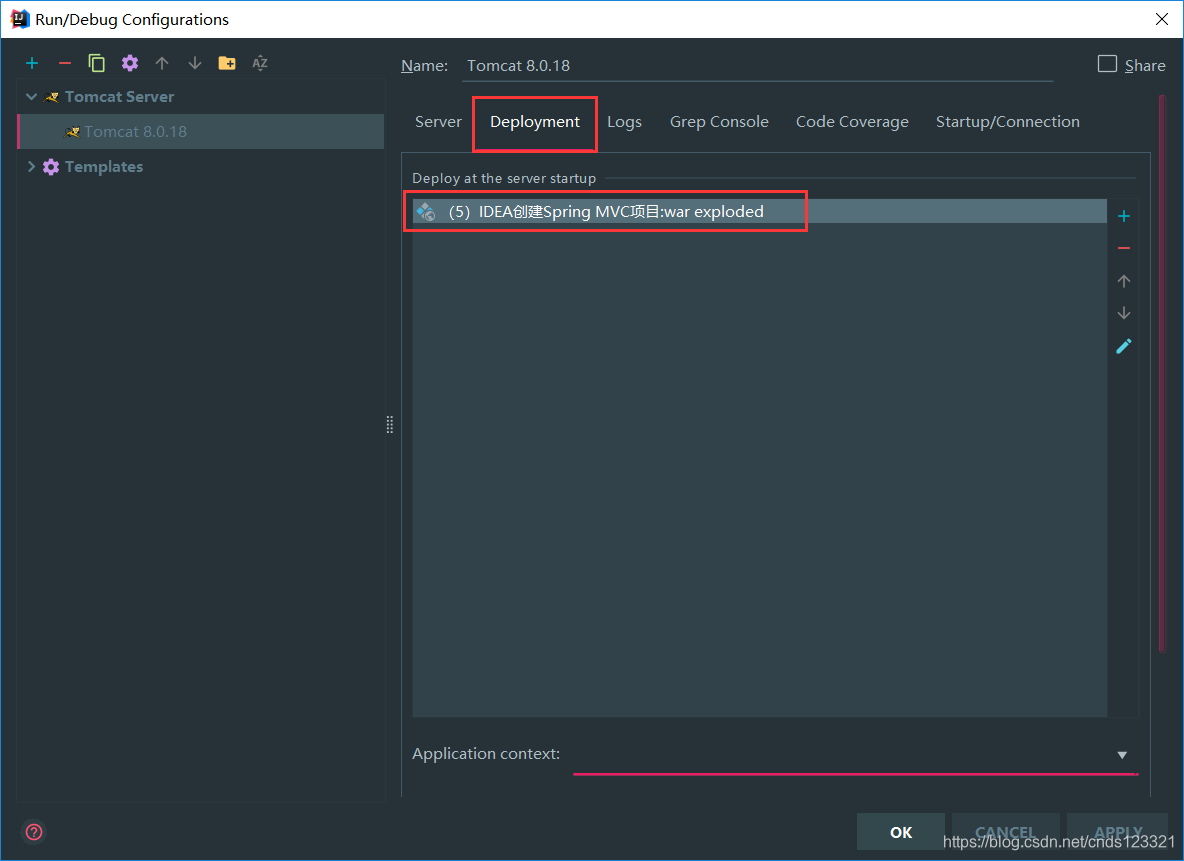
第七步:配置Tomcat
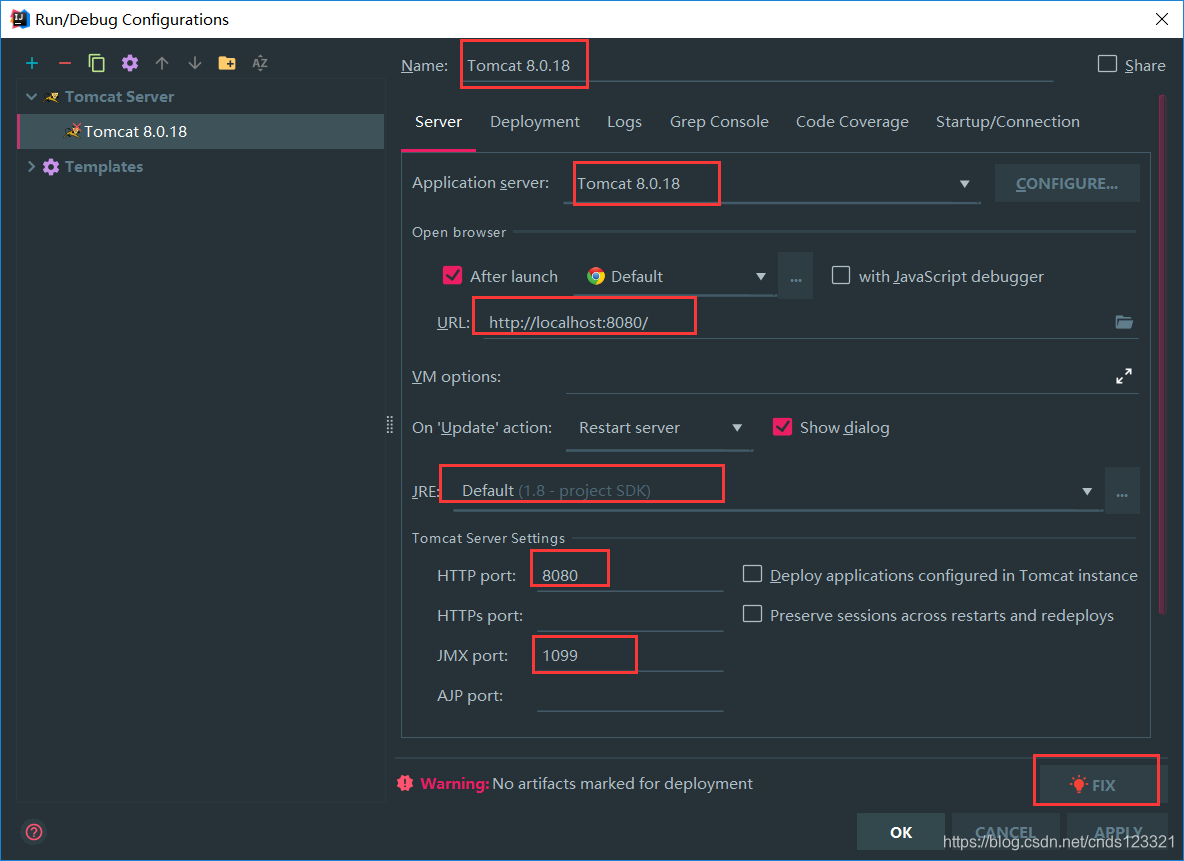
点击【FIX】后
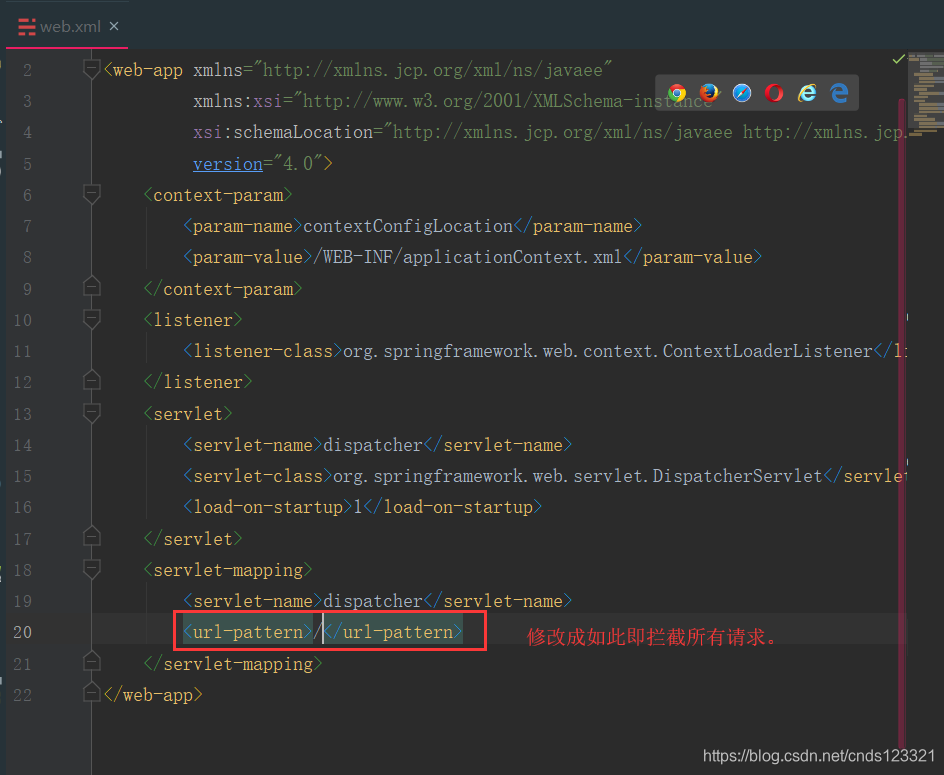
第八步:修改web.xml配置
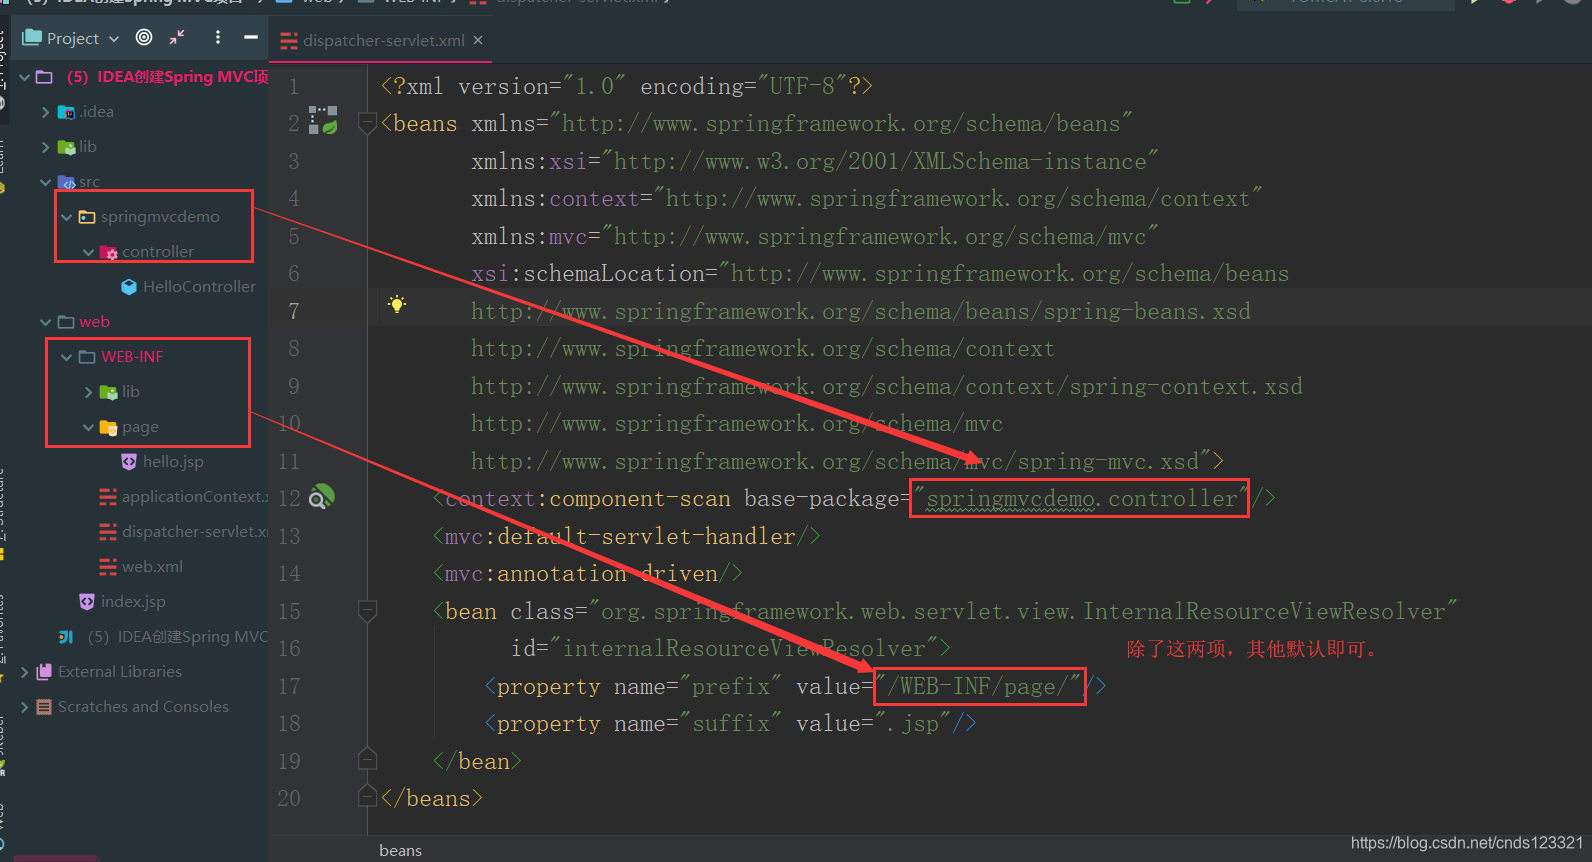
第九步:配置dispatcher-servlet.xml文件
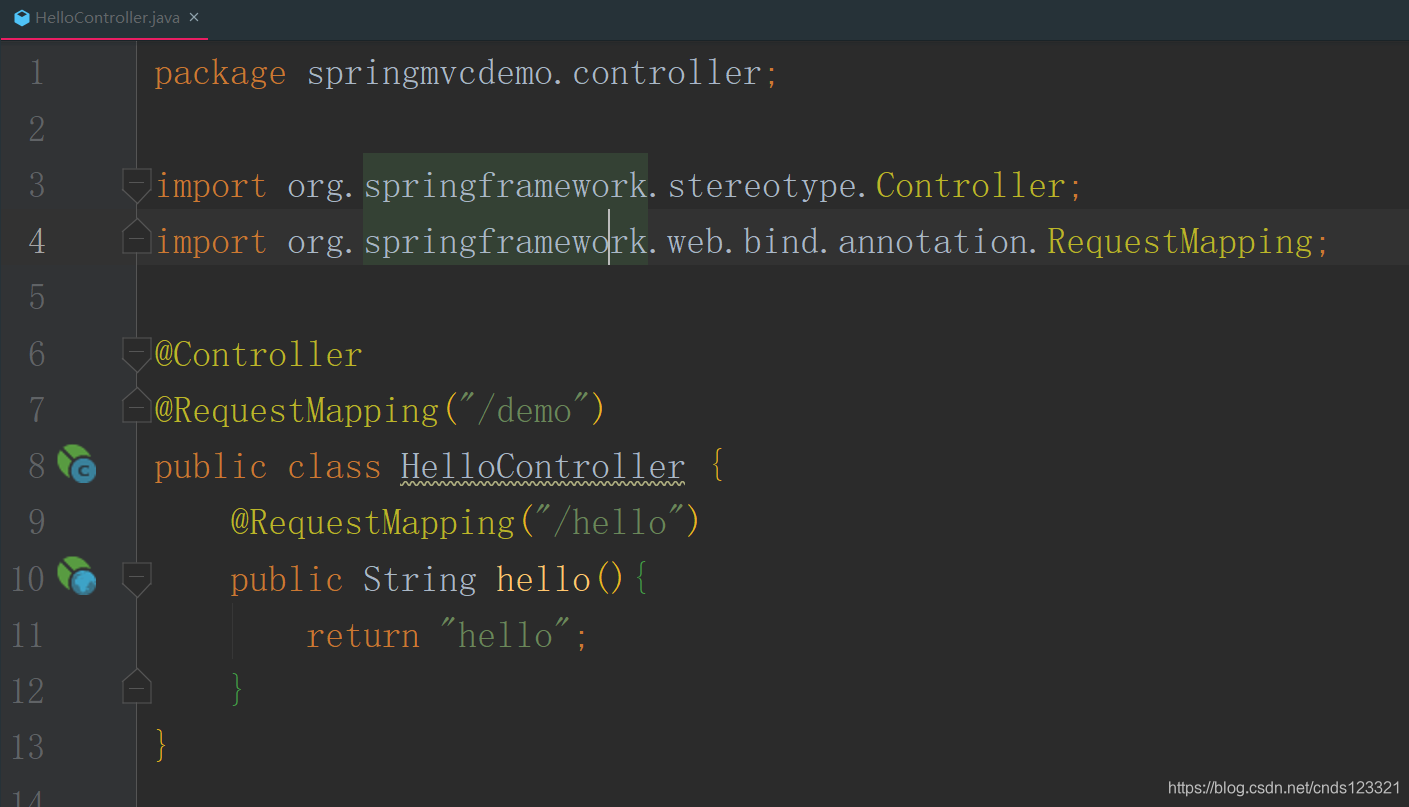
首先在src目录下创建springmvcdemo/controller包,并且在controller包下创建HelloController.java类。
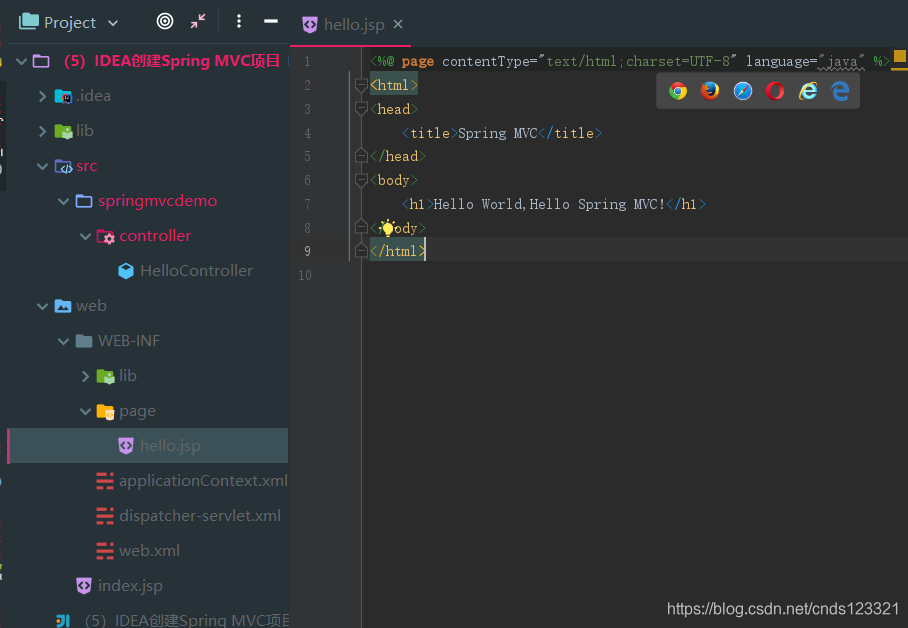
然后在web/WEB-INF下创建page文件夹,然后在其中创建hello.jsp文件
其中结构如下:
接着配置dispatcher-servlet.xml文件
第十步:编写Controller,这里使用注解方式。
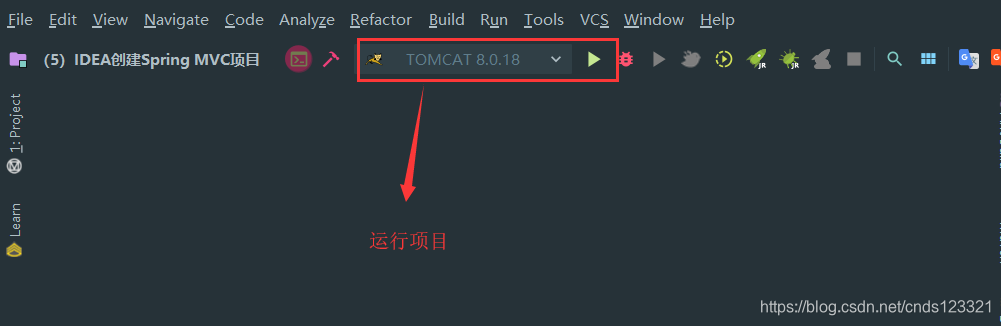
第十一步:运行项目
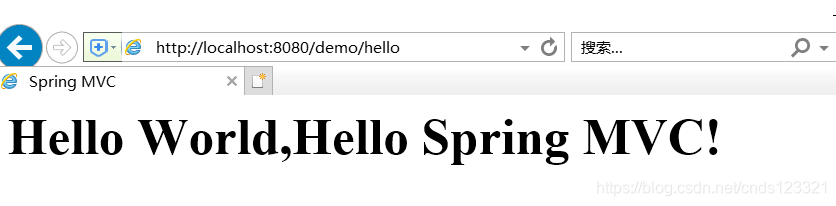
第十二步:查看效果
输入路径:http://localhost:8080/demo/hello
项目概览
项目目录结构:
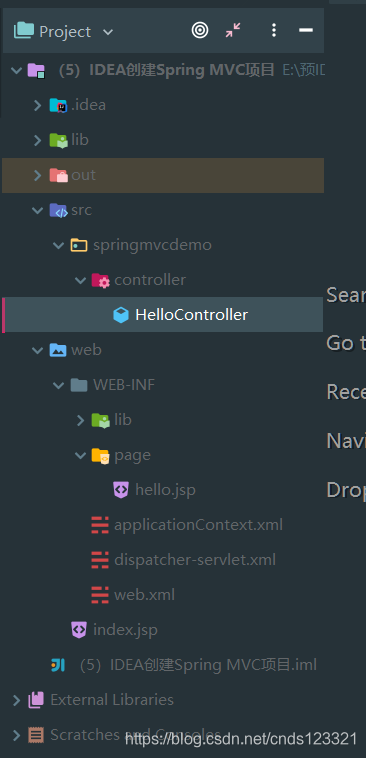
项目文件内容如下:
HelloController.java
package springmvcdemo.controller;

import org.springframework.stereotype.Controller;
import org.springframework.web.bind.annotation.RequestMapping;

@Controller
@RequestMapping("/demo")
public class HelloController {
    @RequestMapping("/hello")
    public String hello(){
        return "hello";
    }
}
hello.jsp
<%@ page contentType="text/html;charset=UTF-8" language="java" %>
<html>
<head>
    <title>Spring MVC</title>
</head>
<body>
    <h1>Hello World,Hello Spring MVC!</h1>
</body>
</html>
applicationContext.xml
<?xml version="1.0" encoding="UTF-8"?>
<beans xmlns="http://www.springframework.org/schema/beans"
       xmlns:xsi="http://www.w3.org/2001/XMLSchema-instance"
       xsi:schemaLocation="http://www.springframework.org/schema/beans http://www.springframework.org/schema/beans/spring-beans.xsd">

</beans>
dispatcher-servlet.xml
<?xml version="1.0" encoding="UTF-8"?>
<beans xmlns="http://www.springframework.org/schema/beans"
       xmlns:xsi="http://www.w3.org/2001/XMLSchema-instance"
       xmlns:context="http://www.springframework.org/schema/context"
       xmlns:mvc="http://www.springframework.org/schema/mvc"
       xsi:schemaLocation="http://www.springframework.org/schema/beans
       http://www.springframework.org/schema/beans/spring-beans.xsd
       http://www.springframework.org/schema/context
       http://www.springframework.org/schema/context/spring-context.xsd
       http://www.springframework.org/schema/mvc
       http://www.springframework.org/schema/mvc/spring-mvc.xsd">
    <context:component-scan base-package="springmvcdemo.controller"/>
    <mvc:default-servlet-handler/>
    <mvc:annotation-driven/>
    <bean class="org.springframework.web.servlet.view.InternalResourceViewResolver"
          id="internalResourceViewResolver">
        <property name="prefix" value="/WEB-INF/page/"/>
        <property name="suffix" value=".jsp"/>
    </bean>
</beans>
web.xml
<?xml version="1.0" encoding="UTF-8"?>
<web-app xmlns="http://xmlns.jcp.org/xml/ns/javaee"
         xmlns:xsi="http://www.w3.org/2001/XMLSchema-instance"
         xsi:schemaLocation="http://xmlns.jcp.org/xml/ns/javaee http://xmlns.jcp.org/xml/ns/javaee/web-app_4_0.xsd"
         version="4.0">
    <context-param>
        <param-name>contextConfigLocation</param-name>
        <param-value>/WEB-INF/applicationContext.xml</param-value>
    </context-param>
    <listener>
        <listener-class>org.springframework.web.context.ContextLoaderListener</listener-class>
    </listener>
    <servlet>
        <servlet-name>dispatcher</servlet-name>
        <servlet-class>org.springframework.web.servlet.DispatcherServlet</servlet-class>
        <load-on-startup>1</load-on-startup>
    </servlet>
    <servlet-mapping>
        <servlet-name>dispatcher</servlet-name>
        <url-pattern>/</url-pattern>
    </servlet-mapping>
</web-app>
index.jsp
<%@ page contentType="text/html;charset=UTF-8" language="java" %>
<html>
  <head>
    <title>$Title$</title>
  </head>
  <body>
  $END$
  </body>
</html>


 374
374

 被折叠的 条评论
为什么被折叠?
被折叠的 条评论
为什么被折叠?
 到【灌水乐园】发言


