


layout: post
title: webpack4打包优化
categories: webpack
tags:
webpack4打包优化
针对vue cli3.0+,webpack4.0+,nodejs10.0+ 这几个版本打包优化
一、量化、分析
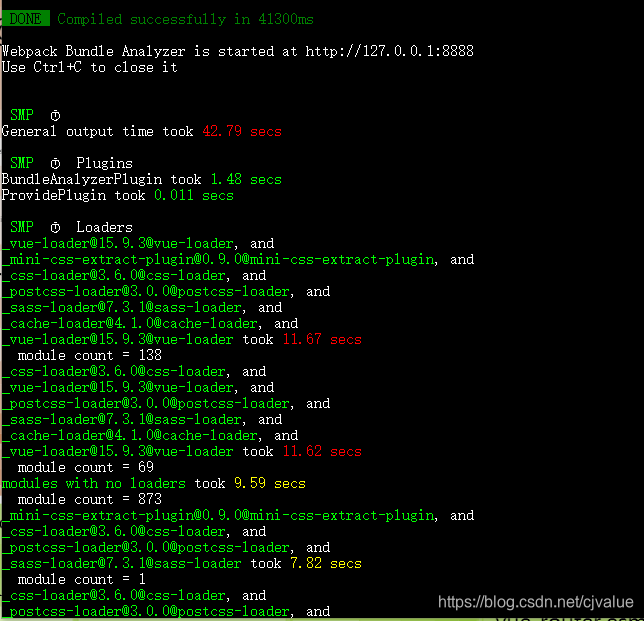
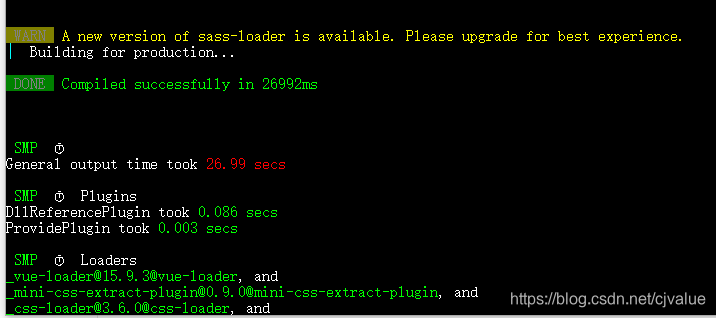
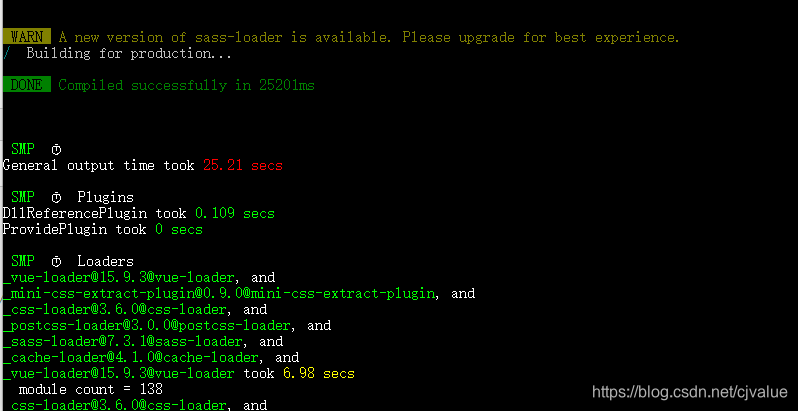
speed-measure-webpack-plugin 时间分析
- 测量出在你的构建过程中,每一个 Loader 和 Plugin 的执行时长
- 而它的使用方法也同样简单,如下方示例代码所示,只需要在你导出 Webpack 配置时,为你的原始配置包一层 smp.wrap 就可以了,接下来执行构建,你就能在 console 面板看到如它 demo 所示的各类型的模块的执行时长
demo
安装
npm i speed-measure-webpack-plugin -D
使用
vue.config.js中配置
const SpeedMeasurePlugin = require('speed-measure-webpack-plugin')
const smp = new SpeedMeasurePlugin({
  outputFormat: 'human'
})
module.exports = {
  configureWebpack: smp.wrap({
    plugins: []
  })
}
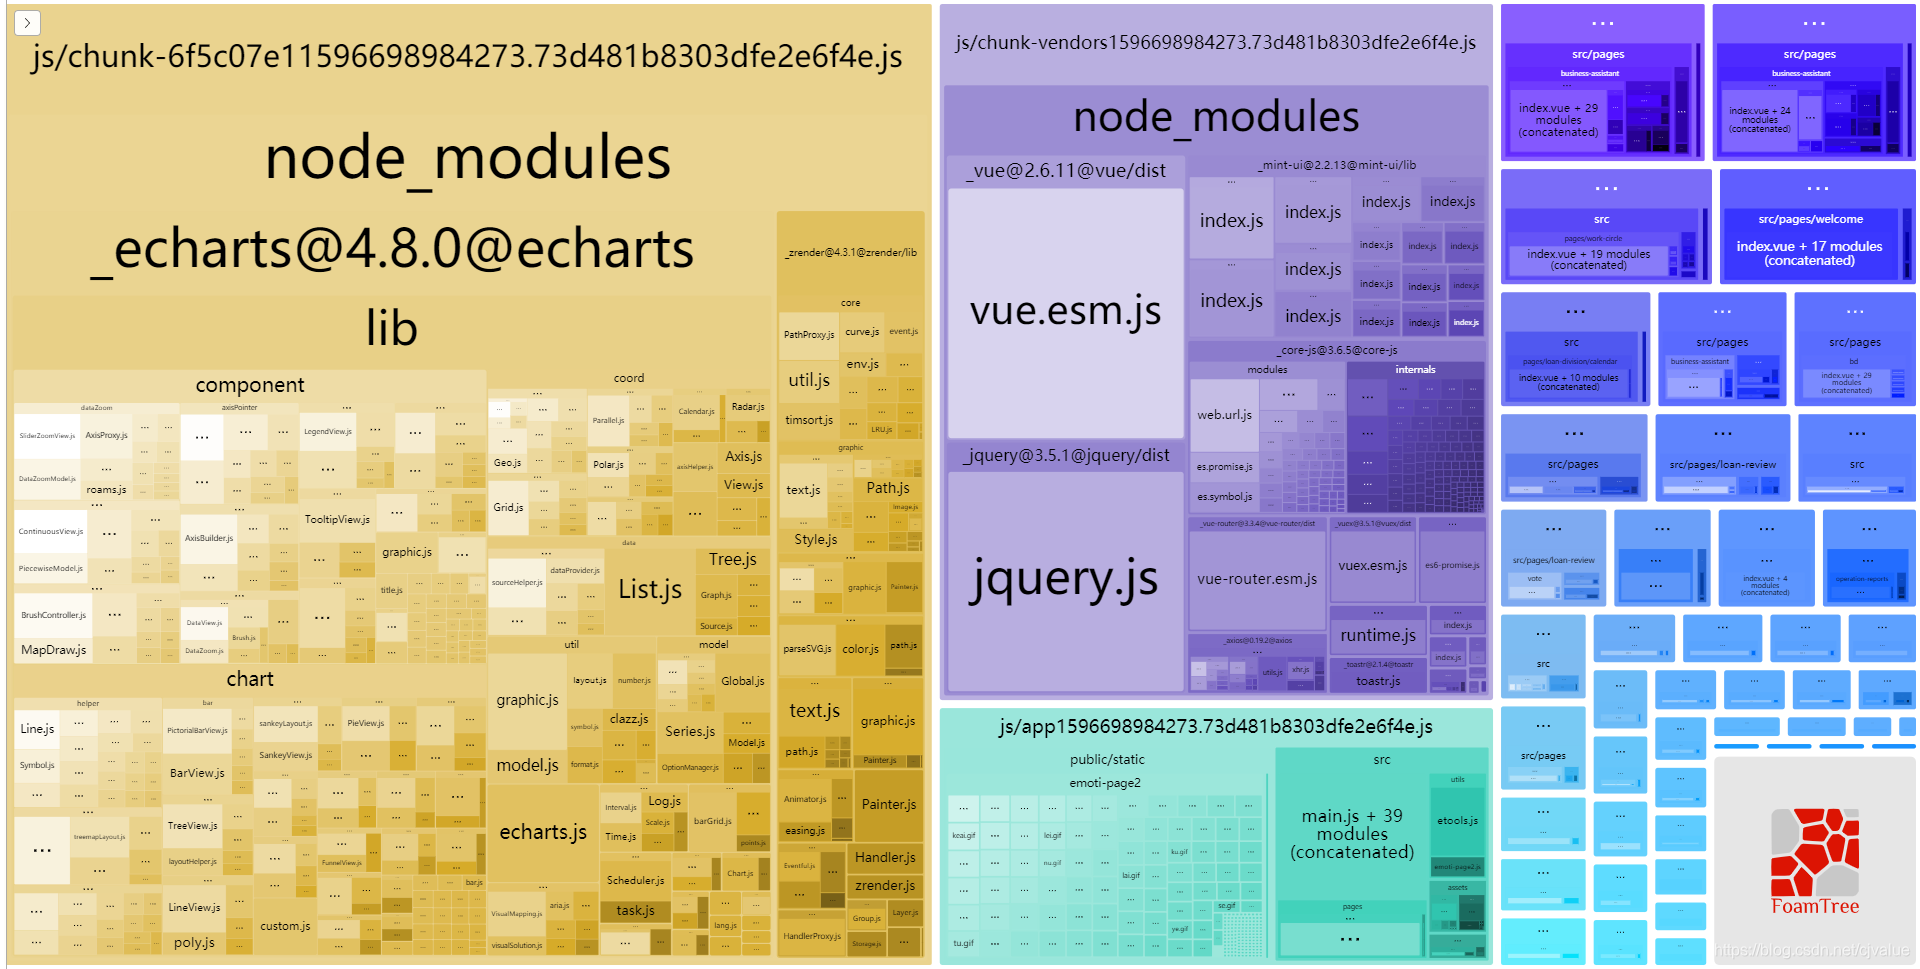
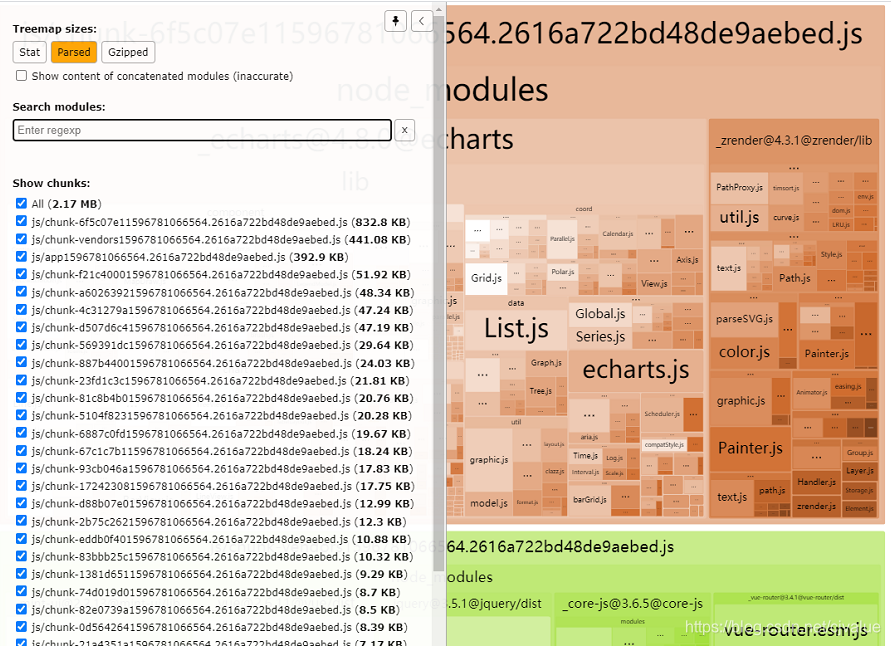
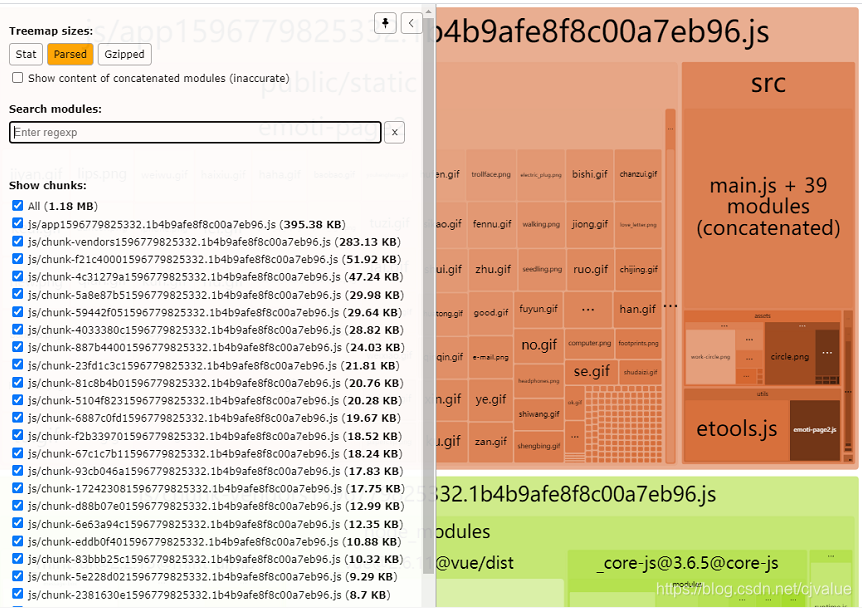
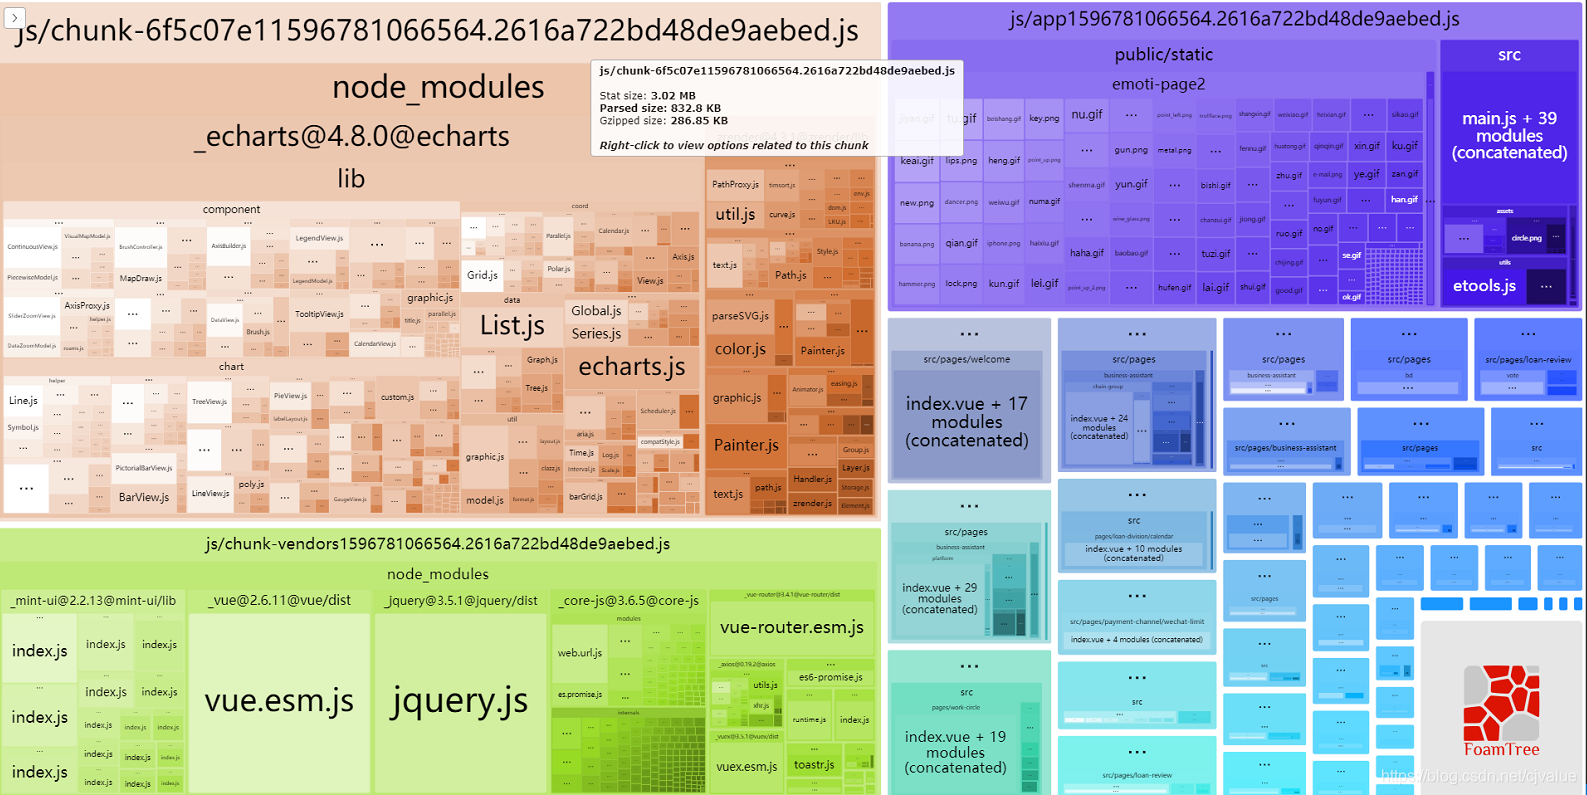
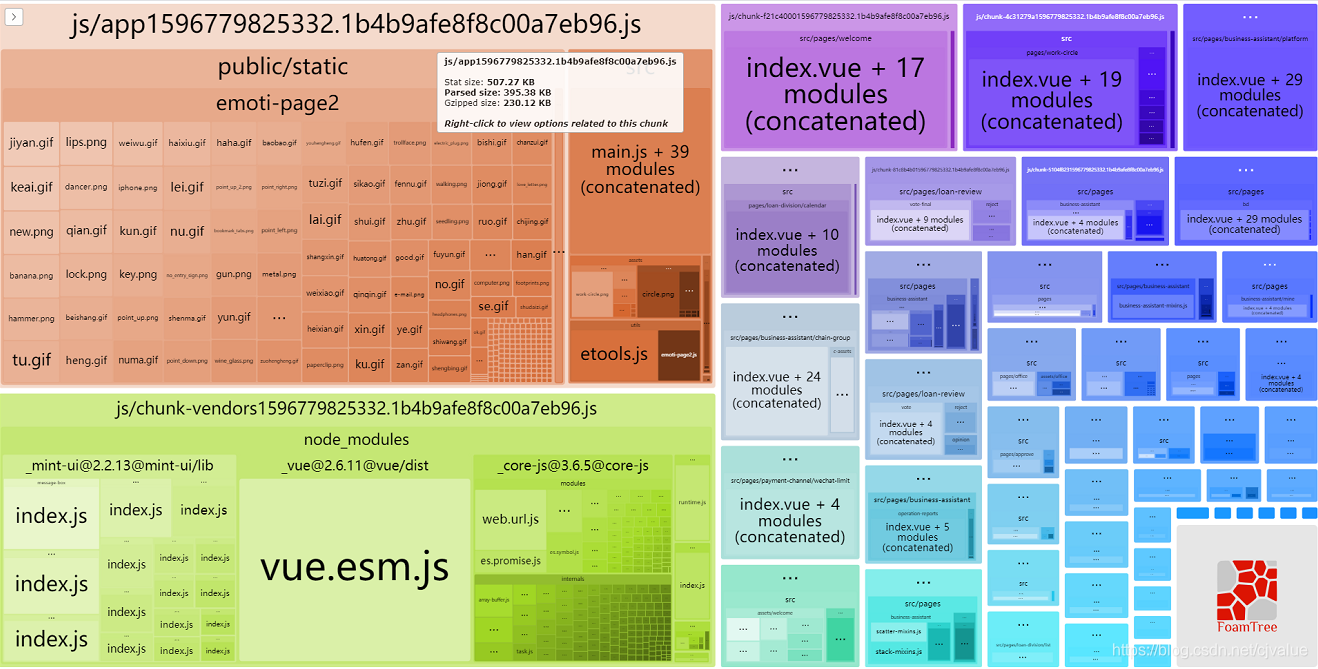
webpack-bundle-analyzer 体积分析
- 分析打包后,各个文件的大小,用于分析 bundle 的
安装
npm i webpack-bundle-analyzer -D
使用
const BundleAnalyzerPlugin = require('webpack-bundle-analyzer').BundleAnalyzerPlugin;
module.exports = {
configureWebpack: {
   plugins: [
      new BundleAnalyzerPlugin({
        //  可以是`server`,`static`或`disabled`。
        //  在`server`模式下,分析器将启动HTTP服务器来显示软件包报告。
        //  在“静态”模式下,会生成带有报告的单个HTML文件。
        //  在`disabled`模式下,你可以使用这个插件来将`generateStatsFile`设置为`true`来生成Webpack Stats JSON文件。
        analyzerMode: 'server',
        //  将在“服务器”模式下使用的主机启动HTTP服务器。
        analyzerHost: '127.0.0.1',
        //  将在“服务器”模式下使用的端口启动HTTP服务器。
        analyzerPort: 8888,
        //  路径捆绑,将在`static`模式下生成的报告文件。
        //  相对于捆绑输出目录。
        reportFilename: 'report.html',
        //  模块大小默认显示在报告中。
        //  应该是`stat`,`parsed`或者`gzip`中的一个。
        //  有关更多信息,请参见“定义”一节。
        defaultSizes: 'parsed',
        //  在默认浏览器中自动打开报告
        openAnalyzer: true,
        //  如果为true,则Webpack Stats JSON文件将在bundle输出目录中生成
        generateStatsFile: false,
        //  如果`generateStatsFile`为`true`,将会生成Webpack Stats JSON文件的名字。
        //  相对于捆绑输出目录。
        statsFilename: 'stats.json',
        //  stats.toJson()方法的选项。
        //  例如,您可以使用`source:false`选项排除统计文件中模块的来源。
        //  在这里查看更多选项:https:  //github.com/webpack/webpack/blob/webpack-1/lib/Stats.js#L21
        statsOptions: null,
        logLevel: 'info' // 日志级别。可以是'信息','警告','错误'或'沉默'。
      })
    ]
  },
}
二、缓存
webpack缓存的插件有两个
- DllPlugin 配置比较繁琐
- hard-source-webpack-plugin
DllPlugin
提取固定三方库预编译,减少打包体积,加快编译速度
使用
- 在项目根目录下新建 webpack.dll.conf.js,输入以下内容
const path = require('path')
const webpack = require('webpack')
const CleanWebpackPlugin = require('clean-webpack-plugin')

// dll文件存放的目录
const dllPath = 'public/vendor'

module.exports = {
  entry: {
    // 需要提取的库文件
    vendor: [
      'vue-router/dist/vue-router.esm.js',
      'vuex/dist/vuex.esm.js',
      'axios',
      'mint-ui',
      'echarts',
      'toastr',
      'mockjs',
      'es6-promise'
    ]
  },
  output: {
    path: path.join(__dirname, dllPath),
    filename: '[name].dll.js',
    // vendor.dll.js中暴露出的全局变量名
    // 保持与 webpack.DllPlugin 中名称一致
    library: '[name]_[hash]'
  },
  plugins: [
    // 清除之前的dll文件
    new CleanWebpackPlugin(['*.*'], {
      root: path.join(__dirname, dllPath)
    }),
    // 设置环境变量
    new webpack.DefinePlugin({
      'process.env': {
        NODE_ENV: 'production'
      }
    }),
    // manifest.json 描述动态链接库包含了哪些内容
    new webpack.DllPlugin({
      path: path.join(__dirname, dllPath, '[name]-manifest.json'),
      // 保持与 output.library 中名称一致
      name: '[name]_[hash]',
      context: process.cwd()
    })
  ]
}
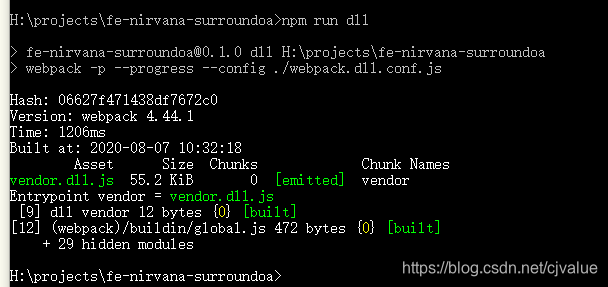
- 在 package.json 中加入如下命令,生成dll
"scripts": {
    ...
    "dll": "webpack -p --progress --config ./webpack.dll.conf.js"
}
配置完成以后运行命令
npm run dll
- 为了节约编译的时间,这时间我们需要告诉 webpack 公共库文件已经编译好了,减少 webpack 对公共库的编译时间。在项目根目录下找到 vue.config.js,配置如下
const webpack = require('webpack')

module.exports = {
    configureWebpack: {
        plugins: [
          new webpack.DllReferencePlugin({
            context: process.cwd(),
            manifest: require('./public/vendor/vendor-manifest.json')
          })
        ]
    }
}
- 经过上面的配置,公共库提取出来了,编译速度快了,但需要在index.html引用生成的 dll 文件
<script src="./vendor/vendor.dll.js"></script>
- 不想手动引入也可以 vue.config.js 在 configureWebpack plugins 节点下,配置 add-asset-html-webpack-plugin
const path = require('path')
const webpack = require('webpack')
const AddAssetHtmlPlugin = require('add-asset-html-webpack-plugin')

module.exports = {
    ...
    configureWebpack: {
        plugins: [
          new webpack.DllReferencePlugin({
            context: process.cwd(),
            manifest: require('./public/vendor/vendor-manifest.json')
          }),
          // 将 dll 注入到 生成的 html 模板中
          new AddAssetHtmlPlugin({
            // dll文件位置
            filepath: path.resolve(__dirname, './public/vendor/*.js'),
            // dll 引用路径
            publicPath: './vendor',
            // dll最终输出的目录
            outputPath: './vendor'
          })
        ]
    }
}
打包速度
-
打包前
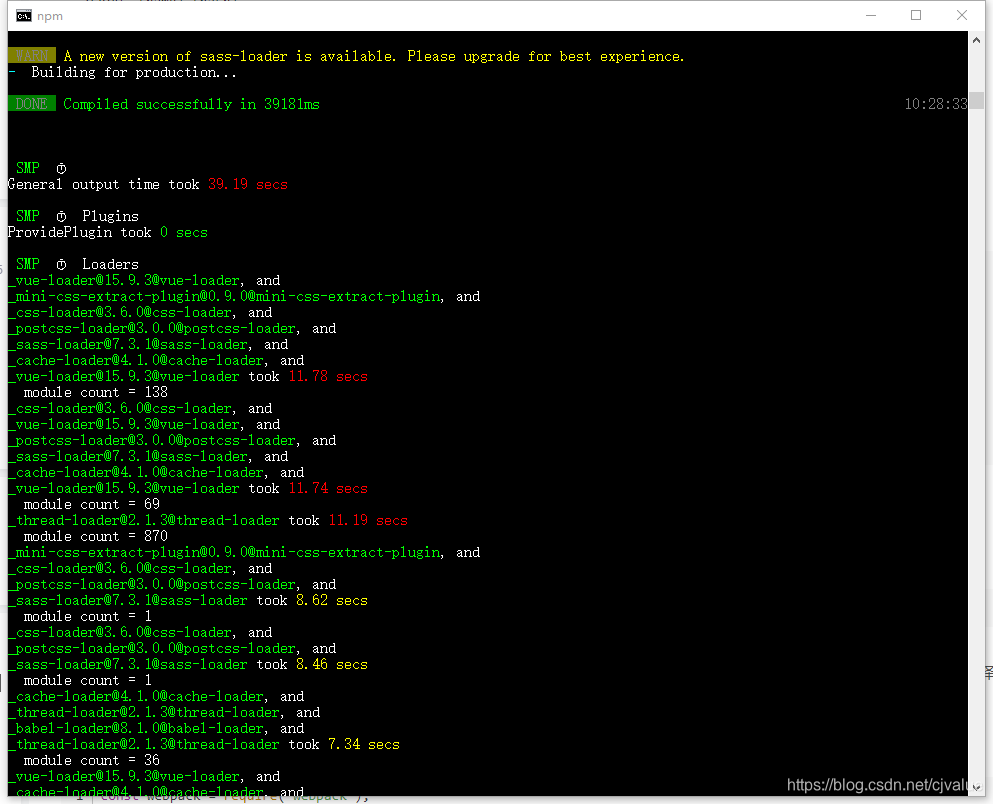
-
打包后
包大小(最大的包echarts被移出并预编译)
- 打包前
-
打包后
-
打包前
-
打包后
hard-source-webpack-plugin
HardSourceWebpackPlugin 为模块提供中间缓存步骤。为了查看结果,您需要使用此插件运行webpack两次:第一次构建将花费正常的时间。第二次构建将显着加快(大概提升90%的构建速度)
npm i webpack-bundle-analyzer -D
const HardSourceWebpackPlugin = require('hard-source-webpack-plugin')
module.exports = {
  configureWebpack: smp.wrap({
    plugins: [
      // 为模块提供中间缓存,缓存路径是:node_modules/.cache/hard-source
      new HardSourceWebpackPlugin(),
    ]
  })
}
tips: webpack5.0会把hard-source-webpack-plugin内置成一个配置。
三、多进程多实例构建,资源并行解析
-
webpack需要处理的文件是非常多的,构建过程是一个涉及大量文件读写的过程。项目复杂起来了,文件数量变多之后,webpack构建就会特别满,而且运行在nodeJS上的webpack是单线程模型的,也就是说Webpack一个时刻只能处理一个任务,不能同时处理多个任务。
-
文件读写和计算操作是无法避免的,那能不能让Webpack在同一时刻处理多个任务发挥多核CPU电脑的功能,以提升构建速度呢
多进程构建的方案比较知名的有以下三个
- thread-loader (推荐使用这个)
- HappyPack
- parallel-webpack
thread-loader
webpack4 官方提供了一个thread loader
把这个 loader 放置在其他 loader 之前, 放置在这个 loader 之后的 loader 就会在一个单独的 worker【worker pool】 池里运行,一个worker 就是一个nodeJS 进程【node.js proces】,每个单独进程处理时间上限为600ms,各个进程的数据交换也会限制在这个时间内。
配置长这样:
npm i thread-loader -D
module.exports = {
  configureWebpack: smp.wrap({
    module: {
      rules: [
        {
          test: /\.js$/,
          include: path.resolve("src"),
          use: [{
            loader: "thread-loader",
            // loaders with equal options will share worker pools
            // 设置同样option的loaders会共享
            options: {
              // worker的数量,默认是cpu核心数
              workers: 2,

              // 一个worker并行的job数量,默认为20
              workerParallelJobs: 50,

              // 添加额外的node js 参数
              workerNodeArgs: ['--max-old-space-size=1024'],

              // 允许重新生成一个dead work pool
              // 这个过程会降低整体编译速度
              // 开发环境应该设置为false

              poolRespawn: false,

              //空闲多少秒后,干掉work 进程
              // 默认是500ms
              // 当处于监听模式下,可以设置为无限大,让worker一直存在
              poolTimeout: 2000,

              // pool 分配给workder的job数量
              // 默认是200
              // 设置的越低效率会更低,但是job分布会更均匀
              poolParallelJobs: 50,

              // name of the pool
              // can be used to create different pools with elsewise identical options
              // pool 的名字
              //
              name: "my-pool"
            }
          },
          // your expensive loader (e.g babel-loader)
        ]}
      ]
    }
  })
}
经过测试,thread-loader 对于打包速度几乎没有影响,是因为它本身的额外开销导致,建议只在极高性能消耗的场景下使用
HappyPack
将任务分解给多个子进程去并发执行,子进程处理完后再将结果发给主进程
安装
npm i happypack -D
使用
const HappyPack = require('happypack');
const os = require('os');
const happyThreadPool = HappyPack.ThreadPool({ size: os.cpus().length });

module.exports = {
  configureWebpack: smp.wrap({
    plugins: [
      new HappyPack({
        id: 'babel',
        loaders: ['babel-loader?cacheDirectory=true'],
        threadPool: happyThreadPool
      })
    ]
  }),
  chainWebpack: config => {
		const jsRule = config.module.rule('js');
    jsRule.uses.clear();
    jsRule.use('happypack/loader?id=babel')
      .loader('happypack/loader?id=babel')
      .end();
	}
}
经过测试,在我们的项目中,对 js 和 ts 文件使用 happypack 收益最大
需要注意的是,Vue-loader 不支持 happypack
四、多进程多实例并行压缩
- 使用 parallel-uglify-plugin 插件
- uglifyjs-webpack-plugin 开启 parallel 参数
- terser-webpack-plugin 开启 parallel 参数 (推荐使用这个,支持 ES6 语法压缩)
uglifyjs-webpack-plugin
通过开启 cache 配置开启我们的缓存功能,也可以通过开启 parallel 开启多核编译功能
安装
npm i terser-webpack-plugin -D
使用
const UglifyJsPlugin = require('uglifyjs-webpack-plugin');

module.exports = {
  configureWebpack: smp.wrap({
    optimization: {
      minimizer: [
        new UglifyJsPlugin({
          uglifyOptions: {
            warnings: false,
            parse: {},
            // 删除console debugger 删除警告
            compress: {
              warnings: false,
              drop_console: true,//console
              drop_debugger: false,
              pure_funcs: ['console.log']//移除console
            },
            mangle: true,
            // 删除注释
            output:{
              comments:false
            },
            toplevel: false,
            nameCache: null,
            ie8: false,
            keep_fnames: false
          },
          cache: true,
          parallel: true
        })
      ]
    }
  })
}
五、其他
另外还有一些关于css打包体积的优化
抽离css
安装
npm install --save-dev mini-css-extract-plugin
使用
const MiniCssExtractPlugin = require('mini-css-extract-plugin');

module.exports = {
  plugins: [
    new MiniCssExtractPlugin({
      filename: 'css/[name].[contenthash:8].css'  // 将css文件统一放入css文件夹
    })
  ]
}
压缩css
安装
npm install -D optimize-css-assets-webpack-plugin
使用
const OptimizeCssAssetsWebpackPlugin = require('optimize-css-assets-webpack-plugin');

module.exports = {
  optimization: {
    minimize: true,
    minimizer: [
        new OptimizeCssAssetsWebpackPlugin()
    ]
  }
}
- 抽离css和压缩css后打包的速度
移除未使用的css
- 在大型项目中,经常会有很多样式内容,在代码中根本未使用,但是会被打包,这些样式需要打包时应该移除
安装
npm i purgecss-webpack-plugin -D
使用
const PurgecssWebpackPlugin = require('purgecss-webpack-plugin');
const glob = require('glob'); // 根据路径查找文件
module.exports = {
  plugins:[
    new PurgecssWebpackPlugin({ //paths要求是绝对路径
      paths: glob.sync(`${path.join(__dirname, 'src/**/*')}`, { nodir: true })
    })
  ]
}


 669
669

 被折叠的 条评论
为什么被折叠?
被折叠的 条评论
为什么被折叠?
 到【灌水乐园】发言


