在很多情况下,我们要给系统提供可配置化的支持,最简单的方式是直接通过spring的标准bean配置方式来配置。但是在配置复杂,参数很多的情况下,这样做会把配置变得很难理解和控制。 为了简化配置和替换配置文件的可读性,通过spring的可扩展Schema,实现自定义的schema是最好的方式。而motan在集成spring配置时正是采用这样的方式,通过扩展schema实现自定义和motan的初始化工作。
通用的实现方式如下:
1.xsd配置文件:
motan的xsd在工程motan-core中:
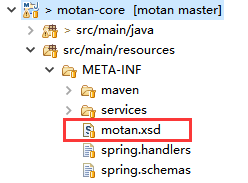
motan.xsd基于abstractConfig定义了abstractRegistryConfig、abstractInterfaceConfig、abstractProtocolConfig三种复杂类型,包括基本参数。 然后再定义对外标识元素:
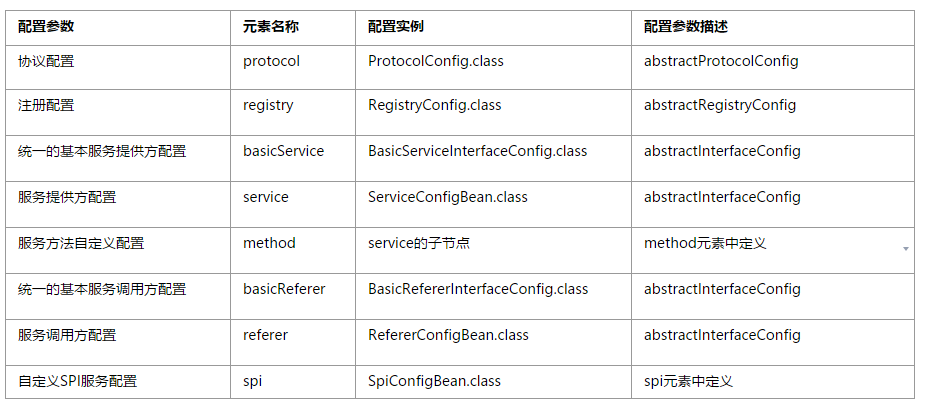
2.通过NamespaceHandler和BeanDefinitionParser完成解析工作
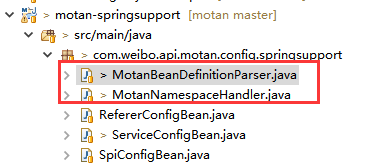
NamespaceHandler-------->MotanNamespaceHandler BeanDefinitionParser-->MotanBeanDefinitionParser MotanNamespaceHandler继承NamespaceHandlerSupport实现NamespaceHandler,根据schema的配置元素找到注册的BeanDefinitionParser解析器进行解析。 Motan没有为每一个元素单独定义解析器,而采用单一的MotanBeanDefinitionParser完成所有配置Bean的解析;通常我们也可以通过继承AbstractSingleBeanDefinitionParser为每个bean提供单独解析类来简化配置。
3.通过spring.handlers和spring.schemas串联起来
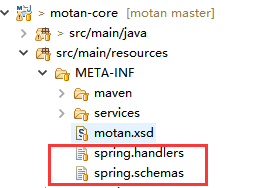
spring通过META-INF下的spring.handlers和spring.schemas这两个配置文件载入。 spring.handlers: http://api.weibo.com/schema/motan=com.weibo.api.motan.config.springsupport.MotanNamespaceHandler spring.schemas: http://api.weibo.com/schema/motan.xsd=META-INF/motan.xsd 通过配置文件内容可以很清楚的知道spring通过handlers注册所有自定义节点的解析,通过motan.xsd来约束节点的配置属性内容。
4.在实际的应用场景中的使用
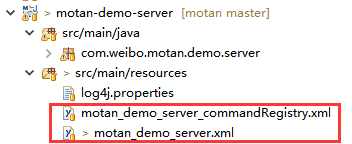
<!-- 业务具体实现类 -->
<bean id="motanDemoServiceImpl" class="com.weibo.motan.demo.server.MotanDemoServiceImpl"/>

<!-- 注册中心配置 使用不同注册中心需要依赖对应的jar包。如果不使用注册中心,可以把check属性改为false,忽略注册失败。-->
<!-- <motan:registry regProtocol="local" name="registry" />-->
<!--<motan:registry regProtocol="consul" name="registry" address="127.0.0.1:8500"/>-->
<motan:registry regProtocol="zookeeper" name="registry" address="192.168.1.220:2181" connectTimeout="2000"/>

<!-- 协议配置。为防止多个业务配置冲突,推荐使用id表示具体协议。-->
<motan:protocol id="demoMotan" default="true" name="motan"
                maxServerConnection="80000" maxContentLength="1048576"
                maxWorkerThread="800" minWorkerThread="20"/>

<!-- 通用配置,多个rpc服务使用相同的基础配置. group和module定义具体的服务池。export格式为“protocol id:提供服务的端口”-->
<motan:basicService export="demoMotan:8002"
                    group="motan-demo-rpc" accessLog="false" shareChannel="true" module="motan-demo-rpc"
                    application="myMotanDemo" registry="registry" id="serviceBasicConfig"/>

<!-- 具体rpc服务配置,声明实现的接口类。-->
<motan:service interface="com.weibo.motan.demo.service.MotanDemoService"
               ref="motanDemoServiceImpl" export="demoMotan:8001" basicService="serviceBasicConfig">
</motan:service>
<motan:service interface="com.weibo.motan.demo.service.MotanDemoService"
               ref="motanDemoServiceImpl" export="demoMotan:8002" basicService="serviceBasicConfig">
</motan:service>
5.Motan配置扩展说明
motan在xml配置解析完成后,通过spring内置接口的实现,完成自动初始化配置,自动导出服务和关闭服务功能。
ServiceConfigBean.class继承扩展了ServiceConfig.class
1)通过实现InitializingBean接口,完成后续初始化工作:
 @Override
    public void afterPropertiesSet() throws Exception {
        // 注意:basicConfig需要首先配置,因为其他可能会依赖于basicConfig的配置
        checkAndConfigBasicConfig();
        checkAndConfigExport();
        checkAndConfigRegistry();
    }
2)通过实现ApplicationListener<ContextRefreshedEvent>接口,在系统初始化完成后自动导出服务:
@Override
   public void onApplicationEvent(ContextRefreshedEvent event) {
       if (!getExported().get()) {
           export();
       }
   }
3)通过实现DisposableBean接口,实现在系统停止时候关闭服务。
@Override
    public void destroy() throws Exception {
        unexport();
    }
RefererConfigBean.class 继承了 RefererConfig<T>.class
1)都是以单例模式运行
 @Override
    public boolean isSingleton() {
        return true;
    }
2)通过实现InitializingBean接口,完成服务调用方配置初始化工作
@Override
    public void afterPropertiesSet() throws Exception {
        // basicConfig需要首先配置,因为其他可能会依赖于basicConfig的配置
        checkAndConfigBasicConfig();
        checkAndConfigProtocols();
        checkAndConfigRegistry();
    }
3)复写了获取服务调用方实例,通过JDKProxy远程调用服务实例。很关键!
  @Override
    public T getObject() throws Exception {
        return getRef();
    }
SpiConfigBean.class继承扩展了SpiConfig.class
可以参考我写的另外一篇关于SPI服务模式的博文《motan源码解读之--SPI(Service Provider Interface)实现方式浅析》。
通过实现InitializingBean接口,完成后续初始化工作,将服务实例导入到SPI中,而不是通过SPI配置方式导入。
@Override
    public void afterPropertiesSet() throws Exception {
        ExtensionLoader.getExtensionLoader(getInterfaceClass()).addExtensionClass(getSpiClass());
    }


 Motan通过自定义Schema简化Spring配置,实现微服务的注册、发现与调用。利用MotanNamespaceHandler和MotanBeanDefinitionParser解析配置,自动初始化、导出与关闭服务。


 144
144

 被折叠的 条评论
为什么被折叠?


