


 本文详细介绍如何在Eclipse和MySQL环境下快速搭建Activiti工作流平台,包括环境配置、单元测试及基本服务获取方法。
开发环境搭建
下面将用最精炼的语言介绍如何快速搭建activiti环境。本次环境搭建是基于eclipse+MySQL+activiti。
1)首先确定你的电脑已经有eclipse开发工具和MySQL。如果没有则自行安装。
2)下载activiti所需要的jar包。可以去官网下载。
3)在eclipse里新建一个web工程(当然其他工程也没问题,web工程方便以后的开发测试)。
4)解压上面链接所下载的压缩包,将文件夹“activiti环境所需jar包”下的所有jar包copy到项目的WEB-INF/lib目录里即可,此时已经包含一个web工程所需要的环境。如果不想全部copy,需要根据自己的需求挑选出一部分jar放入。
5)在MySQL终端输入 create database activiti;创建一个项目所需的数据库。
6)src目录下创建activiti默认的配置文件activiti.cfg.xml,只是搭建最简单的环境,如果需要整合其他框架,还需要加入其他的配置项。
<beans xmlns="http://www.springframework.org/schema/beans" xmlns:context="http://www.springframework.org/schema/context" xmlns:tx="http://www.springframework.org/schema/tx" xmlns:xsi="http://www.w3.org/2001/XMLSchema-instance" xsi:schemaLocation="http://www.springframework.org/schema/beans http://www.springframework.org/schema/beans/spring-beans.xsd http://www.springframework.org/schema/context http://www.springframework.org/schema/context/spring-context-2.5.xsd http://www.springframework.org/schema/tx http://www.springframework.org/schema/tx/spring-tx-3.0.xsd">
    <!-- 配置外部数据库连接信息-->
    <context:property-placeholder location="classpath:mysql.properties"/>
    <bean id="processEngineConfiguration" class="org.activiti.engine.impl.cfg.StandaloneProcessEngineConfiguration">
        <!-- 连接数据的配置 -->
        <property name="jdbcDriver" value="${jdbc.driverClassName}"></property>
        <property name="jdbcUrl" value="${jdbc.url}"></property>
        <property name="jdbcUsername" value="${jdbc.user}"></property>
        <property name="jdbcPassword" value="${jdbc.pass}"></property>
        <!-- 没有表创建表 -->
        <property name="databaseSchemaUpdate" value="true"></property>
    </bean>
</beans>
单元环境测试
曾经用过的单元测试的小伙伴可以直接跳过这里。
创建方法:new->other->Junit Test Case.如下图所示: 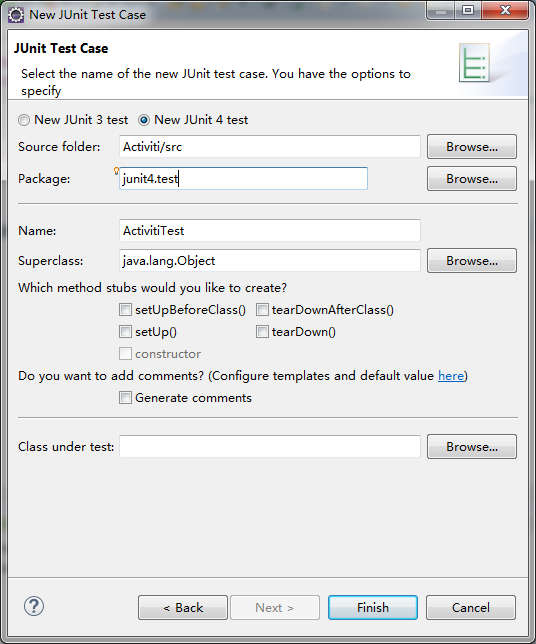
下面使用Junit4进行单元测试activiti环境。首先创建一个方法测试环境搭建是否正常:
    @Test
    public void testActivitiEnv()
    {
        ApplicationContext applicationContext = new ClassPathXmlApplicationContext("classpath:activiti.cfg.xml");
        ProcessEngineConfiguration processEngineConfiguration =  (ProcessEngineConfiguration) applicationContext.getBean("processEngineConfiguration");
        ProcessEngine processEngine = processEngineConfiguration.buildProcessEngine();
        System.err.println(processEngine);
}如果单元测试没有报错,并且输出org.activiti.engine.impl.ProcessEngineImpl@66fa8492表示正常。此时查看数据库activiti就会发现自动创建了23张表,如图所示: 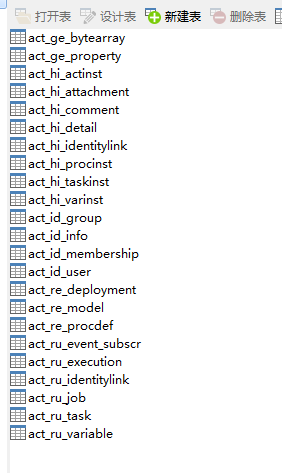
具体23张表示做什么的,以后再谈。
activiti工作流最重要的就是如何部署一个任务,发布任务,完成任务及查询历史活动等。所有的这些都需要获取相应的service完成。
在获取这些service时,最核心的就是获取到ProcessEngine.下面在单元测试中演示如何获取各个service:
@Test
    public void getService()
    {
        ApplicationContext applicationContext = new ClassPathXmlApplicationContext("classpath:activiti.cfg.xml");
        ProcessEngineConfiguration processEngineConfiguration =  (ProcessEngineConfiguration) applicationContext.getBean("processEngineConfiguration");
        ProcessEngine processEngine = processEngineConfiguration.buildProcessEngine();
        RepositoryService repositoryService = processEngine.getRepositoryService();
        RuntimeService runtimeService  = processEngine.getRuntimeService();
        TaskService  taskService =  processEngine.getTaskService();
        HistoryService historyService = processEngine.getHistoryService();
        IdentityService identityService = processEngine.getIdentityService();
        FormService formService = processEngine.getFormService();
        System.out.println(repositoryService);
        System.out.println(runtimeService);
        System.out.println(taskService);
        System.out.println(historyService);
        System.out.println(identityService);
        System.out.println(formService);
    }
运行结果如下: 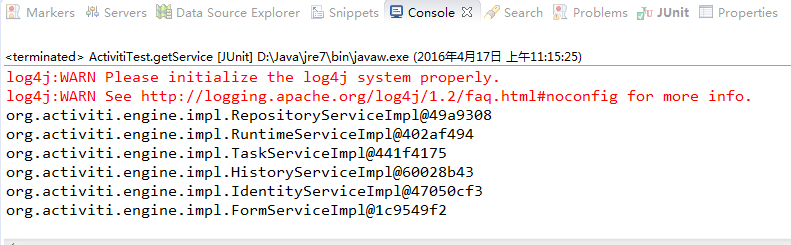
出现上述结果则表示可以创建各类service。
总结
本文主要是介绍如何搭建activiti环境,具体的activiti学习流程将在以后的时间内慢慢介绍。同学习,共进步!
本次测试的项目:http://download.youkuaiyun.com/detail/u010989191/9493583。


 被折叠的 条评论
为什么被折叠?
被折叠的 条评论
为什么被折叠?
 到【灌水乐园】发言


