


 本文介绍了如何通过在Java对象类上添加@JsonInclude(JsonInclude.Include.NON_NULL)注解,来过滤接口响应中值为null的字段。示例展示了在ResponseObj类和Controller层方法中应用该注解,从而优化返回结果,减少不必要的空值信息。
在写项目时,有时候会希望在接口层返回的字段中过滤掉为null值的字段,可以在返回的对象类上加上注解@JsonInclude(JsonInclude.Include.NON_NULL)
举例如下:
1、自定义返回方法体:
import com.fasterxml.jackson.annotation.JsonInclude;
import com.fasterxml.jackson.annotation.JsonInclude.Include;

@JsonInclude(Include.NON_EMPTY)
public class ResponseObj<T> {
    private T result;
    private Integer code;
    private String msg;

    public ResponseEnvelope(T result) {
        this.result = result;
        this.code = 200;
    }

    public T getResult() {
        return result;
    }

    public void setResult(T result) {
        this.result = result;
    }

    public Integer getCode() {
        return code;
    }

    public void setCode(Integer code) {
        this.code = code;
    }

    public String getMsg() {
        return msg;
    }

    public void setMsg(String msg) {
        this.msg = msg;
    }
}
Controller层接口方法:
@GetMapping("/param/stu")
public ResponseEntity<ResponseObj<Stu>> StuTest(@RequestParam Long id){
LOG.info("进入控制层");
Stu stu = stuService.selectById(id);
ResponseObj<Stu> response = new ResponseObj<>(stu);
return new ResponseEntity<>(response, HttpStatus.OK);
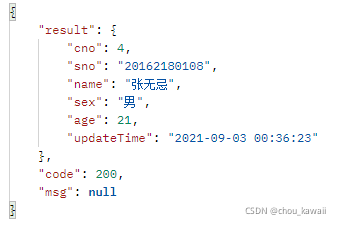
}返回结果:
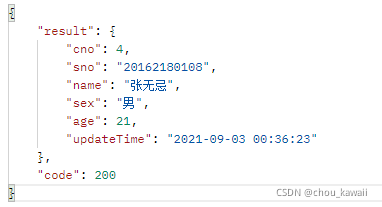
如果没有加上注解@JsonInclude(JsonInclude.Include.NON_NULL)的话,返回结果:


 935
935

 被折叠的 条评论
为什么被折叠?
被折叠的 条评论
为什么被折叠?
 到【灌水乐园】发言


