


 本文介绍了如何自定义Spring Boot的starter,以减少重复配置。首先,创建包含所需功能的类并打包。接着,建立starter项目,配置gradle,生成metadata文件以提供配置提示。最后,演示了如何在新项目中使用该starter并进行测试。
自定义starter可以减少配置类的编写,比如我自定义了某个配置类,需要一些属性的配置,然后在多个模块中引用的话,那么都需要加入这个配置类的信息,常见的是通过@Configration注解来使用,或者是使用xml的方式,但是
其实对于各个模块来说,这个信息是重复的,可以公用,那么可以自定义一个starter来引入。
1、编写你需要引入的功能。比如我这里就是想引入MyWife这个实列。你可以通过@Configuartion这个注解直接引入,这里演示通过自定义starter的方式引入。
这个最简单,就是创建一个gradle项目,然后编写你需要引入的类的功能就可以。
package cn.caraliu;

public class MyWife {

    private String msg;

    public String getMsg() {
        return msg;
    }

    public void setMsg(String msg) {
        this.msg = msg;
    }

    public void say(){
        System.out.println("hello...");
        System.out.println("msg..."+msg);
    }
}
为了建单起见,我直接就定义一个类:然后设置一个msg的属性,可以进行设置。
gradle的配置文件要注意: apply plugin: 'maven' 这个配置要加入,用于打包,不然idea中没有install这个选项。
plugins {
    id 'java'
}

group 'org.example'
version '1.0-SNAPSHOT'
apply plugin: 'maven'
repositories {
    mavenCentral()
}

dependencies {
    testCompile group: 'junit', name: 'junit', version: '4.12'
}
然后点击:install, 可以打印除相应的包: 可以通过: implementation group: 'org.example', name: 'my-demo', version: '1.0-SNAPSHOT' 引入这个打好的包。注意这里的implementation是指当前项目用,打包的时候不引入这个模块。
2、编写starter
创建一个gradle项目:gradle的配置文件:
plugins {
    id 'java'
}

group 'org.example'
version '1.0-SNAPSHOT'
apply plugin: 'maven'
repositories {
    mavenLocal()
    mavenCentral()
}

dependencies {
    testCompile group: 'junit', name: 'junit', version: '4.12'
    annotationProcessor group: 'org.springframework.boot', name: 'spring-boot-configuration-processor', version: '2.3.3.RELEASE'
    implementation group: 'org.example', name: 'my-demo', version: '1.0-SNAPSHOT'
    compile group: 'org.springframework.boot', name: 'spring-boot-starter', version: '2.3.3.RELEASE'
}
注意要引入: apply plugin: 'maven' 用于打包
annotationProcessor group: 'org.springframework.boot', name: 'spring-boot-configuration-processor', version: '2.3.3.RELEASE' 这个配置用于生成:spring-configuration-metadata.json这个文件,帮助写yml的配置文件的时候有提示的作用。
注意annotationProcessor 这个不能使用compile等其他,不然还是无法生成spring-configuration-metadata.json这个文件,还要注意属性要有get set 方法。同时idea 的设置中,要Annotation enable勾选上。
implementation group: 'org.example', name: 'my-demo', version: '1.0-SNAPSHOT' 这个配置是指这个demo包只在当前项目使用,打包时不引入。
mavenLocal() 通过本地仓库引入jar包,因为我们前面的demo这个包是打包到本地的,所以要加入这个。
定义properties文件的对应类。前缀以caraliu开头
package cn.yishijie;

import org.springframework.boot.context.properties.ConfigurationProperties;

@ConfigurationProperties(prefix = MyProperties.CARALIU_PREFIX)
public class MyProperties {

    public static final String CARALIU_PREFIX = "caraliu";
    private Boolean enable;
    private String address;
    private String mobile;


    public Boolean getEnable() {
        return enable;
    }

    public void setEnable(Boolean enable) {
        this.enable = enable;
    }

    public Boolean isEnable() {
        return enable;
    }

    public String getAddress() {
        return address;
    }

    public void setAddress(String address) {
        this.address = address;
    }

    public String getMobile() {
        return mobile;
    }

    public void setMobile(String mobile) {
        this.mobile = mobile;
    }
}
配置处理类:
package cn.yishijie;

import cn.caraliu.MyWife;
import org.springframework.beans.factory.annotation.Autowired;
import org.springframework.boot.autoconfigure.condition.ConditionalOnClass;
import org.springframework.boot.autoconfigure.condition.ConditionalOnMissingBean;
import org.springframework.boot.context.properties.EnableConfigurationProperties;
import org.springframework.context.annotation.Bean;
import org.springframework.context.annotation.Configuration;

@Configuration
@ConditionalOnClass(MyProperties.class)
@EnableConfigurationProperties(MyProperties.class)
public class MyAutoConfig {


    @Autowired
    private MyProperties properties;

    @Bean
    @ConditionalOnMissingBean
    MyWife myWife() {
        MyWife myWife = new MyWife();
        if (properties.isEnable() != null && properties.isEnable()) {
            myWife.setMsg("地址:"+properties.getAddress()+" "+"电话:" + properties.getMobile()+"合并");
            return myWife;
        }
        // 没有开启:所以不注入这个bean
        return null;
    }
}
这里可以看到如果属性enable没有设置的话,这个类时不会注入进来的。
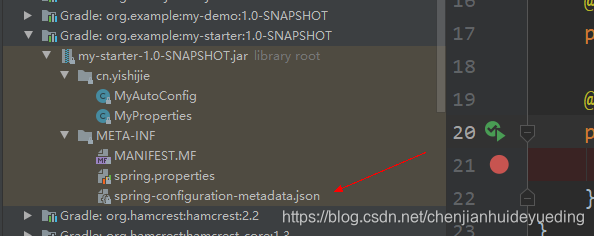
然后在source的文件夹下面创建目录: META-INF ,再创建文件spring.factories,加上内容: 这里要全类名
org.springframework.boot.autoconfigure.EnableAutoConfiguration=\
cn.yishijie.MyAutoConfig
@ConditionalOnMissingBean 这个注解建议加上,因为如果你的自动装配不满足别人需要的配置的时候,别人可以进行手动配置,如果没有这个的话,会报错:
Invalid bean definition with name 'myWife' defined in class path resource [cn/yishijie/MyAutoConfig.class]: Cannot register bean definition [Root bean: class [null]; scope=; abstract=false; lazyInit=null; autowireMode=3; dependencyCheck=0; autowireCandidate=true; primary=false; factoryBeanName=myAutoConfig; factoryMethodName=myWife; initMethodName=null; destroyMethodName=(inferred); defined in class path resource [cn/yishijie/MyAutoConfig.class]] for bean 'myWife': There is already [Root bean: class [null]; scope=; abstract=false; lazyInit=null; autowireMode=3; dependencyCheck=0; autowireCandidate=true; primary=false; factoryBeanName=myConfig; factoryMethodName=myWife; initMethodName=null; destroyMethodName=(inferred); defined in class path resource [cn/yishijie/config/MyConfig.class]] bound.
如果有这个注解,那么运用会优先启用别人手动的配置。@EnableConfigurationProperties(MyProperties.class) 用于处理配置的属性类。你在yml文件配置某些属性的时候,如果这个匹配到的话,会将值设置到这个属性类中。
@ConditionalOnClass(MyProperties.class) 当这个类MyProperties存在的时候,才启动MyAutoConfig 这个类,可以配置多个。
然后可以进行打包。
3、使用上述的jar包,测试功能
还是创建一个gradle项目:配置文件:
plugins {
    id 'java'
}

group 'org.example'
version '1.0-SNAPSHOT'

repositories {
    mavenLocal()
    mavenCentral()
}

dependencies {
    testCompile group: 'junit', name: 'junit', version: '4.12'
    compile group: 'org.example', name: 'my-demo', version: '1.0-SNAPSHOT'
    compile group: 'org.example', name: 'my-starter', version: '1.0-SNAPSHOT'
    testCompile group: 'org.springframework.boot', name: 'spring-boot-starter-test', version: '2.3.3.RELEASE'
    compile group: 'org.springframework.boot', name: 'spring-boot-starter', version: '2.3.3.RELEASE'
}
可以发现两个包都已经导入:其中对应的spring-configuration-metadata.json主要是用于yml或者properties文件的提示功能。比如下面图:
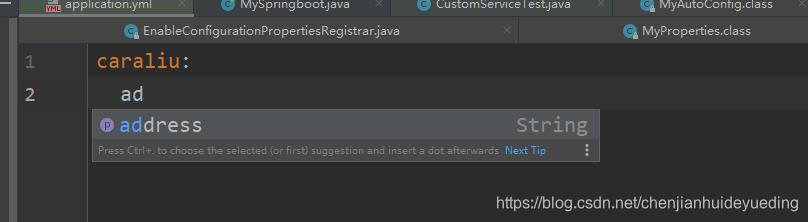
打入ad会提示出对应的属性。
加入属性的配置:application.yml
caraliu:
  address: 最美的不是下雨天
  mobile: 123456
  enable: true
package cn.yishijie;
import org.springframework.boot.SpringApplication;
import org.springframework.boot.autoconfigure.SpringBootApplication;
@SpringBootApplication
public class MySpringboot {
public static void main(String[] args) {
SpringApplication.run(MySpringboot.class, args);
}
}package cn.yishijie;
import cn.caraliu.MyWife;
import org.junit.Test;
import org.junit.runner.RunWith;
import org.springframework.beans.factory.annotation.Autowired;
import org.springframework.boot.autoconfigure.EnableAutoConfiguration;
import org.springframework.boot.test.context.SpringBootTest;
import org.springframework.test.context.junit4.SpringRunner;
@RunWith(SpringRunner.class)
@SpringBootTest(classes = {MySpringboot.class})
@EnableAutoConfiguration
public class CustomServiceTest {
@Autowired
private MyWife myWife;
@Test
public void sayHello(){
myWife.say();
}
}执行单元测试: 打印出结果:
hello...
msg...地址:最美的不是下雨天 电话:123456合并


 3885
3885

 被折叠的 条评论
为什么被折叠?
被折叠的 条评论
为什么被折叠?
 到【灌水乐园】发言


