


 本文详细介绍Spring框架中加载和使用Properties配置文件的多种方法,包括直接注入值、使用FactoryBean及自定义工具类等方式。
public class PropertiesFactoryBeanextends PropertiesLoaderSupportimplements FactoryBean, InitializingBean
Allows for making a properties file from a classpath location available as Properties instance in a bean factory. Can be used to populate any bean property of type Properties via a bean reference.
Supports loading from a properties file and/or setting local properties on this FactoryBean. The created Properties instance will be merged from loaded and local values. If neither a location nor local properties are set, an exception will be thrown on initialization.
Can create a singleton or a new object on each request. Default is a singleton.
一个系统中通常会存在如下一些以Properties形式存在的配置文件
1.数据库配置文件demo-db.properties:
database.url=jdbc:mysql://localhost/smaple
database.driver=com.mysql.jdbc.Driver
database.user=root
database.password=123
2.消息服务配置文件demo-mq.properties:
#congfig of ActiveMQ
mq.java.naming.factory.initial=org.apache.activemq.jndi.ActiveMQInitialContextFactory
mq.java.naming.provider.url=failover:(tcp://localhost:61616?soTimeout=30000&connectionTimeout=30000)?jms.useAsyncSend=true&timeout=30000
mq.java.naming.security.principal=
mq.java.naming.security.credentials=
jms.MailNotifyQueue.consumer=5
3.远程调用的配置文件demo-remote.properties:
remote.ip=localhost
remote.port=16800
remote.serviceName=test
一、系统中需要加载多个Properties配置文件
应用场景:Properties配置文件不止一个,需要在系统启动时同时加载多个Properties文件。
配置方式:
<?xml version="1.0" encoding="UTF-8"?>
<beans xmlns="http://www.springframework.org/schema/beans"
    xmlns:xsi="http://www.w3.org/2001/XMLSchema-instance"
    xsi:schemaLocation="
    http://www.springframework.org/schema/beans http://www.springframework.org/schema/beans/spring-beans-3.0.xsd">

    <!-- 将多个配置文件读取到容器中,交给Spring管理 -->
    <bean id="propertyConfigurer" class="org.springframework.beans.factory.config.PropertyPlaceholderConfigurer">
        <property name="locations">
           <list>
              <!-- 这里支持多种寻址方式:classpath和file -->
              <value>classpath:/opt/demo/config/demo-db.properties</value>
              <!-- 推荐使用file的方式引入,这样可以将配置和代码分离 -->
              <value>file:/opt/demo/config/demo-mq.properties</value>
              <value>file:/opt/demo/config/demo-remote.properties</value>
            </list>
        </property>
    </bean>

    <!-- 使用MQ中的配置 -->
    <bean id="MQJndiTemplate" class="org.springframework.jndi.JndiTemplate">
        <property name="environment">
            <props>
                <prop key="java.naming.factory.initial">${mq.java.naming.factory.initial}</prop>
                <prop key="java.naming.provider.url">${mq.java.naming.provider.url}</prop>
                <prop key="java.naming.security.principal">${mq.java.naming.security.principal}</prop>
                <prop key="java.naming.security.credentials">${mq.java.naming.security.credentials}</prop>
                <prop key="userName">${mq.java.naming.security.principal}</prop>
                <prop key="password">${mq.java.naming.security.credentials}</prop>
            </props>
        </property>
    </bean>
</beans>
我们也可以将配置中的List抽取出来:
<?xml version="1.0" encoding="UTF-8"?>
<beans xmlns="http://www.springframework.org/schema/beans"
    xmlns:xsi="http://www.w3.org/2001/XMLSchema-instance"
    xsi:schemaLocation="
    http://www.springframework.org/schema/beans http://www.springframework.org/schema/beans/spring-beans-3.0.xsd">

    <!-- 将多个配置文件位置放到列表中 -->
    <bean id="propertyResources" class="java.util.ArrayList">
        <constructor-arg>
            <list>
              <!-- 这里支持多种寻址方式:classpath和file -->
              <value>classpath:/opt/demo/config/demo-db.properties</value>
              <!-- 推荐使用file的方式引入,这样可以将配置和代码分离 -->
              <value>file:/opt/demo/config/demo-mq.properties</value>
              <value>file:/opt/demo/config/demo-remote.properties</value>
            </list>
        </constructor-arg>
    </bean>

    <!-- 将配置文件读取到容器中,交给Spring管理 -->
    <bean id="propertyConfigurer" class="org.springframework.beans.factory.config.PropertyPlaceholderConfigurer">
        <property name="locations" ref="propertyResources" />
    </bean>

    <!-- 使用MQ中的配置 -->
    <bean id="MQJndiTemplate" class="org.springframework.jndi.JndiTemplate">
        <property name="environment">
            <props>
                <prop key="java.naming.factory.initial">${mq.java.naming.factory.initial}</prop>
                <prop key="java.naming.provider.url">${mq.java.naming.provider.url}</prop>
                <prop key="java.naming.security.principal">${mq.java.naming.security.principal}</prop>
                <prop key="java.naming.security.credentials">${mq.java.naming.security.credentials}</prop>
                <prop key="userName">${mq.java.naming.security.principal}</prop>
                <prop key="password">${mq.java.naming.security.credentials}</prop>
            </props>
        </property>
    </bean>
</beans>
二、整合多工程下的多个分散的Properties
应用场景:工程组中有多个配置文件,但是这些配置文件在多个地方使用,所以需要分别加载。
配置如下:
<?xml version="1.0" encoding="UTF-8"?>
<beans xmlns="http://www.springframework.org/schema/beans"
    xmlns:xsi="http://www.w3.org/2001/XMLSchema-instance"
    xmlns:p="http://www.springframework.org/schema/p"
    xsi:schemaLocation="
    http://www.springframework.org/schema/beans http://www.springframework.org/schema/beans/spring-beans-3.0.xsd">

    <!-- 将DB属性配置文件位置放到列表中 -->
    <bean id="dbResources" class="java.util.ArrayList">
        <constructor-arg>
        <list>
            <value>file:/opt/demo/config/demo-db.properties</value>
        </list>
        </constructor-arg>
    </bean>

    <!-- 将MQ属性配置文件位置放到列表中 -->
    <bean id="mqResources" class="java.util.ArrayList">
        <constructor-arg>
        <list>
            <value>file:/opt/demo/config/demo-mq.properties</value>
        </list>
        </constructor-arg>
    </bean>

    <!-- 用Spring加载和管理DB属性配置文件 -->
    <bean id="dbPropertyConfigurer" class="org.springframework.beans.factory.config.PropertyPlaceholderConfigurer">
        <property name="order" value="1" />
        <property name="ignoreUnresolvablePlaceholders" value="true" />
        <property name="locations" ref="dbResources" />
    </bean>

    <!-- 用Spring加载和管理MQ属性配置文件 -->
    <bean id="mqPropertyConfigurer" class="org.springframework.beans.factory.config.PropertyPlaceholderConfigurer">
        <property name="order" value="2" />
        <property name="ignoreUnresolvablePlaceholders" value="true" />
        <property name="locations" ref="mqResources" />
    </bean>

    <!-- 使用DB中的配置属性 -->
    <bean id="rmsDataSource" class="org.apache.commons.dbcp.BasicDataSource" destroy-method="close"
        p:driverClassName="${demo.db.driver}" p:url="${demo.db.url}" p:username="${demo.db.username}"
        p:password="${demo.db.password}" pp:maxActive="${demo.db.maxactive}"p:maxWait="${demo.db.maxwait}"
        p:poolPreparedStatements="true" p:defaultAutoCommit="false">
    </bean>

    <!-- 使用MQ中的配置 -->
    <bean id="MQJndiTemplate" class="org.springframework.jndi.JndiTemplate">
        <property name="environment">
            <props>
                <prop key="java.naming.factory.initial">${mq.java.naming.factory.initial}</prop>
                <prop key="java.naming.provider.url">${mq.java.naming.provider.url}</prop>
                <prop key="java.naming.security.principal">${mq.java.naming.security.principal}</prop>
                <prop key="java.naming.security.credentials">${mq.java.naming.security.credentials}</prop>
                <prop key="userName">${mq.java.naming.security.principal}</prop>
                <prop key="password">${mq.java.naming.security.credentials}</prop>
            </props>
        </property>
    </bean>
</beans>
注意:其中order属性代表其加载顺序,而ignoreUnresolvablePlaceholders为是否忽略不可解析的 Placeholder,如配置了多个PropertyPlaceholderConfigurer,则需设置为true。这里一定需要按照这种方式设置这两个参数。
三、Bean中直接注入Properties配置文件中的值
应用场景:Bean中需要直接注入Properties配置文件中的值 。例如下面的代码中需要获取上述demo-remote.properties中的值:
public class Client() {
private String ip;
private String port;
private String service;
}
配置如下:
<?xml version="1.0" encoding="UTF-8"?>
<beans xmlns="<a href="http://www.springframework.org/schema/beans">http://www.springframework.org/schema/beans</a>"
 xmlns:xsi="<a href="http://www.w3.org/2001/XMLSchema-instance">http://www.w3.org/2001/XMLSchema-instance</a>"
 xmlns:util="<a href="http://www.springframework.org/schema/util">http://www.springframework.org/schema/util</a>"
 xsi:schemaLocation="
 <a href="http://www.springframework.org/schema/beans">http://www.springframework.org/schema/beans</a> <a href="http://www.springframework.org/schema/beans/spring-beans-3.0.xsd">http://www.springframework.org/schema/beans/spring-beans-3.0.xsd</a>
 <a href="http://www.springframework.org/schema/util">http://www.springframework.org/schema/util</a> <a href="http://www.springframework.org/schema/util/spring-util-3.0.xsd">http://www.springframework.org/schema/util/spring-util-3.0.xsd</a>">

 <!-- 这种加载方式可以在代码中通过@Value注解进行注入,
 可以将配置整体赋给Properties类型的类变量,也可以取出其中的一项赋值给String类型的类变量 -->
 <!-- <util:properties/> 标签只能加载一个文件,当多个属性文件需要被加载的时候,可以使用多个该标签 -->
 <util:properties id="remoteSettings" location="file:/opt/demo/config/demo-remote.properties" />

 <!-- <util:properties/> 标签的实现类是PropertiesFactoryBean,
 直接使用该类的bean配置,设置其locations属性可以达到一个和上面一样加载多个配置文件的目的 -->
 <bean id="settings"
   class="org.springframework.beans.factory.config.PropertiesFactoryBean">
   <property name="locations">
  <list>
    <value>file:/opt/rms/config/rms-mq.properties</value>
    <value>file:/opt/rms/config/rms-env.properties</value>
  </list>
   </property>
 </bean>
</beans>
Client类中使用Annotation如下:
import org.springframework.beans.factory.annotation.Value;

public class Client() {
    @Value("#{remoteSettings['remote.ip']}")
    private String ip;
    @Value("#{remoteSettings['remote.port']}")
    private String port;
    @Value("#{remoteSettings['remote.serviceName']}")
    private String service;
}
四、Bean中存在Properties类型的类变量
应用场景:当Bean中存在Properties类型的类变量需要以注入的方式初始化
1. 配置方式:我们可以用(三)中的配置方式,只是代码中注解修改如下
import org.springframework.beans.factory.annotation.Value;
import org.springframework.beans.factory.annotation.Autowired;

public class Client() {
    @Value("#{remoteSettings}")
    private Properties remoteSettings;
}
2. 配置方式:也可以使用xml中声明Bean并且注入
<?xml version="1.0" encoding="UTF-8"?>
<beans xmlns="http://www.springframework.org/schema/beans"
    xmlns:xsi="http://www.w3.org/2001/XMLSchema-instance"
    xsi:schemaLocation="
    http://www.springframework.org/schema/beans http://www.springframework.org/schema/beans/spring-beans-3.0.xsd">

    <!-- 可以使用如下的方式声明Properties类型的FactoryBean来加载配置文件,这种方式就只能当做Properties属性注入,而不能获其中具体的值 -->
    <bean id="remoteConfigs" class="org.springframework.beans.factory.config.PropertiesFactoryBean">
        <property name="locations">
            <list>
                <value>file:/opt/demo/config/demo-remote.properties</value>
            </list>
        </property>
    </bean>


<!-- 远端调用客户端类 -->
    <bean id="client" class="com.demo.remote.Client">
        <property name="properties" ref="remoteConfigs" />
    </bean>
</beans>
代码如下:
import org.springframework.beans.factory.annotation.Autowired;

public class Client() {
    //@Autowired也可以使用
    private Properties remoteSettings;

    //getter setter
}
上述的各个场景在项目群中特别有用,需要灵活的使用上述各种配置方式。
原文:http://kingxss.iteye.com/blog/1880681
五种方式让你在java中读取properties文件内容不再是难题
一、背景
最近,在项目开发的过程中,遇到需要在properties文件中定义一些自定义的变量,以供java程序动态的读取,修改变量,不再需要修改代码的问题。就借此机会把Spring+SpringMVC+Mybatis整合开发的项目中通过java程序读取properties文件内容的方式进行了梳理和分析,先和大家共享。
二、项目环境介绍
Spring 4.2.6.RELEASE
SpringMvc 4.2.6.RELEASE
Mybatis 3.2.8
Maven 3.3.9
Jdk 1.7
Idea 15.04
三、五种实现方式
方式1.通过context:property-placeholder加载配置文件jdbc.properties中的内容
<context:property-placeholder location="classpath:jdbc.properties" ignore-unresolvable="true"/>上面的配置和下面配置等价,是对下面配置的简化
<bean id="propertyConfigurer" class="org.springframework.beans.factory.config.PropertyPlaceholderConfigurer">
   <property name="ignoreUnresolvablePlaceholders" value="true"/>
   <property name="locations">
      <list>
         <value>classpath:jdbc.properties</value>
      </list>
    </property>
</bean>注意:这种方式下,如果你在spring-mvc.xml文件中有如下配置,则一定不能缺少下面的红色部分,关于它的作用以及原理,参见另一篇博客:context:component-scan标签的use-default-filters属性的作用以及原理分析
<!-- 配置组件扫描,springmvc容器中只扫描Controller注解 -->
<context:component-scan base-package="com.hafiz.www" use-default-filters="false">
    <context:include-filter type="annotation" expression="org.springframework.stereotype.Controller"/>
</context:component-scan>方式2.使用注解的方式注入,主要用在java代码中使用注解注入properties文件中相应的value值
<bean id="prop" class="org.springframework.beans.factory.config.PropertiesFactoryBean">
   <!-- 这里是PropertiesFactoryBean类,它也有个locations属性,也是接收一个数组,跟上面一样 -->
   <property name="locations">
       <array>
          <value>classpath:jdbc.properties</value>
       </array>
   </property>
</bean>方式3.使用util:properties标签进行暴露properties文件中的内容
<util:properties id="propertiesReader" location="classpath:jdbc.properties"/>注意:使用上面这行配置,需要在spring-dao.xml文件的头部声明以下红色的部分
<beans xmlns="http://www.springframework.org/schema/beans"
       xmlns:xsi="http://www.w3.org/2001/XMLSchema-instance"
       xmlns:context="http://www.springframework.org/schema/context"
       xmlns:util="http://www.springframework.org/schema/util"
       xsi:schemaLocation="http://www.springframework.org/schema/beans
        http://www.springframework.org/schema/beans/spring-beans-3.2.xsd
        http://www.springframework.org/schema/context
        http://www.springframework.org/schema/context/spring-context-3.2.xsd
        http://www.springframework.org/schema/util
http://www.springframework.org/schema/util/spring-util.xsd">方式4.通过PropertyPlaceholderConfigurer在加载上下文的时候暴露properties到自定义子类的属性中以供程序中使用
<bean id="propertyConfigurer" class="com.hafiz.www.util.PropertyConfigurer">
   <property name="ignoreUnresolvablePlaceholders" value="true"/>
   <property name="ignoreResourceNotFound" value="true"/>
   <property name="locations">
       <list>
          <value>classpath:jdbc.properties</value>
       </list>
   </property>
</bean>
自定义类PropertyConfigurer的声明如下:
package com.hafiz.www.util;

import org.springframework.beans.BeansException;
import org.springframework.beans.factory.config.ConfigurableListableBeanFactory;
import org.springframework.beans.factory.config.PropertyPlaceholderConfigurer;

import java.util.Properties;

/**
 * Desc:properties配置文件读取类
 * Created by hafiz.zhang on 2016/9/14.
 */
public class PropertyConfigurer extends PropertyPlaceholderConfigurer {

    private Properties props;       // 存取properties配置文件key-value结果

    @Override
    protected void processProperties(ConfigurableListableBeanFactory beanFactoryToProcess, Properties props)
                            throws BeansException {
        super.processProperties(beanFactoryToProcess, props);
        this.props = props;
    }

    public String getProperty(String key){
        return this.props.getProperty(key);
    }

    public String getProperty(String key, String defaultValue) {
        return this.props.getProperty(key, defaultValue);
    }

    public Object setProperty(String key, String value) {
        return this.props.setProperty(key, value);
    }
}
使用方式:在需要使用的类中使用@Autowired注解注入即可。
方式5.自定义工具类PropertyUtil,并在该类的static静态代码块中读取properties文件内容保存在static属性中以供别的程序使用
package com.hafiz.www.util;

import org.slf4j.Logger;
import org.slf4j.LoggerFactory;

import java.io.*;
import java.util.Properties;

/**
 * Desc:properties文件获取工具类
 * Created by hafiz.zhang on 2016/9/15.
 */
public class PropertyUtil {
    private static final Logger logger = LoggerFactory.getLogger(PropertyUtil.class);
    private static Properties props;
    static{
        loadProps();
    }

    synchronized static private void loadProps(){
        logger.info("开始加载properties文件内容.......");
        props = new Properties();
        InputStream in = null;
        try {
       <!--第一种,通过类加载器进行获取properties文件流-->
            in = PropertyUtil.class.getClassLoader().getResourceAsStream("jdbc.properties");
        <!--第二种,通过类进行获取properties文件流-->
            //in = PropertyUtil.class.getResourceAsStream("/jdbc.properties");
            props.load(in);
        } catch (FileNotFoundException e) {
            logger.error("jdbc.properties文件未找到");
        } catch (IOException e) {
            logger.error("出现IOException");
        } finally {
            try {
                if(null != in) {
                    in.close();
                }
            } catch (IOException e) {
                logger.error("jdbc.properties文件流关闭出现异常");
            }
        }
        logger.info("加载properties文件内容完成...........");
        logger.info("properties文件内容:" + props);
    }

    public static String getProperty(String key){
        if(null == props) {
            loadProps();
        }
        return props.getProperty(key);
    }

    public static String getProperty(String key, String defaultValue) {
        if(null == props) {
            loadProps();
        }
        return props.getProperty(key, defaultValue);
    }
}
说明:这样的话,在该类被加载的时候,它就会自动读取指定位置的配置文件内容并保存到静态属性中,高效且方便,一次加载,可多次使用。
四、注意事项及建议
以上五种方式,前三种方式比较死板,而且如果你想在带有@Controller注解的Bean中使用,你需要在SpringMVC的配置文件spring-mvc.xml中进行声明,如果你想在带有@Service、@Respository等非@Controller注解的Bean中进行使用,你需要在Spring的配置文件中spring.xml中进行声明。原因请参见另一篇博客:Spring和SpringMVC父子容器关系初窥
我个人比较建议第四种和第五种配置方式,第五种为最好,它连工具类对象都不需要注入,直接调用静态方法进行获取,而且只一次加载,效率也高。而且前三种方式都不是很灵活,需要修改@Value的键值。
五、测试验证是否可用
1.首先我们创建PropertiesService
package com.hafiz.www.service;

/**
 * Desc:java程序获取properties文件内容的service
 * Created by hafiz.zhang on 2016/9/16.
 */
public interface PropertiesService {

    /**
     * 第一种实现方式获取properties文件中指定key的value
     *
     * @return
     */
    String getProperyByFirstWay();

    /**
     * 第二种实现方式获取properties文件中指定key的value
     *
     * @return
     */
    String getProperyBySecondWay();

    /**
     * 第三种实现方式获取properties文件中指定key的value
     *
     * @return
     */
    String getProperyByThirdWay();

    /**
     * 第四种实现方式获取properties文件中指定key的value
     *
     * @param key
     *
     * @return
     */
    String getProperyByFourthWay(String key);

    /**
     * 第四种实现方式获取properties文件中指定key的value
     *
     * @param key
     *
     * @param defaultValue
     *
     * @return
     */
    String getProperyByFourthWay(String key, String defaultValue);

    /**
     * 第五种实现方式获取properties文件中指定key的value
     *
     * @param key
     *
     * @return
     */
    String getProperyByFifthWay(String key);

    /**
     * 第五种实现方式获取properties文件中指定key的value
     *
     * @param key
     *
     * @param defaultValue
     *
     * @return
     */
    String getProperyByFifthWay(String key, String defaultValue);
}
2.创建实现类PropertiesServiceImpl
package com.hafiz.www.service.impl;
import com.hafiz.www.service.PropertiesService;
import com.hafiz.www.util.PropertyConfigurer;
import com.hafiz.www.util.PropertyUtil;
import org.springframework.beans.factory.annotation.Autowired;
import org.springframework.beans.factory.annotation.Value;
import org.springframework.stereotype.Service;
/**
* Desc:java程序获取properties文件内容的service的实现类
* Created by hafiz.zhang on 2016/9/16.
*/
@Service
public class PropertiesServiceImpl implements PropertiesService {
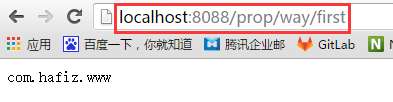
@Value("${test}")
private String testDataByFirst;
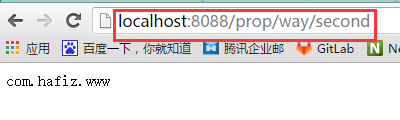
@Value("#{prop.test}")
private String testDataBySecond;
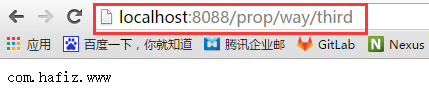
@Value("#{propertiesReader[test]}")
private String testDataByThird;
@Autowired
private PropertyConfigurer pc;
@Override
public String getProperyByFirstWay() {
return testDataByFirst;
}
@Override
public String getProperyBySecondWay() {
return testDataBySecond;
}
@Override
public String getProperyByThirdWay() {
return testDataByThird;
}
@Override
public String getProperyByFourthWay(String key) {
return pc.getProperty(key);
}
@Override
public String getProperyByFourthWay(String key, String defaultValue) {
return pc.getProperty(key, defaultValue);
}
@Override
public String getProperyByFifthWay(String key) {
return PropertyUtil.getPropery(key);
}
@Override
public String getProperyByFifthWay(String key, String defaultValue) {
return PropertyUtil.getProperty(key, defaultValue);
}
}3.控制器类PropertyController
package com.hafiz.www.controller;
import com.hafiz.www.service.PropertiesService;
import com.hafiz.www.util.PropertyUtil;
import org.springframework.beans.factory.annotation.Autowired;
import org.springframework.stereotype.Controller;
import org.springframework.web.bind.annotation.PathVariable;
import org.springframework.web.bind.annotation.RequestMapping;
import org.springframework.web.bind.annotation.RequestMethod;
import org.springframework.web.bind.annotation.ResponseBody;
/**
* Desc:properties测试控制器
* Created by hafiz.zhang on 2016/9/16.
*/
@Controller
@RequestMapping("/prop")
public class PropertyController {
@Autowired
private PropertiesService ps;
@RequestMapping(value = "/way/first", method = RequestMethod.GET)
@ResponseBody
public String getPropertyByFirstWay(){
return ps.getProperyByFirstWay();
}
@RequestMapping(value = "/way/second", method = RequestMethod.GET)
@ResponseBody
public String getPropertyBySecondWay(){
return ps.getProperyBySecondWay();
}
@RequestMapping(value = "/way/third", method = RequestMethod.GET)
@ResponseBody
public String getPropertyByThirdWay(){
return ps.getProperyByThirdWay();
}
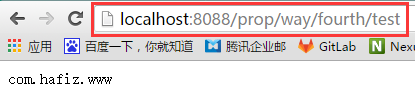
@RequestMapping(value = "/way/fourth/{key}", method = RequestMethod.GET)
@ResponseBody
public String getPropertyByFourthWay(@PathVariable("key") String key){
return ps.getProperyByFourthWay(key, "defaultValue");
}
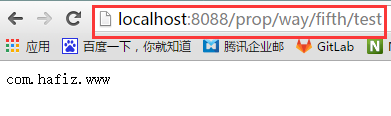
@RequestMapping(value = "/way/fifth/{key}", method = RequestMethod.GET)
@ResponseBody
public String getPropertyByFifthWay(@PathVariable("key") String key){
return PropertyUtil.getProperty(key, "defaultValue");
}
}4.jdbc.properties文件
jdbc.driver=com.mysql.jdbc.Driver
jdbc.url=jdbc:mysql://192.168.1.196:3306/dev?useUnicode=true&characterEncoding=UTF-8
jdbc.username=root
jdbc.password=123456
jdbc.maxActive=200
jdbc.minIdle=5
jdbc.initialSize=1
jdbc.maxWait=60000
jdbc.timeBetweenEvictionRunsMillis=60000
jdbc.minEvictableIdleTimeMillis=300000
jdbc.validationQuery=select 1 from t_user
jdbc.testWhileIdle=true
jdbc.testOnReturn=false
jdbc.poolPreparedStatements=true
jdbc.maxPoolPreparedStatementPerConnectionSize=20
jdbc.filters=stat
#test data
test=com.hafiz.www
5.项目结果图
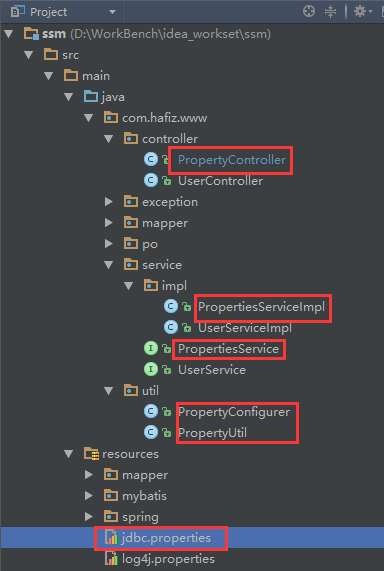
6.项目GitHub地址
https://github.com/hafizzhang/SSM/branches 页面下的propertiesConfigurer分支。
7.测试结果
第一种方式
第二种方式
第三种方式
第四种方式
第五种方式
六、总结
通过本次的梳理和测试,我们理解了Spring和SpringMVC的父子容器关系以及context:component-scan标签包扫描时最容易忽略的use-default-filters属性的作用以及原理。能够更好地定位和快速解决再遇到的问题。总之,棒棒哒~~~


 7214
7214

 被折叠的 条评论
为什么被折叠?
被折叠的 条评论
为什么被折叠?
 到【灌水乐园】发言


