


 当遇到psql: 致命错误: 用户 "postgres" Ident 认证失败时,可以通过修改/var/lib/pgsql/data/pg_hba.conf文件,将认证METHOD的ident改为trust,然后重启postgresql服务器以允许通过账户和密码访问数据库。
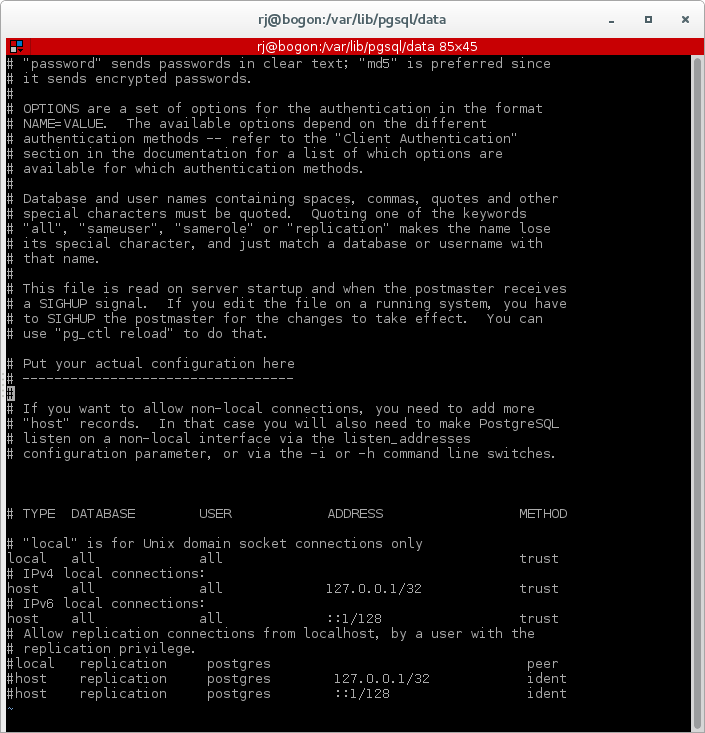
修改认证文件/var/lib/pgsql/data/pg_hba.conf,登陆使用密码。
#vi /var/lib/pgsql/data/pg_hba.conf
把这个配置文件中的认证 METHOD的ident修改为trust,可以实现用账户和密码来访问数据库,
即解决psql: 致命错误: 用户 "postgres" Ident 认证失败 这个问题)
第五步:重启postgresql服务器使设置生效
#service postgresql-9.4 restart
或者
#systemctl restart postgresql.service
这样问题就解决了,数据库可以正常被rails项目访问了
pg_hba.conf这个文件的完整代码如下:
#=========================================
# PostgreSQL Client Authentication Configuration File
# ===================================================
#
# Refer to the "Client Authentication" section in the PostgreSQL
# documentation for a complete description of this file. A short
# synopsis follows.
#
# This file controls: which hosts are allowed to connect, how clients
# are authenticated, which PostgreSQL user names they can use, which
# databases they can access. Records take one of these forms:
#
# local DATABASE USER METHOD [OPTIONS]
# host DATABASE USER ADDRESS METHOD [OPTIONS]
# hostssl DATABASE USER ADDRESS METHOD [OPTIONS]
# hostnossl DATABASE USER ADDRESS METHOD [OPTIONS]
#
# (The uppercase items must be replaced by actual values.)
#
# The first field is the connection type: "local" is a Unix-domain
# socket, "host" is either a plain or SSL-encrypted TCP/IP socket,
# "hostssl" is an SSL-encrypted TCP/IP socket, and "hostnossl" is a
# plain TCP/IP socket.
#
# DATABASE can be "all", "sameuser", "samerole", "replication", a
# database name, or a comma-separated list thereof. The "all"
# keyword does not match "replication". Access to replication
# must be enabled in a separate record (see example below).
#
# USER can be "all", a user name, a group name prefixed with "+", or a
# comma-separated list thereof. In both the DATABASE and USER fields
# you can also write a file name prefixed with "@" to include names
# from a separate file.
#
# ADDRESS specifies the set of hosts the record matches. It can be a
# host name, or it is made up of an IP address and a CIDR mask that is
# an integer (between 0 and 32 (IPv4) or 128 (IPv6) inclusive) that
# specifies the number of significant bits in the mask. A host name
# that starts with a dot (.) matches a suffix of the actual host name.
# Alternatively, you can write an IP address and netmask in separate
# columns to specify the set of hosts. Instead of a CIDR-address, you
# can write "samehost" to match any of the server's own IP addresses,
# or "samenet" to match any address in any subnet that the server is
# directly connected to.
#
# METHOD can be "trust", "reject", "md5", "password", "gss", "sspi",
# "krb5", "ident", "peer", "pam", "ldap", "radius" or "cert". Note that
# "password" sends passwords in clear text; "md5" is preferred since
# it sends encrypted passwords.
#
# OPTIONS are a set of options for the authentication in the format
# NAME=VALUE. The available options depend on the different
# authentication methods -- refer to the "Client Authentication"
# section in the documentation for a list of which options are
# available for which authentication methods.
#
# Database and user names containing spaces, commas, quotes and other
# special characters must be quoted. Quoting one of the keywords
# "all", "sameuser", "samerole" or "replication" makes the name lose
# its special character, and just match a database or username with
# that name.
#
# This file is read on server startup and when the postmaster receives
# a SIGHUP signal. If you edit the file on a running system, you have
# to SIGHUP the postmaster for the changes to take effect. You can
# use "pg_ctl reload" to do that.
# Put your actual configuration here
# ----------------------------------
#
# If you want to allow non-local connections, you need to add more
# "host" records. In that case you will also need to make PostgreSQL
# listen on a non-local interface via the listen_addresses
# configuration parameter, or via the -i or -h command line switches.
# TYPE DATABASE USER ADDRESS METHOD
# "local" is for Unix domain socket connections only
local all all trust
# IPv4 local connections:
host all all 127.0.0.1/32 trust
# IPv6 local connections:
host all all ::1/128 trust
# Allow replication connections from localhost, by a user with the
# replication privilege.
#local replication postgres peer
#host replication postgres 127.0.0.1/32 ident
#host replication postgres ::1/128 ident
#=========================================


 4625
4625

 被折叠的 条评论
为什么被折叠?
被折叠的 条评论
为什么被折叠?
 到【灌水乐园】发言


