


 本文介绍了MVC(Model-View-Controller)架构模式的基本概念及其在实际开发中的应用。通过一个简单的登录示例,详细展示了如何利用JavaBean实体类、UI界面及控制器来实现业务逻辑与界面显示的分离。
前言
MVC的架构模式是在开发中最常用到的,下面分享一下我对MVC架构模式的理解。
MVC详解
MVC全称是Model View Controller。
- M:业务模型;
- V:用户界面;
- C:控制器。
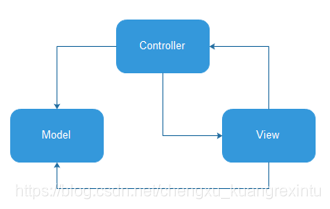
在实际开发中, Model 层就是 JavaBean 实体类,用于保存实例数据;View 层其实就是程序的 UI 界面,用于向用户展示数据以及接收用户的输入;Controller 控制器用于更新 UI 界面和数据实例。
MVC代码示例
用MVC架构模式实现登录有关的案例:
1.配置Model的build.gradle文件
这个是个人习惯,我一般是使用小刀注解和支持Java8。
android{
    // 使用Java8
    compileOptions {
        targetCompatibility 1.8
        sourceCompatibility 1.8
    }
}
dependencies{
    implementation 'com.jakewharton:butterknife:8.7.0'
    annotationProcessor 'com.jakewharton:butterknife-compiler:8.7.0'
}
2.xml文件
<?xml version="1.0" encoding="utf-8"?>
<android.support.constraint.ConstraintLayout xmlns:android="http://schemas.android.com/apk/res/android"
    xmlns:app="http://schemas.android.com/apk/res-auto"
    xmlns:tools="http://schemas.android.com/tools"
    android:layout_width="match_parent"
    android:layout_height="match_parent"
    tools:context=".MainActivity"
    tools:layout_editor_absoluteY="81dp">

    <EditText
        android:id="@+id/et_username"
        android:layout_width="match_parent"
        android:layout_height="wrap_content"
        android:hint="用户名"
        app:layout_constraintBottom_toTopOf="@+id/et_pwd"
        app:layout_constraintEnd_toEndOf="parent"
        app:layout_constraintHorizontal_bias="0.0"
        app:layout_constraintStart_toStartOf="parent"
        app:layout_constraintTop_toTopOf="parent"
        app:layout_constraintVertical_bias="0.0" />

    <EditText
        android:id="@+id/et_pwd"
        android:layout_width="match_parent"
        android:layout_height="wrap_content"
        android:hint="密码"
        app:layout_constraintTop_toBottomOf="@+id/et_username" />

    <Button
        android:id="@+id/btn_login"
        android:layout_width="match_parent"
        android:layout_height="wrap_content"
        android:text="登录"
        app:layout_constraintTop_toBottomOf="@+id/et_pwd" />
</android.support.constraint.ConstraintLayout>
3.MainActivity处理所有界面交互逻辑
package com.wyb.mvcdemo;

import android.os.Bundle;
import android.os.SystemClock;
import android.support.v7.app.AppCompatActivity;
import android.text.TextUtils;
import android.widget.EditText;
import android.widget.Toast;

import butterknife.BindView;
import butterknife.ButterKnife;
import butterknife.OnClick;

/**
 * @author yubo
 */
public class MainActivity extends AppCompatActivity {

    @BindView(R.id.et_username)
    EditText etUsername;
    @BindView(R.id.et_pwd)
    EditText etPwd;

    @Override
    protected void onCreate(Bundle savedInstanceState) {
        super.onCreate(savedInstanceState);
        setContentView(R.layout.activity_main);
        ButterKnife.bind(this);
    }

    @OnClick(R.id.btn_login)
    public void onViewClicked() {
        // 获取用户输入的用户名
        String userName = etUsername.getText().toString();
        // 获取用户输入的密码
        String pwd = etPwd.getText().toString();
        if (!TextUtils.isEmpty(userName) && !TextUtils.isEmpty(pwd)) {
            login(userName, pwd);
        } else {
            Toast.makeText(MainActivity.this, "用户名和密码都不能为空哦", Toast.LENGTH_SHORT).show();
        }
    }

    private void login(String userName, String pwd) {
        new Thread(() -> {
            SystemClock.sleep(2000);
            if (userName.equals("zhangsan") && pwd.equals("123456")) {
                runOnUiThread(() -> Toast.makeText(MainActivity.this, "登录成功", Toast.LENGTH_SHORT).show());
            } else {
                runOnUiThread(() -> Toast.makeText(MainActivity.this, "登录失败", Toast.LENGTH_SHORT).show());
            }
        }).start();
    }
}
这是最简单的MVC案例,希望对想要了解的MVC的小伙伴有帮助。


 779
779

 被折叠的 条评论
为什么被折叠?
被折叠的 条评论
为什么被折叠?
 到【灌水乐园】发言


