在CentOS中安装GitLab后修改超级管理员root的密码

切换到gitlab下的bin目录

cd /opt/gitlab/bin

执行如下指令进入到console

sudo gitlab-rails console

输入如下指令,查看所有用户

u=User.all

执行如下指令查找和切换到root用户

u=User.where(id:1).first

输入如下指令,设置的root用户的密码,如“123456cb”

u.password='123456cb'

输入如下指令,确认密码

u.password_confirmation='123456cb'
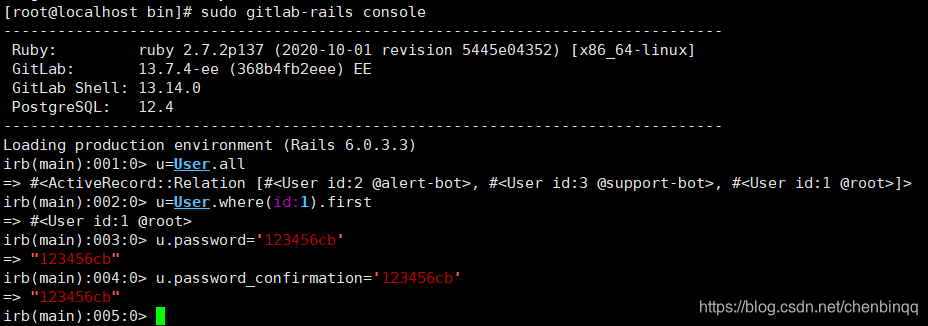
执行如下指令,保存设置

u.save!
### 在 CentOS 8 上安装 GitLab 的具体步骤 #### 准备工作 在开始安装之前,确保系统已经更新到最新状态,并且满足 GitLab 的硬件和软件要求。可以通过以下命令更新系统: ```bash sudo dnf update -y ``` #### 安装必要的依赖 根据引用[^4],虽然网上有些资料提到不需要安装 `policycoreutils-python`,但实际上该依赖项是必须的。因此需要安装以下依赖项: ```bash sudo dnf install -y curl openssh-server policycoreutils-python-utils ``` #### 配置防火墙 如果启用了防火墙,则需要允许 HTTP 和 HTTPS 流量通过防火墙: ```bash sudo firewall-cmd --permanent --add-service=http sudo firewall-cmd --permanent --add-service=https sudo firewall-cmd --reload ``` #### 添加 GitLab 官方仓库 CentOS 8 的官方 Yum 源中不包含 GitLab,因此需要手动添加 GitLab 的官方仓库。执行以下命令以导入 GPG 密钥并配置仓库: ```bash curl https://packages.gitlab.com/install/repositories/gitlab/gitlab-ce/script.rpm.sh | sudo bash ``` #### 安装 GitLab CE 使用以下命令安装 GitLab 社区版(CE): ```bash sudo dnf install -y gitlab-ce ``` 注意:如果遇到网络问题导致下载失败,可以尝试使用清华大学的镜像源[^2]。例如: ```bash wget --content-disposition https://packages.gitlab.com/gitlab/gitlab-ce/packages/el/8/gitlab-ce-13.6.3-ce.0.el8.x86_64.rpm/download.rpm sudo dnf localinstall download.rpm ``` #### 配置 GitLab GitLab 的主要配置文件位于 `/etc/gitlab/gitlab.rb`。根据引用[^3],可以通过编辑此文件来修改域名和数据存储路径: ```bash sudo vi /etc/gitlab/gitlab.rb ``` 将以下内容添加到配置文件中以设置外部 URL 和数据存储目录: ```ruby external_url 'http://your-domain-or-ip' git_data_dirs({ "default" => { "path" => "/data/gitlab" } }) ``` 如果需要修改备份目录位置,可以参考引用[^5]中的方法: ```ruby gitlab_rails['backup_path'] = "/DB/backups" ``` #### 启动并重新配置 GitLab 完成配置后,运行以下命令以启动 GitLab 并应用配置更改: ```bash sudo gitlab-ctl reconfigure ``` 这一步可能会花费一些时间,因为它会生成初始配置并启动相关服务。 #### 访问 GitLab 打开浏览器并访问配置文件中指定的外部 URL(如 `http://your-domain-or-ip`)。首次访问时,系统会提示设置管理员密码。 --- ### 注意事项 - 如果系统中已经有数据,则需要按照引用[^5]中的方法进行数据迁移。 - 确保磁盘空间充足,尤其是在自定义数据存储路径的情况下。 - 如果需要更高性能或企业功能,可以考虑安装 GitLab 企业版(EE)。 --- ### 示例代码块 以下是完整的安装脚本示例: ```bash # 更新系统 sudo dnf update -y # 安装依赖 sudo dnf install -y curl openssh-server policycoreutils-python-utils # 配置防火墙 sudo firewall-cmd --permanent --add-service=http sudo firewall-cmd --permanent --add-service=https sudo firewall-cmd --reload # 添加 GitLab 官方仓库 curl https://packages.gitlab.com/install/repositories/gitlab/gitlab-ce/script.rpm.sh | sudo bash # 安装 GitLab CE sudo dnf install -y gitlab-ce # 编辑配置文件 sudo vi /etc/gitlab/gitlab.rb # 应用配置 sudo gitlab-ctl reconfigure ``` ---
评论
成就一亿技术人!
拼手气红包6.0元
还能输入1000个字符  | 博主筛选后可见
 
红包 添加红包
表情包 插入表情
 条评论被折叠 查看
添加红包

请填写红包祝福语或标题

红包个数最小为10个

红包金额最低5元

当前余额3.43前往充值 >
需支付:10.00
成就一亿技术人!
领取后你会自动成为博主和红包主的粉丝 规则
hope_wisdom
发出的红包
实付
使用余额支付
点击重新获取
扫码支付
钱包余额 0

抵扣说明:

1.余额是钱包充值的虚拟货币,按照1:1的比例进行支付金额的抵扣。
2.余额无法直接购买下载,可以购买VIP、付费专栏及课程。

余额充值