


 本文详细介绍了使用TensorRT进行模型推理部署的过程,包括加载模型参数、创建GPU缓冲区、执行模型推理等关键步骤,并提供了代码示例。同时,文中还讨论了版本兼容性和安装配置等问题。
tensorrt官方文档:https://docs.nvidia.com/deeplearning/tensorrt/archives/tensorrt-723
一、简介
TensorRT是一种深度学习框架?是一种库?官方文档中的称呼是:TensorRT 是一个 SDK(Software Development Kit)软件开发工具,用于优化经过训练的深度学习模型以实现高性能推理。
二、模型推理的流程
1、加载engine模型参数
"step0.通过文件流读取engine文件"
std::vector<char> trtModelStream_;   //engine文件参数读取后保存到该数组中
size_t size{0};

std::ifstream file(engineFile, std::ios::binary);
if (file.good()) {
    file.seekg(0, file.end);    //从打开的文件流中获取信息
    size = file.tellg();    //获取到文件的大小
    file.seekg(0, file.beg);    //从打开的文件流中获取信息
    trtModelStream_.resize(size);
    file.read(trtModelStream_.data(), size);    //读取文件流的内容保存到数组中
    file.close();
}

"step1.通过RunTime对象反序列化engine引擎"
IRuntime *runtime = createInferRuntime(gLogger);
assert(runtime != nullptr);
m_engine = runtime->deserializeCudaEngine(trtModelStream_.data(), size, nullptr);  //最后一个参数不再使用,必须是一个空指针.
assert(m_engine != nullptr);

"step2.创建context来开辟空间存储中间值,一个engine可以有多个context来并行处理"
//由于引擎保存网络定义和训练参数,因此需要额外的空间。这些保存在context中
m_context = m_engine->createExecutionContext();
assert(m_context != nullptr);
2、创建流并预分配GPU缓冲区内存
"步骤一:创建流(可以在推理之前提前创建好)"
    // Pointers to input and output device buffers to pass to engine.
    // Engine requires exactly IEngine::getNbBindings() number of buffers.
    assert(engine.getNbBindings() == 2);    //getNbBindings()获取网络输入输出数量
    void* buffers[2];

    // In order to bind the buffers, we need to know the names of the input and output tensors.
    // Note that indices are guaranteed to be less than IEngine::getNbBindings()
    // 为了绑定缓冲区,我们需要知道输入和输出张量的名称。 请注意,索引必须小于IEngine::getNbBindings()
    "step1.指定输入和输出节点名来获取输入输出索引"
    const int inputIndex = engine.getBindingIndex(m_input_tensor_name.data());//blob名称是转换模型时设置好的,这里需要保持一致
    const int outputIndex = engine.getBindingIndex(m_output_tensor_name.data());

    "step2.在设备上开辟网络输入输出需要的GPU缓冲区(内存)"
    //开辟输入输出需要的GPU内存,由网络输入输出决定
    TENSORRTCHECK(cudaMalloc(&buffers[inputIndex], batchSize * 3 * m_height * m_width * sizeof(float)));
    TENSORRTCHECK(cudaMalloc(&buffers[outputIndex], batchSize * m_output_size * sizeof(float)));

    "step3.创建流"
    cudaStream_t stream;
    TENSORRTCHECK(cudaStreamCreate(&stream));
3、执行模型推理
"调用推理函数(自己创建的)"
float *outdata = new float[m_batch_size * m_output_size];
//注意输入数据传入的方式.ptr的首地址
doInference(*m_context, (float *)pre_img.ptr<float>(0), outdata, m_batch_size);
bool TensorRTWrapper::doInference(nvinfer1::IExecutionContext& context, float* input, float* output, int batchSize) {
const nvinfer1::ICudaEngine& engine = context.getEngine();
"步骤二:执行推理"
"step1.拷贝数据 从主机(CPU)--->设备(GPU)"
TENSORRTCHECK(cudaMemcpyAsync(buffers[inputIndex], input, batchSize * 3 * m_height * m_width * sizeof(float), cudaMemcpyHostToDevice, stream));
"step2.执行推理"
context.enqueue(batchSize, buffers, stream, nullptr);
"step3.拷贝数据 从设备(GPU)--->主机(CPU)"
TENSORRTCHECK(cudaMemcpyAsync(output, buffers[outputIndex], batchSize * m_output_size * sizeof(float), cudaMemcpyDeviceToHost, stream));
"step4.同步流"
cudaStreamSynchronize(stream);//因为上面的cudaMemcpyAsync()函数是异步方式执行的,所有这里需要进行同步
}4、释放前面创建的对象和内存
    "步骤三:释放内存(可以放在类析构时)"
    cudaStreamDestroy(stream);
    TENSORRTCHECK(cudaFree(buffers[inputIndex]));
    TENSORRTCHECK(cudaFree(buffers[outputIndex]));
三、版本问题及安装
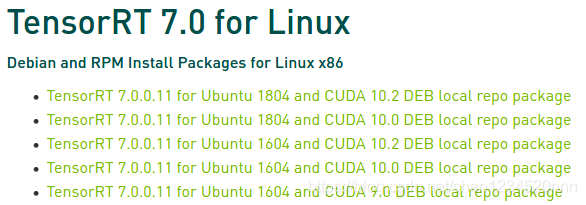
1、tensorrt版本
- tensorrt7.0版本支持的cuda有10.0和10.2,注意这里是不支持cuda10.1版本的
- 如果是tensorrt7.2版本的话,最低只支持cuda10.2了,已经不能支持cuda10.0,看来升级cuda大势所趋了;
- 这种东西对版本要求比较严格,要注意版本要匹配。
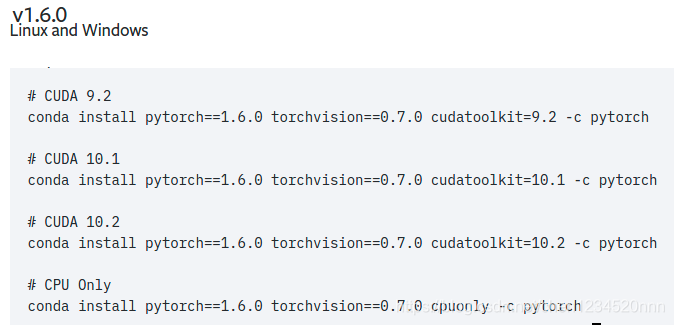
下面顺便提一下pytorch版本,pytorch1.6版本也不支持cuda10.0了...
2、tensorrt安装
- tensorrt安装直接参看网上的链接,没必要重复码字。
- 需要注意的是c++环境和python环境需要单独安装一下,anaconda下安装也参看python下的安装教程。
- 教程链接:https://blog.youkuaiyun.com/qq_40672851/article/details/107380136
3、将pytorch1.6以上高版本训练的模型转换为低版本pytorch能读取的模型:
https://blog.youkuaiyun.com/weixin_44769214/article/details/108188126


 被折叠的 条评论
为什么被折叠?
被折叠的 条评论
为什么被折叠?
 到【灌水乐园】发言


