


Elasticsearch是一个分布式、RESTful风格的搜索和数据分析引擎。目前已被各大公司广泛的引入生产使用,也已成为大数据生态的重要组成部分。本篇简单介绍一下Elasticsearch的本地安装和一些常用操作。
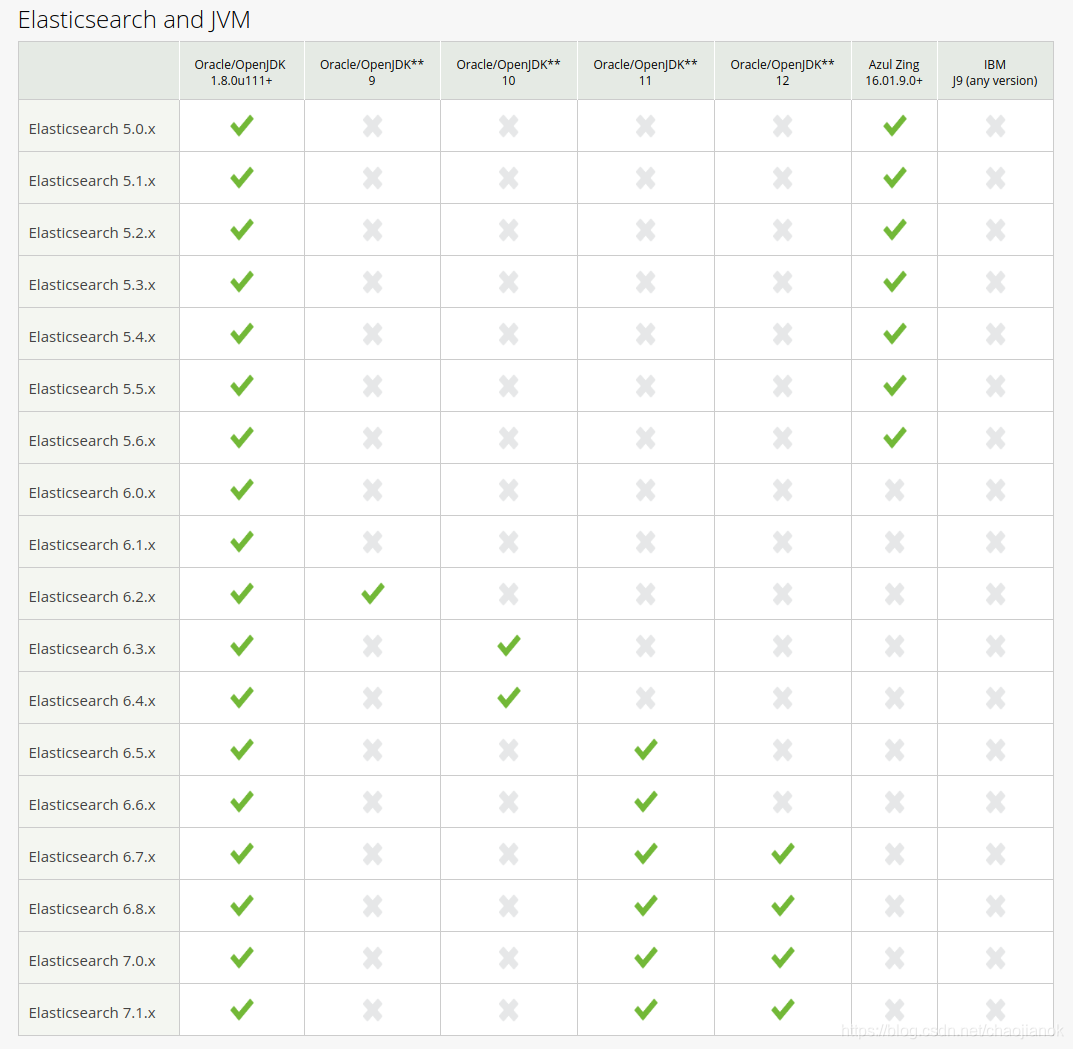
Elasticsearch使用Java构建,不同版本的Elasticsearch对Java版本要求略有差异,可参考下图来选择Elasticsearch和Java的版本(下图来自官网Support Matrix JVM)。
Elasticsearch本地安装
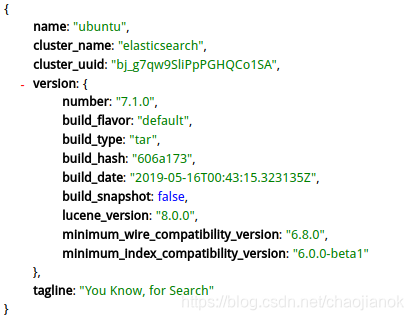
本地安装Elasticsearch非常简单,首先到官网下载Elasticsearch到本地指定目录,然后解压,进入到Elasticsearch的解压目录下,执行./bin/elasticsearch或.\bin\elasticsearch.bat(Windows),可以加上-d参数让Elasticsearch在后台运行。至此,Elasticsearch就安装好了,可以通过curl http://localhost:9200或者用浏览器打开http://localhost:9200/检查是否正常启动,下图这样就表示正常启动了。
常见问题
Elasticsearch的安装非常简单,通常在安装过程中会遇到一些问题,下面这几个问题是在Ubuntu操作系统安装时经常遇到的问题。
问题一:
ERROR: [1] bootstrap checks failed
[1]: max virtual memory areas vm.max_map_count [65530] is too low, increase to at least [262144]
解决办法:
切换到root用户修改配置/etc/sysctl.conf
添加下面配置并执行命令:
vm.max_map_count=655360
sysctl -p
然后,重新启动elasticsearch,即可启动成功。
问题二:
ERROR: [1] bootstrap checks failed
[1]: max number of threads [1024] for user [elasticsearch] is too low, increase to at least [2048]
解决办法:
修改/etc/security/limits.d/90-nproc.conf
* soft nproc 1024 修改成 * soft nproc 2048
Elasticsearch常用操作
问题三:
ERROR: [1] bootstrap checks failed
[1]: max file descriptors [4096] for elasticsearch process likely too low, increase to at least [65536]
解决办法:
切换到root用户,编辑/etc/security/limits.conf添加如下内容(其实切换到root用户直接执行ulimit -n 65536即可)
* soft nofile 65536
* hard nofile 131072
* soft nproc 2048
* hard nproc 4096
新增一个索引
curl -X PUT 'http://localhost:9200/index_name' -H 'Content-Type: application/json' -d '{
    "settings": {
        ...
    },
    "mappings": {
        "one": {...},
        "two": {...},
        ...
    }
}'
删除一个索引
curl -X DELETE "http://localhost:9200/index_name"
删除多个索引
curl -X DELETE "http://localhost:9200/index_name1,index_name2"
删除所有索引
curl -X DELETE "http://localhost:9200/_all"
curl -X DELETE "http://localhost:9200/*"
添加一条数据
curl -X PUT 'http://localhost:9200/index_name/type_name/id' -H 'Content-Type: application/json' -d '{
  "title": "The title",
  "text":  "The text ...",
  "date":  "2019/01/01"
}'
删除单条数据
curl -X DELETE "http://localhost:9200/index_name/type_name/id"
批量删除多条数据
curl -X POST "http://localhost:9200/_bulk" -H 'Content-Type: application/json' -d '
{"delete":{"_index":"index_name","_type":"main","_id":"1"}}
{"delete":{"_index":"index_name","_type":"main","_id":"2"}}
'
删除所有数据
curl -X POST "http://localhost:9200/index_name/type_name/_delete_by_query?conflicts=proceed" -H 'Content-Type: application/json' -d '{"query": {"match_all": {}}}'
修改索引setting
curl -X POST 'http://localhost:9200/index_name' -H 'Content-Type: application/json' -d '{
    "settings": {
        "number_of_shards": 3,
        "number_of_replicas": 0,
        "index.mapping.total_fields.limit": 5000
    }
}'
索引重命名
curl -X POST 'http://localhost:9200/_reindex' -H 'Content-Type: application/json' -d '{
  "source": {
    "index": "index_name_old"
  },
  "dest": {
    "index": "index_name_new"
  }
}'
手动迁移分片
curl -X PUT 'http://localhost:9200/_cluster/settings' -H 'Content-Type: application/json' -d'{
    "transient": {
        "cluster.routing.allocation.enable": "none"
    }
}'
curl -X PUT 'http://localhost:9200/_cluster/settings' -H 'Content-Type: application/json' -d'{
    "transient": {
        "cluster.routing.allocation.enable": "all"
    }
}'
curl -X POST 'http://localhost:9200/_cluster/reroute' -H 'Content-Type: application/json' -d  '{
    "commands" : [
        {
            "move" : {
                "index" : "reindex-resharding-test",
                "shard" : 0,
                "from_node" : "192.168.0.101",
                "to_node" : "192.168.0.102"
            }
        }
    ]
}'
查看集群状态
curl -X GET 'http://localhost:9200/_cluster/health?pretty'
查看所有索引
curl -X GET 'http://localhost:9200/_cat/indices?v'
查看所有shards
curl -X GET 'http://localhost:9200/_cat/shards'
查看unassigned shards
curl -X GET 'http://localhost:9200/_cat/shards' | grep UNASSIGNED
欢迎关注微信公众号“大数据技术和人工智能”,专注于大数据和人工智能技术分享!


 104
104

 被折叠的 条评论
为什么被折叠?
被折叠的 条评论
为什么被折叠?
 到【灌水乐园】发言


