


本文将详细介绍一个基于 HTML 和 JavaScript 实现的图片裁剪上传功能。该功能支持文件选择、拖放上传、图片预览、区域选择、裁剪操作以及图片下载等功能,适用于需要进行图片处理的 Web 应用场景。
效果演示

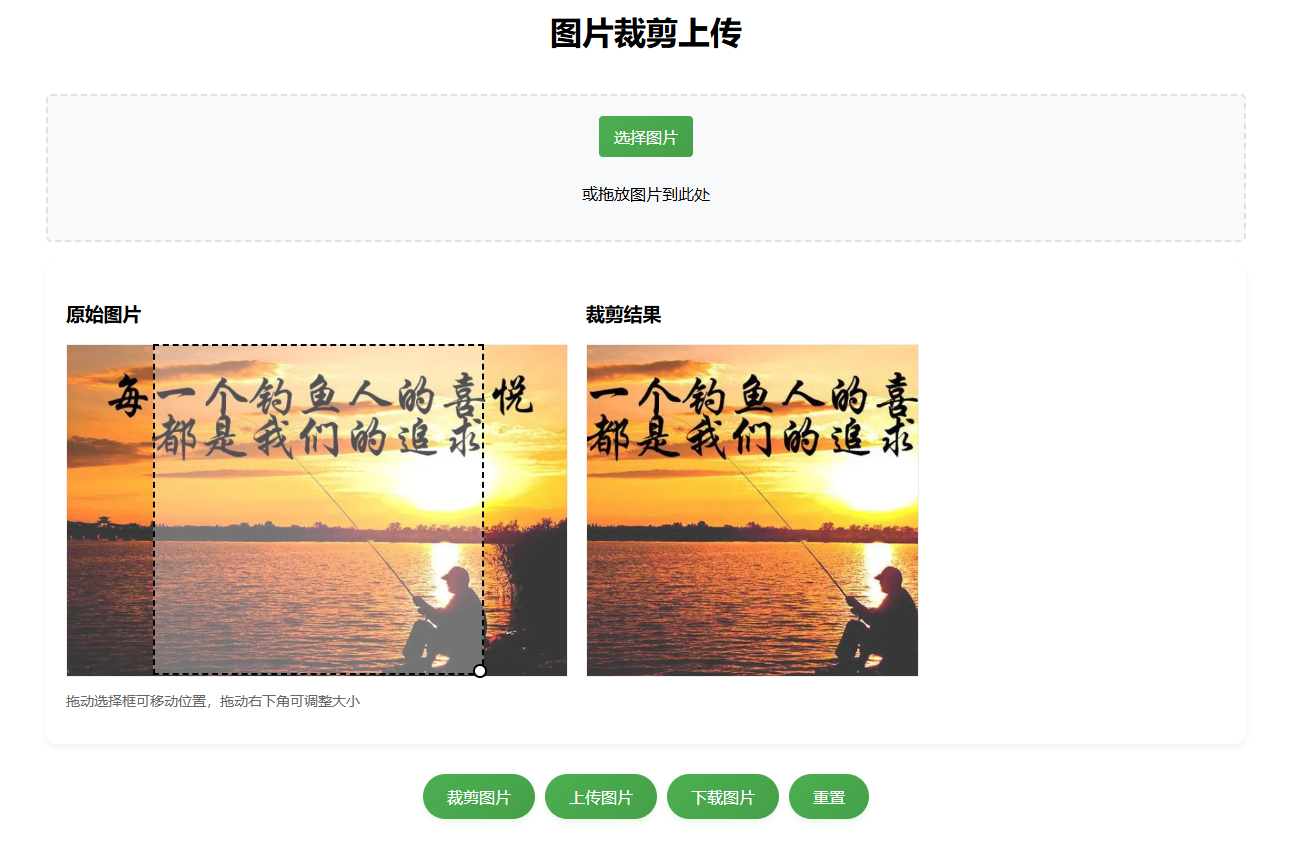
项目概述
本项目主要包含以下核心功能:
- 文件选择与拖放上传
- 裁剪框拖动与调整大小
- 图片裁剪
- 图片上传(模拟)与下载
页面结构
上传区域
实现友好的文件选择体验,并支持拖放上传。
<div class="upload-section">
    <input type="file" id="fileInput" accept="image/*">
    <label for="fileInput" class="file-label">选择图片</label>
    <p>或拖放图片到此处</p>
</div>
预览区域
分为两个部分,左侧显示原始图片和裁剪框,右侧展示裁剪后的结果。
<div class="preview-section">
    <div class="image-container">
        <div>
            <h3>原始图片</h3>
            <img id="originalImage" style="max-width: 100%; display: none;">
            <div class="cropper-container" id="cropperContainer" style="display: none;">
                <canvas id="sourceCanvas"></canvas>
                <div class="selection-box" id="selectionBox">
                    <div class="resize-handle"></div>
                </div>
            </div>
            <p class="instruction">拖动选择框可移动位置,拖动右下角可调整大小</p>
        </div>

        <div>
            <h3>裁剪结果</h3>
            <canvas id="croppedCanvas" style="display: none;"></canvas>
            <p id="noCropMessage">请先选择图片并设置裁剪区域</p>
        </div>
    </div>
</div>
操作按钮
提供“裁剪”、“上传”、“下载”和“重置”按钮,方便用户进行各种操作。
<div class="controls">
    <button id="cropBtn" disabled>裁剪图片</button>
    <button id="uploadBtn" disabled>上传图片</button>
    <button id="downloadBtn" disabled>下载图片</button>
    <button id="resetBtn">重置</button>
</div>
核心功能实现
定义基础变量
获取DOM元素
const fileInput = document.getElementById('fileInput');
const originalImage = document.getElementById('originalImage');
const sourceCanvas = document.getElementById('sourceCanvas');
const croppedCanvas = document.getElementById('croppedCanvas');
const cropperContainer = document.getElementById('cropperContainer');
const selectionBox = document.getElementById('selectionBox');
const cropBtn = document.getElementById('cropBtn');
const uploadBtn = document.getElementById('uploadBtn');
const resetBtn = document.getElementById('resetBtn');
const noCropMessage = document.getElementById('noCropMessage');
const downloadBtn = document.getElementById('downloadBtn');
定义全局变量
let isDragging = false;
let isResizing = false;
let startX, startY;
let selection = {
    x: 0,
    y: 0,
    width: 0,
    height: 0,
    startX: 0,
    startY: 0,
    startWidth: 0,
    startHeight: 0
};
let imageRatio = 1;
文件选择
使用 FileReader API 将选中的图片读取为 Data URL 并显示在页面上。
function handleFileSelect(event) {
    const file = event.target.files[0];
    if (!file || !file.type.match('image.*')) {
        alert('请选择有效的图片文件');
        return;
    }

    const reader = new FileReader();
    reader.onload = function(e) {
        originalImage.src = e.target.result;
        originalImage.onload = function() {
            initCropper();
        };
    };
    reader.readAsDataURL(file);
}
拖放上传
通过监听 dragover、dragleave 和 drop 事件实现拖放上传功能。
const uploadSection = document.querySelector('.upload-section');
uploadSection.addEventListener('dragover', (e) => {
    e.preventDefault();
    uploadSection.style.borderColor = '#4CAF50';
});

uploadSection.addEventListener('dragleave', () => {
    uploadSection.style.borderColor = '#ccc';
});

uploadSection.addEventListener('drop', (e) => {
    e.preventDefault();
    uploadSection.style.borderColor = '#ccc';

    if (e.dataTransfer.files.length) {
        fileInput.files = e.dataTransfer.files;
        handleFileSelect({ target: fileInput });
    }
});
图片预览与裁剪框初始化
在图片加载完成后,绘制到 canvas 上,并根据图片尺寸调整画布大小。初始化一个固定比例的裁剪框,居中显示在画布上。
function initCropper() {
    // 显示原始图片和裁剪区域
    originalImage.style.display = 'none';
    cropperContainer.style.display = 'inline-block';

    // 设置canvas尺寸
    const maxWidth = 500;
    imageRatio = originalImage.naturalWidth / originalImage.naturalHeight;

    let canvasWidth, canvasHeight;
    if (originalImage.naturalWidth > maxWidth) {
        canvasWidth = maxWidth;
        canvasHeight = maxWidth / imageRatio;
    } else {
        canvasWidth = originalImage.naturalWidth;
        canvasHeight = originalImage.naturalHeight;
    }

    sourceCanvas.width = canvasWidth;
    sourceCanvas.height = canvasHeight;

    // 绘制图片到canvas
    const ctx = sourceCanvas.getContext('2d');
    ctx.drawImage(originalImage, 0, 0, canvasWidth, canvasHeight);

    // 初始化选择框 (1:1比例)
    const boxSize = Math.min(canvasWidth, canvasHeight) * 0.6;
    selection = {
        x: Math.max(0, Math.min((canvasWidth - boxSize) / 2, canvasWidth - boxSize)), // 确保初始位置在画布范围内
        y: Math.max(0, Math.min((canvasHeight - boxSize) / 2, canvasHeight - boxSize)), // 确保初始位置在画布范围内
        width: boxSize,
        height: boxSize,
        startX: 0,
        startY: 0,
        startWidth: 0,
        startHeight: 0
    };

    updateSelectionBox();
    cropBtn.disabled = false;
}
裁剪框拖动与调整大小
通过监听鼠标事件(mousedown、mousemove、mouseup)实现裁剪框的拖动和调整大小功能。确保裁剪框始终位于画布范围内,并保持指定的比例。
selectionBox.addEventListener('mousedown', startDrag);
document.addEventListener('mousemove', handleDrag);
document.addEventListener('mouseup', endDrag);
const resizeHandle = document.querySelector('.resize-handle');
resizeHandle.addEventListener('mousedown', (e) => {
    e.stopPropagation();
    startResize(e);
});
function startDrag(e) {
    if (e.target.classList.contains('resize-handle')) {
        return; // 忽略调整大小手柄的点击
    }
    isDragging = true;
    startX = e.clientX;
    startY = e.clientY;
    // 存储初始位置
    selection.startX = selection.x;
    selection.startY = selection.y;
    e.preventDefault();
}
function startResize(e) {
    isResizing = true;
    startX = e.clientX;
    startY = e.clientY;

    // 存储初始尺寸和位置
    selection.startX = selection.x;
    selection.startY = selection.y;
    selection.startWidth = selection.width;
    selection.startHeight = selection.height;

    e.preventDefault();
}
function handleDrag(e) {
    if (!isDragging && !isResizing) return;
    const dx = e.clientX - startX;
    const dy = e.clientY - startY;
    if (isDragging) {
        // 处理移动选择框
        let newX = selection.startX + dx;
        let newY = selection.startY + dy;
        // 限制在canvas范围内
        newX = Math.max(0, Math.min(newX, sourceCanvas.width - selection.width));
        newY = Math.max(0, Math.min(newY, sourceCanvas.height - selection.height));

        selection.x = newX;
        selection.y = newY;
    } else if (isResizing) {
        // 处理调整大小 (保持1:1比例)
        let newSize = Math.max(10, Math.min(
            selection.startWidth + (dx + dy) / 2, // 取dx和dy的平均值使调整更平滑
            Math.min(
                sourceCanvas.width - selection.startX,
                sourceCanvas.height - selection.startY
            )
        ));
        // 应用新尺寸 (保持正方形)
        selection.width = newSize;
        selection.height = newSize;
        // 确保裁剪框不会超出画布范围
        if (selection.x + selection.width > sourceCanvas.width) {
            selection.x = sourceCanvas.width - selection.width;
        }
        if (selection.y + selection.height > sourceCanvas.height) {
            selection.y = sourceCanvas.height - selection.height;
        }
    }
    updateSelectionBox();
}
function endDrag() {
    isDragging = false;
    isResizing = false;
}
图片裁剪与结果展示
使用 drawImage 方法从源画布中裁剪出指定区域,并将其绘制到目标画布上。
function cropImage() {
    const ctx = croppedCanvas.getContext('2d');
    // 设置裁剪后canvas的尺寸 (1:1)
    croppedCanvas.width = selection.width;
    croppedCanvas.height = selection.height;
    // 执行裁剪
    ctx.drawImage(
        sourceCanvas,
        selection.x, selection.y, selection.width, selection.height, // 源图像裁剪区域
        0, 0, selection.width, selection.height                     // 目标canvas绘制区域
    );
    // 显示裁剪结果
    croppedCanvas.style.display = 'block';
    noCropMessage.style.display = 'none';
    uploadBtn.disabled = false;
    downloadBtn.disabled = false;
}
图片上传与下载
提供模拟的上传功能,使用 toBlob 方法获取裁剪后的图片数据。支持将裁剪后的图片下载为 JPEG 格式的文件。
function uploadImage() {
    // 在实际应用中,这里应该将图片数据发送到服务器
    croppedCanvas.toBlob((blob) => {
        // 创建FormData对象并添加图片
        const formData = new FormData();
        formData.append('croppedImage', blob, 'cropped-image.jpg');

        // 模拟上传延迟
        setTimeout(() => {
            alert('图片上传成功!(模拟)');
            console.log('上传的图片数据:', blob);
            // 在实际应用中,你可能需要处理服务器响应
        }, 1000);
    }, 'image/jpeg', 0.9);
}
function downloadImage() {
    if (!croppedCanvas.width || !croppedCanvas.height) {
        alert('请先裁剪图片');
        return;
    }
    // 创建一个临时的a标签用于触发下载
    const link = document.createElement('a');
    link.href = croppedCanvas.toDataURL('image/jpeg', 0.9);
    link.download = 'cropped-image.jpg'; // 设置下载文件名
    link.click();
}
扩展建议
- 支持多种裁剪比例:可以扩展代码以支持不同的裁剪比例(如 4:3、16:9),并通过 UI 控件让用户选择。
- 图像缩放功能:添加对图片缩放的支持,允许用户放大或缩小图片以便更精确地选择裁剪区域。
- 服务器端集成:实际应用中,应将裁剪后的图片发送到服务器进行存储和处理,可以通过请求实现。
完整代码
<!DOCTYPE html>
<html lang="zh-CN">
<head>
    <meta charset="UTF-8">
    <meta name="viewport" content="width=device-width, initial-scale=1.0">
    <title>图片裁剪上传</title>
    <style>
        body {
            max-width: 1200px;
            margin: 0 auto;
            padding: 20px;
        }
        .container {
            display: flex;
            flex-direction: column;
            gap: 20px;
        }
        h1 {
            text-align: center;
        }
        .upload-section {
            padding: 20px;
            text-align: center;
            border-radius: 5px;
            background: #f8f9fa;
            border: 2px dashed #dee2e6;
            transition: all 0.3s ease;
            cursor: pointer;
        }
        .upload-section:hover {
            border-color: #4CAF50;
            background: rgba(76, 175, 80, 0.05);
        }
        .file-label {
            background: linear-gradient(135deg, #4CAF50 0%, #45a049 100%);
            color: white;
            border-radius: 25px;
            padding: 12px 24px;
            transition: transform 0.2s;
        }

        .file-label:hover {
            transform: translateY(-2px);
            box-shadow: 0 4px 15px rgba(76, 175, 80, 0.3);
        }

        .preview-section {
            display: flex;
            flex-direction: column;
            gap: 20px;
            background: #ffffff;
            border-radius: 12px;
            padding: 20px;
            box-shadow: 0 4px 6px rgba(0, 0, 0, 0.05);
        }
        canvas {
            max-width: 100%;
            border: 1px solid #eee;
            display: block;
        }
        .cropper-container {
            position: relative;
            display: inline-block;
        }
        .selection-box {
            position: absolute;
            border: 2px dashed #000;
            background: rgba(255, 255, 255, 0.3);
            cursor: move;
            box-sizing: border-box;
        }
        .resize-handle {
            position: absolute;
            width: 10px;
            height: 10px;
            background: #fff;
            border: 2px solid #000;
            border-radius: 50%;
            bottom: -5px;
            right: -5px;
            cursor: se-resize;
        }
        button {
            padding: 10px 15px;
            background-color: #4CAF50;
            color: white;
            border: none;
            border-radius: 4px;
            cursor: pointer;
            font-size: 16px;
        }
        button:hover {
            background-color: #45a049;
        }
        button {
            background: linear-gradient(135deg, #4CAF50 0%, #45a049 100%);
            border-radius: 25px;
            padding: 12px 24px;
            font-weight: 500;
            box-shadow: 0 4px 6px rgba(76, 175, 80, 0.1);
            transition: all 0.3s ease;
        }

        button:hover {
            transform: translateY(-2px);
            box-shadow: 0 6px 12px rgba(76, 175, 80, 0.2);
        }

        button:disabled {
            opacity: 0.6;
            cursor: not-allowed;
        }
        input[type="file"] {
            display: none;
        }
        .file-label {
            display: inline-block;
            padding: 10px 15px;
            background-color: #f0f0f0;
            border-radius: 4px;
            cursor: pointer;
            margin-bottom: 10px;
        }
        .controls {
            display: flex;
            gap: 10px;
            margin-top: 10px;
            justify-content: center;
        }
        .instruction {
            font-size: 14px;
            color: #666;
            margin-top: 10px;
        }
        .image-container {
            display: flex;
            gap: 20px;
        }
        .image-container > div {
            width: 500px;
        }
    </style>
</head>
<body>
<div class="container">
    <h1>图片裁剪上传</h1>

    <div class="upload-section">
        <input type="file" id="fileInput" accept="image/*">
        <label for="fileInput" class="file-label">选择图片</label>
        <p>或拖放图片到此处</p>
    </div>

    <div class="preview-section">
        <div class="image-container">
            <div>
                <h3>原始图片</h3>
                <img id="originalImage" style="max-width: 100%; display: none;">
                <div class="cropper-container" id="cropperContainer" style="display: none;">
                    <canvas id="sourceCanvas"></canvas>
                    <div class="selection-box" id="selectionBox">
                        <div class="resize-handle"></div>
                    </div>
                </div>
                <p class="instruction">拖动选择框可移动位置,拖动右下角可调整大小</p>
            </div>

            <div>
                <h3>裁剪结果</h3>
                <canvas id="croppedCanvas" style="display: none;"></canvas>
                <p id="noCropMessage">请先选择图片并设置裁剪区域</p>
            </div>
        </div>
    </div>

    <div class="controls">
        <button id="cropBtn" disabled>裁剪图片</button>
        <button id="uploadBtn" disabled>上传图片</button>
        <button id="downloadBtn" disabled>下载图片</button>
        <button id="resetBtn">重置</button>
    </div>
</div>

<script>
    // 获取DOM元素
    const fileInput = document.getElementById('fileInput');
    const originalImage = document.getElementById('originalImage');
    const sourceCanvas = document.getElementById('sourceCanvas');
    const croppedCanvas = document.getElementById('croppedCanvas');
    const cropperContainer = document.getElementById('cropperContainer');
    const selectionBox = document.getElementById('selectionBox');
    const cropBtn = document.getElementById('cropBtn');
    const uploadBtn = document.getElementById('uploadBtn');
    const resetBtn = document.getElementById('resetBtn');
    const noCropMessage = document.getElementById('noCropMessage');
    const downloadBtn = document.getElementById('downloadBtn');

    // 全局变量
    let isDragging = false;
    let isResizing = false;
    let startX, startY;
    let selection = {
        x: 0,
        y: 0,
        width: 0,
        height: 0,
        startX: 0,
        startY: 0,
        startWidth: 0,
        startHeight: 0
    };
    let imageRatio = 1;

    // 监听文件选择
    fileInput.addEventListener('change', handleFileSelect);

    // 拖放功能
    const uploadSection = document.querySelector('.upload-section');
    uploadSection.addEventListener('dragover', (e) => {
        e.preventDefault();
        uploadSection.style.borderColor = '#4CAF50';
    });

    uploadSection.addEventListener('dragleave', () => {
        uploadSection.style.borderColor = '#ccc';
    });

    uploadSection.addEventListener('drop', (e) => {
        e.preventDefault();
        uploadSection.style.borderColor = '#ccc';

        if (e.dataTransfer.files.length) {
            fileInput.files = e.dataTransfer.files;
            handleFileSelect({ target: fileInput });
        }
    });

    // 选择框鼠标事件
    selectionBox.addEventListener('mousedown', startDrag);
    document.addEventListener('mousemove', handleDrag);
    document.addEventListener('mouseup', endDrag);

    // 调整大小手柄事件
    const resizeHandle = document.querySelector('.resize-handle');
    resizeHandle.addEventListener('mousedown', (e) => {
        e.stopPropagation();
        startResize(e);
    });

    // 下载图片
    function downloadImage() {
        if (!croppedCanvas.width || !croppedCanvas.height) {
            alert('请先裁剪图片');
            return;
        }
        // 创建一个临时的a标签用于触发下载
        const link = document.createElement('a');
        link.href = croppedCanvas.toDataURL('image/jpeg', 0.9);
        link.download = 'cropped-image.jpg'; // 设置下载文件名
        link.click();
    }

    // 按钮事件
    cropBtn.addEventListener('click', cropImage);
    uploadBtn.addEventListener('click', uploadImage);
    resetBtn.addEventListener('click', resetAll);
    downloadBtn.addEventListener('click', downloadImage);

    // 处理文件选择
    function handleFileSelect(event) {
        const file = event.target.files[0];
        if (!file || !file.type.match('image.*')) {
            alert('请选择有效的图片文件');
            return;
        }

        const reader = new FileReader();
        reader.onload = function(e) {
            originalImage.src = e.target.result;
            originalImage.onload = function() {
                initCropper();
            };
        };
        reader.readAsDataURL(file);
    }

    // 初始化裁剪器
    function initCropper() {
        // 显示原始图片和裁剪区域
        originalImage.style.display = 'none';
        cropperContainer.style.display = 'inline-block';

        // 设置canvas尺寸
        const maxWidth = 500;
        imageRatio = originalImage.naturalWidth / originalImage.naturalHeight;

        let canvasWidth, canvasHeight;
        if (originalImage.naturalWidth > maxWidth) {
            canvasWidth = maxWidth;
            canvasHeight = maxWidth / imageRatio;
        } else {
            canvasWidth = originalImage.naturalWidth;
            canvasHeight = originalImage.naturalHeight;
        }

        sourceCanvas.width = canvasWidth;
        sourceCanvas.height = canvasHeight;

        // 绘制图片到canvas
        const ctx = sourceCanvas.getContext('2d');
        ctx.drawImage(originalImage, 0, 0, canvasWidth, canvasHeight);

        // 初始化选择框 (1:1比例)
        const boxSize = Math.min(canvasWidth, canvasHeight) * 0.6;
        selection = {
            x: Math.max(0, Math.min((canvasWidth - boxSize) / 2, canvasWidth - boxSize)), // 确保初始位置在画布范围内
            y: Math.max(0, Math.min((canvasHeight - boxSize) / 2, canvasHeight - boxSize)), // 确保初始位置在画布范围内
            width: boxSize,
            height: boxSize,
            startX: 0,
            startY: 0,
            startWidth: 0,
            startHeight: 0
        };

        updateSelectionBox();
        cropBtn.disabled = false;
    }

    // 更新选择框位置和尺寸
    function updateSelectionBox() {
        selectionBox.style.left = `${selection.x}px`;
        selectionBox.style.top = `${selection.y}px`;
        selectionBox.style.width = `${selection.width}px`;
        selectionBox.style.height = `${selection.height}px`;
    }

    // 开始拖动
    function startDrag(e) {
        if (e.target.classList.contains('resize-handle')) {
            return; // 忽略调整大小手柄的点击
        }

        isDragging = true;
        startX = e.clientX;
        startY = e.clientY;

        // 存储初始位置
        selection.startX = selection.x;
        selection.startY = selection.y;

        e.preventDefault();
    }

    // 处理拖动
    function handleDrag(e) {
        if (!isDragging && !isResizing) return;

        const dx = e.clientX - startX;
        const dy = e.clientY - startY;

        if (isDragging) {
            // 处理移动选择框
            let newX = selection.startX + dx;
            let newY = selection.startY + dy;

            // 限制在canvas范围内
            newX = Math.max(0, Math.min(newX, sourceCanvas.width - selection.width));
            newY = Math.max(0, Math.min(newY, sourceCanvas.height - selection.height));

            selection.x = newX;
            selection.y = newY;
        } else if (isResizing) {
            // 处理调整大小 (保持1:1比例)
            let newSize = Math.max(10, Math.min(
                selection.startWidth + (dx + dy) / 2, // 取dx和dy的平均值使调整更平滑
                Math.min(
                    sourceCanvas.width - selection.startX,
                    sourceCanvas.height - selection.startY
                )
            ));

            // 应用新尺寸 (保持正方形)
            selection.width = newSize;
            selection.height = newSize;

            // 确保裁剪框不会超出画布范围
            if (selection.x + selection.width > sourceCanvas.width) {
                selection.x = sourceCanvas.width - selection.width;
            }
            if (selection.y + selection.height > sourceCanvas.height) {
                selection.y = sourceCanvas.height - selection.height;
            }
        }

        updateSelectionBox();
    }

    // 结束拖动或调整大小
    function endDrag() {
        isDragging = false;
        isResizing = false;
    }

    // 开始调整大小
    function startResize(e) {
        isResizing = true;
        startX = e.clientX;
        startY = e.clientY;

        // 存储初始尺寸和位置
        selection.startX = selection.x;
        selection.startY = selection.y;
        selection.startWidth = selection.width;
        selection.startHeight = selection.height;

        e.preventDefault();
    }

    // 裁剪图片
    function cropImage() {
        const ctx = croppedCanvas.getContext('2d');
        // 设置裁剪后canvas的尺寸 (1:1)
        croppedCanvas.width = selection.width;
        croppedCanvas.height = selection.height;
        // 执行裁剪
        ctx.drawImage(
            sourceCanvas,
            selection.x, selection.y, selection.width, selection.height, // 源图像裁剪区域
            0, 0, selection.width, selection.height                     // 目标canvas绘制区域
        );
        // 显示裁剪结果
        croppedCanvas.style.display = 'block';
        noCropMessage.style.display = 'none';
        uploadBtn.disabled = false;
        downloadBtn.disabled = false;
    }

    // 上传图片
    function uploadImage() {
        // 在实际应用中,这里应该将图片数据发送到服务器
        croppedCanvas.toBlob((blob) => {
            // 创建FormData对象并添加图片
            const formData = new FormData();
            formData.append('croppedImage', blob, 'cropped-image.jpg');

            // 模拟上传延迟
            setTimeout(() => {
                alert('图片上传成功!(模拟)');
                console.log('上传的图片数据:', blob);
                // 在实际应用中,你可能需要处理服务器响应
            }, 1000);
        }, 'image/jpeg', 0.9);
    }

    // 重置所有
    function resetAll() {
        // 隐藏元素
        cropperContainer.style.display = 'none';
        croppedCanvas.style.display = 'none';
        noCropMessage.style.display = 'block';
        originalImage.style.display = 'none';

        // 重置按钮状态
        cropBtn.disabled = true;
        uploadBtn.disabled = true;
        downloadBtn.disabled = true;

        // 清除文件输入
        fileInput.value = '';

        // 清除画布
        const ctx = sourceCanvas.getContext('2d');
        ctx.clearRect(0, 0, sourceCanvas.width, sourceCanvas.height);

        const croppedCtx = croppedCanvas.getContext('2d');
        croppedCtx.clearRect(0, 0, croppedCanvas.width, croppedCanvas.height);
    }
</script>
</body>
</html>
 396


 扫一扫


 被折叠的 条评论
为什么被折叠?
 到【灌水乐园】发言


