


 本文详细介绍了在项目中优化Redis整合的过程,包括项目结构调整、配置管理后台改进、配置类与插件类的设计,以及使用存储过程批量初始化配置。通过这些优化,实现了更高效、便捷的Redis配置管理。
前言
经过上一篇草稿篇redis整合,痛定思痛,提取了各个部分然后重新组织项目结构,优化完善。
上一篇是:
一个基本开发框架的整合演化之路–4(1)、整合redis试作品篇【草稿性质可跳过】
背景说明
当整合完redis以后发现,这样的整合复杂麻烦而且费劲,所以项目都基本重新装修了一次。
下面会逐步说明的。
项目结构变更说明
项目结构如下:

项目clover【取自幸福四叶草的意思】目前共有几个模块。
其中:
xxl-conf-core以及xxl-conf-admin 不用想了,就是从许雪里大神的项目里面download下来的xxl-conf项目,其中xxl-conf-admin是做了前面的特殊符号输入规则的修改的。
Shared项目---人如其名,是基础工具类,常用很多工具类。
FileServerWebApp---原则上是一个文件服务器程序,用于对外提供文件上传的服务,也是这系列文章用来示范如何整合框架各种技术【xxl-conffastdfs、redis、spring mvc、postgresql、sofarpc等等】的demo项目。
WebExt -- 这个项目是比较新的,用来存放spring、fastdfs第三方插件配置以及工具插件的地方。
libs---这是一个文件夹,用来存放jar--都是些maven仓库都找不到的古董了。
下面继续说一些作出的修改,当然,这篇文章是用不到的:
各项目更改说明
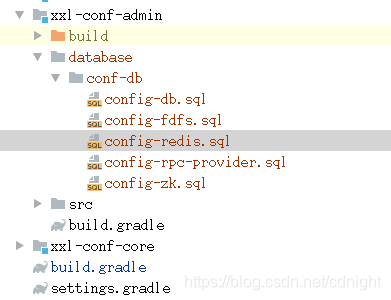
xxl-conf-admin【配置管理后台】变更说明
xxl-conf-admin的项目下面有
conf-db的文件夹,里面存放的都是在整合各个第三方插件、软件、服务—譬如redis时候的初始化xxl-conf配置中心的文件,下面以redis的配置文件为例子说明:
-- 直接用脚本导入数据库默认配置,方便省事。
-- 小技巧,如果是手动添加数据,那么可以执行这个sql从数据库中直接查找需要的数据,生成需要的数据拼接字符串:
-- with t1 as(
-- select concat("key",'->',"title",'->',value,'$$') as str from xxl_conf_node where env='test' and "key" like 'file-server.redis.%')
-- select string_agg(str,'') from t1;
create or replace function "initRedisConfig"(
in envName varchar,
in para_appname varchar
)
returns varchar
as $BODY$

  declare _defaultValues varchar;
  declare _envName varchar;
  declare _appname varchar;
  declare _prefix varchar;
  declare strArrays varchar[];

  declare arrItemLv1 varchar;
  declare tempArrSubItem varchar;
  declare valArrs varchar[];

  declare item_attr varchar;
  declare item_title varchar;
  declare item_val varchar;
  begin

    if envName <> 'test' and envName<> 'ppe' and envName<> 'product' then

      raise notice '环境变量异常,只能为test、ppe以及product其中一个。';
      return '环境变量异常,只能为test、ppe以及product其中一个。';

    end if;

    _appname:=para_appname;
    _prefix:=concat(_appname,'.redis.','');
  _defaultValues:=
      'auth->验证用的密码,假如没有不需要验证的话,请留空->$$' ||
      'dbIndex->redis默认使用的db的序号【共有12个】->1$$' ||
      'host->redis服务器所在ip地址或者hostname->localhost$$' ||
      'max_active->redis最大激活连接数量->1000$$' ||
      'max_idle->redis控制一个pool最多有多少个状态为idle(空闲的)的jedis实例,默认值也是8。->200$$' ||
      'max_wait->等待可用连接的最大时间,单位毫秒,默认值为-1,表示永不超时。如果超过等待时间,则直接抛出JedisConnectionException;->5000$$' ||
      'needAuth->是否需要验证,输入 true 或者 false 两种布尔值->false$$' ||
      'port->redis的服务端口,请填写数字->6379$$' ||
      'test_on_borrow->在borrow一个jedis实例时,是否提前进行validate操作;如果为true,则得到的jedis实例均是可用的->true$$' ||
      'timeout->超时时间->10000$$'
    ;

  strArrays:=string_to_array(_defaultValues,'$$');
  _envName:=envName;

insert into xxl_conf_project ("appname", title) values (_appname,_appname) on conflict ("appname") do nothing;
  <<loop4BigArray>>
    foreach arrItemLv1 in array  strArrays

      loop

        if char_length(arrItemLv1) < 1 then
          raise notice '空字符串无须处理';
          continue ;
        end if;
        valArrs:=string_to_array(arrItemLv1,'->');
        item_attr:=valArrs[1];
        item_title:=valArrs[2];
        item_val:=valArrs[3];

      raise notice '属性名称:%,描述:%,当前值:%',item_attr,item_title,item_val;
      raise notice '开始添加记录';
        insert into xxl_conf_node("env","key","appname","title","value")
        values (_envName,concat(_prefix,item_attr),_appname,item_title,item_val)
        on conflict ("env","key") do nothing ;

    end loop loop4BigArray;


    return envName||'环境下的'||_appName||'配置成功';
  end;

  $BODY$ language plpgsql volatile ;
-- 记住执行下面方法分别添加三个环境下的默认数据。
-- select "initRedisConfig"('test','file-server');
-- select "initRedisConfig"('ppe','file-server');
-- select "initRedisConfig"('product','file-server');
这段代码的意思是,在数据执行这个文件,就会生成一个initRedisConfig的存储过程,只要你调用了,select “initRedisConfig”(‘test’,‘file-server’) ,就能够在测试环境下,appname为file-server的配置里面插入redis的相关默认配置信息,比手动一个一个输入方便多了,以后还会有各种项目,譬如:im社交等等,到时候就调用select “initRedisConfig”(‘test’,‘im’)生成。
WebExt说明
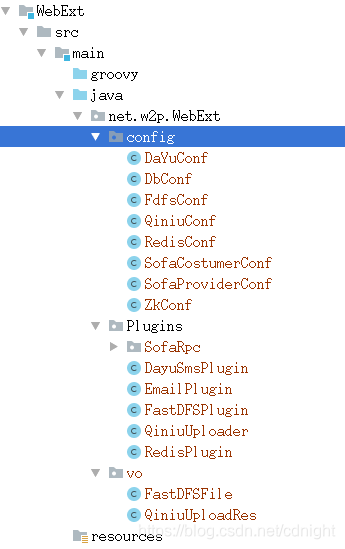
WebExt里面绝对有配置类,还有plugin类,以redis为例说明:
配置类:
package net.w2p.WebExt.config;

/***
 *
 * 提取redis的设置
 *
 * redis.needAuth = false
 * redis.auth = none
 * #host
 * redis.HOST = localhost
 * #port
 * redis.PORT = 6379
 * #db index
 * redis.DbIndex = 3
 * ***/
public class RedisConf {
    public Boolean needAuth = false;//是否需要验证
    public String auth = "";//验证用的密码
    public String host = "localhost";

    public Integer port = 6379;

    public Integer dbIndex = 3;


    //    public  Integer MAX_ACTIVE =1000;
    public  Integer max_active =1000;
    // FileUtil.getPropertyValueInt("/properties/redis.properties", "max_active");;

    //控制一个pool最多有多少个状态为idle(空闲的)的jedis实例,默认值也是8。
    public  Integer max_idle = 200;
    //FileUtil.getPropertyValueInt("/properties/redis.properties", "max_idle");;

    //等待可用连接的最大时间,单位毫秒,默认值为-1,表示永不超时。如果超过等待时间,则直接抛出JedisConnectionException;
    public  Integer max_wait =5000;
    //FileUtil.getPropertyValueInt("/properties/redis.properties", "max_wait");;

    //超时时间
    public  Integer timeout = 10000;
    //FileUtil.getPropertyValueInt("/properties/redis.properties", "timeout");;

    //在borrow一个jedis实例时,是否提前进行validate操作;如果为true,则得到的jedis实例均是可用的;
    public  Boolean test_on_borrow = true;
    //FileUtil.getPropertyValueBoolean("/properties/redis.properties", "test_on_borrow");


    public Boolean getNeedAuth() {
        return needAuth;
    }

    public void setNeedAuth(Boolean needAuth) {
        this.needAuth = needAuth;
    }

    public String getAuth() {
        return auth;
    }

    public void setAuth(String auth) {
        this.auth = auth;
    }

    public String getHost() {
        return host;
    }

    public void setHost(String host) {
        this.host = host;
    }

    public Integer getPort() {
        return port;
    }

    public void setPort(Integer port) {
        this.port = port;
    }

    public Integer getDbIndex() {
        return dbIndex;
    }

    public void setDbIndex(Integer dbIndex) {
        this.dbIndex = dbIndex;
    }

    public Integer getMax_active() {
        return max_active;
    }

    public void setMax_active(Integer max_active) {
        this.max_active = max_active;
    }

    public Integer getMax_idle() {
        return max_idle;
    }

    public void setMax_idle(Integer max_idle) {
        this.max_idle = max_idle;
    }

    public Integer getMax_wait() {
        return max_wait;
    }

    public void setMax_wait(Integer max_wait) {
        this.max_wait = max_wait;
    }

    public Integer getTimeout() {
        return timeout;
    }

    public void setTimeout(Integer timeout) {
        this.timeout = timeout;
    }

    public Boolean isTest_on_borrow() {
        return test_on_borrow;
    }

    public void setTest_on_borrow(Boolean test_on_borrow) {
        this.test_on_borrow = test_on_borrow;
    }
}
里面都是配置参数,
而plugin类:
package net.w2p.WebExt.Plugins;


import net.w2p.Shared.common.WebTools;
import net.w2p.WebExt.config.RedisConf;
import org.springframework.context.annotation.DependsOn;
import org.springframework.stereotype.Service;
import redis.clients.jedis.Jedis;
import redis.clients.jedis.JedisPool;
import redis.clients.jedis.JedisPoolConfig;
import java.io.*;
import java.net.URL;
import java.util.*;
import java.util.concurrent.ConcurrentHashMap;

/****
 *
 * 需要在spring里面进行托管。
 *
 * ***/

public class RedisPlugin {


    /****
     * 注意,这里需要存储一下其他redis的实例,假如因为某个原因而没有释放资源,那么这里就需要释放资源了,你永远也不知道什么地方漏了释放资源的。
     * **/
    private ConcurrentHashMap<Jedis,Long> redisInstanceCachePool =new ConcurrentHashMap<>();
    private JedisPool jedisPool = null;
    /**
     * redis过期时间,以秒为单位
     */
    public final static int EXRP_HOUR = 60*60;          //一小时
    public final static int EXRP_DAY = 60*60*24;        //一天
    public final static int EXRP_MONTH = 60*60*24*30;   //一个月


    private RedisConf redisConf;

    public RedisPlugin(RedisConf redisConf){
        this.redisConf=redisConf;
    }


    /**
     * 初始化Redis连接池
     */
    private  void initialPool(){
        try {


            JedisPoolConfig config = new JedisPoolConfig();

            config.setMaxTotal(redisConf.max_active);
            config.setMaxIdle(redisConf.max_idle);
            config.setMaxWaitMillis(redisConf.max_wait);
            config.setTestOnBorrow(redisConf.test_on_borrow);

            if(redisConf.needAuth){
                jedisPool = new JedisPool(config, redisConf.host,
                        redisConf.port,
                        redisConf.timeout,redisConf.auth);
            }
            else{
                jedisPool = new JedisPool(config, redisConf.host, redisConf.port,
                        redisConf.timeout);
            }


        } catch (Exception e) {
            e.printStackTrace();
            try{

            }catch(Exception e2){
                e2.printStackTrace();
            }
        }


    }


    /**
     * 同步获取Jedis实例
     * @return Jedis
     */
    public synchronized  Jedis getJedis() {
        if (jedisPool == null) {
            initialPool();
        }
        Jedis jedis = null;
        try {
            if (jedisPool != null) {
                jedis = jedisPool.getResource();
                jedis.select(redisConf.dbIndex);
                Long nowTime= WebTools.getPhpTimeStamp(new Date().getTime());
                redisInstanceCachePool.put(jedis,nowTime);
            }
        } catch (Exception e) {
            e.printStackTrace();
        }finally{

        }
        return jedis;
    }


    /**
     * 释放jedis资源
     * @param jedis
     */
    public  synchronized void returnResource(final Jedis jedis) {
        if (jedis != null && jedisPool !=null) {
            jedisPool.returnResource(jedis);
            if(redisInstanceCachePool.containsKey(jedis)){
                redisInstanceCachePool.remove(jedis);
            }
        }
    }
 }
就是对redis进行操作,获取redis实例的一个插件类了—ps:这个类可以在spring里面托管,到时候autowired使用即可。
FileServerWebApp demo项目说明
项目里面加了一个beanConfiguration文件夹,是这样的:

里面的含义是,这个文件夹下面的都是spring的配置文件,只不过用的是java代码而已,
ps:可能有部分朋友完全没用过java代码做配置,毕竟网上大部分都是xml配置,可以参考
在Spring中使用@Configuration注解加载JavaConfig配置
Spring Boot 自定义数据源 DruidDataSource
spring bean加载顺序解决办法笔记
Druid连接池基本配置
以redis的配置作为例子说明: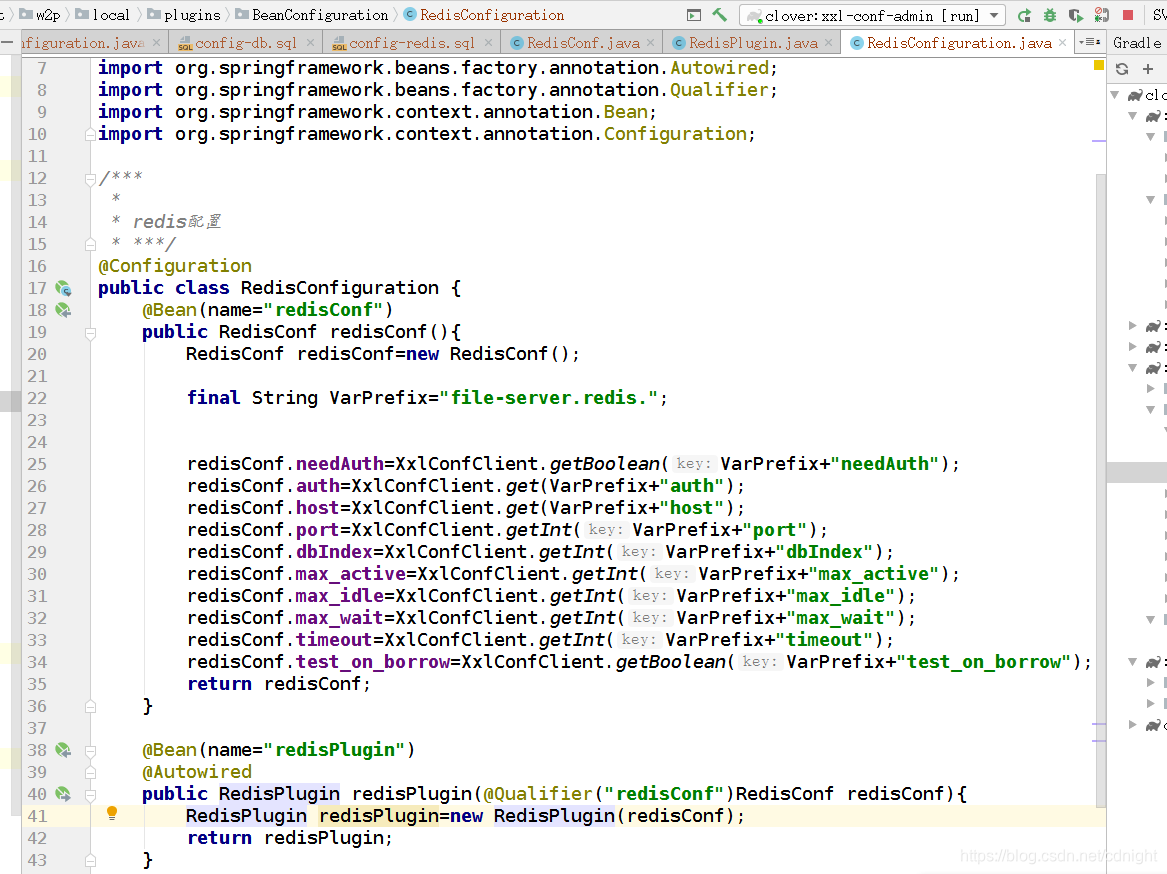
这个配置例子说明,注册了一个name为redisConf的bean【是RedisConf的一个实例】,注册了一个name为redisPlugin的bean【是RedisPlugin的一个实例,并且该实例在初始化过程中需要用到前面提到过的redisConf(注入)】
结语
这份东西看起来还是有点复杂了。


 被折叠的 条评论
为什么被折叠?
被折叠的 条评论
为什么被折叠?
 到【灌水乐园】发言


