


 本文详细介绍了如何在Spring Cloud环境中将微服务注册到EurekaServer,包括配置pom.xml、application.yml以及启动类的具体步骤。同时,解析了Eureka的自我保护机制及其在生产环境中的作用。
将微服务注册到Eureka Server
我们创建一个新的module, cloud-service-member。
- 配置一下pom.xml
<?xml version="1.0" encoding="UTF-8"?>
<project xmlns="http://maven.apache.org/POM/4.0.0"
         xmlns:xsi="http://www.w3.org/2001/XMLSchema-instance"
         xsi:schemaLocation="http://maven.apache.org/POM/4.0.0 http://maven.apache.org/xsd/maven-4.0.0.xsd">
    <parent>
        <artifactId>spring-cloud-demo</artifactId>
        <groupId>com.cc.cloud</groupId>
        <version>1.0</version>
    </parent>
    <modelVersion>4.0.0</modelVersion>

    <artifactId>cloud-service-member</artifactId>


    <dependencies>
        <dependency>
            <groupId>com.cc.cloud</groupId>
            <artifactId>cloud-common</artifactId>
        </dependency>
        <dependency>
            <groupId>org.springframework.cloud</groupId>
            <artifactId>spring-cloud-starter-netflix-eureka-client</artifactId>
        </dependency>
        <dependency>
            <groupId>org.springframework.boot</groupId>
            <artifactId>spring-boot-starter-web</artifactId>
        </dependency>
    </dependencies>
</project>
<artifactId>spring-cloud-starter-eureka</artifactId>已经过期,推荐使用<artifactId>spring-cloud-starter-netflix-eureka-client</artifactId>
加入<artifactId>spring-boot-starter-web</artifactId>是为了让我们的服务以web应用的形式启动。
- 在parent的pom.xml中也加入common模块的版本管理。
<dependency>
        <groupId>com.cc.cloud</groupId>
        <artifactId>cloud-common</artifactId>
        <version>1.0</version>
 </dependency>
- 然后我们加入application.yml
eureka:
  client:
    service-url:
      defaultZone: http://localhost:8888/eureka/
server:
  port: 8762
spring:
  application:
    name: cloud-service-member
其中,spring.application.name用于指定注册到Eureka Server上的应用名称。如果配置了eureka
.instance.prefer-ip-address=true 表示将自己的IP注册到Eureka Server。如不配置该属性或将其设置为false,则表示注册微服务所在操作系统的hostname到Eureka Server。
如果想配置多个eureka server实现高可用,可以在 defaultZone后面配置多个eureka server的地址,以逗号分隔。
- 加入启动类
package com.cc.cloud.member;

import org.springframework.boot.SpringApplication;
import org.springframework.boot.autoconfigure.SpringBootApplication;
import org.springframework.cloud.netflix.eureka.EnableEurekaClient;

@SpringBootApplication
@EnableEurekaClient
public class MemberApp {
    public static void main(String[] args) {
        SpringApplication.run(MemberApp.class, args);
    }
}
这里使用@EnableEurekaclient注解替代@EnableDiscoveryClient。在Spring Cloud中,服务发现组件有多种选择,例如Zookeeper、Consul等。@EnableDiscoveryClient为各种服务组件提供了支持,该注解是spring-cloud-commons项目的注解,是一个高度的抽象;而@EnableEurekaClient表明是Eureka的Client,该注解是spring-cloud-netflix项目中的注解,只能与Eureka一起工作。当Eureka在项目的claspath中时,两个注解没有区别。
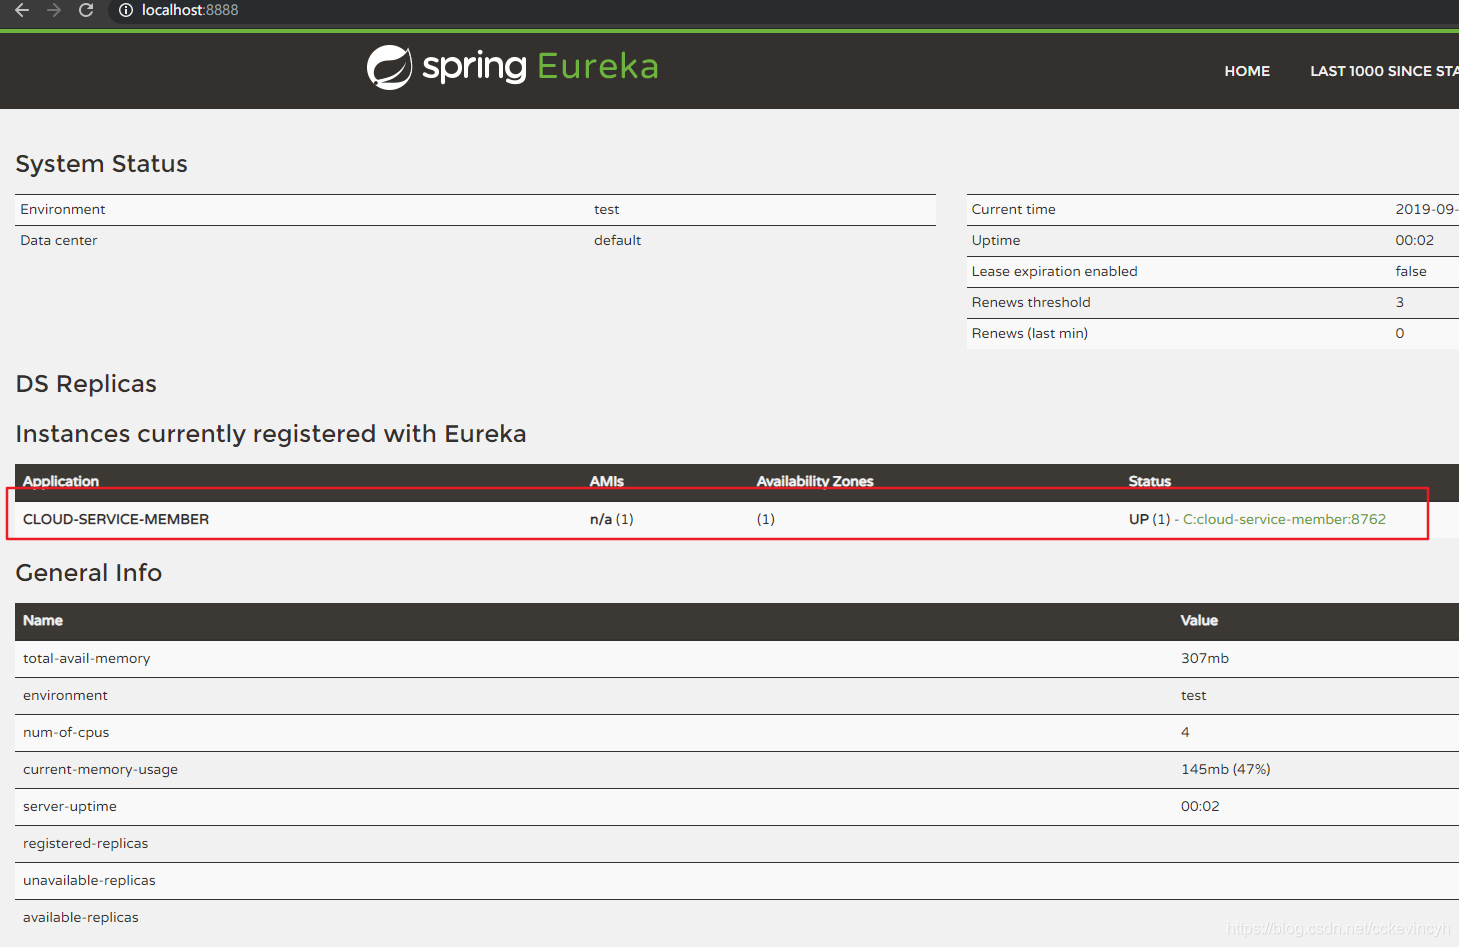
- 启动我们eureka server和member service
访问eureka server的地址: http://localhost:8888
然后我们再创建一个新的module, cloud-service-order。也是同样的步骤配置。
pom.xml配置
<?xml version="1.0" encoding="UTF-8"?>
<project xmlns="http://maven.apache.org/POM/4.0.0"
         xmlns:xsi="http://www.w3.org/2001/XMLSchema-instance"
         xsi:schemaLocation="http://maven.apache.org/POM/4.0.0 http://maven.apache.org/xsd/maven-4.0.0.xsd">
    <parent>
        <artifactId>spring-cloud-demo</artifactId>
        <groupId>com.cc.cloud</groupId>
        <version>1.0</version>
    </parent>
    <modelVersion>4.0.0</modelVersion>

    <artifactId>cloud-service-order</artifactId>
    <dependencies>
        <dependency>
            <groupId>com.cc.cloud</groupId>
            <artifactId>cloud-common</artifactId>
        </dependency>
        <dependency>
            <groupId>org.springframework.cloud</groupId>
            <artifactId>spring-cloud-starter-netflix-eureka-client</artifactId>
        </dependency>
        <dependency>
            <groupId>org.springframework.boot</groupId>
            <artifactId>spring-boot-starter-web</artifactId>
        </dependency>
    </dependencies>
</project>
application.yml配置
eureka:
  client:
    serviceUrl:
      defaultZone: http://localhost:8888/eureka/
server:
  port: 8765
spring:
  application:
    name: cloud-service-order
启动类
package com.cc.cloud.order;

import org.springframework.boot.SpringApplication;
import org.springframework.boot.autoconfigure.SpringBootApplication;
import org.springframework.cloud.netflix.eureka.EnableEurekaClient;

@SpringBootApplication
@EnableEurekaClient
public class OrderApp {
    public static void main(String[] args) {
        SpringApplication.run(OrderApp.class, args);
    }
}
查看eureka server
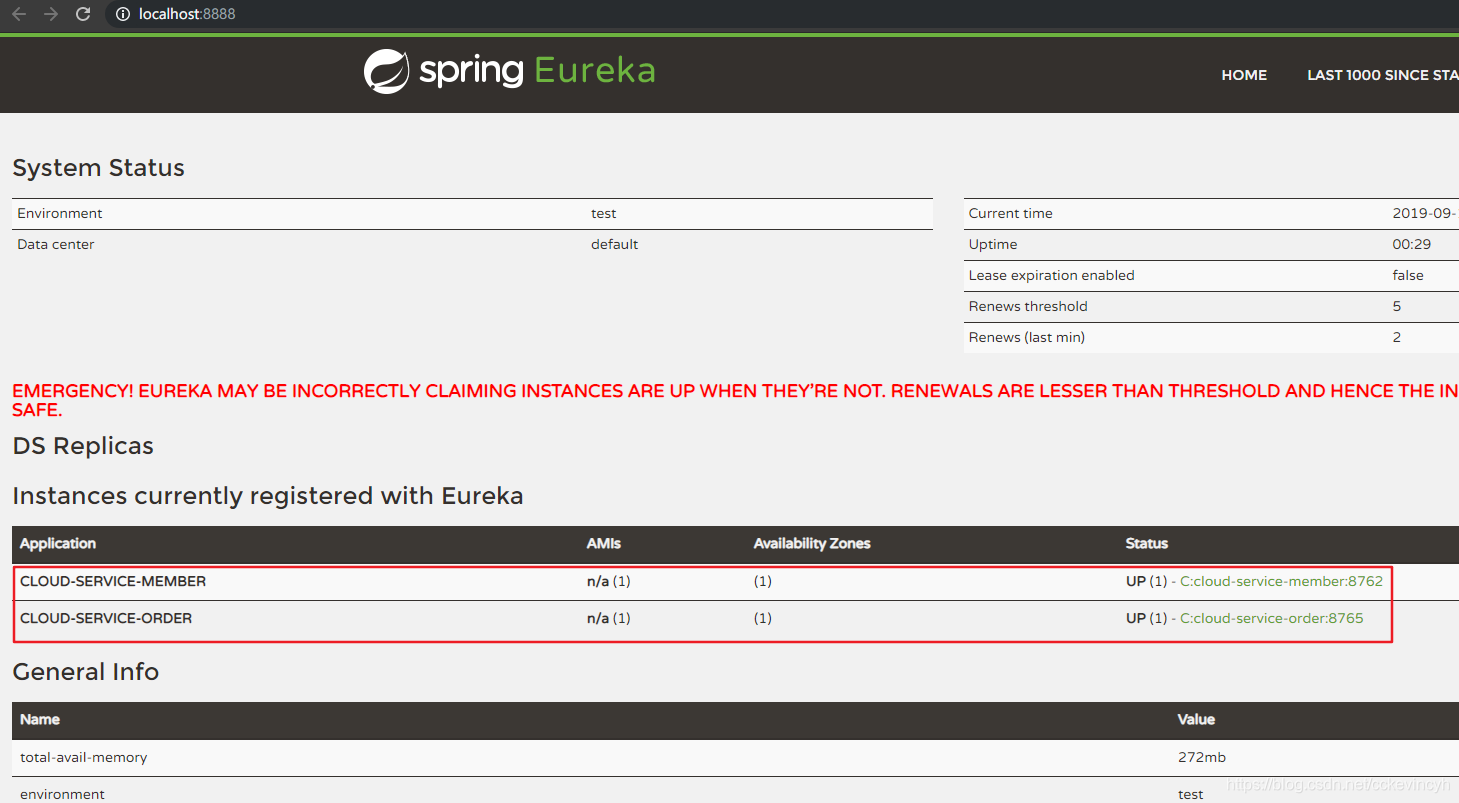
我们可以看到eureka上面有一段红色的警告。EMERGENCY! EUREKA MAY BE INCORRECTLY CLAIMING INSTANCES ARE UP WHEN THEY'RE NOT. RENEWALS ARE LESSER THAN THRESHOLD AND HENCE THE INSTANCES ARE NOT BEING EXPIRED JUST TO BE SAFE.
原因是:这个是Eureka的自我保护机制。Eureka Server在运行期间,会统计心跳失败的比例在15分钟之内是否低于85%,如果出现低于的情况(在单机调试的时候很容易满足,实际在生产环境上通常是由于网络不稳定导致),Eureka Server会将当前的实例注册信息保护起来,同时提示这个警告。
参考:https://www.cnblogs.com/gudi/p/8645370.html
默认情况下,如果Eureka Server在一定时间内没有接收到某个微服务实例的心跳,Eureka Server 将会注销该实例(默认90秒)。但是当网络分区故障发生时,微服务与Eureka Server之间无法正常通信,以上行为可能变得非常危险了——因为微服务本身其实是健康的,此时本不应该注销这个微服务。
Eureka通过“自我保护模式”来解决这个问题—一当Eureka Server节点在短时间内丢失过多客户端时(可能发生了网络分区故障),那么这个节点就会进入自我保护模式。一旦进入该模式,Eureka Server就会保护服务注册表中的信息,不再删除服务注册表中的数据(也就是不会注销任何微服务)。当网络故障恢复后,该Eureka Server节点会自动退出自我保护模式。
综上,自我保护模式是一种应对网络异常的安全保护措施。它的架构哲学是宁可同时保留所有微服务(健康的微服务和不健康的微服务都会保留),也不盲目注销任何健康的微服务。使用自我保护模式,可以让Eureka集群更加的健壮、稳定。
在Spring Cloud中,可以使用eureka.server.enable-self-preservation=false禁用自我保护模式。
参考
SpringCloud与Docker微服务架构实战-完整版.pdf
源代码
https://gitee.com/cckevincyh/spring-cloud-demo/tree/eureka-client


 2792
2792

 被折叠的 条评论
为什么被折叠?
被折叠的 条评论
为什么被折叠?
 到【灌水乐园】发言


