


 本文详细介绍了Java中Executor框架的使用,包括ExecutorService接口、线程池创建方法及其内部实现,如newFixedThreadPool、newCachedThreadPool和newScheduledThreadPool。并通过示例代码展示了不同线程池的特性与应用场景。
我总结出了很多互联网公司的面试题及答案,并整理成了文档,以及各种学习的进阶学习资料,免费分享给大家。
扫描二维码或搜索下图红色VX号,加VX好友,拉你进【程序员面试学习交流群】免费领取。也欢迎各位一起在群里探讨技术。
目录
Executor接口介绍
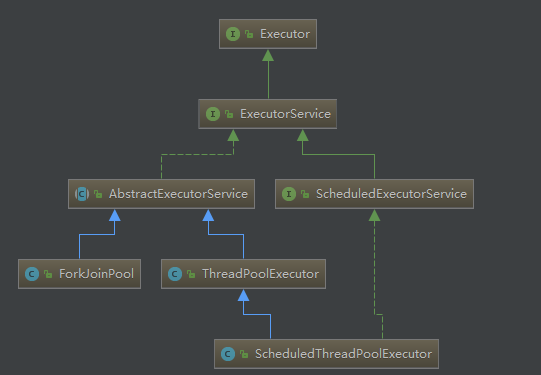
Executor是一个接口,里面提供了一个execute方法,该方法接收一个Runable参数,如下
public interface Executor {

    void execute(Runnable command);

}
Executor框架的常用类和接口结构图
线程对象及线程执行返回的对象
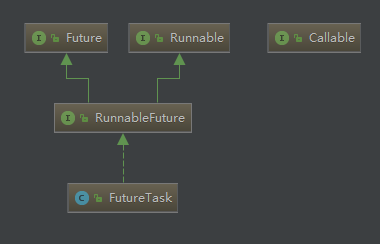
线程对象
线程对象就是提交给线程池的任务,可以实现Runable接口或Callable接口。或许这边会产生一个疑问,为什么Runable接口和Callable接口没有任何关联,却都能作为任务来执行?大家可以思考下,文章的结尾会对此进行说明
Future接口
Future接口和FutureTask类是用来接收线程异步执行后返回的结果,可以看到下方ExecutorService接口的submit方法返回的就是Future。
ExecutorService常用接口介绍
接下来我们来看看继承了Executor接口的ExecutorService
public interface ExecutorService extends Executor {

    //正常关闭(不再接收新任务,执行完队列中的任务)

    void shutdown();

    //强行关闭(关闭当前正在执行的任务,返回所有尚未启动的任务清单)

    List<Runnable> shutdownNow();

    boolean isShutdown();

    boolean isTerminated();

    <T> Future<T> submit(Callable<T> task);

    <T> Future<T> submit(Runnable task, T result);

    Future<?> submit(Runnable task);

    ...

}
ThreadPoolExecutor构造函数介绍
在介绍穿件线程池的方法之前要先介绍一个类ThreadPoolExecutor,应为Executors工厂大部分方法都是返回ThreadPoolExecutor对象,先来看看它的构造函数吧
public ThreadPoolExecutor(int corePoolSize,

                              int maximumPoolSize,

                              long keepAliveTime,

                              TimeUnit unit,

                              BlockingQueue<Runnable> workQueue,

                              ThreadFactory threadFactory,

                              RejectedExecutionHandler handler) {...}
参数介绍
| 参数 | 类型 | 含义 |
|---|---|---|
| corePoolSize | int | 核心线程数 |
| maximumPoolSize | int | 最大线程数 |
| keepAliveTime | long | 存活时间 |
| unit | TimeUnit | 时间单位 |
| workQueue | BlockingQueue | 存放线程的队列 |
| threadFactory | ThreadFactory | 创建线程的工厂 |
| handler | RejectedExecutionHandler | 多余的的线程处理器(拒绝策略) |
创建线程池的一些方法介绍
为什么要讲ExecutorService接口呢?是因为我们使用Executors的方法时返回的大部分都是ExecutorService。
Executors提供了几个创建线程池方法,接下来我就介绍一下这些方法
newFixedThreadPool(int nThreads)

创建一个线程的线程池,若空闲则执行,若没有空闲线程则暂缓在任务队列中。

newWorkStealingPool()

创建持有足够线程的线程池来支持给定的并行级别,并通过使用多个队列,减少竞争,它需要穿一个并行级别的参数,如果不传,则被设定为默认的CPU数量。

newSingleThreadExecutor()

该方法返回一个固定数量的线程池

该方法的线程始终不变,当有一个任务提交时,若线程池空闲,则立即执行,若没有,则会被暂缓在一个任务队列只能怪等待有空闲的线程去执行。

newCachedThreadPool()

返回一个可根据实际情况调整线程个数的线程池,不限制最大线程数量,若有空闲的线程则执行任务,若无任务则不创建线程,并且每一个空闲线程会在60秒后自动回收。

newScheduledThreadPool(int corePoolSize)

返回一个SchededExecutorService对象,但该线程池可以设置线程的数量,支持定时及周期性任务执行。


newSingleThreadScheduledExecutor()

创建一个单例线程池,定期或延时执行任务。
下面讲解下几个常用的方法,创建单个的就不说明了
newFixedThreadPool方法
该方法创建指定线程数量的线程池,没有限制可存放的线程数量(无界队列),适用于线程任务执行较快的场景。

看看Executors工厂内部是如何实现的
public static ExecutorService newFixedThreadPool(int nThreads) {

    return new ThreadPoolExecutor(nThreads, nThreads,

                                  0L, TimeUnit.MILLISECONDS,

                                  new LinkedBlockingQueue<Runnable>());

}
可以看到返回的是一个ThreadPoolExecutor对象,核心线程数和是最大线程数都是传入的参数,存活时间是0,时间单位是毫秒,阻塞队列是无界队列LinkedBlockingQueue。
由于队列采用的是无界队列LinkedBlockingQueue,最大线程数maximumPoolSize和keepAliveTime都是无效参数,拒绝策略也将无效,为什么?
这里又延伸出一个问题,无界队列说明任务没有上限,如果执行的任务比较耗时,那么新的任务会一直存放在线程池中,线程池的任务会越来越多,将会导致什么后果?下面的代码可以试试
public class Main {

    public static void main(String[] args){

        ExecutorService pool = Executors.newFixedThreadPool(Runtime.getRuntime().availableProcessors());

        while (true){

            pool.submit(new Runnable() {

                @Override

                public void run() {

                    try {

                        Thread.sleep(10000);

                    } catch (InterruptedException e) {

                        e.printStackTrace();

                    }

                }

            });

        }

    }

}
示例代码
public class Main {

    public static void main(String[] args){

        ExecutorService pool = Executors.newFixedThreadPool(4);

        for (int i = 0; i < 8; i++) {

            int finalI = i + 1;

            pool.submit(() -> {

                try {

                    System.out.println("任务"+ finalI +":开始等待2秒,时间:"+LocalTime.now()+",当前线程名:"+Thread.currentThread().getName());

                    Thread.sleep(2000);

                    System.out.println("任务"+ finalI +":结束等待2秒,时间:"+LocalTime.now()+",当前线程名:"+Thread.currentThread().getName());

                } catch (InterruptedException e) {

                    e.printStackTrace();

                }

            });

        }

        pool.shutdown();

    }

}
输出结果
任务4:开始等待2秒,时间:17:13:22.048,当前线程名:pool-1-thread-4

任务2:开始等待2秒,时间:17:13:22.048,当前线程名:pool-1-thread-2

任务3:开始等待2秒,时间:17:13:22.048,当前线程名:pool-1-thread-3

任务1:开始等待2秒,时间:17:13:22.048,当前线程名:pool-1-thread-1

任务2:结束等待2秒,时间:17:13:24.048,当前线程名:pool-1-thread-2

任务3:结束等待2秒,时间:17:13:24.048,当前线程名:pool-1-thread-3

任务1:结束等待2秒,时间:17:13:24.048,当前线程名:pool-1-thread-1

任务4:结束等待2秒,时间:17:13:24.048,当前线程名:pool-1-thread-4

任务6:开始等待2秒,时间:17:13:24.049,当前线程名:pool-1-thread-4

任务7:开始等待2秒,时间:17:13:24.049,当前线程名:pool-1-thread-1

任务5:开始等待2秒,时间:17:13:24.049,当前线程名:pool-1-thread-3

任务8:开始等待2秒,时间:17:13:24.049,当前线程名:pool-1-thread-2

任务5:结束等待2秒,时间:17:13:26.050,当前线程名:pool-1-thread-3

任务7:结束等待2秒,时间:17:13:26.050,当前线程名:pool-1-thread-1

任务8:结束等待2秒,时间:17:13:26.051,当前线程名:pool-1-thread-2

任务6:结束等待2秒,时间:17:13:26.050,当前线程名:pool-1-thread-4
可以看出任务1-4在同一时间执行,在2秒后执行完毕,同时开始执行任务5-8。说明方法内部只创建了4个线程,其他任务存放在队列中等待执行。
newCachedThreadPool方法
newCachedThreadPool方法创建的线程池会根据需要自动创建新线程。

看看Executors工厂内部是如何实现的
public static ExecutorService newCachedThreadPool() {
return new ThreadPoolExecutor(0, Integer.MAX_VALUE,
60L, TimeUnit.SECONDS,
new SynchronousQueue<Runnable>());
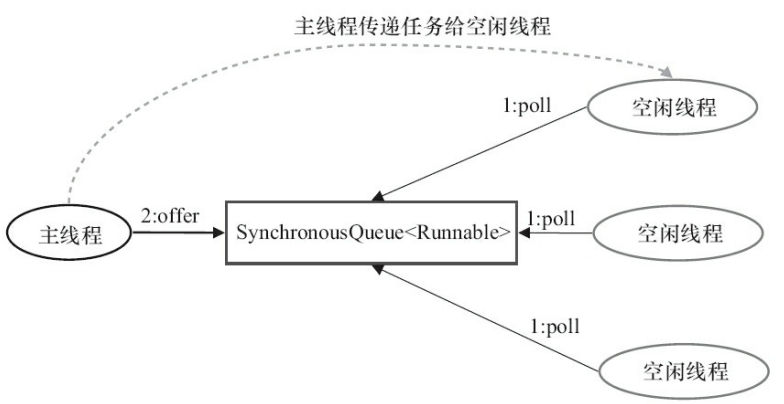
}newCachedThreadPool方法也是返回ThreadPoolExecutor对象,核心线程是0,最大线程数是Integer的最MAX_VALUE,存活时间是60,时间单位是秒,SynchronousQueue队列。
从传入的参数可以得知,在newCachedThreadPool方法中的空闲线程存活时间时60秒,一旦超过60秒线程就会被终止。这边还隐含了一个问题,如果执行的线程较慢,而提交任务的速度快于线程执行的速度,那么就会不断的创建新的线程,从而导致cpu和内存的增长。
代码和newFixedThreadPool一样循环添加新的线程任务,我的电脑运行就会出现如下错误
An unrecoverable stack overflow has occurred.

Exception in thread "main" java.lang.OutOfMemoryError: unable to create new native thread

    at java.lang.Thread.start0(Native Method)

    at java.lang.Thread.start(Thread.java:714)

    at java.util.concurrent.ThreadPoolExecutor.addWorker(ThreadPoolExecutor.java:950)

    at java.util.concurrent.ThreadPoolExecutor.execute(ThreadPoolExecutor.java:1368)

    at java.util.concurrent.AbstractExecutorService.submit(AbstractExecutorService.java:112)

    at com.learnConcurrency.executor.cachedThreadPool.Main.main(Main.java:11)

Process finished with exit code -1073741571 (0xC00000FD)
关于SynchronousQueue队列,它是一个没有容量的阻塞队列,任务传递的示意图如下
示例代码
public class Main {

    public static void main(String[] args) throws Exception{

        ExecutorService pool = Executors.newCachedThreadPool();

        for (int i = 0; i < 8; i++) {

            int finalI = i + 1;

            pool.submit(() -> {

                try {

                    System.out.println("任务"+ finalI +":开始等待60秒,时间:"+LocalTime.now()+",当前线程名:"+Thread.currentThread().getName());

                    Thread.sleep(60000);

                    System.out.println("任务"+ finalI +":结束等待60秒,时间:"+LocalTime.now()+",当前线程名:"+Thread.currentThread().getName());

                } catch (InterruptedException e) {

                    e.printStackTrace();

                }

            });

            //睡眠10秒

            Thread.sleep(10000);

        }

        pool.shutdown();

    }

}
执行结果
任务1:开始等待60秒,时间:17:15:21.570,当前线程名:pool-1-thread-1

任务2:开始等待60秒,时间:17:15:31.553,当前线程名:pool-1-thread-2

任务3:开始等待60秒,时间:17:15:41.555,当前线程名:pool-1-thread-3

任务4:开始等待60秒,时间:17:15:51.554,当前线程名:pool-1-thread-4

任务5:开始等待60秒,时间:17:16:01.554,当前线程名:pool-1-thread-5

任务6:开始等待60秒,时间:17:16:11.555,当前线程名:pool-1-thread-6

任务7:开始等待60秒,时间:17:16:21.555,当前线程名:pool-1-thread-7

任务1:结束等待60秒,时间:17:16:21.570,当前线程名:pool-1-thread-1

任务2:结束等待60秒,时间:17:16:31.554,当前线程名:pool-1-thread-2

任务8:开始等待60秒,时间:17:16:31.556,当前线程名:pool-1-thread-2

任务3:结束等待60秒,时间:17:16:41.555,当前线程名:pool-1-thread-3

任务4:结束等待60秒,时间:17:16:51.556,当前线程名:pool-1-thread-4

任务5:结束等待60秒,时间:17:17:01.556,当前线程名:pool-1-thread-5

任务6:结束等待60秒,时间:17:17:11.555,当前线程名:pool-1-thread-6

任务7:结束等待60秒,时间:17:17:21.556,当前线程名:pool-1-thread-7

任务8:结束等待60秒,时间:17:17:31.557,当前线程名:pool-1-thread-2
示例代码中每个任务都睡眠60秒,每次循环添加任务睡眠10秒,从执行结果来看,添加的7个任务都是由不同的线程来执行,而此时线程1和2都执行完毕,任务8添加进来由之前创建的pool-1-thread-2执行。
newScheduledThreadPool方法
这个线程池主要用来延迟执行任务或者定期执行任务。
看看Executors工厂内部是如何实现的
public static ScheduledExecutorService newScheduledThreadPool(int corePoolSize) {

    return new ScheduledThreadPoolExecutor(corePoolSize);

}
这里返回的是ScheduledThreadPoolExecutor对象,我们继续深入进去看看
public ScheduledThreadPoolExecutor(int corePoolSize) {

    super(corePoolSize, Integer.MAX_VALUE, 0, NANOSECONDS,

          new DelayedWorkQueue());

}
这里调用的是父类的构造函数,ScheduledThreadPoolExecutor的父类是ThreadPoolExecutor,所以返回的也是ThreadPoolExecutor对象。核心线程数是传入的参数corePoolSize,线程最大值是Integer的MAX_VALUE,存活时间时0,时间单位是纳秒,队列是DelayedWorkQueue。
public class ScheduledThreadPoolExecutor

        extends ThreadPoolExecutor

        implements ScheduledExecutorService {}
下面是ScheduledExecutorService的一些方法
public interface ScheduledExecutorService extends ExecutorService {

    //delay延迟时间,unit延迟单位,只执行1次,在经过delay延迟时间之后开始执行

    public ScheduledFuture<?> schedule(Runnable command,long delay, TimeUnit unit);

    public <V> ScheduledFuture<V> schedule(Callable<V> callable,long delay, TimeUnit unit);

    //首次执行时间时然后在initialDelay之后,然后在initialDelay+period 后执行,接着在 initialDelay + 2 * period 后执行,依此类推

    public ScheduledFuture<?> scheduleAtFixedRate(Runnable command,long initialDelay,

                                                  long period,

                                                  TimeUnit unit);

    //首次执行时间时然后在initialDelay之后,然后延迟delay时间执行

    public ScheduledFuture<?> scheduleWithFixedDelay(Runnable command,

                                                     long initialDelay,

                                                     long delay,

                                                     TimeUnit unit);

}
疑问解答
Runable接口和Callable接口
那么就从提交任务入口看看吧
submit方法是由抽象类AbstractExecutorService实现的
public Future<?> submit(Runnable task) {

    if (task == null) throw new NullPointerException();

    RunnableFuture<Void> ftask = newTaskFor(task, null);

    execute(ftask);

    return ftask;

}

public <T> Future<T> submit(Callable<T> task) {

    if (task == null) throw new NullPointerException();

    RunnableFuture<T> ftask = newTaskFor(task);

    execute(ftask);

    return ftask;

}
可以看出将传入的Runnable对象和Callable传入一个newTaskFor方法,然后返回一个RunnableFuture对象
我们再来看看newTaskFor方法
protected <T> RunnableFuture<T> newTaskFor(Runnable runnable, T value) {

    return new FutureTask<T>(runnable, value);

}

protected <T> RunnableFuture<T> newTaskFor(Callable<T> callable) {

    return new FutureTask<T>(callable);

}
这里都是调用FutureTask的构造函数,我们接着往下看
private Callable<V> callable;
public FutureTask(Callable<V> callable) {
if (callable == null)
throw new NullPointerException();
this.callable = callable;
this.state = NEW;
}
public FutureTask(Runnable runnable, V result) {
this.callable = Executors.callable(runnable, result);
this.state = NEW;
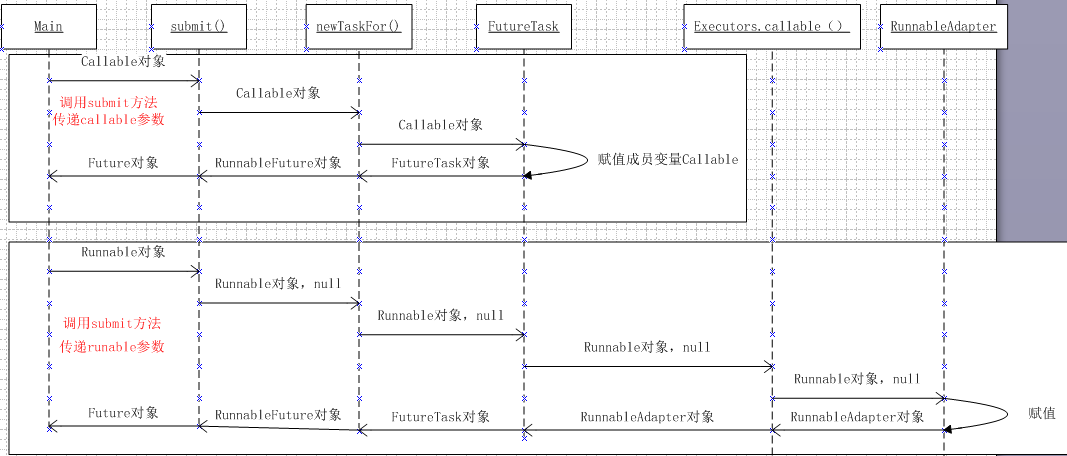
}FutureTask类中有个成员变量callable,而传入的Runnable对象则继续调用Executors工厂类的callable方法返回一个Callable对象
public static <T> Callable<T> callable(Runnable task, T result) {

    if (task == null)

        throw new NullPointerException();

    return new RunnableAdapter<T>(task, result);

}

//适配器

static final class RunnableAdapter<T> implements Callable<T> {

    final Runnable task;

    final T result;

    RunnableAdapter(Runnable task, T result) {

        this.task = task;

        this.result = result;

    }

    public T call() {

        task.run();

        return result;

    }

}
好了,到这里也就真相大白了,Runnable对象经过一系列的方法调用,最终被RunnableAdapter适配器适配成Callable对象。方法调用图如下
GitHub地址
觉得不错的点个star
下一篇会介绍下自定义线程池,后续也会更新newWorkStealingPool方法介绍
参考资料
[1] Java 并发编程的艺术
[2] Java 并发编程实战
转载:https://www.cnblogs.com/fixzd/p/9125737.html
推荐内容:
Java面试题—初级(9)
java面试整理
JAVA面试相关
JAVA中的main()方法详解
Java中CAS原理详解
java 面试收集
VSCode配置JAVA开发环境
JAVA 与 sqlite3 连接
java常见面试题总结
JAVA工程师面试题库


 171万+
171万+

 被折叠的 条评论
为什么被折叠?
被折叠的 条评论
为什么被折叠?
 到【灌水乐园】发言


