


 本文详细介绍了Vue.js框架的基础知识,包括指令、组件、生命周期等核心概念,并讲解了Vue-cli脚手架的使用、路由配置、状态管理库Vuex的应用等内容。
Vue
1.基础知识
 var vue = new Vue({
            // 监管的容器
            el:"#app",
            // 数据定义
            data:{
                msg:"hello world"
            }
        })
new 的背后隐藏的桥梁函数
- 初始化一个空对象 stu = {}
- 绑定原型链节约内存 stu.proto = Person.prototype
- 正常绑定属性
- return给stu这个对象实例
v-text 不可以解析标签
v-html 可以解析标签
v-cloak
侦测到vue的实例成功之后,才会显示.
    <div id="app" v-cloak>
       {{msg}}
    </div>
    <script>
        var vue = new Vue({
            // 监管的容器
            el:"#app",
            // 数据定义
            data:{
                msg:"hello world",
            }
        })
    </script>
v-pre
不会解析{{}}变量,原样显示
  <!-- 不会解析{{}},会原样显示 -->
    <div id="app" v-pre>
       {{msg}}
    </div>
    <script>
        var vue = new Vue({
            // 监管的容器
            el:"#app",
            // 数据定义
            data:{
                msg:"hello world",
            }
        })

    </script>
v-once
数据只会更新首次
 <!--只会显示首次修改 -->
    <div id="app" v-once>
       {{msg}}
    </div>
    <script>
        var vue = new Vue({
            // 监管的容器
            el:"#app",
            // 数据定义
            data:{
                msg:"hello world",
            }
        })
        console.log(vue)
        setTimeout(()=>{
            vue._data.msg="12345"
        },2000)
    </script>
v-bind
 <!-- <div id="app" :style="[style1,style2]">
        {{msg}}
        <a :href="url">百度一下</a>
    </div> -->


    <div id="app" :style="{color:a,width:b}">
        {{msg}}
        <a :href="url">百度一下</a>
    </div>
    <script>
        var vue = new Vue({
            // 监管的容器
            el:"#app",
            // 数据定义
            data:{
                msg:"hello world",
                title:"nihao",
                aa:"aa111",
                url:"https://www.baidu.com",
                // style1:{
                //    color:"blue",
                // },
                // style2:{
                //     width:"100px",
                //     background:"red"
                // }
                a:"red",
                b:"200px"
            }
        })
        // 用v-bind来绑定属性值,缩写 :
    </script>
-
可以直接赋值一个对象。
-
可以是数组,都会被解析。
v-on
事件监听
应用的时候不加小括号,在定义函数的地方用一个evt参数接收,这个参数就是事件对象。
加小括号进行自定义传参时,第一个参数强制为$event
<body>
    <div id="app">
        <!-- 需要自定义传参的时候 -->
        <button  v-on:click="func($event,1,2,3)">传参的</button>
        <button @click="func()"></button>
        <!--  应用的时候不加小括号可以得到事件对象 -->
        <button @click="func1">事件对象</button>
    </div>
    <script>
        var vue = new Vue({
            // 监管的容器
            el:"#app",
            // 数据定义
            data:{
                msg:"hello world",
            },
            // 函数定义的位置
            methods:{
                func(event,a,b,c){
                    console.log(event,a,b,c)
                },

                // 应用的时候不加小括号可以得到事件对象
                func1(evt){
                    console.log(evt)
                }
            }
        })
        // 用v-on:可以简写成@来绑定属性值,缩写 :
    </script>
vue2的重大bug,更新数组的数据时,视图不会更新。
  <div id="app" >
       {{arr[0]}}
    </div>
    <script>
        var vue = new Vue({
            // 监管的容器
            el:"#app",
            data:{
                // 数据定义
                arr:[100,200,300]
            }

        })
        console.log(vue)
        setTimeout(()=>{
            // 改变数组的数据,视图不会跟着刷新
            vue._data.arr[0]=10000;
            // bug解决:用$forceUpdate()来强制刷新
            vue.$forceUpdate();
        },2000)
    </script>
提供几种解决方式:
-
用$forceUpdate()进行强制刷新
-
用官方提供的Vue.set(this.arr,1,10000)
-
用数组提供的方法来操作数组
事件修饰符
.stop 阻止事件冒泡
.prevent 阻止默认事件
.self 在父元素上,只有点击自己才会触发,点击子元素不会触发
.capture 事件捕获
v-model
输入的值会动态的去刷新
   <form action="" id="app">
        <input type="text" v-model="name">
        {{name}}
    </form>
    <script>
        var vue = new Vue({
            // 监管的容器
            el:"#app",
            // 数据定义
            data:{
                name:"hello world",
            }

        })
    </script>
冒泡和禁止默认事件
用@click.stop来阻止冒泡
用@click.pravent来禁止默认事件,可以链式调用@click.stop.pravent
<div @click.stop.pravent="func()"></div>
事件捕获
@click.capture
键盘修饰符
    <div id="app" >
      <input type="text" @keyup.enter="submit()" v-model="name">
    </div>
    <script>
        var vue = new Vue({
            // 监管的容器
            el:"#app",
            data:{
                // 数据定义
                name:''
            },
            methods:{
                submit(){
                    console.log(this.name)
                }
            }

        })
        console.log(vue)
    </script>
[外链图片转存失败,源站可能有防盗链机制,建议将图片保存下来直接上传(img-kFTRax1t-1648267447187)(assets/1645092194239.png)]
你还可以通过全局 config.keyCodes 对象自定义按键修饰符别名:
// 可以使用 `v-on:keyup.f1`
Vue.config.keyCodes.f1 = 112
v-for
   <div action="" id="app">
       // 遍历数组
        <ul v-for="(item,index) in arr" :key="index">
            <li>{{item}}</li>
        </ul>
        <ul v-for="(item) in arr" :key="index">
            <li>{{item}}</li>
        </ul>
        //遍历对象
        <ul v-for="(item,key,index) in user" :key="index">
            <li>{{item}}---{{key}}---{{index}}</li>
        </ul>
        <ul v-for="(item) in user" :key="index">
            <li>{{item}}</li>
        </ul>
    </form>
    <script>
        var vue = new Vue({
            // 监管的容器
            el:"#app",
            // 数据定义
            data:{
                arr:[10,20,30],
                user:{
                    name:"zhangsan",
                    age:12,
                    sex:"男"
                }
            }

        })
    </script>
如果:key的绑定用index可能会出现容器错乱,特别是向头部添加数组的时候,因为向头部添加数据的时候,容器会重新计算index,整个数据的index就会发生变化。
向尾部添加数据就你不会出现这种问题。所以:key的绑定最后用id。
v-for遍历数组的时候是item,index.就是值和index,遍历对象的时(item,key,index)两个都可以只留下item
表单控件绑定
只有单个文本的,绑定的是一个布尔,对于输入的文本框绑定的是一个字符串,对于单选框的绑定也是一个值,但是需要input给一个value属性。多选框绑定的是一个数组,也需要input绑定value属性。
<body>
    <div class="app">
        <div>
            <textarea  v-model="text"></textarea>
            {{text}}
        </div>
        <!--  单选框  需要绑定一个value-->
        <div>
            <input type="radio" v-model="sex" value="男">男
            <input type="radio" v-model="sex" value="女">女
            {{sex}}
        </div>
        <!-- 多选框  需要绑定一个value  这样才会实现双向绑定 -->
        <div>
            <input type="checkbox" v-model="isList"  value="VUE">VUE
            <input type="checkbox" v-model="isList"  value="React">React
            <input type="checkbox" v-model="isList"  value="JS">JS
            {{isList}}
        </div>
    </div>
    <script>
        new Vue({
            el:".app",
            data:{
                text:"",
                sex:"",
                isList:[]
            }
        })
    </script>
表单修饰符
<div>
    <textarea  v-model.lazy="text"></textarea>
    {{text}}
</div>
.lazy失去 焦点之后才会去更新。
.number 为数字类型
.trim 去首尾空格
闭包
闭包的方式就是打破常规的作用域,构建一个暂时的独特的作用域,可以跨域穿梭。
在常规作用域中不存在闭包,函数平级调用和子作用域调用父作用域的内容。
当父级作用域调用子作用域的时候就会用闭包来解决。
正常情况下:
function f1(){
    function f2(){

    }
    f3() // 正常调用
}
function f3(){}
f1();  // 正常调用

f2();  //我在这里调用f2就会发生错误,怎么才能在这里调用f2呢?闭包就可以解决
形成闭包:
function f1(){
    function f2(){

    }
    return f2;
}
function f3(){}
var a=f1();

a();  // 这样就相当于调用f2()函数了 就形成了闭包
再比如:
function f1(){
    function f2(){

    }
   f3(f2)
}
function f3(fun){
    // 在这个作用域调用f2函数
    fun()
}

// 这样也形成了一个闭包,就是打破常规作用域,形成了一个独特的作用域
v-if和v-show
判断的条件为true就显示元素
v-if是直接删除DOM元素节点,而v-show是加一个display:none样式
v-if不适合频繁的切换,因为v-if更消耗性能
   <div action="" id="app">
       <div v-if="flag">{{message}}</div>
       <div v-show="flag">{{message}}</div>
       <button @click="change">切换状态</button>
    </form>
    <script>
        var vue = new Vue({
            // 监管的容器
            el:"#app",
            // 数据定义
            data:{
                message:"hello",
                flag:true
            },
            methods:{
                change(){
                    this.flag = !this.flag;
                }
            }
        })
    </script>
宏任务和微任务
宏任务和微任务都是异步任务,微任务的执行权限更高,更先执行
宏任务包含:
script(整体代码)
setTimeout
setInterval
I/O
UI交互事件
postMessage
MessageChannel
setImmediate(Node.js 环境)
微任务包含:
Promise.then
Object.observe
MutationObserver
process.nextTick(Node.js 环境)
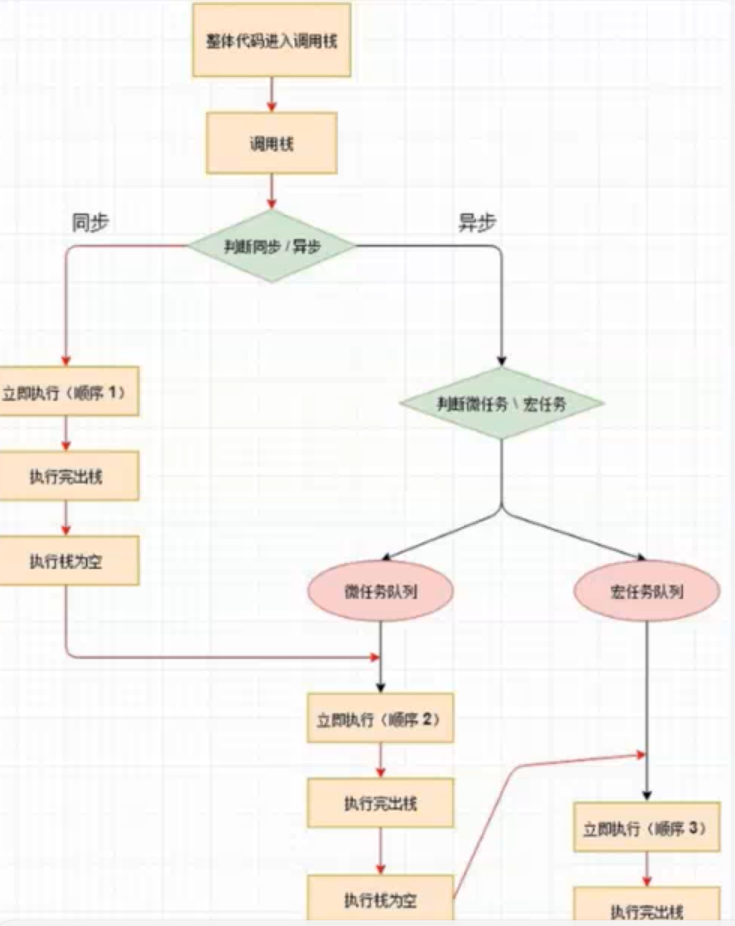
值得注意的是Promise有一点特殊,因为Promise分为两部分,构造函数中的代码你是立即执行的同步任务,而promise.then()和Promise.catch()属于微任务。也就是resolve和reject是微任务。
        console.log(1)
        function fun(){
            console.log(2)
        }
        fun();


        setTimeout(()=>{
            console.log(3)
        },0)


        new Promise((resolve,reject)=>{
            console.log(4)
            resolve();
        }).then(function(){
            console.log(5)
        })
        console.log(6)


        // 执行顺序是怎样的?
        // 1,2,4,6,5,3
问这段代码的执行顺序是怎样的?
- (1)先执行同步任务,也就是1,2,4,6,在这里需要注意的是Promise中的构造函数也是同步任务也就是15行的代码
- (2)执行微任务,这里的微任务只有promise.then()中的,也就是5
- (3)最后执行宏任务,也就是setTimeOut的 3
计算属性
- 计算属性的定义像函数一样定义,使用像data中的变量一样使用,需要返回一个值。
- 有依赖特性,如果依赖没有发生变化,就会用上一次的结果,不用重复调用,性能很强。
- 依赖函数没有发生变化,就用缓存的,发生了变化就会跟随变化。
 <div id="app">
       <div>{{fun}}</div>
       <div>{{fun}}</div>
       <div>{{fun}}</div>
       计算
       <input type="text" v-model="a">+
       <input type="text" v-model="b">=
       结果:{{sum}}
    </div>
    <script>
        var vue = new Vue({
            // 监管的容器
            el:"#app",
            // 数据定义
            data:{
              msg:"hello",
              a:0,
              b:0,
            },
            // 计算属性,当依赖的数据发生变化时,就会重新调用这个函数
            computed:{
                fun(){
                    console.log("hello")
                    return this.msg
                },
                //定义
                sum(){
                    return Math.round(this.a)+Math.round(this.b)
                }
            }
        })
Watch 侦听器
watch侦听器监听数据的变化,当数据变化时就调用相应的函数来处理。
<div id="app">
       计算
       <input type="text" v-model="a">+
       <input type="text" v-model="b">=
       结果:{{total}}
    </div>
    <script>
        var vue = new Vue({
            // 监管的容器
            el:"#app",
            // 数据定义
            data:{
              msg:"hello",
              a:0,
              b:0,
              total:0

            },
            // watch 侦听器,监听数据的变化,调用响应的函数进行处理
            watch:{
                // a:function(val){
                //         this.total = Math.round(val)+Math.round(this.b)
                //     },
                b:function(val){
                    this.total = Math.round(val)+Math.round(this.a)
                },
                // 外置写法
                a:{
                    handler:"sum"  //在这里调用处理的函数
                }
            },
            methods:{
                sum(){
                    this.total = Math.round(this.a)+Math.round(this.b)
                }
            }

        })
    </script>
这里处理函数有两种方式,一种是内置的直接在监听数据的后面写处理的函数;第二种是外置处理函数。
如果数据不是首层,需要加入deep:true深度监听
filter过滤器
对数据进行处理只会再显示,处理的时候在显示数据的地方用管道符隔开,{{msg | filterName}}
全局的filter用Vue来定义
 <h1>{{msg | toUper}}</h1>
Vue.filter("filterName",(val)=>{
    // val就是msg的值
    // 处理过程
    return 结果
}}))
局部定义的filter
filters:{
    filterName:(val)=>{
        // 处理过程
        return 处理结果
    }
}
    <div id="app">
      <div>
          <h1>{{msg | toUper}}</h1>
          <h1>{{msg1 | toDown}}</h1>
      </div>
    </div>
    <script>
        // filter过滤器  在使用的数据的地方用管道发隔开
        // 全局过滤器,用Vue来定义
        Vue.filter("toUper",(val)=>{
            return val.toUpperCase();
        })
        var vue = new Vue({
            // 监管的容器
            el:"#app",
            // 数据定义
            data:{
              msg:"hello",
              msg1:"NIHAO"
            },
            // 局部过滤器
            filters:{
                toDown:(val)=>{
                    return val.toLowerCase();
                }
            }
        })
    </script>
自定义指令
全局指令的定义和filter一样都是利用Vue来创建。
Vue.directive("name",{
    inserted:(el)=>{
        //el就是插入指令单那个DOM元素
    }
})
name就是指令名称,插入元素的时候写成 v-name即可
- inserted 在指令插入元素的时候使用
- bind 是指令第一次绑定到元素的时候执行
- update 数据发生改变的时候执行
  <h1 v-red>{{msg}}</h1>

 //   全局指令  red是指令名,使用的时候加一个v-red
    Vue.directive("red",{
      // 插入的时候执行
      inserted:function(el){
        el.style.color="red"
      }
      // bind 在指令第一次绑定到元素上时使用
      // update 更新数据时使用
    })
el参数就是绑定指令的元素
需要参入参数的是用binding来接受参数
<h1 v-color="'blue'">{{msg}}</h1>

  Vue.directive("color",{
  // binding 来传参  binding.value就是传入的参数
  inserted:(el,binding)=>{
    el.style.color=binding.value;
  }
})
binding.value就是参数值
局部指令的定义
用directives来定义
   // 局部指令 写在xvue里面
directives:{
  // 指令名称
  phone:{
    // 在更新的时候调用
    update:(el)=>{
      if(!(/^1[3-9]\d{10}$/).test(el.value)){
        vue.msg="手机号格式错误"
      }else{
        vue.msg="手机号格式正确"
      }
    }
  }
}
phone就是指令名称.
完整的例子
 <div id="app">
      <div>
          <h1 v-red>{{msg}}</h1>
          <!-- 指令传参 -->
          <h1 v-color="'blue'">{{msg}}</h1>
          <input v-phone v-model="phone">
        {{msg}}
      </div>
    </div>
    <script>
        //   全局指令  red是指令名,使用的时候加一个v-red
        Vue.directive("red",{
          // 插入的时候执行
          inserted:function(el){
            el.style.color="red"
          }
          // bind 在指令第一次绑定到元素上时使用
          // update 更新数据时使用
        })
        Vue.directive("color",{
          // binding 来传参  binding.value就是传入的参数
          inserted:(el,binding)=>{
            el.style.color=binding.value;
          }
        })
        var vue = new Vue({
            // 监管的容器
            el:"#app",
            // 数据定义
            data:{
              msg:"",
              msg1:"NIHAO",
              phone:""
            },
            // 局部指令
            directives:{
              // 指令名称
              phone:{
                // 在更新的时候调用
                update:(el)=>{
                  if(!(/^1[3-9]\d{10}$/).test(el.value)){
                    vue.msg="手机号格式错误"
                  }else{
                    vue.msg="手机号格式正确"
                  }
                }
              }
            }
        })
    </script>
生命周期函数
一个应用或者页面,从创建到消亡的过程中,在某一时刻会自懂调用回调函数就叫生命周期函数。
- beforeCreate() 创建之前,在桥梁函数没有返回之前执行,这个时候data和methods还没有加载。基本不会使用,比较费的一个生命周期函数。
- created() 创建之后,在四步桥梁函数之后。初始化data和methods。最早的ajax请求。但是页面还没来得及渲染,在这里面不要进行DOM操作。没有进行比对的算法。
- beforeMounte() DOM加载好之前,差一部渲染完成就掉用这个方法。和creare()差不多。完成了对比的工作,但是还没有给变量赋值。
- mounted() 渲染之后。 变量替换成功开始调用这个方法进行页面的渲染。
- beforeupdate() 数据更新之前,数据已经更新了,还没来得及渲染到页面
- updated() 更新之后。执行这个函数是,数据和页面已经保持一致。
- beforeDestory() 销毁之前,这个时候的data和methods还处于可用状态
- destoryed() 销毁之后,组件已经全部销毁,都不可用
mixin
主要是用来代码的复用
var myMIxin = {
         create:function(){
             this.hrllo();
         },
         methods:{
             hello:function(){
                 console.log("hello")
             }
         }
     }
        var vue = new Vue({
            // 引入复用的组件
            mixins:[myMIxin],
            // 监管的容器
            el:"#app",
            // 数据定义
            data:{
              msg:"",
              msg1:"NIHAO",
              phone:""
            }
        })
    </script>
组件
定义组件有两种方式,一种是全局组件:vue的compopnent来定义全局组件。
Vue.component("header1",{
    data:()=>{
        return:{
            hello:"hello"
        }
    },
    template:"<div>{{hello}}</div>"
})
- 为什么组件和页面在同一个页面,因为不支持import导入
- 为什么data是一个函数,需要返回对象
局部组件的定义:
 // 局部组件,局部组件要求注册
        let footer1 = {
            data:function(){
                return {
                    name:"地步"
                }
            },
            template:"<div>{{name}}</div>"
        }

var vue = new Vue({
            el:"#app",
            data:{
              msg:"",
            },
            // 局部组件注册的位置
            components:{
                // 注册的位置
                footer1
            }
        })
局部组件要求注册,然后才能使用,注册用components
组件传值 父传子
在引用组件的地方成为父组件,在定义组件的地方称为子组件。
比如定义一个footer1组件,用局部定义的方法。
// 组件的使用和标签的使用一摸一样,在html页面使用
<footer1 :msg="name"></footer1>

let footer1 = {
    props:["msg"]
    data:()=>{
        return{
            name:"组件定义的位置"
        }
    },
    templete:"<h1>{{msg}}</h1>"
}

new Vue({
    el:"#app",
    // 组件注册
    components:{
        footer
    }
    data:{
        name:"父组件"
    }
})
还可以进行属性验证
props{
    msg:String
}
添加默认属性
props{
    msg:String,
    default: "默认值"
}
在html页面使用组件
<footer1 :msg="name"></footer1>
组件传值 子传父
子传父依赖vue提供的一个发射器$emit
 <!-- 父组件 -->
<!-- 父组件接受值 -->
      <footer1 @sigal="f3"></footer1>
  // 局部组件,局部组件要求注册  子组建
let footer1 = {
    data:function(){
        return {
            name:"地步"
        }

    },
    template:`<div>
                 <h1>{{name}</h1>
                <button @click="fun()">点击</button>
             </div>
    `,
    methods:{
        fun(){
            // 子传父用vue提供的一个$emit发射器,信号发射器,事件触发器
            // 子父组件传值要用到提供的发射器
            this.$emit("sigal","只是要发给父子组件的内容")
            console.log("fun")
        }
    }
}
var vue = new Vue({
    el:"#app",
    data:{
      name:"hello",
      zi:""
    },
    // 局部组件注册的位置
    components:{
        // 注册的位置
        footer1
    },
    methods:{
        f3(e){
            // 这里的参数就是子组件传的值
            console.log(e)
            this.zi=e;
        }
    }
})
</script>
子组件之间传值
-
比如Film.vue组件的值传递到Item.vue中去显示。怎么传值呢?利用共同的父页面,这两个组件都在Home.vue页面调用,通过子传父,将Film.vue页面的值传递到父页面Home,然后再将父页面的值通过父传值传递给Item.
-
通过eventBus来传值。在main.js中window.eventBus = new Vue();
在main.js
// eventBus
window.eventBus = new Vue();
在film.vue中
<button @click="handleClick()">查看称号</button>
handleClick(){
            console.log(this.hero.desc);
            eventBus.$emit("busEvent",this.hero.desc);
        }
在Item.vue中
<template>
    <div>
        {{heroDesc}}
    </div>
</template>
mounted() {
        eventBus.$on("busEvent",(data)=>{
            this.heroDesc = data
        })

    },
然后就顺利的将Film中的值传递到了Item中
ref
- ref 当作用在原生标签上时,可以取代原生的DOM操作,是原生的语法糖
- 在标签上加上ref属性,然后就可以通过this.$refs得到这个元素,取代原来的document.getElementById()
  <div id="app">
        <!-- 1.ref使用在原生上,则指向的是DOM元素,如果ref用在组件上,引用就指向子组件实例。 -->
        <div ref="p"></div>
    </div>
    <script>
        var vue = new Vue({
            el:"#app",
            data:{
              name:"hello",
              zi:""
            },
            mounted(){
                // 这样就拿到了这个元素
                console.log(this.$refs.p)
            }
        })
     </script>
通过this.$refs.aaa来获取子组件,然后可以获取子组件的任何东西
动态组件
父组件不动,可以动态的切换组件。
定义三个局部组件,并注册进去
  let aaa = {
            template:"<h1>我是aaa</h1>",
            created(){
                console.log(aaa)
            },
            deactivated(){
                // 组件暂时离开
            },
            actived(){
                // 用户暂时进来
            }


        }
        let bbb = {
            template:"<h1>我是bbb</h1>",
            created(){
                console.log(bbb)
            }
        }
        let ccc = {
            template:"<h1>我是ccc</h1>",
            created(){
                console.log(ccc)
            }
        }
          var vue = new Vue({
            el:"#app",
            components:{
                aaa,bbb,ccc
            },
            data:{
              name:"aaa",

            },
            methods:{
                f1(){
                    this.name="aaa"
                },
                f2(){
                    this.name="bbb"
                },
                f3(){
                    this.name="ccc"
                }
            }
        })
然后引用组件
 <div id="app">
        <button @click="f1">切换组件1</button>
        <button @click="f2">切换组件2</button>
        <button @click="f3">切换组件3</button>
        <!-- 切换组件 -->
        <!-- 加上keep-alive 不再销毁组件 可以做性能优化 -->
        <keep-alive>
            <component :is="name"></component>
        </keep-alive>
        <!-- 缺点:没办法清除定时器 为了解决这个问题添加了一个生命周期函数deactivated暂时清除定时器 -->
    </div>
现在的实现思想就是点击不同的按钮来切换组件在同一位置显示
不会销毁组件,可以优化性能。然后利用标签里里面绑定一个is属性,这个属性的值就是对应的组件的名字,名字是那个组件就会显示那个组件。然后只需要哦对那个太的改变is的值就可以实现组件的动态切换。
的缺点也很明显,就是没办法清除定时器,为了解决这个问题,专门定义了两个生命周期函数,一个是让组件暂时离开的deactivate和让用户进来的actived
匿名插槽
让父组件下的字标签的内容显示在子组件的插槽中,slot标签就相当于是一个坑位,让父组件的内容显示在插槽中。
  <div id="app">
        <header1> <h1>我是插槽显示的内容</h1></header>
    </div>
    <script>
        let header1 = {
            template:`
            <div>
                <span>我是顶部</span>
                <slot></slot>
             </div>`,
        }
        // 这里的 slot表示一个插槽,相当于一个坑,父组件中的整体内容还在这个坑里显示
        // 在这里就相当于 <h1>我是插槽显示的内容</h1>正内容在slot中显示
        var vue = new Vue({
            el:"#app",
            components:{
               header1
            },
            data:{
              name:"aaa",
            },
        })
    </script>
这里的 slot表示一个插槽,相当于一个坑,父组件中的整体内容还在这个坑里显示
在这里就相当于 <h1>我是插槽显示的内容</h1>正内容在slot中显示
具名插槽
具名插槽就是给插槽命名。然后再父组件中用对应的名字来填入到插槽中。
给添加一个name属性,将父组件的内容加上一个slot属性。
   <div id="app">
        <header1> <h1 slot="header1">我是插槽显示的内容</h1></header>
    </div>
    <script>
        let header1 = {
            template:`
            <div>
                <span>我是顶部</span>
                <slot name="header1"></slot>
             </div>`,
        }
        var vue = new Vue({
            el:"#app",
            components:{
               header1
            },
            data:{
              name:"aaa",

            },

        })
    </script>
作用域插槽
 <div id="app">
        <header1>
            <div slot-scope="props">
                <h1 >我是插槽显示的内容</h1>
                <h1>{{props.text}}</h1>
            </div>

        </header>
    </div>
    <script>
        // 1.作用域插槽是一个带有数据的匿名插槽
        // 2.父组件的代码可以用slot-scope来获取这个数据
        let header1 = {
            template:`
            <div>
                <span>我是顶部</span>
                <slot text="abcde"></slot>
             </div>`,
        }
        var vue = new Vue({
            el:"#app",
            components:{
               header1
            },
            data:{
              name:"aaa",

            },

        })
    </script>
1.作用域插槽是一个带有数据的匿名插槽
2.父组件的代码可以用slot-scope来获取这个数据
2.Vue-cli脚手架
安装脚手架
npm i -g @vue/cli
创建一个项目
vue create hello-world
路由
<template>
  <div id="app">
    <div id="nav">
      <router-link to="/">Home</router-link> |
      <router-link to="/about">About</router-link>
    </div>
    <!-- 当击中相应的路由之后,就会在这里显示 -->
    <router-view/>
  </div>
</template>
<router-view/>当击中相应的路由之后,就会在这里显示,可以实现单页面应用.
路由有两种方式:
- 声明式路由:
这里的 /about 是路由中的地址。
<router-link to="/about">About</router-link>
2.编程式路由:
methods: {
        // 编程式导航
        toNews() {
          this.$router.push("/news")
        },
      },
编程式导航主要是通过this.$router.push("/path"),这里的path也是路由地址
$route是路由的信息对象,里面主要包含路由的一些基本信息,包括name,meta,path,hash,query,fullPath,mathched,redirectedFrom。
$router 是VueRouter的实例,包含了一些路由的跳转方法,钩子函数等
编程式导航:
先看一下路由的结构:
import Vue from 'vue'
import VueRouter from 'vue-router'
import Home from '../views/Home.vue'
const routes = [
  {
    path: '/',
    name: 'Home',
    component: Home
  },
  {
    path: '/about',
    name: 'About',
    // 懒加载引入
    component: () => import("../views/News.vue")
  },
  {
    path: '/news',
    name: 'News',
    // 懒加载引入
    component: () => import(/* webpackChunkName: "about" */ '../views/News.vue')
  }
]
const router = new VueRouter({
  mode: 'history',
  base: process.env.BASE_URL,
  routes
})
export default router;
在路由中有path和name两种参数。下面会根据这两种属性来进行不同的页面跳转,用path实现的跳转是get请求方式,用name实现的请求方式是post方式。
get请求方式
    不传参的时候可以考虑这种简便的方式,参数是路由的path属性值。
    this.$router.push("/news")
     get跳转,会暴露数据,query是跟着参数
     this.$router.push({path:"/news",query:{name:"zhangsan"}});
post请求方式   这里传递的是路由的名字这个是路由的名字
    这里是根据路由的名字进行跳转的
this.$router.push({name:"News",params:{name:"zhangsan"}})
接收路由参数
这两种方式跳转路由,目标路由接收参数的方式也不一样。
接收get请求的参数
var name = this.$route.query.name;
接收post请求参数
var name = this.$route.params.name;
值得注意的是这里的负责跳转的是大 r o u t e r , 接 收 参 数 用 的 是 小 router,接收参数用的是小 router,接收参数用的是小router
路由回退
还可以利用大$router实现回退功能。
this.$router.go(-1)
路由的跳转有一个很重要的问题,就是当自己跳转自己的页面的时候,会报错,但是功能会正常执行。解决这一问题,可以在路由文件中添加如下代码.
// 解决当前页面跳转当前页报错的问题
const originPush = VueRouter.prototype.push;
VueRouter.prototype.push = function push(location){
    return originPush.call(this,location).catch(err=>{err})
}
重定向
当两个网页指的是一个,可以利用重定向到一起,在路由中添加redirect:‘path’
const routes = [
  {
    path: '/',
    name: 'Home',
    redirect:'/home'
    component: Home
  },  {
    path: '/home',
    name: 'Home',
    component: Home
  },
 }
子路由
也就是二级路由,怎么定义
用children,在路由的定义中
 {
    path: '/home',
    name: 'Home',
    component: Home,
    // 子路由是通过children属性来添加子路由规则的
    // 子路由的出口在它上层页面的出口,也就是上层出口的<router-view />
    children:[
      {
        // 不用加 "/" 会自动加 /
        path: 'home-chile',
        // 懒加载引入
        component: () => import("../views/Home-Chile.vue")
      }

    ]

  },
那么子路由的页面在哪里显示呢?在上级路由的处显示,二级页面跳转的时候也需要添加完整的路由path
this.$router.push(`/home/home-chile`)
动态路由
在跳转页面的:
this.$router.push(`/home/home-chile/${this.id}`)
在这个页面的路由的path上加上:id
children:[
      {
        // 不用加 / 会自动加 /
        path: 'home-chile/:id',
        // 懒加载引入
        component: () => import("../views/Home-Chile.vue")
      }
在这个页面接收参数时,和post接收参数一样用小$route.params
this.id = this.$route.params.id
路由守卫
全局拦截,在router文件夹中的index.js中
router.beforeEach((to, from, next) => {
  console.log(to)
  next()
})
可以在路由上添加meta标记
 {
    path: '/about',
    name: 'About',
    component: () => import('../views/About.vue'),
    meta: {
      isSearch: true
    }
  }
然后通过router.beforeEach,来判断
router.beforeEach((to, from, next) => {
  console.log(to)
  if (to.meta.isSearch === true) {
    next()
  } else {
    next({
      path: '/login',
      // 保存我们所在的位置,以便以后再来
      query: { redirect: to.fullPath }
    })
    console.log('需要登录才可以访问')
  }
})
这里的next中的query是专门用来记录当前的位置,方便后面返回.
在login页面用小$route.query.redirect就可以获取路径
路由守卫用beforeEach实现,就是判断用户的登录状态,有一些页面用户没有登录是不能去的.
 var vue = new Vue({
            // 监管的容器
            el:"#app",
            // 数据定义
            data:{
                msg:"hello world"
            }
        })
局部拦截
直接在路由下面添加一个beforeEach
 {
    path: '/about',
    name: 'About',
    component: () => import('../views/About.vue'),
    meta: {
      isSearch: true
    },
    beforeEach: (to, from, next) => {
      if (localStorage.getItem('userInfo')) {
        next()
      } else {
        next('/login')
      }
    }
  }
新增的生命周期方法
 // 新增的生命周期方法
    beforeRouteEnter(to,from,next){
        // this 没有
        next(vm=>{})
        // 在路由进入之前,还没有渲染,没有this
    },
        // 路由离开之前
    beforeRputeLeave(to,from,next){
         if(confirm("确定要离开吗?") === true){
              next()
         } else{

         }
       }
	beforeRouteUpdate(to,from,name){
            // 同一个页面,刷新不通的数据的时候
            next()
        },
路由设计
在项目开发中不可能将整个项目的路由全部都定义在router下的index.js中,将路由分发出来。
新建一个center.vue
然后在router目录先新建一个routers文件夹,然后将center模块的路由定义在里面。
// vue的暴露模式
export default({
    path: '/center',
    name: 'center',
    component: ()=>import('../../views/Center/Center.vue')


    // 只有一句话的时候,箭头函数,省略return必须省略花括号
})
vue中的暴露方式是 export default
然后就是路由的定义。接下来将暴露的center路由添加在index.js里面
路由模式
在router文件加下面
const router = new VueRouter({
  mode: 'history',
  base: process.env.BASE_URL,
  routes
})
-
history模式
在创建路由器实例时,
history配置允许我们在不同的历史模式中进行选择。 -
hash模式
它在内部传递的实际 URL 之前使用了一个哈希字符(
#)。由于这部分 URL 从未被发送到服务器,所以它不需要在服务器层面上进行任何特殊处理。不过,它在 SEO 中确实有不好的影响。如果你担心这个问题,可以使用 HTML5 模式。
3.axios
安装
nom i axios

使用之前导入
import axios from 'axios'
封装axios
axios 是请求后台资源的模块。 通过npm install axios -S来安装,在大多数情况下我们需要封装拦截器,在实现登录的过程中我们一般在请求拦截器中来加入token,在响应请求器中通过判断后端返回的状态码来对返回的数据进行不同的处理。如果发送的是跨域请求,需在配置文件中 config/index.js 进行代理配置。
// 可以进行全局默认配置
xios.defaults.baseURL = 'https://api.example.com';
axios.defaults.headers.common['Authorization'] = localStorage.getItem('token') || ''
axios.defaults.headers.post['Content-Type'] = 'application/x-www-form-urlencoded';
axios.defaults.withCredentials = true  //允许跨域
// 或者使用创建实例
// 使用axios用于对数据的请求
import axios from 'axios'
// 创建axios实例
const instance = axios.create({
  baseURL: baseURL + version,
  timeout: 5000
})

// 创建请求的拦截器,添加token
instance.interceptors.request.use(config => {
  config.headers['Authorization'] = localStorage.getItem('token') || ''
  return config
}, error => {
  return Promise.reject(error)·
})

// 创建响应的拦截器
instance.interceptors.response.use(response => {
  let res = null

  // 对相应的数据进行过滤
  if (response.status === 200) {
    if (response.data && response.data.err === 0) {
      res = response.data.data
    } else if (response.data.err === -1) {
      return alert('token无效')
    }
  } else {
    return alert('请求失败')
  }

  return res
}, error => {
  return Promise.reject(error)
})

export default instance
4.EsLint
代码格式,是是一种规范,如果不按照规范来就会报错。
但是在开发中规范是很麻烦的,有三中方式可以解决麻烦。
1.执行命令 npm run lint 自动规范代码
2.安装插件 eslint ,然后在vscode中的setting.json中配置,每次保存之后可以自动修复,但是不是每次都能生效
   "editor.codeActionsOnSave":{
        "source.fixAll": true
    },
3.书写vue的配置文件,添加一个vue.config.js文件,然后添加如下内容,暂时关闭检测。
module.exports = {
  lintOnSave: false // 暂时关闭代码格式检测
}
5.跨域
配置反向代理。就是将请求代理给服务器,服务器之间是没有跨域的。
在vue.config.js文件中配置反向代码。
module.exports = {
  devServer: {
    proxy: {
      '/films': {
        target: 'https://www.maoyan.com',
        changeOrigin: true
      }
    }
  }
}
created () {
    axios.get('/films?showType=1').then((res) => {
      console.log(res.data)
    })
  }
6.ElementUI
安装
npm i element-ui -S
使用
在 main.js 中写入以下内容:
import Vue from 'vue';
import ElementUI from 'element-ui';
import 'element-ui/lib/theme-chalk/index.css';
import App from './App.vue';

Vue.use(ElementUI);

new Vue({
  el: '#app',
  render: h => h(App)
});
7.vant
安装
# Vue 3 项目,安装最新版 Vant:
npm i vant -S

# Vue 2 项目,安装 Vant 2:
npm i vant@latest-v2 -S
应用
添加到main.js中
import Vant from 'vant';
import 'vant/lib/index.css';

Vue.use(Vant);
8.vuex
Vuex 是一个专为 Vue.js 应用程序开发的状态管理模式。它采用集中式存储管理应用的所有组件的状态,并以相应的规则保证状态以一种可预测的方式发生变化。说的直白一点就是用vuex来管理全局变量,在很多页面需要用到这个变量.
安装
npm install vuex --save
1.同步
创建一个store文件夹,然后创建index.js
[外链图片转存失败,源站可能有防盗链机制,建议将图片保存下来直接上传(img-dgmd3SC3-1648267447190)(assets/1645499720822.png)]
index.js的内容如下:
import Vue from 'vue'
import Vuex from 'vuex'

Vue.use(Vuex)

export default new Vuex.Store({
  state: {
    // 公共状态
    name: "上海",
    path:  '前端'
  },
    // 只支持同步,不支持异步
  mutations: {
  },
  actions: {
  },
  modules: {
  }
})
将这个文件引入到main.js中
import store from './store'
new Vue({
  router,
  store,
  render: h => h(App)
}).$mount('#app')
在store中的index.js中,填写了公共状态,有name和path.接下来在其他页面用name这状态,使用方式{{$store.state.name}}
这样页面上就可以显示上海了.需改状态时,需要经过mutations.
我们通过提交 mutation 的方式,而非直接改变 store.state.name,是因为我们想要更明确地追踪到状态的变化。这个简单的约定能够让你的意图更加明显,这样你在阅读代码的时候能更容易地解读应用内部的状态改变。此外,这样也让我们有机会去实现一些能记录每次状态改变,保存状态快照的调试工具。有了它,我们甚至可以实现如时间穿梭般的调试体验。
由于 store 中的状态是响应式的,在组件中调用 store 中的状态简单到仅需要在计算属性中返回即可。触发变化也仅仅是在组件的 methods 中提交 mutation。
this.$store.commit('changeName',"wuhan")
// 在stroe 中的index.js  mutations不能做异步
mutations: {
     changeName(state,name){
      state.name = name
    }
  },
2.异步
action就是用来做异步的,action中异步同步都支持.Action 就不受约束!我们可以在 action 内部执行异步操作:
export default new Vuex.Store({
  state: {
    // 公共状态
    name: "上海",
    path:  '前端'
  },
   actions: {
    getDate(store,id){
        // 再调用同步的去解决
     axios.get('localhost:3000/api').then(res=>{
        this.$this.$store.commit('mutationHandler', id)
      }).catch(error=>{

      })
    }
  },
  modules: {
  }
})
调用的时候用dispatch
//分发
this.$store.dispatch('getDate', id);
9. vue3
安装vue3
npm i vue@next
创建方式的改变
创建vue不再是new Vue() 而是Vue。create App(obj).mount(".app"),还有一个点就是data变成了一个函数,需要return一个对象。
<body>
    <div class="app">
        {{name}}
    </div>

    <script>
        var obj={
            data(){
                return{
                    name:"12"
                }
            }
        }
        Vue.createApp(obj)
			// 挂载到标签上
            .mount(".app")
    </script>
创建组件的方式
  <script>
        var obj={
            data(){
                return{
                    name:"12"
                }
            }
        }
        Vue.createApp(obj)
            .component("hh1",{
                template:`
                <div>
                     123456
                </div>`
            })
            .mount(".app")
  </script>
修复vue存在的bug
直接通过数组索引修改时,视图不同步更新的问题.
指令
全局指令的修改.
在main.js中添加.directive()
import { createApp } from 'vue'
import App from './App.vue'
import router from './router'
import store from './store'

createApp(App).use(store).use(router)
    .directive("hello",{
        mounted(){
            console.log("全局指令")
        }
    })

    .mount('#app')
inserted也变成了mounted
局部指令和以前一样,同样的inserted也变成了mounted
vue3不支持过滤器
用函数来代替.
composition api
用vue2的方式来写也可以,既然时vue3,那就改动彻底.用函数式写法
函数式写法.在vue3中,用setup生命周期函数来代替brforeCreate和created,将数据和函数的定义都放在setup中,然后返回回去就可以了.
用reactive来定义状态
reactive的区域就相当于之前的data区域.
<template>
    <div>
        {{obj.myname}}
    </div>
</template>

<script>
import {reactive} from 'vue'
export default {
    setup(){
        // 定义状态
        let obj = reactive({
            myname: 'zhangsan',
            age: 14
        })

        return {obj}
    }
};
</script>
如果有点击事件怎办?
同样也是写在setup里面,然后将函数返回,代码如下:
<template>
    <div>
        {{obj.myname}}
        <button @click="handClick()">点击</button>
    </div>
</template>

<script>
import {reactive} from 'vue'
export default {
    setup(){
        // 定义状态
        let obj = reactive({
            myname: 'zhangsan',
            age: 14
        })

        const handClick = ()=>{
            obj.myname="lisi"
        }

        return {obj,handClick}
    }
};
</script>
ref
在普通元素上添加ref属性,可以通过this.$refs.value来获取这个元素.但是函数式写法没有this.
那他的函数式写法怎么写呢
  <input type="text" ref='myref'>
   import {reactive,ref} from 'vue'

   setup(){
        const myref = ref();
        console.log(myref)
        return {obj,handClick,myref}
    }
};
ref还可以代替data,可以不用像reactive一样还要去用对象调用,并且reactive不可以直接传字符串,只能传入对象.
ref就可以传入字符和对象
 const dataList = ref(['111','222','333'])
 const data1 = ref('zhangsanyaya')
 return {obj,handClick,myref,dataList,data1}

 <ul v-for="data in dataList" :key="data">
     <li>{{data}}</li>
</ul>
{{data1}}
[外链图片转存失败,源站可能有防盗链机制,建议将图片保存下来直接上传(img-vuxNLoaJ-1648267447191)(assets/1645523428346.png)]
toRefs
上面说到reactive返回的是对象,渲染数据的时候还需要去通过点来操作,比较麻烦,可以用toRefs来将reactive对象转化为ref.
import {reactive,ref,toRefs} from 'vue'
setup(){
    let obj = reactive({
            myname: 'zhangsan',
            age: 14,
            text: ''
        })

    return {
        ...toRefs(obj)
    }
}
prop & emit
父传子的时候,发送传参是一样的,只是接收参数的时候发生了变化.
将父组件的name=“zhangsan” age=123 传递给子组件并显示
点击子组件的按钮A,隐藏父组件的按钮B
// 子
<template>
    <div>
        <h1>{{name}}----{{age}}</h1>
        <button @click="showHandle">按钮A</button>
    </div>
</template>
<script>
import {reactive ,toRefs} from 'vue'
export default {
    name: '6VueChile',
    props:["name","age"],
    setup(props,{emit}){
        let msg = reactive({
            name:'',
            age:0
        })

        msg.name = props.name
        msg.age = props.age

        let showHandle = () => {
             // 子传父
            emit("event")
        }
        return{
            ...toRefs(msg),
            showHandle
        }


    },
// 父
<template>
    <div>
        <chile name="zhangsan" age="123" @event='change'></chile>
        <button v-show='shows'>按钮B</button>
    </div>
</template>

<script>
import chile from '@/components/chile'

export default {
    components: {chile},
    data(){
        return{
            shows:true
        }
    },
    methods: {
        change(){
            this.shows = !this.shows
        }

    },
};
</script>
父传子通过props来传递参数的值.props中包含了传递的信息.
而子传父通第二个参数,第二个参数中的对象有一个emit方法,将这个方法结构出来传递子传父的方式.
生命周期函数
beforeCreate()和create换成了setup
beforeDestory()替换成beforeUnmount()
destoryed()替换成unmounted()
其余的加一个On
[外链图片转存失败,源站可能有防盗链机制,建议将图片保存下来直接上传(img-HyFbz9P1-1648267447191)(assets/1645533819779.png)]
生命周期的用法
<script>
// 导入
import { onMounted } from 'vue';
export default {
   setup(){
       onMounted(()=>{
           console.log("dom上树")
       })
   }
};
</script>
将生命周期卸载setup中,然后生命周期是一个方法,需要从vue中解构出来,然后传入一个回调函数.
计算属性
引入computed
import { computed, onMounted,reactive } from 'vue';


const filterList = computed(() => {
    return obj.dataList.filter(item => item.includes(obj.mytext))
})
 return {
           filterList
       }
computed需要传入一个回调函数.
watch
// 第一个函数就是绑定监听的数据
// 第二个函数就是处理
watch(() => obj.mytext,()=>{
    bj.dataList.filter(item => item.includes(obj.mytext))
})
路由
import{useRouter} from 'vue-router'
export default {
   setup(){
        let router = useRouter() // router == this.$router
        router.push('/about')
   }
}
接收参数也是一样的,用useRoute


 1万+
1万+

 被折叠的 条评论
为什么被折叠?
被折叠的 条评论
为什么被折叠?
 到【灌水乐园】发言


