


 本文详细介绍了Spring Boot中的Environment初始化过程,包括如何加载系统环境和命令行参数,以及如何通过activeProfiles设置环境模式。同时讨论了自定义文件PropertySource的加载时机,并探讨了profile激活指定模式的多种方式。最后,文章总结了Environment在整个Spring Boot启动流程中的作用和意义。
前言
之前讲到了application run listener,但没有展开讲spring内置的listener拎出来讲,spring很多动作就是在内置的listener中随容器启动时候做的。后续我们再列举说明,这篇先学下spring里面的Environment。
Environment是spring中一个抽象,简单理解保存的是spring中所有的环境配置数据。从接口来看主要包含两个概念,一个profiles,一个properties。
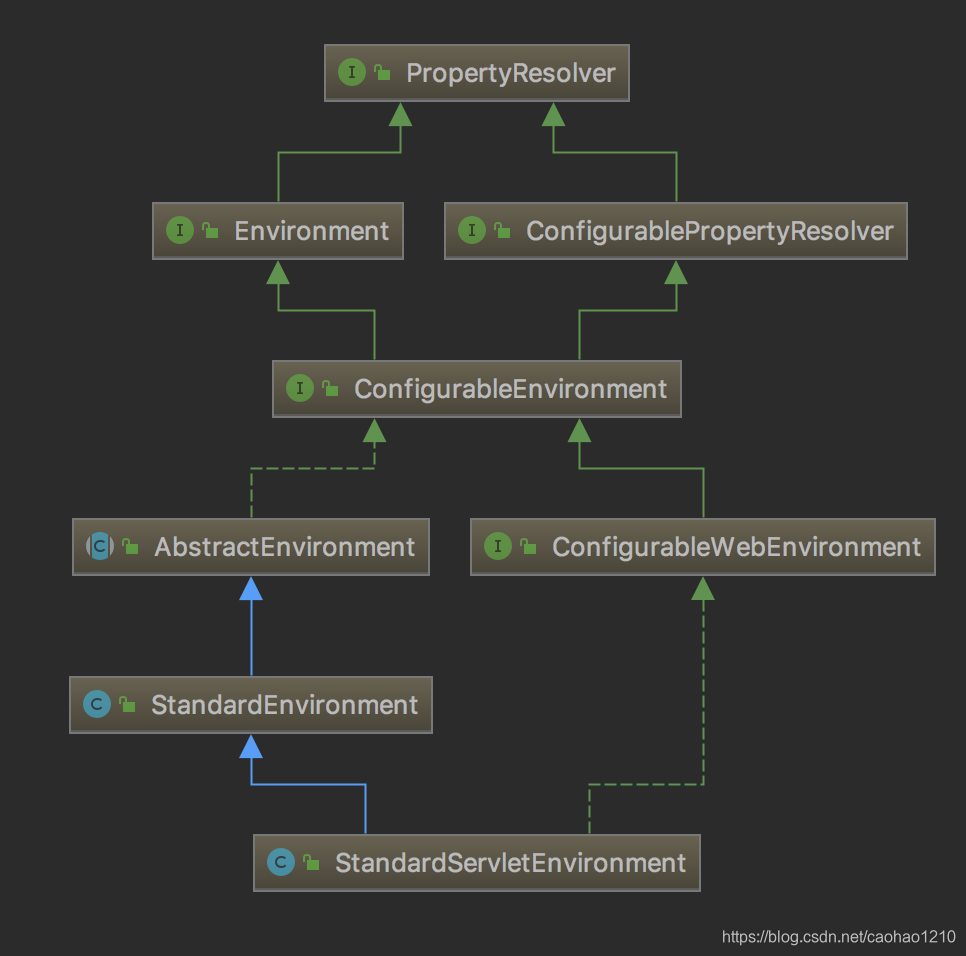
从类继承关系图可以看出,Environment继承自接口PropertyResolver,一个是properties的定义,一个是profiles定义。而ConfigurablePropertyResolver则定义了数据转换服务,即:ConfigurableConversionService。
真正的实现类:StandardEnvironment作为默认实现,而web项目的StandardServletEnvironment从其继承而来,扩展了部分PropertySource。
Environment初始化
从springapplication的启动run方法,我们可以看到environment的初始化,在prepareEnvironment方法中。
private ConfigurableEnvironment prepareEnvironment(
			SpringApplicationRunListeners listeners,
			ApplicationArguments applicationArguments) {
		// Create and configure the environment
		ConfigurableEnvironment environment = getOrCreateEnvironment();
		configureEnvironment(environment, applicationArguments.getSourceArgs());
		listeners.environmentPrepared(environment);
		bindToSpringApplication(environment);
		if (!this.isCustomEnvironment) {
			environment = new EnvironmentConverter(getClassLoader())
					.convertEnvironmentIfNecessary(environment, deduceEnvironmentClass());
		}
		ConfigurationPropertySources.attach(environment);
		return environment;
	}
- 首先构造Environment实现类,getOrCreateEnvironment,因为这里使用的是StandardEnvironment实现,所以内部只加载了systemProperties和systemEnvironment,即启动传入的环境变量和系统环境变量。而activeProfiles没有任何变动。
- configureEnvironment方法,通过main启动传入的args参数,构造SimpleCommandLinePropertySource,把传入的参数放入其中。通过additionalProfiles设置activeProfiles,而非args。所以控制activeProfiles无法通过args传入参数指定,可以通过springapplication对象设置additionalProfiles修改
- listeners.environmentPrepared,调用listener的environment预处理,可以在listener中加入propertySource,比如simple-example模块最简单的spring boot案例中加入了RandomValuePropertySource和OriginTrackedMapPropertySource,一个是所谓的随机数,一个是application.properties文件
- bindToSpringApplication即把environment绑定到springapplication中,可是为什么要如此麻烦,不直接写this.environment=environment呢,而且跟进去发现springapplication对象中的environment还是null,这里没太理解,有大佬能解答一下吗
- EnvironmentConverter做了一层environment的转换,不过debug来看,构造的和目标类型是一致的,不知道为何要做这样一步,可能是防止environment是自定义传进来的吧
- ConfigurationPropertySources.attach可以理解成构造了一个上述propertysouce的组合在一起的SpringConfigurationPropertySources。
Environment 初始化后应用
主要从springapplication的run方法中可以看到构造完Environment对象后对象使用:
ConfigurableEnvironment environment = prepareEnvironment(listeners,
					applicationArguments);
			configureIgnoreBeanInfo(environment);
			Banner printedBanner = printBanner(environment);
			context = createApplicationContext();
			exceptionReporters = getSpringFactoriesInstances(
					SpringBootExceptionReporter.class,
					new Class[] { ConfigurableApplicationContext.class }, context);
			prepareContext(context, environment, listeners, applicationArguments,
					printedBanner);
			refreshContext(context);
			afterRefresh(context, applicationArguments);
			stopWatch.stop();
			if (this.logStartupInfo) {
				new StartupInfoLogger(this.mainApplicationClass)
						.logStarted(getApplicationLog(), stopWatch);
			}
			listeners.started(context);
			callRunners(context, applicationArguments);
- configureIgnoreBeanInfo,使用environment配置spring.beaninfo.ignore,默认为true
- printBanner(environment),根据environment配置打印banner,即启动时的图案。在environment中取spring.banner.image.location和spring.banner.location配置,默认取:banner.gif/jpg/png和banner.txt。以及:spring.banner.image.width/height/margin/invert配置。使用banner.txt时的spring.banner.charset编码配置,banner.txt文件中可以使用表达式引用environment中的变量
- 将environment给context引用
从上述过程可以看出springapplication中的environment最终还是null,未赋值,不太理解为何这样。返回的context中包含其environment引用。
自定义文件PropertySource
@PropertySource("classpath:app.properties")
如代码所示,加入注解即加载app.properties文件,当然也可以用xml的方式:
<context:property-placeholder location="classpath:app.properties" />
从上面分析代码我们可以知道Environment的构造在context步骤之前的,所以很明显app.properties的创建肯定是在context步骤中创建的,但context持有Environment对象,所以过程中加入PropertySource也是非常简单的。通过debug我们可以发现,加载步骤是在refreshContext(context)这步。具体过程后面学context的时候我们再具体分析。
profile激活指定模式
在prepareEnvironment方法中configureEnvironment方法,对profiles进行了配置,跟进代码我们可以发现主要从两个方面获取profiles,一个是环境变量中(包括system和env),一个是springapplication的additionalProfiles属性。所以profile指定可以通过:
JAVA_OPTS="-Dspring.profiles.active=dev"
环境变量指定,也可以:
application.setAdditionalProfiles("dev");
硬编码的方式指定,当然硬编码使用的可能性很小。
当然除了这些在prepareEnvironment就确定profile的方式,还可以在context过程中确定。比如在配置文件中配置:
spring.profiles.active=dev
这里有个不太重要的细节,即:配置在application.properties文件中,则在prepareEnvironment中的listener.environmentPrepared过程确定profile。如果在自定义文件,如app.properties中,之前说过文件是在refreshContext步骤。
profile除了用来指定配置文件,也可以指定不同的configuration对象,进而决定@Bean的初始化,以及@Component的构造等
@Profile("dev")
当然这个不涉及到propertysource,只是涉及到context上下文过程中bean的构造,这里其实我突然想到,因为spring.profiles.active配置在不同的地方可能不同的时候生效,如:prepareEnvironment和refreshContext,那会不会影响到bean的构造,比如refreshContext过程,那岂不bean的构造也是在refreshContext过程中,甚至在propertySource的Environment之后。
总结
这篇主要把Environment的意义和加载过程梳理了一下,对整体过程有了一个认识,以及profile如何制定和生效的。在源码过程中是如果通过profile去加载文件的,内置listener对Environment的propertySource的意义。


 2049
2049

 被折叠的 条评论
为什么被折叠?
被折叠的 条评论
为什么被折叠?
 到【灌水乐园】发言


